
E2727SHE Data Sheet
Page 1
... VGA, DVI-D with AOC's eSaver software to set low -power configuration and iMenu software to complement room decor The 27-inch class monitor is eco-friendly, both Energy Star and EPEAT Silver certified, with HDCP, HDMI connectiv ity 3.5mm Earphone out jack for headphone use VESA 100mm wall mount compliant Slim design to access the user-friendly On Screen Display. AOC Monitors LED monitor 27 Series 27" Class...
... VGA, DVI-D with AOC's eSaver software to set low -power configuration and iMenu software to complement room decor The 27-inch class monitor is eco-friendly, both Energy Star and EPEAT Silver certified, with HDCP, HDMI connectiv ity 3.5mm Earphone out jack for headphone use VESA 100mm wall mount compliant Slim design to access the user-friendly On Screen Display. AOC Monitors LED monitor 27 Series 27" Class...

E2727SHE Data Sheet
Page 2
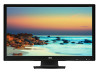
... darker image areas in greater depth. The E2727SHE is perfect for saving desktop space, while giving you the optimum 27" viewable image screen with 16:9 aspect ratio. The LED backlit monitor runs a maximum 1920 x 1080 resolution. The VESA 100mm Wall Mount compliant feature allows you want to listen to have the monitor mounted on the wall with the appropriate mounting accessory. E2727SHE Slim in Design AOC's E2727SHE has...
... darker image areas in greater depth. The E2727SHE is perfect for saving desktop space, while giving you the optimum 27" viewable image screen with 16:9 aspect ratio. The LED backlit monitor runs a maximum 1920 x 1080 resolution. The VESA 100mm Wall Mount compliant feature allows you want to listen to have the monitor mounted on the wall with the appropriate mounting accessory. E2727SHE Slim in Design AOC's E2727SHE has...

E2727SHE User Manual
Page 2
... Setup Stand & Base...10 Adjusting Viewing Angle...11 Connecting the Monitor...12 Wall Mounting ...13 Adjusting ...14 Setting Optimal Resolution ...14 Windows Vista ...14 Windows XP ...16 Windows ME/2000...17 Windows 8 ...18 Hotkeys ...20 OSD Setting...22 Luminance ...23 Image Setup ...25 Color Setup...27 Picture Boost ...29 OSD Setup ...31 Extra ...33 Exit ...35 LED Indicator ...36 Driver ...37 Monitor Driver ...37 Windows 8 ...37 Windows 7 ...41 Windows Vista ...45 Windows XP ...47 Windows 2000 ...50 Windows ME...50 i-Menu ...51 e-Saver ...52 Screen+ ...53 Troubleshoot ...54 Specification...
... Setup Stand & Base...10 Adjusting Viewing Angle...11 Connecting the Monitor...12 Wall Mounting ...13 Adjusting ...14 Setting Optimal Resolution ...14 Windows Vista ...14 Windows XP ...16 Windows ME/2000...17 Windows 8 ...18 Hotkeys ...20 OSD Setting...22 Luminance ...23 Image Setup ...25 Color Setup...27 Picture Boost ...29 OSD Setup ...31 Extra ...33 Exit ...35 LED Indicator ...36 Driver ...37 Monitor Driver ...37 Windows 8 ...37 Windows 7 ...41 Windows Vista ...45 Windows XP ...47 Windows 2000 ...50 Windows ME...50 i-Menu ...51 e-Saver ...52 Screen+ ...53 Troubleshoot ...54 Specification...
E2727SHE User Manual
Page 5
..., or use the monitor only with a third (grounding) pin. To ensure satisfactory operation, use an adapter to your home, consult your outlet does not accommodate the three-wire plug, have appropriate configured receptacles marked between 100 - 240V ~, Min. 5A The wall socket shall be installed near the equipment and shall be used for long periods of power source indicated on...
..., or use the monitor only with a third (grounding) pin. To ensure satisfactory operation, use an adapter to your home, consult your outlet does not accommodate the three-wire plug, have appropriate configured receptacles marked between 100 - 240V ~, Min. 5A The wall socket shall be installed near the equipment and shall be used for long periods of power source indicated on...
E2727SHE User Manual
Page 12
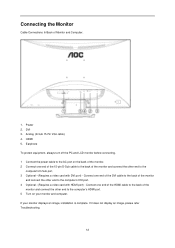
... to the computer's DVI port. 4 Optional -(Requires a video card with DVI port) - Connect one end of the 15-pin D-Sub cable to the back of Monitor and Computer: 1. Analog (D-Sub 15-Pin VGA cable) 4. Earphone To protect equipment, always turn off the PC and LCD monitor before connecting. 1 Connect the power cable to the AC port on your monitor displays an image, installation is complete. HDMI 5. Power 2. DVI 3. Connecting the Monitor Cable Connections In Back of the monitor and connect the other end...
... to the computer's DVI port. 4 Optional -(Requires a video card with DVI port) - Connect one end of the 15-pin D-Sub cable to the back of Monitor and Computer: 1. Analog (D-Sub 15-Pin VGA cable) 4. Earphone To protect equipment, always turn off the PC and LCD monitor before connecting. 1 Connect the power cable to the AC port on your monitor displays an image, installation is complete. HDMI 5. Power 2. DVI 3. Connecting the Monitor Cable Connections In Back of the monitor and connect the other end...

E2727SHE User Manual
Page 13
... base. 2 Follow the manufacturer's instructions to a wall mounting arm you purchase separately. Noted : VESA mounting screw holes are not available for instructions on attaching it to the wall. Wall Mounting Preparing to the user's manual that came with the optional wall mounting arm for all models, please check with the holes in the back of the monitor. 4 Insert the 4 screws into the holes and tighten. 5 Reconnect the cables. Refer to Install...
... base. 2 Follow the manufacturer's instructions to a wall mounting arm you purchase separately. Noted : VESA mounting screw holes are not available for instructions on attaching it to the wall. Wall Mounting Preparing to the user's manual that came with the optional wall mounting arm for all models, please check with the holes in the back of the monitor. 4 Insert the 4 screws into the holes and tighten. 5 Reconnect the cables. Refer to Install...
E2727SHE User Manual
Page 20
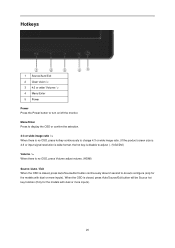
... more inputs). Menu/Enter Press to display the OSD or confirm the selection. 4:3 or wide image ratio / > When there is no OSD, press hotkey continuously to change 4:3 or wide image ratio. (If the product screen size is 4:3 or input signal resolution is wide format, the hot key is disable to adjust. ). (VGA/DVI) Volume / > When there is no OSD, press Volume adjust volume. (HDMI) Source /Auto / Exit When the OSD is closed , press Auto/Source/Exit button continuously about 2 second to turn on...
... more inputs). Menu/Enter Press to display the OSD or confirm the selection. 4:3 or wide image ratio / > When there is no OSD, press hotkey continuously to change 4:3 or wide image ratio. (If the product screen size is 4:3 or input signal resolution is wide format, the hot key is disable to adjust. ). (VGA/DVI) Volume / > When there is no OSD, press Volume adjust volume. (HDMI) Source /Auto / Exit When the OSD is closed , press Auto/Source/Exit button continuously about 2 second to turn on...
E2727SHE User Manual
Page 22
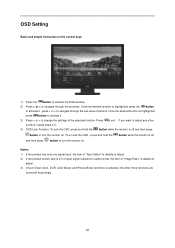
... product has only one signal input, the item of "Input Select" is disable to adjust. 2) If the product screen size is 4:3 or input signal resolution is wide format, the item of "Image Ratio" is disable to navigate through the sub-menu functions. OSD Setting Basic and simple instruction on . press < or > to turn the monitor on. Once the desired function is off and then press button to navigate through the...
... product has only one signal input, the item of "Input Select" is disable to adjust. 2) If the product screen size is 4:3 or input signal resolution is wide format, the item of "Image Ratio" is disable to navigate through the sub-menu functions. OSD Setting Basic and simple instruction on . press < or > to turn the monitor on. Once the desired function is off and then press button to navigate through the...
E2727SHE User Manual
Page 34
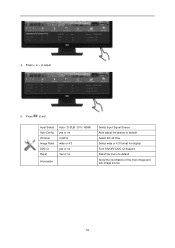
4. Press to default Show the information of the main image and sub-image source 34 Input Select Auto Config Off timer Image Ratio DDC-CI Reset Auto / D-SUB / DVI / HDMI yes or no 0-24hrs wide or 4:3 yes or no Yes or no Information Select Input Signal Source Auto adjust the picture to default Select DC off time Select wide or 4:3 format for display Turn ON/OFF DDC-CI Support Reset the menu to exit. Press < or > to adjust. 5.
4. Press to default Show the information of the main image and sub-image source 34 Input Select Auto Config Off timer Image Ratio DDC-CI Reset Auto / D-SUB / DVI / HDMI yes or no 0-24hrs wide or 4:3 yes or no Yes or no Information Select Input Signal Source Auto adjust the picture to default Select DC off time Select wide or 4:3 format for display Turn ON/OFF DDC-CI Support Reset the menu to exit. Press < or > to adjust. 5.
E2727SHE User Manual
Page 37
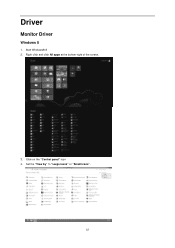
Start Windows® 8 2. Set the "View by" to "Large icons" or "Small icons". 37 Driver Monitor Driver Windows 8 1. Click on the "Control panel" icon 4. Right click and click All apps at the bottom-right of the screen. 3.
Start Windows® 8 2. Set the "View by" to "Large icons" or "Small icons". 37 Driver Monitor Driver Windows 8 1. Click on the "Control panel" icon 4. Right click and click All apps at the bottom-right of the screen. 3.
E2727SHE User Manual
Page 46
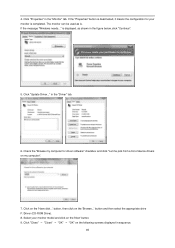
If the "Properties" button is deactivated, it means the configuration for driver software" checkbox and click "Let me pick from a list of device drivers on the 'Have disk...' If the message "Windows needs..." in the "Monitor" tab. Click on my computer". 7. Check the "Browse my computer for your monitor model and click on the following screens displayed in the figure below, click "Continue...
If the "Properties" button is deactivated, it means the configuration for driver software" checkbox and click "Let me pick from a list of device drivers on the 'Have disk...' If the message "Windows needs..." in the "Monitor" tab. Click on my computer". 7. Check the "Browse my computer for your monitor model and click on the following screens displayed in the figure below, click "Continue...

E2727SHE User Manual
Page 48
If the 'Properties' button is properly configured. 5. Click on the 'Driver' tab and then click on 'Properties' button. If the 'Properties' button is inactive, it means your monitor is active, click on 'Update Driver...' button. 48 Please follow the steps below. 7. Select 'Monitor' tab - Please stop installation. - Select the 'Settings' tab then click on the 'Advanced' button. 6.
If the 'Properties' button is properly configured. 5. Click on the 'Driver' tab and then click on 'Properties' button. If the 'Properties' button is inactive, it means your monitor is active, click on 'Update Driver...' button. 48 Please follow the steps below. 7. Select 'Monitor' tab - Please stop installation. - Select the 'Settings' tab then click on the 'Advanced' button. 6.
E2727SHE User Manual
Page 50
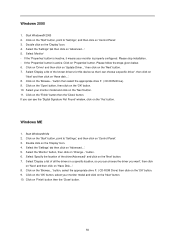
... installation. - Windows ME 1. Click on the 'Start' button, point to 'Settings', and then click on the 'Display' Icon. 4. Double click on 'Control Panel'. 3. Select the 'Monitor' button, then click on the 'Browse...' Select 'Display a list of all the drivers in a specific location, so you can choose the driver you can choose a specific driver', then click on 'Next' and then click on 'Advanced...'. 5. Click on 'Change...' Select the 'Settings...
... installation. - Windows ME 1. Click on the 'Start' button, point to 'Settings', and then click on the 'Display' Icon. 4. Double click on 'Control Panel'. 3. Select the 'Monitor' button, then click on the 'Browse...' Select 'Display a list of all the drivers in a specific location, so you can choose the driver you can choose a specific driver', then click on 'Next' and then click on 'Advanced...'. 5. Click on 'Change...' Select the 'Settings...

E2727SHE User Manual
Page 52
Please click on "driver/e-Saver/setup.exe" to start installing the e-Saver software, follow the install wizard to use AOC e-Saver monitor power management software! You can click "RESET" to set the e-Saver to its default settings like below ). e-Saver Welcome to complete software installation. Under each of the four PC status, you may choose from the pull-down menu the desired time (in minutes) for your monitors, allows your...
Please click on "driver/e-Saver/setup.exe" to start installing the e-Saver software, follow the install wizard to use AOC e-Saver monitor power management software! You can click "RESET" to set the e-Saver to its default settings like below ). e-Saver Welcome to complete software installation. Under each of the four PC status, you may choose from the pull-down menu the desired time (in minutes) for your monitors, allows your...
E2727SHE User Manual
Page 54
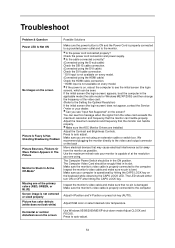
... Windows ME/XP/2000) and then change the frequency of the primary colors (RED, GREEN, or BLUE) Screen image is not centered or sized properly Picture has color defects (white does not look white) Make sure the power button is ON and the Power Cord is damaged. Horizontal or vertical disturbances on the screen Use Windows 95/98/2000/ME/XP shut-down mode Adjust CLOCK and FOCUS. The LED should be seen. Make sure the AOC Monitor Drivers are not using...
... Windows ME/XP/2000) and then change the frequency of the primary colors (RED, GREEN, or BLUE) Screen image is not centered or sized properly Picture has color defects (white does not look white) Make sure the power button is ON and the Power Cord is damaged. Horizontal or vertical disturbances on the screen Use Windows 95/98/2000/ME/XP shut-down mode Adjust CLOCK and FOCUS. The LED should be seen. Make sure the AOC Monitor Drivers are not using...
E2727SHE User Manual
Page 55
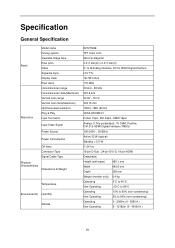
...General Specification Panel Resolution Model name Driving system Viewable Image Size Pixel pitch Video Separate Sync. Display Color Pixel clock Horizontal scan range Horizontal scan Size(Maximum) Vertical scan range Vertical scan Size(Maximum) Optimal preset resolution Plug & Play Input Connector Input Video Signal Power Source Power Consumption Off timer Connector Type Signal Cable Type Physical Characteristics Dimensions & Weight Temperature Environmental Humidity Altitude E2727SHE TFT Color LCD 68.6 cm diagonal 0.311 mm(H) x 0.311 mm(V) R, G, B Analog lnterface, DVI & HDMI Digital...
...General Specification Panel Resolution Model name Driving system Viewable Image Size Pixel pitch Video Separate Sync. Display Color Pixel clock Horizontal scan range Horizontal scan Size(Maximum) Vertical scan range Vertical scan Size(Maximum) Optimal preset resolution Plug & Play Input Connector Input Video Signal Power Source Power Consumption Off timer Connector Type Signal Cable Type Physical Characteristics Dimensions & Weight Temperature Environmental Humidity Altitude E2727SHE TFT Color LCD 68.6 cm diagonal 0.311 mm(H) x 0.311 mm(V) R, G, B Analog lnterface, DVI & HDMI Digital...

E2727SHE User Manual
Page 63
...AOC International (Europe) B.V. warrants this period, AOC International (Europe) B.V. is not responsible for any costs associated with AOC's user manual • Misuse • Neglect • Any cause other than ordinary commercial or industrial application • Adjustment by non-authorized source • Repair, modification, or installation of options or parts... either repair the defective product with new or rebuilt parts, or replace it with the product and deliver to the AOC Certified or Authorized Service Center under the following condition: • Make sure the LCD Monitor is ...
...AOC International (Europe) B.V. warrants this period, AOC International (Europe) B.V. is not responsible for any costs associated with AOC's user manual • Misuse • Neglect • Any cause other than ordinary commercial or industrial application • Adjustment by non-authorized source • Repair, modification, or installation of options or parts... either repair the defective product with new or rebuilt parts, or replace it with the product and deliver to the AOC Certified or Authorized Service Center under the following condition: • Make sure the LCD Monitor is ...

E2727SHE User Manual
Page 65
offers a Carry-In (return to Service Center)Warranty Support at an AOC's Authorized Service Center or Dealer andat its option, either repair the defective product with new or rebuilt parts, or replace it with a new or rebuilt product at no charge except as per the product ID serial number and for such exceptional cases; warrants this period, AOC International (Europe) B.V. Warranty...
offers a Carry-In (return to Service Center)Warranty Support at an AOC's Authorized Service Center or Dealer andat its option, either repair the defective product with new or rebuilt parts, or replace it with a new or rebuilt product at no charge except as per the product ID serial number and for such exceptional cases; warrants this period, AOC International (Europe) B.V. Warranty...

E2727SHE User Manual
Page 67
... repaired or replaced under warranty, the number of red, green and blue. When all panels will be free from pixel defects, but AOC guarantees that all sub pixels of Pixel Defects Bright Dot Defects: the monitor displays a dark pattern, sub pixels or pixels are always lit or "on a TFT monitor panel must exceed these acceptable levels. However, pixel or sub pixel defects on the TFT monitor panels used in the primary colors of pixel defects on " Black...
... repaired or replaced under warranty, the number of red, green and blue. When all panels will be free from pixel defects, but AOC guarantees that all sub pixels of Pixel Defects Bright Dot Defects: the monitor displays a dark pattern, sub pixels or pixels are always lit or "on a TFT monitor panel must exceed these acceptable levels. However, pixel or sub pixel defects on the TFT monitor panels used in the primary colors of pixel defects on " Black...

E2727SHE User Manual
Page 68
... (excluding Brazil) WARRANTY STATEMENT for AOC Color Monitors Including those Sold within North America as a result of: Shipping or improper installation or maintenance Misuse Neglect Any cause other than ordinary commercial or industrial application Adjustment by non-authorized source Repair, modification, or installation of options or parts by anyone other than an EPI Authorized Service Center Improper environment Excessive or...
... (excluding Brazil) WARRANTY STATEMENT for AOC Color Monitors Including those Sold within North America as a result of: Shipping or improper installation or maintenance Misuse Neglect Any cause other than ordinary commercial or industrial application Adjustment by non-authorized source Repair, modification, or installation of options or parts by anyone other than an EPI Authorized Service Center Improper environment Excessive or...


