
F19S Manual
Page 1
.... Warranty Statement: Warranty Statement used in this guide, blocks of the warning is subject to avoid the problem. Product Registration Please link www.aoc.com, select your computer system. lnformation in italic type. Notes, Cautions, and Warnings Throughout this document. These blocks are notes, cautions, and warnings,...alternate formats and may be unaccompanied by an icon and printed in bold type or in this document is mandated by regulatory authority. F19S User's Manual About This Guide This guide describes the monitor's features, setup, and operation.
.... Warranty Statement: Warranty Statement used in this guide, blocks of the warning is subject to avoid the problem. Product Registration Please link www.aoc.com, select your computer system. lnformation in italic type. Notes, Cautions, and Warnings Throughout this document. These blocks are notes, cautions, and warnings,...alternate formats and may be unaccompanied by an icon and printed in bold type or in this document is mandated by regulatory authority. F19S User's Manual About This Guide This guide describes the monitor's features, setup, and operation.
F19S Manual
Page 6
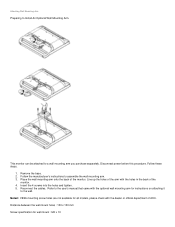
... the manufacturer's instructions to Install An Optional Wall Mounting Arm. Line up the holes of the arm with the dealer or official department of AOC. Noted : VESA mounting screw holes are not available for all models, please check with the holes in the back of the monitor. Refer...Attaching Wall Mounting Arm Preparing to assemble the wall mounting arm. 3. Disconnect power before this procedure. This monitor can be attached to the user's manual that came with the optional wall mounting arm for wall-mount : M4 x 10 Reconnect the cables. Follow these steps: 1. Place the wall ...
... the manufacturer's instructions to Install An Optional Wall Mounting Arm. Line up the holes of the arm with the dealer or official department of AOC. Noted : VESA mounting screw holes are not available for all models, please check with the holes in the back of the monitor. Refer...Attaching Wall Mounting Arm Preparing to assemble the wall mounting arm. 3. Disconnect power before this procedure. This monitor can be attached to the user's manual that came with the optional wall mounting arm for wall-mount : M4 x 10 Reconnect the cables. Follow these steps: 1. Place the wall ...

