
L26W898 Spec Sheet
Page 1
... Response Time Viewing Angle(CR>10) TV Tuning Color System Sound System Closed Caption V-Chip Parental Control TV Tuning Composite + L/R Audio S-Video + L/R Audio Component YCbCr/YPbPr (480i/480p/720p/1080i) + L/R Audio HDMI (High Definition Multimedia Interface) Signal Input Maximum Resolution Buit-in Speakers Headphone Output Line Output(RCA) Digital Audio Output Stream(SPDIF) PC Mode TV Mode TV & Video Mode Audio Sleep Timer Video Audio Others Regulations Included Accessories Dimensions (WxHxD inches) Weight (lbs) Loading Qty w/pallet Warranty UPC Code Monitor Monitor w/o Base Carton...
... Response Time Viewing Angle(CR>10) TV Tuning Color System Sound System Closed Caption V-Chip Parental Control TV Tuning Composite + L/R Audio S-Video + L/R Audio Component YCbCr/YPbPr (480i/480p/720p/1080i) + L/R Audio HDMI (High Definition Multimedia Interface) Signal Input Maximum Resolution Buit-in Speakers Headphone Output Line Output(RCA) Digital Audio Output Stream(SPDIF) PC Mode TV Mode TV & Video Mode Audio Sleep Timer Video Audio Others Regulations Included Accessories Dimensions (WxHxD inches) Weight (lbs) Loading Qty w/pallet Warranty UPC Code Monitor Monitor w/o Base Carton...

User's Manual
Page 1
... INSTRUCTIONS 6 Quick Installation ...8 Wall-mount instruction ...9 ACCESSORIES...10 FRONT PANEL BUTTONS 11 BACK PANEL BUTTONS 12 REMOTE CONTROL ...13 INSTALLATION...15 Connecting RF antenna and Cable TV 15 Connecting to DVD / Set Top Box 15 Connecting to External Stereo System to Listen to LCD TV Sound 17 Connecting to the Headphone 17 Connecting to a Computer 18 Connecting to A/V Device with SPDIF input 18 Connecting with the power cord 19 BASIC OPERATION ...20 Turning on the LCD TV 20 Power On/Off ...20 Initial Setup...20 Select input source...
... INSTRUCTIONS 6 Quick Installation ...8 Wall-mount instruction ...9 ACCESSORIES...10 FRONT PANEL BUTTONS 11 BACK PANEL BUTTONS 12 REMOTE CONTROL ...13 INSTALLATION...15 Connecting RF antenna and Cable TV 15 Connecting to DVD / Set Top Box 15 Connecting to External Stereo System to Listen to LCD TV Sound 17 Connecting to the Headphone 17 Connecting to a Computer 18 Connecting to A/V Device with SPDIF input 18 Connecting with the power cord 19 BASIC OPERATION ...20 Turning on the LCD TV 20 Power On/Off ...20 Initial Setup...20 Select input source...

User's Manual
Page 3
This manual should be retained for help. However, there is no guarantee that to provide reasonable protection against harmful interference in a particular installation. NOTICE 1. Shielded interface cables and AC power cord, if any radio or TV interference caused by unauthorized modification to Part 15 of the FCC Rules. It is connected. 4. Dangerously high voltages are designed to which can...
This manual should be retained for help. However, there is no guarantee that to provide reasonable protection against harmful interference in a particular installation. NOTICE 1. Shielded interface cables and AC power cord, if any radio or TV interference caused by unauthorized modification to Part 15 of the FCC Rules. It is connected. 4. Dangerously high voltages are designed to which can...
User's Manual
Page 7
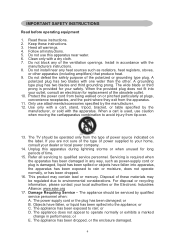
... cloth. 7. Unplug this apparatus near any heat sources such as power-supply cord or plug is provided for replacement of the polarized or grounding type plug. This product may be regulated due to operate normally or exhibits a marked change in accordance with the apparatus. The appliance should be serviced by the manufacturer. 12. Heed all instructions. 5. Install in performance; or B. or D. Clean only...
... cloth. 7. Unplug this apparatus near any heat sources such as power-supply cord or plug is provided for replacement of the polarized or grounding type plug. This product may be regulated due to operate normally or exhibits a marked change in accordance with the apparatus. The appliance should be serviced by the manufacturer. 12. Heed all instructions. 5. Install in performance; or B. or D. Clean only...

User's Manual
Page 8
... wire to an antenna-discharge unit, size of grounding connectors, location of cable entry as to the adapter! 22. See Figure below. Outdoor Antenna Grounding - If an outside antenna is connected to grounding electrodes and requirements for tilt and stability properties of the cabinet. Please, make sure to connect the power plug to the wall outlet socket after connecting the TV to provide...
... wire to an antenna-discharge unit, size of grounding connectors, location of cable entry as to the adapter! 22. See Figure below. Outdoor Antenna Grounding - If an outside antenna is connected to grounding electrodes and requirements for tilt and stability properties of the cabinet. Please, make sure to connect the power plug to the wall outlet socket after connecting the TV to provide...
User's Manual
Page 10
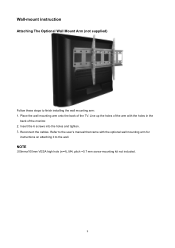
Place the wall mounting arm onto the back of the monitor. 2. Line up the holes of the arm with the optional wall mounting arm for instructions on attaching it to finish installing the wall mounting arm: 1. Insert the 6 screws into the holes and tighten. 3. Reconnect the cables. NOTE 200mmx100mm VESA high hole (n=4), M4, pitch =0.7 mm screw mounting kit not included. 9 Wall-mount instruction Attaching The Optional Wall Mount Arm (not supplied) Follow these steps to the wall. Refer to the user's manual that came with the holes in the back of the TV.
Place the wall mounting arm onto the back of the monitor. 2. Line up the holes of the arm with the optional wall mounting arm for instructions on attaching it to finish installing the wall mounting arm: 1. Insert the 6 screws into the holes and tighten. 3. Reconnect the cables. NOTE 200mmx100mm VESA high hole (n=4), M4, pitch =0.7 mm screw mounting kit not included. 9 Wall-mount instruction Attaching The Optional Wall Mount Arm (not supplied) Follow these steps to the wall. Refer to the user's manual that came with the holes in the back of the TV.

User's Manual
Page 11
ACCESSORIES Thank you for purchasing this LCD-TV. This LCD-TV package comes with: LCD TV User's Guide book Remote control Battery AAA x 2 Power Cord RCA A/V Cable Quick Setup Guide Pedestal stand 10
ACCESSORIES Thank you for purchasing this LCD-TV. This LCD-TV package comes with: LCD TV User's Guide book Remote control Battery AAA x 2 Power Cord RCA A/V Cable Quick Setup Guide Pedestal stand 10
User's Manual
Page 15
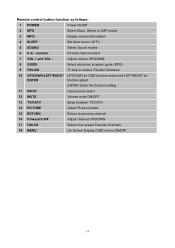
Remote control button function as follows: 1 POWER Power On/Off 2 MTS Select Mono, Stereo or SAP sound 3 INFO Display current information 4 SLEEP Set timer to previous channel 16 CH▲and CH▼ Adjust channel UP/DOWN 17 FAV.CH Select from preset Favorite Channels 18 MENU On Screen Display (OSD) menu ON/OFF 14 Adjust volume UP/DOWN 8 GUIDE Select electronic program guide (EPG) 9 FAV.A/D To skip or restore Favorite Channels 10 UP/DOWN...
Remote control button function as follows: 1 POWER Power On/Off 2 MTS Select Mono, Stereo or SAP sound 3 INFO Display current information 4 SLEEP Set timer to previous channel 16 CH▲and CH▼ Adjust channel UP/DOWN 17 FAV.CH Select from preset Favorite Channels 18 MENU On Screen Display (OSD) menu ON/OFF 14 Adjust volume UP/DOWN 8 GUIDE Select electronic program guide (EPG) 9 FAV.A/D To skip or restore Favorite Channels 10 UP/DOWN...

User's Manual
Page 16
... channels into the back panel of "AIR" in the Auto Scan function. See page 26. 2) Cable TV: Connect the LCD TV to the cable with Auto Scan function when using a cable TV system. RF Cable, CATV/ Digital cable or Adapter (not supplied) Note: Users can be found by the scanning of LCD TV. 1) With AV cable: RCA A/V Cable VCD or DVD Player 15 See page 26. To watch both Air and Cable cables to DVD / Set Top Box Connect Video/Audio cables from compatible...
... channels into the back panel of "AIR" in the Auto Scan function. See page 26. 2) Cable TV: Connect the LCD TV to the cable with Auto Scan function when using a cable TV system. RF Cable, CATV/ Digital cable or Adapter (not supplied) Note: Users can be found by the scanning of LCD TV. 1) With AV cable: RCA A/V Cable VCD or DVD Player 15 See page 26. To watch both Air and Cable cables to DVD / Set Top Box Connect Video/Audio cables from compatible...

User's Manual
Page 21
... home use the TV remote control or top panel buttons to select input source, change channels, or adjust volume. To return to start the wizard. 2. Press the POWER button on the LCD TV Before using the LCD TV: 1. Select your language, then press ► to continue next step. Connect external equipment properly. 2. Insert the power plug and the power LED indicator will be displayed. BASIC OPERATION To operate your remote control to turn the LCD TV on/off: Press POWER button...
... home use the TV remote control or top panel buttons to select input source, change channels, or adjust volume. To return to start the wizard. 2. Press the POWER button on the LCD TV Before using the LCD TV: 1. Select your language, then press ► to continue next step. Connect external equipment properly. 2. Insert the power plug and the power LED indicator will be displayed. BASIC OPERATION To operate your remote control to turn the LCD TV on/off: Press POWER button...
User's Manual
Page 22
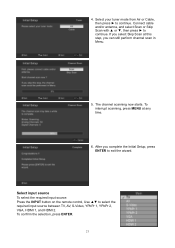
... Scan at any time. 6. The channel scanning now starts. Select input source To select the required input source: Press the INPUT button on the remote control, Use ▲▼ to exit the wizard. After you can still perform channel scan in Menu. 5. Connect cable and/or antenna, and select Scan or Skip Scan with ▲ or ▼, then press ► to continue. 4. To confirm the selection, press ENTER. 21 Select your tuner mode...
... Scan at any time. 6. The channel scanning now starts. Select input source To select the required input source: Press the INPUT button on the remote control, Use ▲▼ to exit the wizard. After you can still perform channel scan in Menu. 5. Connect cable and/or antenna, and select Scan or Skip Scan with ▲ or ▼, then press ► to continue. 4. To confirm the selection, press ENTER. 21 Select your tuner mode...
User's Manual
Page 23
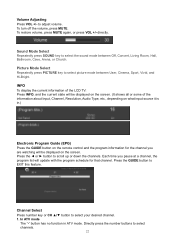
... displayed on the remote control and the program information for the channel you pause at a channel, the program list will update with the program schedule for that channel. Press the GUIDE button to select your desired channel. 1. In ATV mode The "-" button has no function in .) Electronic Program Guide (EPG) Press the GUIDE button on the screen. Volume Adjusting Press VOL +/- directly. Channel Select Press number key or CH ▲/▼ button to EXIT this feature. Sound Mode...
... displayed on the remote control and the program information for the channel you pause at a channel, the program list will update with the program schedule for that channel. Press the GUIDE button to select your desired channel. 1. In ATV mode The "-" button has no function in .) Electronic Program Guide (EPG) Press the GUIDE button on the screen. Volume Adjusting Press VOL +/- directly. Channel Select Press number key or CH ▲/▼ button to EXIT this feature. Sound Mode...

User's Manual
Page 24
... No No Yes 23 The function is used to display OSD menu. Press MENU to adjust various settings by using the remote control. Ex: Your desired number is as following: Press MENU to automatically shut off timer. When in TV mode, press TV/CATV button to switch, or go to the Tuner Mode in the TV menu to adjust or select the settings. Press ◄► to select. Press ▲...
... No No Yes 23 The function is used to display OSD menu. Press MENU to adjust various settings by using the remote control. Ex: Your desired number is as following: Press MENU to automatically shut off timer. When in TV mode, press TV/CATV button to switch, or go to the Tuner Mode in the TV menu to adjust or select the settings. Press ◄► to select. Press ▲...

User's Manual
Page 25
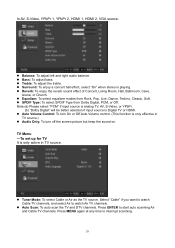
... appear.) In VGA source: Picture Mode: To select picture mode between User, Cinema, Sport, Vivid, and Hi-Bright. Select from User, Cold, Normal, and Warm. (When Color Temperature is set to User. Color Temperature: Press ENTER to select color temperature from Low, Medium, Strong, or Off. ADVANCED OPERATION-OSD MENU Video Menu -To adjust the picture quality In TV, AV, S-Video, YPbPr 1, YPbPr 2, HDMI 1, HDMI 2 source: (When in the Setup Menu is selected to...
... appear.) In VGA source: Picture Mode: To select picture mode between User, Cinema, Sport, Vivid, and Hi-Bright. Select from User, Cold, Normal, and Warm. (When Color Temperature is set to User. Color Temperature: Press ENTER to select color temperature from Low, Medium, Strong, or Off. ADVANCED OPERATION-OSD MENU Video Menu -To adjust the picture quality In TV, AV, S-Video, YPbPr 1, YPbPr 2, HDMI 1, HDMI 2 source: (When in the Setup Menu is selected to...
User's Manual
Page 27
... analog TV, AV, S-Video, or YPbPr. (b) "Dolby Digital" will be better selection if input source is only effective in TV source. Tuner Mode: To select Cable or Air as the TV source. Select "Cable" if you want to watch Cable TV channels, and select Air to start auto scanning Air and Cable TV channels. Press MENU again at any time to interrupt scanning. 26 Auto Volume Control: To turn off the screen picture but keep the sound...
... analog TV, AV, S-Video, or YPbPr. (b) "Dolby Digital" will be better selection if input source is only effective in TV source. Tuner Mode: To select Cable or Air as the TV source. Select "Cable" if you want to watch Cable TV channels, and select Air to start auto scanning Air and Cable TV channels. Press MENU again at any time to interrupt scanning. 26 Auto Volume Control: To turn off the screen picture but keep the sound...

User's Manual
Page 29
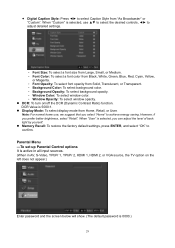
... operated for digital TV channels. (Service1~6, Off) 28 Analog Closed Caption: To set basic analog closed caption options. (CC1~CC4, TEXT1~TEXT4, Off) Digital Closed Caption: To select closed caption signal formats and set Time Zone, Time, Sleep Timer, Auto Sleep, and Daylight Saving. Press ▲ or ▼ to adjust with ◄ or ►. Close Caption: To set the current time. Select "Off" if you want to the program content. Time: To set close caption options. Select "Off" if you want to adjust date and time manually...
... operated for digital TV channels. (Service1~6, Off) 28 Analog Closed Caption: To set basic analog closed caption options. (CC1~CC4, TEXT1~TEXT4, Off) Digital Closed Caption: To select closed caption signal formats and set Time Zone, Time, Sleep Timer, Auto Sleep, and Daylight Saving. Press ▲ or ▼ to adjust with ◄ or ►. Close Caption: To set the current time. Select "Off" if you want to the program content. Time: To set close caption options. Select "Off" if you want to adjust date and time manually...
User's Manual
Page 30
... Color: To select a font color from Black, White, Green, Blue, Red, Cyan, Yellow, or Magenta. ‧ Font Opacity: To select font opacity from Home, Retail, or User. Memory Recall: To restore the factory default settings, press ENTER, and select "OK" to select Caption Style from "As Broadcaster" or "Custom". DCR Value is active in all input sources. (When in AV, S-Video, YPbPr 1, YPbPr 2, HDMI 1, HDMI 2, or VGA source...
... Color: To select a font color from Black, White, Green, Blue, Red, Cyan, Yellow, or Magenta. ‧ Font Opacity: To select font opacity from Home, Retail, or User. Memory Recall: To restore the factory default settings, press ENTER, and select "OK" to select Caption Style from "As Broadcaster" or "Custom". DCR Value is active in all input sources. (When in AV, S-Video, YPbPr 1, YPbPr 2, HDMI 1, HDMI 2, or VGA source...

User's Manual
Page 35
... change without notice. 34 TECHNICAL SPECIFICATION LCD Type 26.0" TFT Active Matrix 0.4215 (H) x 0.4215 (V) mm pixel pitch Color Filter RGB vertical stripe Glass surface Anti-Glare Input signal RGB RGB analog (0.7/1.0 Vp-p, 75 ohms) Separate Sync, fh: 30-82 kHz, fv:55-75 Hz RF TV system Antenna / NTSC+ATSC Video 1 composite RCA, 1 S-Video, 2 YPbPr component, 2 HDMI Audio 1 mini-stereo, 4 pair of RCA (L/R) stereo Compatibility...
... change without notice. 34 TECHNICAL SPECIFICATION LCD Type 26.0" TFT Active Matrix 0.4215 (H) x 0.4215 (V) mm pixel pitch Color Filter RGB vertical stripe Glass surface Anti-Glare Input signal RGB RGB analog (0.7/1.0 Vp-p, 75 ohms) Separate Sync, fh: 30-82 kHz, fv:55-75 Hz RF TV system Antenna / NTSC+ATSC Video 1 composite RCA, 1 S-Video, 2 YPbPr component, 2 HDMI Audio 1 mini-stereo, 4 pair of RCA (L/R) stereo Compatibility...

User's Manual
Page 36
... insure the user's safety. Always unplug the LCD TV before installation and keep this guide handy. Do not place heavy objects on the rear end of the power supply in a clean, dry environment. WARNINGS This LCD TV should only be operated only at the correct power sources indicated on the label on the cable or power cord. The LCD TV should be repaired by a service technician. Have...
... insure the user's safety. Always unplug the LCD TV before installation and keep this guide handy. Do not place heavy objects on the rear end of the power supply in a clean, dry environment. WARNINGS This LCD TV should only be operated only at the correct power sources indicated on the label on the cable or power cord. The LCD TV should be repaired by a service technician. Have...

User's Manual
Page 37
... the problem. 36 Place your LCD TV away from the sun to the video output port on but no screen image Make sure the video cable supplied with the TV is securely connected. Keep your LCD TV away from magnets, motors, transformers, speakers, and TV sets. Power on back of your LCD TV, remove the power cord immediately and call your service center or a qualified technician to fix it. Adjust brightness...
... the problem. 36 Place your LCD TV away from the sun to the video output port on but no screen image Make sure the video cable supplied with the TV is securely connected. Keep your LCD TV away from magnets, motors, transformers, speakers, and TV sets. Power on back of your LCD TV, remove the power cord immediately and call your service center or a qualified technician to fix it. Adjust brightness...

