Q2770PQU Data Sheet
Page 1
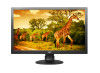
...; VGA, DVI-D, HDMI (MHL), Display Port, PC Audio-in the best picture quality that you deserve when viewing entertainment and working on detailed photos and videos. AOC Monitors LED monitor 70Series 27", 2560 x 1440 Q2770PQU 27-inch Quad HD High Performance IPS Monitor AOC's Q2770PQU is a wide Quad HD display with sleek hairline texture, anti-glare matte IPS screen Get the crisp and clarity in , Headphone-out, 2W speakers • Fully adjustable tilt, swivel, pivot, height adjustments •...
...; VGA, DVI-D, HDMI (MHL), Display Port, PC Audio-in the best picture quality that you deserve when viewing entertainment and working on detailed photos and videos. AOC Monitors LED monitor 70Series 27", 2560 x 1440 Q2770PQU 27-inch Quad HD High Performance IPS Monitor AOC's Q2770PQU is a wide Quad HD display with sleek hairline texture, anti-glare matte IPS screen Get the crisp and clarity in , Headphone-out, 2W speakers • Fully adjustable tilt, swivel, pivot, height adjustments •...
Q2770PQU Data Sheet
Page 2
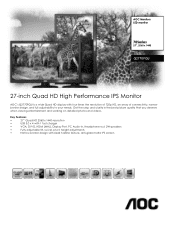
.... Multi-Function Connectivity The Q2770PQU features all the connectivity you the freedom to adjust according to 3 times the speed of the connectivity ports. The 24-inch display has tilt, pivot, swivel, height adjustability, and can fit four 720p HD videos on a 27-inch widescreen allows you clarity with VGA, DVI-D, HDMI (MHL), Display Port, and four USB 3.0 ports. Whether editing photos, videos, or watching movies, Q2770PQU gives you to keep your cables together and...
.... Multi-Function Connectivity The Q2770PQU features all the connectivity you the freedom to adjust according to 3 times the speed of the connectivity ports. The 24-inch display has tilt, pivot, swivel, height adjustability, and can fit four 720p HD videos on a 27-inch widescreen allows you clarity with VGA, DVI-D, HDMI (MHL), Display Port, and four USB 3.0 ports. Whether editing photos, videos, or watching movies, Q2770PQU gives you to keep your cables together and...
Q2770PQU Data Sheet
Page 3
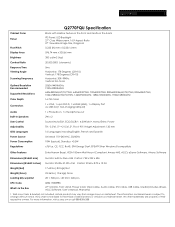
Q2770PQU Cabinet Color Panel Pixel Pitch Display Area Brightness Contrast Ratio Response Time Viewing Angle Scanning Frequency Optimal Resolution Recommended Supported Resolutions Color Depth Connectors Audio Built-In Speakers User Control Adjustability OSD Languages Power Source Power Consumption Regulations Q2770PQU Specification Black with Hairline Texture in the front and matte in the back IPS Panel, LED Backlight 27" Class Widescreen, 16:9 Aspect Ratio 27" Viewable Image Size, Diagonal 0.233 (H) mm x 0.233 (v) mm 596.74 mm x 335.66 mm 300 cd/m2 (typ) 20,000...
Q2770PQU Cabinet Color Panel Pixel Pitch Display Area Brightness Contrast Ratio Response Time Viewing Angle Scanning Frequency Optimal Resolution Recommended Supported Resolutions Color Depth Connectors Audio Built-In Speakers User Control Adjustability OSD Languages Power Source Power Consumption Regulations Q2770PQU Specification Black with Hairline Texture in the front and matte in the back IPS Panel, LED Backlight 27" Class Widescreen, 16:9 Aspect Ratio 27" Viewable Image Size, Diagonal 0.233 (H) mm x 0.233 (v) mm 596.74 mm x 335.66 mm 300 cd/m2 (typ) 20,000...

Q2770PQU User Manual
Page 2
......4 Power ...5 Installation...6 Cleaning...7 Other ...8 Setup ...9 Content of the Box ...9 Setup Stand ...10 Adjusting Viewing Angle...11 Connecting the Monitor...12 Wall Mounting ...15 Adjusting ...16 Setting Optimal Resolution ...16 Windows Vista ...16 Windows XP ...18 Windows ME/2000...19 Windows 8 ...20 Hotkeys ...22 Clear Vision ...23 Using "MHL(Mobile High-Definition Link)"(Optional 24 OSD Setting...25 Luminance ...26 Image Setup ...27 Color Setup...28 Picture Boost ...29 OSD Setup ...30 Extra ...31 Exit...32 LED Indicator ...33 Driver ...34 Monitor Driver ...34 Windows...
......4 Power ...5 Installation...6 Cleaning...7 Other ...8 Setup ...9 Content of the Box ...9 Setup Stand ...10 Adjusting Viewing Angle...11 Connecting the Monitor...12 Wall Mounting ...15 Adjusting ...16 Setting Optimal Resolution ...16 Windows Vista ...16 Windows XP ...18 Windows ME/2000...19 Windows 8 ...20 Hotkeys ...22 Clear Vision ...23 Using "MHL(Mobile High-Definition Link)"(Optional 24 OSD Setting...25 Luminance ...26 Image Setup ...27 Color Setup...28 Picture Boost ...29 OSD Setup ...30 Extra ...31 Exit...32 LED Indicator ...33 Driver ...34 Monitor Driver ...34 Windows...
Q2770PQU User Manual
Page 5
... the three-wire plug, have an electrician install the correct outlet, or use an adapter to power surges. If you are not sure of the type of the grounded plug. This will fit only into a grounded power outlet as a safety feature. This plug will protect the monitor from the type of time. The wall socket shall be installed near the equipment...
... the three-wire plug, have an electrician install the correct outlet, or use an adapter to power surges. If you are not sure of the type of the grounded plug. This will fit only into a grounded power outlet as a safety feature. This plug will protect the monitor from the type of time. The wall socket shall be installed near the equipment...
Q2770PQU User Manual
Page 9
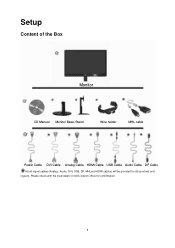
Setup Content of the Box Monitor CD Manual Monitor Base /Stand Wire holder MHL cable Power Cable DVI Cable Analog Cable HDMI Cable USB Cable Audio Cable DP Cable Not all signal cables (Analog , Audio, DVI, USB, DP, MHLand HDMI cables) will be provided for confirmation. 9 Please check with the local dealer or AOC branch office for all countries and regions.
Setup Content of the Box Monitor CD Manual Monitor Base /Stand Wire holder MHL cable Power Cable DVI Cable Analog Cable HDMI Cable USB Cable Audio Cable DP Cable Not all signal cables (Analog , Audio, DVI, USB, DP, MHLand HDMI cables) will be provided for confirmation. 9 Please check with the local dealer or AOC branch office for all countries and regions.

Q2770PQU User Manual
Page 14
...'s DVI port. 4. (Optional - If it does not display an image, please refer Troubleshooting. 14 Requires a video card with DP port) - If your monitor and computer. 3. (Optional -Requires a video card with DVI port)Connect one end of the DVI cable to the back of the monitor and connect the other end to the computer's MHL port. 7. (Optional)Connect the audio cable to audio in port on your monitor displays an image, installation is complete. Connect one end of the HDMI cable to...
...'s DVI port. 4. (Optional - If it does not display an image, please refer Troubleshooting. 14 Requires a video card with DP port) - If your monitor and computer. 3. (Optional -Requires a video card with DVI port)Connect one end of the DVI cable to the back of the monitor and connect the other end to the computer's MHL port. 7. (Optional)Connect the audio cable to audio in port on your monitor displays an image, installation is complete. Connect one end of the HDMI cable to...
Q2770PQU User Manual
Page 15
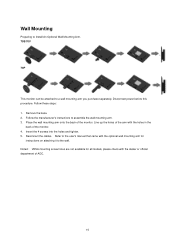
... procedure. Reconnect the cables. Place the wall mounting arm onto the back of the monitor. 4. Wall Mounting Preparing to Install An Optional Wall Mounting Arm. 70S/70V 70P This monitor can be attached to assemble the wall mounting arm. 3. Remove the base. 2. Noted : VESA mounting screw holes are not available for instructions on attaching it to the user's manual that came with the optional wall mounting arm for all models, please check with the holes...
... procedure. Reconnect the cables. Place the wall mounting arm onto the back of the monitor. 4. Wall Mounting Preparing to Install An Optional Wall Mounting Arm. 70S/70V 70P This monitor can be attached to assemble the wall mounting arm. 3. Remove the base. 2. Noted : VESA mounting screw holes are not available for instructions on attaching it to the user's manual that came with the optional wall mounting arm for all models, please check with the holes...

Q2770PQU User Manual
Page 22
... no OSD, press Auto/Source button continuously about 3 second to do auto configure . Hotkeys E2770SD/M2770V/M2870V/I2770V 1 Source/Auto/Exit 2 Clear Vision/- 3 4:3 or Wide/+ 4 Menu/Enter 5 Power E2770SHE/ E2770PQU/Q2770PQU/M2870VQ/M2870VHE/I2770VHE 1 Source/Auto/Exit 2 Clear Vision/- 3 Volume/+ 4 Menu/Enter 5 Power Power Press the Power button to the source selecte 22 Press Source button continuously to select the input source showed in the message bar , press Menu/Enter button to change to turn on/off the monitor. Auto...
... no OSD, press Auto/Source button continuously about 3 second to do auto configure . Hotkeys E2770SD/M2770V/M2870V/I2770V 1 Source/Auto/Exit 2 Clear Vision/- 3 4:3 or Wide/+ 4 Menu/Enter 5 Power E2770SHE/ E2770PQU/Q2770PQU/M2870VQ/M2870VHE/I2770VHE 1 Source/Auto/Exit 2 Clear Vision/- 3 Volume/+ 4 Menu/Enter 5 Power Power Press the Power button to the source selecte 22 Press Source button continuously to select the input source showed in the message bar , press Menu/Enter button to change to turn on/off the monitor. Auto...

Q2770PQU User Manual
Page 24
... display size of the product is larger than those of the mobile device to the latest version. If MHL mode is not activated even though the mobile device supports MHL, check if mobile device MHL port is MHL standard port otherwise an additional MHL-enabled adapter is required. 24 Press the source button and switch to HDMI /MHL to activate MHL mode. 3. Using...
... display size of the product is larger than those of the mobile device to the latest version. If MHL mode is not activated even though the mobile device supports MHL, check if mobile device MHL port is MHL standard port otherwise an additional MHL-enabled adapter is required. 24 Press the source button and switch to HDMI /MHL to activate MHL mode. 3. Using...

Q2770PQU User Manual
Page 25
... "Image Ratio" is activated; Press - Press - the other three functions are turned off and then press power-button to adjust any other function, repeat steps 2-3. 4. OSD Setting Basic and simple instruction on . Press AUTO to activate. If you want to turn the monitor on the control keys. 1. Press - If the product screen size is 4:3 or input signal resolution is wide format, the item of Clear vision, DCR, Color Boost...
... "Image Ratio" is activated; Press - Press - the other three functions are turned off and then press power-button to adjust any other function, repeat steps 2-3. 4. OSD Setting Basic and simple instruction on . Press AUTO to activate. If you want to turn the monitor on the control keys. 1. Press - If the product screen size is 4:3 or input signal resolution is wide format, the item of Clear vision, DCR, Color Boost...

Q2770PQU User Manual
Page 34
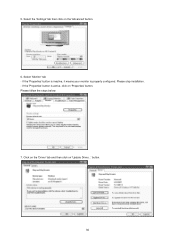
... a specific driver', then click on 'Next' and then click on the 'Next' button. 10. Click on 'Control Panel'. 3. Click on the 'Start' button, point to 'Settings', and then click on the 'Browse...' If the 'Properties' button is properly configured. Please follow the steps given below. 6. Click on the 'Open' button, then click on the 'Display' Icon. 4. Double click on the 'OK' button. 10. Driver Monitor Driver Windows...
... a specific driver', then click on 'Next' and then click on the 'Next' button. 10. Click on 'Control Panel'. 3. Click on the 'Start' button, point to 'Settings', and then click on the 'Browse...' If the 'Properties' button is properly configured. Please follow the steps given below. 6. Click on the 'Open' button, then click on the 'Display' Icon. 4. Double click on the 'OK' button. 10. Driver Monitor Driver Windows...
Q2770PQU User Manual
Page 36
Select 'Monitor' tab - Click on the 'Driver' tab and then click on the 'Advanced' button. 6. Select the 'Settings' tab then click on 'Update Driver...' If the 'Properties' button is properly configured. Please stop installation. - 5. Please follow the steps below. 7. button. 36 If the 'Properties' button is inactive, it means your monitor is active, click on 'Properties' button.
Select 'Monitor' tab - Click on the 'Driver' tab and then click on the 'Advanced' button. 6. Select the 'Settings' tab then click on 'Update Driver...' If the 'Properties' button is properly configured. Please stop installation. - 5. Please follow the steps below. 7. button. 36 If the 'Properties' button is inactive, it means your monitor is active, click on 'Properties' button.

Q2770PQU User Manual
Page 39
..." → "OK" on the following screens displayed in the "Driver" tab. 6. The monitor can be used as shown in the "Monitor" tab. If the message "Windows needs..." in sequence. 39 Click "Properties" in the figure below, click "Continue". 5. button and then select the appropriate drive F:\Driver (CD-ROM Drive). 8. 4. Check the "Browse my computer for your monitor model and click on my computer". 7.
..." → "OK" on the following screens displayed in the "Driver" tab. 6. The monitor can be used as shown in the "Monitor" tab. If the message "Windows needs..." in sequence. 39 Click "Properties" in the figure below, click "Continue". 5. button and then select the appropriate drive F:\Driver (CD-ROM Drive). 8. 4. Check the "Browse my computer for your monitor model and click on my computer". 7.

Q2770PQU User Manual
Page 49
... menu the desired time (in sleep/stand-by mode. 4) The monitor will automatically shutdown 10 minutes after the screen saver appears. the actual shutdown time depends on your monitor to complete software installation. You can click "RESET" to set the e-Saver to its default settings like below ). The example above illustrated: 1) The monitor will never shutdown when the PC is powered on "driver/e-Saver/setup.exe" to start installing...
... menu the desired time (in sleep/stand-by mode. 4) The monitor will automatically shutdown 10 minutes after the screen saver appears. the actual shutdown time depends on your monitor to complete software installation. You can click "RESET" to set the e-Saver to its default settings like below ). The example above illustrated: 1) The monitor will never shutdown when the PC is powered on "driver/e-Saver/setup.exe" to start installing...

Q2770PQU User Manual
Page 51
Adjust the maximum resolution and frequency that the monitor can be seen. Make sure the AOC Monitor Drivers are using. 51 If the power is on the screen? Picture Is Fuzzy & Has Ghosting Shadowing Problem Adjust the Contrast and Brightness Controls. Check the power cord connection and power supply. Make sure you see "Input Not Supported" on , reboot the computer to the monitor. Can you are not using the signal cable) Check the signal cable connection. We recommend plugging the monitor directly to the video card output connector on the...
Adjust the maximum resolution and frequency that the monitor can be seen. Make sure the AOC Monitor Drivers are using. 51 If the power is on the screen? Picture Is Fuzzy & Has Ghosting Shadowing Problem Adjust the Contrast and Brightness Controls. Check the power cord connection and power supply. Make sure you see "Input Not Supported" on , reboot the computer to the monitor. Can you are not using the signal cable) Check the signal cable connection. We recommend plugging the monitor directly to the video card output connector on the...

Q2770PQU User Manual
Page 52
Missing one of the primary colors (RED, GREEN, or BLUE) Inspect the monitor's video cable and make sure no pin is bent. Press to adjust. 52 Screen image is properly connected to the computer. Display not on whole screen in default resolution ration Use I-menu software from CD(or download from AOC official website), select "reset" option to auto-adjust. Make sure the monitor's video cable is not centered Adjust H-Position and V-Position or press hot-key (Power/AUTO). Make sure your computer is properly...
Missing one of the primary colors (RED, GREEN, or BLUE) Inspect the monitor's video cable and make sure no pin is bent. Press to adjust. 52 Screen image is properly connected to the computer. Display not on whole screen in default resolution ration Use I-menu software from CD(or download from AOC official website), select "reset" option to auto-adjust. Make sure the monitor's video cable is not centered Adjust H-Position and V-Position or press hot-key (Power/AUTO). Make sure your computer is properly...

Q2770PQU User Manual
Page 53
... ft ) 0~ 12192m (0~ 40000 ft ) 53 Display Color Dot Clock Horizontal scan range Horizontal scan Size(Maximum) Vertical scan range Vertical scan Size(Maximum) Optimal preset resolution Plug & Play Resolution Input Connector Input Video Signal Power Source Power Consumption Off timer Speakers Physical Connector Type Characteristics Signal Cable Type Temperature: Environmental Humidity: Altitude: E2770SD/E2770SHE/M2770V/I2770V/I2770VHE TFT Color LCD 68.6cm diagonal 0.3114mm(H)X0.3114mm(V) R, G, B Analog lnterface & Digital Interface H/V TTL 16.7M Colors 148.5MHz 30 kHz - 83 kHz...
... ft ) 0~ 12192m (0~ 40000 ft ) 53 Display Color Dot Clock Horizontal scan range Horizontal scan Size(Maximum) Vertical scan range Vertical scan Size(Maximum) Optimal preset resolution Plug & Play Resolution Input Connector Input Video Signal Power Source Power Consumption Off timer Speakers Physical Connector Type Characteristics Signal Cable Type Temperature: Environmental Humidity: Altitude: E2770SD/E2770SHE/M2770V/I2770V/I2770VHE TFT Color LCD 68.6cm diagonal 0.3114mm(H)X0.3114mm(V) R, G, B Analog lnterface & Digital Interface H/V TTL 16.7M Colors 148.5MHz 30 kHz - 83 kHz...

Q2770PQU User Manual
Page 54
... (0~ 40000 ft ) 54 Panel Resolution Product name Driving system Viewable Image Size Pixel pitch Video Separate Sync. Display Color Dot Clock Horizontal scan range Horizontal scan Size(Maximum) Vertical scan range Vertical scan Size(Maximum) Optimal preset resolution Plug & Play Input Connector Input Video Signal Power Source Power Consumption Off timer Speakers Physical Connector Type Characteristics Signal Cable Type Temperature: Environmental Humidity: Altitude: E2770PQU TFT Color LCD 68.6cm diagonal 0.3114mm(H)X0.3114mm(V) R, G, B Analog lnterface & Digital Interface H/V TTL 16...
... (0~ 40000 ft ) 54 Panel Resolution Product name Driving system Viewable Image Size Pixel pitch Video Separate Sync. Display Color Dot Clock Horizontal scan range Horizontal scan Size(Maximum) Vertical scan range Vertical scan Size(Maximum) Optimal preset resolution Plug & Play Input Connector Input Video Signal Power Source Power Consumption Off timer Speakers Physical Connector Type Characteristics Signal Cable Type Temperature: Environmental Humidity: Altitude: E2770PQU TFT Color LCD 68.6cm diagonal 0.3114mm(H)X0.3114mm(V) R, G, B Analog lnterface & Digital Interface H/V TTL 16...
Q2770PQU User Manual
Page 66
... and deliver to the AOC Certified or Authorized Service Center under the following condition: Make sure the LCD Monitor is not responsible for the warranty instructions in material and workmanship for any such modifications or alteration. will, at its option, either repair the defective product with new or rebuilt parts, or replace it with AOC's user manual Misuse Neglect...
... and deliver to the AOC Certified or Authorized Service Center under the following condition: Make sure the LCD Monitor is not responsible for the warranty instructions in material and workmanship for any such modifications or alteration. will, at its option, either repair the defective product with new or rebuilt parts, or replace it with AOC's user manual Misuse Neglect...


