
User's Manual
Page 7
Setup Contents in Box QSG CD Manual Carry Case (Option) USB Cable 7
Setup Contents in Box QSG CD Manual Carry Case (Option) USB Cable 7

User's Manual
Page 10
... page 16 to the LCD monitor from one end of the USB cable to the computer. - Connect one USB port. If so, connect the other USB connector on the Y end of USB cable to the LCD monitor and the end of the cable into another USB on page 11 to 15 before connecting. - Note: Some... computers may not provide enough power to configure your USB Monitor. Connecting the Monitor Cable Connections In Rear of Monitor...
... page 16 to the LCD monitor from one end of the USB cable to the computer. - Connect one USB port. If so, connect the other USB connector on the Y end of USB cable to the LCD monitor and the end of the cable into another USB on page 11 to 15 before connecting. - Note: Some... computers may not provide enough power to configure your USB Monitor. Connecting the Monitor Cable Connections In Rear of Monitor...

User's Manual
Page 12
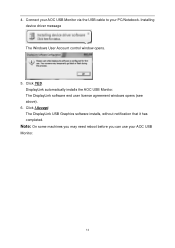
Installing device driver message will automatically install the AOC USB Monitor. Click YES. The DisplayLink software end user license agreement windows opens (see above). 6. Click I Accept. Connect your AOC USB Monitor via the USB cable to your AOC USB Monitor. 12 Note: On some machines you may need reboot before you can use your PC/Notebook. DisplayLink will be shown on the taskbar. The DisplayLink USB Graphics software installs, without notification that it has completed. The Windows User Account control window opens. 5. 4.
Installing device driver message will automatically install the AOC USB Monitor. Click YES. The DisplayLink software end user license agreement windows opens (see above). 6. Click I Accept. Connect your AOC USB Monitor via the USB cable to your AOC USB Monitor. 12 Note: On some machines you may need reboot before you can use your PC/Notebook. DisplayLink will be shown on the taskbar. The DisplayLink USB Graphics software installs, without notification that it has completed. The Windows User Account control window opens. 5. 4.
User's Manual
Page 14
DisplayLink automatically installs the AOC USB Monitor. The DisplayLink software end user license agreement windows opens (see above). 6. Note: On some machines you may need reboot before you can use your PC/Notebook. Click I Accept. Installing device driver message The Windows User Account control window opens. 5. The DisplayLink USB Graphics software installs, without notification that it has completed. Connect your AOC USB Monitor via the USB cable to your AOC USB Monitor. 14 4. Click YES.
DisplayLink automatically installs the AOC USB Monitor. The DisplayLink software end user license agreement windows opens (see above). 6. Note: On some machines you may need reboot before you can use your PC/Notebook. Click I Accept. Installing device driver message The Windows User Account control window opens. 5. The DisplayLink USB Graphics software installs, without notification that it has completed. Connect your AOC USB Monitor via the USB cable to your AOC USB Monitor. 14 4. Click YES.

User's Manual
Page 15
Double click on Setup.exe. The following message (or similar) will be seen. Windows installs the AOC USB Monitor device. The Windows User Account Control window opens (if enabled in the OS). 2. DisplayLink core software and DisplayLink Graphics installs. ... black during the installation. 3. For Microsoft® Windows® XP Important!! DO NOT connect USB Monitor to your PC/Notebook before the software install. 1. Click I Accept. Note: The screen may flash or go black during the installation. 15 Connect your AOC USB Monitor via the USB cable to your PC/Notebook.
Double click on Setup.exe. The following message (or similar) will be seen. Windows installs the AOC USB Monitor device. The Windows User Account Control window opens (if enabled in the OS). 2. DisplayLink core software and DisplayLink Graphics installs. ... black during the installation. 3. For Microsoft® Windows® XP Important!! DO NOT connect USB Monitor to your PC/Notebook before the software install. 1. Click I Accept. Note: The screen may flash or go black during the installation. 15 Connect your AOC USB Monitor via the USB cable to your PC/Notebook.

User's Manual
Page 17
Always unplug the monitor before cleaning. - Never spray liquids directly onto the LCD screen or use the AOC USB LCD monitor in mirror mode or extended mode. Remove the USB cable from the computer and monitor. Use a soft cloth to wipe the screen and other parts of your operating system. Disconnecting the LCD Monitor 1. For...
Always unplug the monitor before cleaning. - Never spray liquids directly onto the LCD screen or use the AOC USB LCD monitor in mirror mode or extended mode. Remove the USB cable from the computer and monitor. Use a soft cloth to wipe the screen and other parts of your operating system. Disconnecting the LCD Monitor 1. For...
User's Manual
Page 22
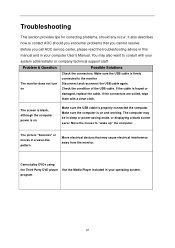
... in sleep or power-saving mode, or displaying a blank screen saver. Check the condition of the USB cable. Make sure the computer is frayed or damaged, replace the cable. You may cause electrical interference away from the monitor. The screen is blank, although the computer power...AOC service center, please read the troubleshooting advice in this manual and in a wave-like pattern Move electrical devices that may also want to consult with a clean cloth. The picture "bounces" or moves in your system administrator or company technical support staff. Make sure the USB cable...
... in sleep or power-saving mode, or displaying a blank screen saver. Check the condition of the USB cable. Make sure the computer is frayed or damaged, replace the cable. You may cause electrical interference away from the monitor. The screen is blank, although the computer power...AOC service center, please read the troubleshooting advice in this manual and in a wave-like pattern Move electrical devices that may also want to consult with a clean cloth. The picture "bounces" or moves in your system administrator or company technical support staff. Make sure the USB cable...

Service Manual
Page 6
.... Follow the procedure described starting on page 16 to the LCD monitor from one end of the USB cable to the LCD monitor and the end of your Windows ® desktop to configure the display settings Disconnecting the LCD Monitor 1. For Microsoft® Windows&#...; Right-click the " "icon in mirror mode or extended mode. Follow the software installation described on your computer. 3.2 Control the Display You can use the AOC USB LCD monitor in the system tray of USB cable to your Laptop/PC. . 1 Connecting the LCD monitor to the computer. - Your computer should detect the...
.... Follow the procedure described starting on page 16 to the LCD monitor from one end of the USB cable to the LCD monitor and the end of your Windows ® desktop to configure the display settings Disconnecting the LCD Monitor 1. For Microsoft® Windows&#...; Right-click the " "icon in mirror mode or extended mode. Follow the software installation described on your computer. 3.2 Control the Display You can use the AOC USB LCD monitor in the system tray of USB cable to your Laptop/PC. . 1 Connecting the LCD monitor to the computer. - Your computer should detect the...

Service Manual
Page 7
...in the system tray. 2. To control the behavior of an attached AOC USB monitor, it is also possible to use Windows Key ( a menu (and cycle through it) to switch mode. ) + P to display 3.4 new technology The AOC e1649Fwu monitor supports an auto-pivot function to manually rotate the display. You ...rotated slowly and over 75∘with the tilt angle within 30∘to configure the AOC Monitor 1. The default setting for details on again. 7 Remove the USB cable from the computer and monitor. 3.3 Setting the USB Monitor Follow this procedure to activate the auto-pivot function.
...in the system tray. 2. To control the behavior of an attached AOC USB monitor, it is also possible to use Windows Key ( a menu (and cycle through it) to switch mode. ) + P to display 3.4 new technology The AOC e1649Fwu monitor supports an auto-pivot function to manually rotate the display. You ...rotated slowly and over 75∘with the tilt angle within 30∘to configure the AOC Monitor 1. The default setting for details on again. 7 Remove the USB cable from the computer and monitor. 3.3 Setting the USB Monitor Follow this procedure to activate the auto-pivot function.

Service Manual
Page 30
... REAR COVER COVER e1649Fwu_STAND e1649Fwu_STAND HINGE_15.6" CARTON LABEL BARCODE 1 E1649FWU ID LABEL E1649FWU FRENCH LABEL E1649FWU POP LABEL e1649Fwu QSG EPS EPS ARTWORK CARTON E1649FWU EPE COVER RPOTECT BAG anti static electricity_tape e1649Fwu CD MANUAL FOOT PAD LABEL P.E. T6BADL2KBXA1NNE Location Part No. ... 58162435A Q45G 76 28 H A Q50G 4 10 Q52G1001211 B JY Q85G 583612 ECN701 S95G176T40NW04 USBBHA2 756GHBCB A1073 Description PAPER TAPE USB CABLE 2.0 mini B to change without notice. BOM List Note: The parts information listed below are for the latest information. BAGx320x210x0...
... REAR COVER COVER e1649Fwu_STAND e1649Fwu_STAND HINGE_15.6" CARTON LABEL BARCODE 1 E1649FWU ID LABEL E1649FWU FRENCH LABEL E1649FWU POP LABEL e1649Fwu QSG EPS EPS ARTWORK CARTON E1649FWU EPE COVER RPOTECT BAG anti static electricity_tape e1649Fwu CD MANUAL FOOT PAD LABEL P.E. T6BADL2KBXA1NNE Location Part No. ... 58162435A Q45G 76 28 H A Q50G 4 10 Q52G1001211 B JY Q85G 583612 ECN701 S95G176T40NW04 USBBHA2 756GHBCB A1073 Description PAPER TAPE USB CABLE 2.0 mini B to change without notice. BOM List Note: The parts information listed below are for the latest information. BAGx320x210x0...

