Spec Sheet_E2060SWD
Page 1
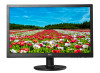
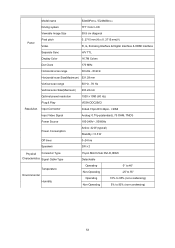
e2060Swd Cabinet Color Panel Pixel Pitch Display Area Brightness Contrast Ratio Response Time Viewing Angle Scanning Frequency Pixel Frequency Maximum Resolution Recommended Resolution Supported Resolutions Black with Hairline Texture TFT Active Matrix, LED Backlight 20" Class, 16:9 Aspect Ratio 19.5" Viewable Image Size, Diagonal 0.276 x 0.276mm 432mm x 240mm 200 cd/m2 (typ) 20,000,000:1 (dynamic) 5ms (typical) Horizontal: 90 Degrees (CR>10) Vertical: 50 Degrees (CR>10) Horizontal: 30K~83KHz Vertical: 50~76 Hz 108...
e2060Swd Cabinet Color Panel Pixel Pitch Display Area Brightness Contrast Ratio Response Time Viewing Angle Scanning Frequency Pixel Frequency Maximum Resolution Recommended Resolution Supported Resolutions Black with Hairline Texture TFT Active Matrix, LED Backlight 20" Class, 16:9 Aspect Ratio 19.5" Viewable Image Size, Diagonal 0.276 x 0.276mm 432mm x 240mm 200 cd/m2 (typ) 20,000,000:1 (dynamic) 5ms (typical) Horizontal: 90 Degrees (CR>10) Vertical: 50 Degrees (CR>10) Horizontal: 30K~83KHz Vertical: 50~76 Hz 108...

User's Manual_E2060SWD
Page 2
......9 Setup Stand & Base ...10 Adjusting Viewing Angle...12 Connecting the Monitor...14 Wall Mounting...15 Adjusting ...16 Setting Optimal Resolution...16 Windows Vista ...16 Windows XP...18 Windows ME/2000...19 Windows 8...19 Hotkeys ...22 OSD Setting ...24 Luminance...25 Image Setup ...27 Color Setup ...28 Picture Boost ...29 OSD Setup ...30 Extra ...31 Exit ...32 LED Indicator...33 Driver ...34 Monitor Driver...34 Windows 2000 ...34 Windows ME ...34 Windows XP...35 Windows Vista ...38 Windows 7...40 Windows 8...44 i-Menu ...44 e-Saver ...45 Screen+ ...46 Troubleshoot ...47 Specification...50...
......9 Setup Stand & Base ...10 Adjusting Viewing Angle...12 Connecting the Monitor...14 Wall Mounting...15 Adjusting ...16 Setting Optimal Resolution...16 Windows Vista ...16 Windows XP...18 Windows ME/2000...19 Windows 8...19 Hotkeys ...22 OSD Setting ...24 Luminance...25 Image Setup ...27 Color Setup ...28 Picture Boost ...29 OSD Setup ...30 Extra ...31 Exit ...32 LED Indicator...33 Driver ...34 Monitor Driver...34 Windows 2000 ...34 Windows ME ...34 Windows XP...35 Windows Vista ...38 Windows 7...40 Windows 8...44 i-Menu ...44 e-Saver ...45 Screen+ ...46 Troubleshoot ...47 Specification...50...
User's Manual_E2060SWD
Page 5
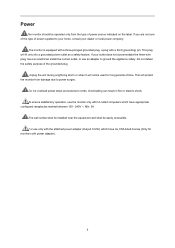
... periods of the grounded plug. To ensure satisfactory operation, use an adapter to ground the appliance safely. If your dealer or local power company. Power The monitor should be operated only from damage due to power surges. For use only with the attached power adapter (Output 12Vdc) which have an electrician install the correct outlet, or use the monitor only with UL listed...
... periods of the grounded plug. To ensure satisfactory operation, use an adapter to ground the appliance safely. If your dealer or local power company. Power The monitor should be operated only from damage due to power surges. For use only with the attached power adapter (Output 12Vdc) which have an electrician install the correct outlet, or use the monitor only with UL listed...
User's Manual_E2060SWD
Page 14
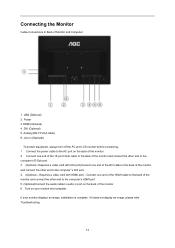
Analog (DB-15 VGA cable) 6. Requires a video card with DVI port)Connect one end of the HDMI cable to the back of the monitor and connect the other end to audio in (Optional) To protect equipment, always turn off the PC and LCD monitor before connecting. 1 Connect the power cable to the AC port on the back of the monitor. 2 Connect one end of the 15-pin D-Sub cable to the back of Monitor and Computer...
Analog (DB-15 VGA cable) 6. Requires a video card with DVI port)Connect one end of the HDMI cable to the back of the monitor and connect the other end to audio in (Optional) To protect equipment, always turn off the PC and LCD monitor before connecting. 1 Connect the power cable to the AC port on the back of the monitor. 2 Connect one end of the 15-pin D-Sub cable to the back of Monitor and Computer...
User's Manual_E2060SWD
Page 15
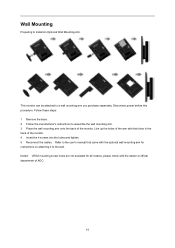
... to assemble the wall mounting arm. 3 Place the wall mounting arm onto the back of the monitor. 4 Insert the 4 screws into the holes and tighten. 5 Reconnect the cables. Disconnect power before this procedure. This monitor can be attached to Install An Optional Wall Mounting Arm. Follow these steps: 1 Remove the base. 2 Follow the manufacturer's instructions to the user's manual that came with the optional wall mounting arm for all models, please check...
... to assemble the wall mounting arm. 3 Place the wall mounting arm onto the back of the monitor. 4 Insert the 4 screws into the holes and tighten. 5 Reconnect the cables. Disconnect power before this procedure. This monitor can be attached to Install An Optional Wall Mounting Arm. Follow these steps: 1 Remove the base. 2 Follow the manufacturer's instructions to the user's manual that came with the optional wall mounting arm for all models, please check...
User's Manual_E2060SWD
Page 23
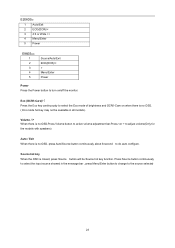
E2060SW: 1 Auto/Exit 2 ECO(DCR)/< 3 4:3 or Wide / > 4 Menu/Enter 5 Power E960SRD: 1 2 3 4 5 Source/Auto/Exit ECO(DCR)/< > Menu/Enter Power Power Press the Power button to select the Eco mode of brightness and DCR/I -Care)/ < Press the Eco key continuously to turn on when there is no OSD. ( Eco mode hot key may not be available in all models). Volume / > When there is no OSD,Press Volume button to active volume adjustment bar,Press Eco (DCR/I -Care on /off the monitor.
E2060SW: 1 Auto/Exit 2 ECO(DCR)/< 3 4:3 or Wide / > 4 Menu/Enter 5 Power E960SRD: 1 2 3 4 5 Source/Auto/Exit ECO(DCR)/< > Menu/Enter Power Power Press the Power button to select the Eco mode of brightness and DCR/I -Care)/ < Press the Eco key continuously to turn on when there is no OSD. ( Eco mode hot key may not be available in all models). Volume / > When there is no OSD,Press Volume button to active volume adjustment bar,Press Eco (DCR/I -Care on /off the monitor.

User's Manual_E2060SWD
Page 24
.... AUTO to change the settings of the selected function. press and hold the MENU button while the monitor is highlighted, press MENU-button to activate it . OSD Setting Basic and simple instruction on the control keys. 1) Press the MENU-button to activate the OSD window. 2) Press < or > to turn the monitor on . MENU button Notes: 1) If the product has only one signal input, the item of "Input Select" is disable to adjust. 2) If the product screen size...
.... AUTO to change the settings of the selected function. press and hold the MENU button while the monitor is highlighted, press MENU-button to activate it . OSD Setting Basic and simple instruction on the control keys. 1) Press the MENU-button to activate the OSD window. 2) Press < or > to turn the monitor on . MENU button Notes: 1) If the product has only one signal input, the item of "Input Select" is disable to adjust. 2) If the product screen size...
User's Manual_E2060SWD
Page 31
.../E2460PHU) Select input signal source. ( E960SRDA/ E960PRDA/ E960SRD/E2060SWDA/E2060PWDA/E2060SWD/ E2260SD/E2260SDA/ E2260PDA) Select input signal source.(E2060SW) Auto adjust the picture to enter. Select wide or 4:3 format for display. Turn ON/OFF DDC-CI Support. to default. to exit. Select DC off time. Show the information of the main image and sub-image source. 31 Extra 1 Press (Menu) to display menu. 2 Press < or >to...
.../E2460PHU) Select input signal source. ( E960SRDA/ E960PRDA/ E960SRD/E2060SWDA/E2060PWDA/E2060SWD/ E2260SD/E2260SDA/ E2260PDA) Select input signal source.(E2060SW) Auto adjust the picture to enter. Select wide or 4:3 format for display. Turn ON/OFF DDC-CI Support. to default. to exit. Select DC off time. Show the information of the main image and sub-image source. 31 Extra 1 Press (Menu) to display menu. 2 Press < or >to...

User's Manual_E2060SWD
Page 34
... a specific location, so you can see the 'Digital Signature Not Found' window, click on 'Properties' button. Select your monitor is active. Please stop installation. - Click on 'Driver' and then click on the 'Display' Icon. 4. Double click on 'Update Driver...' Windows ME 1. button. 6. Click on 'Advanced...'. 5. Driver Monitor Driver Windows 2000 1. Select the 'Settings' tab then click on 'Finish' button then the 'Close' button. 34 Click on the 'Start' button, point to 'Settings...
... a specific location, so you can see the 'Digital Signature Not Found' window, click on 'Properties' button. Select your monitor is active. Please stop installation. - Click on 'Driver' and then click on the 'Display' Icon. 4. Double click on 'Update Driver...' Windows ME 1. button. 6. Click on 'Advanced...'. 5. Driver Monitor Driver Windows 2000 1. Select the 'Settings' tab then click on 'Finish' button then the 'Close' button. 34 Click on the 'Start' button, point to 'Settings...

User's Manual_E2060SWD
Page 36
5. Select 'Monitor' tab - Please stop installation. - If the 'Properties' button is inactive, it means your monitor is active, click on 'Update Driver...' Click on the 'Driver' tab and then click on 'Properties' button. If the 'Properties' button is properly configured. Please follow the steps below. 7. button. 36 Select the 'Settings' tab then click on the 'Advanced' button. 6.
5. Select 'Monitor' tab - Please stop installation. - If the 'Properties' button is inactive, it means your monitor is active, click on 'Update Driver...' Click on the 'Driver' tab and then click on 'Properties' button. If the 'Properties' button is properly configured. Please follow the steps below. 7. button. 36 Select the 'Settings' tab then click on the 'Advanced' button. 6.

User's Manual_E2060SWD
Page 39
... screens displayed in the figure below, click "Continue". 5. The monitor can be used as is displayed, as shown in sequence. 39 button, then click on the 'Have disk...' Check the "Browse my computer for your monitor model and click on my computer". 7. If the message "Windows needs..." Select your monitor is completed. If the "Properties" button is deactivated, it means the configuration for driver software...
... screens displayed in the figure below, click "Continue". 5. The monitor can be used as is displayed, as shown in sequence. 39 button, then click on the 'Have disk...' Check the "Browse my computer for your monitor model and click on my computer". 7. If the message "Windows needs..." Select your monitor is completed. If the "Properties" button is deactivated, it means the configuration for driver software...

User's Manual_E2060SWD
Page 44
... maximum refresh rate and corresponding Color Matching Profiles. Click the "Have Disk" button. Click the "OK" button. 13. Click on the "Change display settings" button. 6. i-Menu Welcome to "i-Menu" software by using on screen menus instead of the OSD button on the "Browse" button and navigate to "Large icons" or "Small icons". 4. Start Windows® 8 2. Select "Let me pick from the CD to adjust your monitor model and click the "Next" button. Windows 8 1. Click...
... maximum refresh rate and corresponding Color Matching Profiles. Click the "Have Disk" button. Click the "OK" button. 13. Click on the "Change display settings" button. 6. i-Menu Welcome to "i-Menu" software by using on screen menus instead of the OSD button on the "Browse" button and navigate to "Large icons" or "Small icons". 4. Start Windows® 8 2. Select "Let me pick from the CD to adjust your monitor model and click the "Next" button. Windows 8 1. Click...

User's Manual_E2060SWD
Page 46
... menu the desired time (in sleep/stand-by AOC, Screen+ software is in minutes) for your preferences (see example below . the actual shutdown time depends on "driver/e-Saver/setup.exe" to start installing the e-Saver software, follow the install wizard to automatically shutdown. Please click on your monitor to complete software installation. Under each pane displays a different window. Screen+ Welcome to a corresponding 46 You only need to drag the window...
... menu the desired time (in sleep/stand-by AOC, Screen+ software is in minutes) for your preferences (see example below . the actual shutdown time depends on "driver/e-Saver/setup.exe" to start installing the e-Saver software, follow the install wizard to automatically shutdown. Please click on your monitor to complete software installation. Under each pane displays a different window. Screen+ Welcome to a corresponding 46 You only need to drag the window...
User's Manual_E2060SWD
Page 48
... Problem Adjust the Contrast and Brightness Controls. Inspect the monitor's video cable and make sure no pin is properly connected to auto adjust. If the power is operational by hitting the CAPS LOCK key on the screen? Can you are installed. Press to the computer. The Computer Video Card should be in its slot. You can handle properly. Check the power cord connection and power supply. Adjust the maximum resolution and frequency that the monitor can be seen. Picture...
... Problem Adjust the Contrast and Brightness Controls. Inspect the monitor's video cable and make sure no pin is properly connected to auto adjust. If the power is operational by hitting the CAPS LOCK key on the screen? Can you are installed. Press to the computer. The Computer Video Card should be in its slot. You can handle properly. Check the power cord connection and power supply. Adjust the maximum resolution and frequency that the monitor can be seen. Picture...

User's Manual_E2060SWD
Page 49
Missing one of the primary colors (RED, GREEN, or BLUE) Inspect the monitor's video cable and make sure that no pin is not centered Adjust H-Position and V-Position or press hot-key (AUTO). Press to the computer. Screen image is damaged. Horizontal or vertical disturbances on the screen Use Windows 95/98/2000/ME/XP shut-down mode Adjust CLOCK and FOCUS. Make sure the monitor's video cable is properly connected to auto-adjust. 49 or sized properly Picture has color defects (white does not look white) Adjust RGB color or select desired color temperature.
Missing one of the primary colors (RED, GREEN, or BLUE) Inspect the monitor's video cable and make sure that no pin is not centered Adjust H-Position and V-Position or press hot-key (AUTO). Press to the computer. Screen image is damaged. Horizontal or vertical disturbances on the screen Use Windows 95/98/2000/ME/XP shut-down mode Adjust CLOCK and FOCUS. Make sure the monitor's video cable is properly connected to auto-adjust. 49 or sized properly Picture has color defects (white does not look white) Adjust RGB color or select desired color temperature.

User's Manual_E2060SWD
Page 50
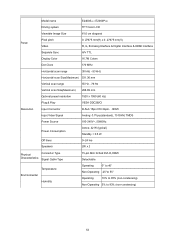
... Display Color Dot Clock Horizontal scan range Horizontal scan Size(Maximum) Vertical scan range Vertical scan Size(Maximum) Optimal preset resolution Plug & Play Input Connector E960SRDA/ E960PRDA/ E960SRD TFT Color LCD 48.2cm diagonal 0.294mm(H)X0.294mm(V) R, G, B Analog lnterface & Digital Interface H/V TTL 16.7M Colors 108MHz 30 kHz - 83 kHz 376.32mm 50 Hz - 76 Hz 301.056mm 1280x 1024 (60 Hz) VESA DDC2B/CI D-Sub 15pin; Specification General Specification Panel Resolution Model name Driving system Viewable Image Size Pixel...
... Display Color Dot Clock Horizontal scan range Horizontal scan Size(Maximum) Vertical scan range Vertical scan Size(Maximum) Optimal preset resolution Plug & Play Input Connector E960SRDA/ E960PRDA/ E960SRD TFT Color LCD 48.2cm diagonal 0.294mm(H)X0.294mm(V) R, G, B Analog lnterface & Digital Interface H/V TTL 16.7M Colors 108MHz 30 kHz - 83 kHz 376.32mm 50 Hz - 76 Hz 301.056mm 1280x 1024 (60 Hz) VESA DDC2B/CI D-Sub 15pin; Specification General Specification Panel Resolution Model name Driving system Viewable Image Size Pixel...
User's Manual_E2060SWD
Page 53
... TFT Color LCD Viewable Image Size 59.8 cm diagonal Panel Pixel pitch Video 0. 2715 mm(H) x 0. 2715 mm(V) R, G, B Analog lnterface & Digital Interface & HDMI lnterface Separate Sync H/V TTL Display Color 16.7M Colors Dot Clock 170 MHz Horizontal scan range 30 kHz - 83 kHz Horizontal scan Size(Maximum) 521.28 mm Vertical scan range 50 Hz - 76 Hz Vertical scan Size(Maximum) 293.22 mm Optimal preset resolution 1920 x 1080 (60 Hz) Plug & Play Resolution Input Connector VESA DDC2B/CI D-Sub 15pin DVI...
... TFT Color LCD Viewable Image Size 59.8 cm diagonal Panel Pixel pitch Video 0. 2715 mm(H) x 0. 2715 mm(V) R, G, B Analog lnterface & Digital Interface & HDMI lnterface Separate Sync H/V TTL Display Color 16.7M Colors Dot Clock 170 MHz Horizontal scan range 30 kHz - 83 kHz Horizontal scan Size(Maximum) 521.28 mm Vertical scan range 50 Hz - 76 Hz Vertical scan Size(Maximum) 293.22 mm Optimal preset resolution 1920 x 1080 (60 Hz) Plug & Play Resolution Input Connector VESA DDC2B/CI D-Sub 15pin DVI...
User's Manual_E2060SWD
Page 54
... TFT Color LCD Viewable Image Size 61.0 cm diagonal Panel Pixel pitch Video 0. 27675 mm(H) x 0. 27675 mm(V) R, G, B Analog lnterface & Digital Interface & HDMI lnterface Separate Sync H/V TTL Display Color 16.7M Colors Dot Clock 170 MHz Horizontal scan range 30 kHz - 83 kHz Horizontal scan Size(Maximum) 531.36 mm Vertical scan range 55 Hz - 76 Hz Vertical scan Size(Maximum) 298.89 mm Optimal preset resolution 1920 x 1080 (60 Hz) Resolution Plug & Play Input Connector VESA DDC2B/CI D-Sub 15pin DVI...
... TFT Color LCD Viewable Image Size 61.0 cm diagonal Panel Pixel pitch Video 0. 27675 mm(H) x 0. 27675 mm(V) R, G, B Analog lnterface & Digital Interface & HDMI lnterface Separate Sync H/V TTL Display Color 16.7M Colors Dot Clock 170 MHz Horizontal scan range 30 kHz - 83 kHz Horizontal scan Size(Maximum) 531.36 mm Vertical scan range 55 Hz - 76 Hz Vertical scan Size(Maximum) 298.89 mm Optimal preset resolution 1920 x 1080 (60 Hz) Resolution Plug & Play Input Connector VESA DDC2B/CI D-Sub 15pin DVI...

User's Manual_E2060SWD
Page 59
... Shield TMDS data 3- Pin Number 13 14 15 16 17 18 19 20 21 22 23 24 24-Pin Color Display Signal Cable TMDS data 3+ +5V Power Ground (for+5V) Hot Plug Detect TMDS data 0- TMDS data...Serial data H-sync V-sync DDC-Serial clock Pin Number 1 2 3 4 5 6 7 8 9 10 11 12 24-Pin Color Display Signal Cable TMDS data 2- TMDS data 2+ TMDS data 2/4 Shield TMDS data 4- TMDS data 4+ DDC Clock DDC Data N.C. Pin Assignments Pin Number 1 2 3 s 5 6 7 8 9 10 11 12 13 14 15 15-Pin Side of the Signal Cable Video-Red Video-Green Video-Blue N.C. Detect Cable...
... Shield TMDS data 3- Pin Number 13 14 15 16 17 18 19 20 21 22 23 24 24-Pin Color Display Signal Cable TMDS data 3+ +5V Power Ground (for+5V) Hot Plug Detect TMDS data 0- TMDS data...Serial data H-sync V-sync DDC-Serial clock Pin Number 1 2 3 4 5 6 7 8 9 10 11 12 24-Pin Color Display Signal Cable TMDS data 2- TMDS data 2+ TMDS data 2/4 Shield TMDS data 4- TMDS data 4+ DDC Clock DDC Data N.C. Pin Assignments Pin Number 1 2 3 s 5 6 7 8 9 10 11 12 13 14 15 15-Pin Side of the Signal Cable Video-Red Video-Green Video-Blue N.C. Detect Cable...

User's Manual_E2060SWD
Page 65
... application Adjustment by non-authorized source Repair, modification, or installation of options or parts by anyone other than an AOC Certified or Authorized Service Center Improper environments like humidity and dusts Damaged by violence Excessive or inadequate heating or air conditioning or electrical powers failures, surges, or other irregularities All AOC LCD Monitors are produced according...
... application Adjustment by non-authorized source Repair, modification, or installation of options or parts by anyone other than an AOC Certified or Authorized Service Center Improper environments like humidity and dusts Damaged by violence Excessive or inadequate heating or air conditioning or electrical powers failures, surges, or other irregularities All AOC LCD Monitors are produced according...


