
User's Manual_E2060SWD
Page 2
......9 Setup Stand & Base ...10 Adjusting Viewing Angle...12 Connecting the Monitor...14 Wall Mounting...15 Adjusting ...16 Setting Optimal Resolution...16 Windows Vista ...16 Windows XP...18 Windows ME/2000...19 Windows 8...19 Hotkeys ...22 OSD Setting ...24 Luminance...25 Image Setup ...27 Color Setup ...28 Picture Boost ...29 OSD Setup ...30 Extra ...31 Exit ...32 LED Indicator...33 Driver ...34 Monitor Driver...34 Windows 2000 ...34 Windows ME ...34 Windows XP...35 Windows Vista ...38 Windows 7...40 Windows 8...44 i-Menu ...44 e-Saver ...45 Screen+ ...46 Troubleshoot ...47 Specification...50...
......9 Setup Stand & Base ...10 Adjusting Viewing Angle...12 Connecting the Monitor...14 Wall Mounting...15 Adjusting ...16 Setting Optimal Resolution...16 Windows Vista ...16 Windows XP...18 Windows ME/2000...19 Windows 8...19 Hotkeys ...22 OSD Setting ...24 Luminance...25 Image Setup ...27 Color Setup ...28 Picture Boost ...29 OSD Setup ...30 Extra ...31 Exit ...32 LED Indicator...33 Driver ...34 Monitor Driver...34 Windows 2000 ...34 Windows ME ...34 Windows XP...35 Windows Vista ...38 Windows 7...40 Windows 8...44 i-Menu ...44 e-Saver ...45 Screen+ ...46 Troubleshoot ...47 Specification...50...
User's Manual_E2060SWD
Page 5
... protect the monitor from the type of power supplied to ground the appliance safely. Do not overload power strips and extension cords. To ensure satisfactory operation, use the monitor only with power adapter). 5 This plug will not be used for monitors with UL listed computers which have appropriate configured receptacles marked between 100 - 240V ~, Min. 5A The wall socket shall be installed near the...
... protect the monitor from the type of power supplied to ground the appliance safely. Do not overload power strips and extension cords. To ensure satisfactory operation, use the monitor only with power adapter). 5 This plug will not be used for monitors with UL listed computers which have appropriate configured receptacles marked between 100 - 240V ~, Min. 5A The wall socket shall be installed near the...
User's Manual_E2060SWD
Page 14
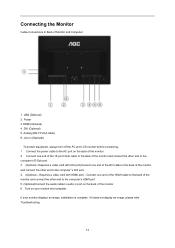
USB (Optional) 2. Analog (DB-15 VGA cable) 6. Requires a video card with DVI port)Connect one end of the DVI cable to the back of the monitor and connect the other end to the computer's D-Sub port. 3. (Optional -Requires a video card with HDMI port) - Connect one end of the HDMI cable to the back of the monitor and connect the other end to the computer's HDMI port. 5. (Optional)Connect the audio cable to audio in (Optional) To protect equipment, always turn off...
USB (Optional) 2. Analog (DB-15 VGA cable) 6. Requires a video card with DVI port)Connect one end of the DVI cable to the back of the monitor and connect the other end to the computer's D-Sub port. 3. (Optional -Requires a video card with HDMI port) - Connect one end of the HDMI cable to the back of the monitor and connect the other end to the computer's HDMI port. 5. (Optional)Connect the audio cable to audio in (Optional) To protect equipment, always turn off...
User's Manual_E2060SWD
Page 15
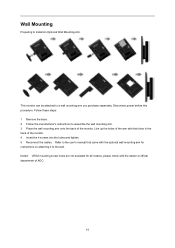
Follow these steps: 1 Remove the base. 2 Follow the manufacturer's instructions to a wall mounting arm you purchase separately. Line up the holes of the arm with the dealer or official department of AOC. 15 Wall Mounting Preparing to the wall. Disconnect power before this procedure. Refer to the user's manual that came with the optional wall mounting arm for all models, please check with the holes in the...
Follow these steps: 1 Remove the base. 2 Follow the manufacturer's instructions to a wall mounting arm you purchase separately. Line up the holes of the arm with the dealer or official department of AOC. 15 Wall Mounting Preparing to the wall. Disconnect power before this procedure. Refer to the user's manual that came with the optional wall mounting arm for all models, please check with the holes in the...
User's Manual_E2060SWD
Page 23
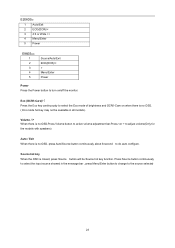
Volume / > When there is no OSD,Press Volume button to turn on/off the monitor. E2060SW: 1 Auto/Exit 2 ECO(DCR)/< 3 4:3 or Wide / > 4 Menu/Enter 5 Power E960SRD: 1 2 3 4 5 Source/Auto/Exit ECO(DCR)/< > Menu/Enter Power Power Press the Power button to active volume adjustment bar,Press Eco (DCR/I-Care)/ < Press the Eco key continuously to select the Eco mode of brightness and DCR/I-Care on when there is no OSD. ( Eco mode hot key may not be available in all models).
Volume / > When there is no OSD,Press Volume button to turn on/off the monitor. E2060SW: 1 Auto/Exit 2 ECO(DCR)/< 3 4:3 or Wide / > 4 Menu/Enter 5 Power E960SRD: 1 2 3 4 5 Source/Auto/Exit ECO(DCR)/< > Menu/Enter Power Power Press the Power button to active volume adjustment bar,Press Eco (DCR/I-Care)/ < Press the Eco key continuously to select the Eco mode of brightness and DCR/I-Care on when there is no OSD. ( Eco mode hot key may not be available in all models).

User's Manual_E2060SWD
Page 24
... desired function is disable to adjust 4) OSD Lock Function: To lock the OSD, press and hold the while the monitor is turned off accordingly. 24 OSD Setting Basic and simple instruction on . MENU button Notes: 1) If the product has only one signal input, the item of "Input Select" is disable to adjust. 2) If the product screen size is 4:3 or input signal resolution is wide format, the item of "Image Ratio" is highlighted, press MENU-button to exit.
... desired function is disable to adjust 4) OSD Lock Function: To lock the OSD, press and hold the while the monitor is turned off accordingly. 24 OSD Setting Basic and simple instruction on . MENU button Notes: 1) If the product has only one signal input, the item of "Input Select" is disable to adjust. 2) If the product screen size is 4:3 or input signal resolution is wide format, the item of "Image Ratio" is highlighted, press MENU-button to exit.
User's Manual_E2060SWD
Page 31
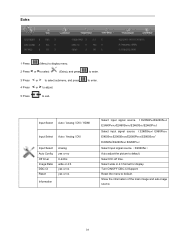
... default. Input Select Auto / Analog / DVI / HDMI Input Select Auto / Analog / DVI Input Select Auto Config Off timer Image Ratio DDC-CI Reset Analog yes or no 0-24hrs wide or 4:3 yes or no yes or no Information Select input signal source. ( E2260PHU/E2260SHU/ E2460PW HU/E2460SW HU/E2460SHU/E2460PHU) Select input signal source. ( E960SRDA/ E960PRDA/ E960SRD/E2060SWDA/E2060PWDA/E2060SWD/ E2260SD/E2260SDA/ E2260PDA) Select input signal source.(E2060SW) Auto adjust the picture to exit. Reset...
... default. Input Select Auto / Analog / DVI / HDMI Input Select Auto / Analog / DVI Input Select Auto Config Off timer Image Ratio DDC-CI Reset Analog yes or no 0-24hrs wide or 4:3 yes or no yes or no Information Select input signal source. ( E2260PHU/E2260SHU/ E2460PW HU/E2460SW HU/E2460SHU/E2460PHU) Select input signal source. ( E960SRDA/ E960PRDA/ E960SRD/E2060SWDA/E2060PWDA/E2060SWD/ E2260SD/E2260SDA/ E2260PDA) Select input signal source.(E2060SW) Auto adjust the picture to exit. Reset...

User's Manual_E2060SWD
Page 34
... 'Start' button, point to 'Settings', and then click on 'Update Driver...' button, select the appropriate drive F: ( CD-ROM Drive) then click on 'Control Panel'. 3. Driver Monitor Driver Windows 2000 1. Select the 'Settings' tab then click on the 'Browse...' Please follow the steps given below. 6. Click on 'Advanced...'. 5. Select your monitor model and click on 'Have Disk...'. 8. Start Windows® Me 2. Select 'Display a list of all the drivers in a specific location...
... 'Start' button, point to 'Settings', and then click on 'Update Driver...' button, select the appropriate drive F: ( CD-ROM Drive) then click on 'Control Panel'. 3. Driver Monitor Driver Windows 2000 1. Select the 'Settings' tab then click on the 'Browse...' Please follow the steps given below. 6. Click on 'Advanced...'. 5. Select your monitor model and click on 'Have Disk...'. 8. Start Windows® Me 2. Select 'Display a list of all the drivers in a specific location...

User's Manual_E2060SWD
Page 36
If the 'Properties' button is inactive, it means your monitor is active, click on 'Update Driver...' Please follow the steps below. 7. Click on the 'Driver' tab and then click on 'Properties' button. Select 'Monitor' tab - button. 36 Please stop installation. - If the 'Properties' button is properly configured. 5. Select the 'Settings' tab then click on the 'Advanced' button. 6.
If the 'Properties' button is inactive, it means your monitor is active, click on 'Update Driver...' Please follow the steps below. 7. Click on the 'Driver' tab and then click on 'Properties' button. Select 'Monitor' tab - button. 36 Please stop installation. - If the 'Properties' button is properly configured. 5. Select the 'Settings' tab then click on the 'Advanced' button. 6.

User's Manual_E2060SWD
Page 39
... Drive). 8. Click "Update Driver..." in sequence. 39 button, then click on the 'Have disk...' Check the "Browse my computer for your monitor model and click on the following screens displayed in the "Driver" tab. 6. Click "Close" → "Close" → "OK" → "OK" on the 'Next' button. 9. 4. Click on the 'Browse...' is displayed, as is completed. If the message "Windows needs..." Click "Properties" in...
... Drive). 8. Click "Update Driver..." in sequence. 39 button, then click on the 'Have disk...' Check the "Browse my computer for your monitor model and click on the following screens displayed in the "Driver" tab. 6. Click "Close" → "Close" → "OK" → "OK" on the 'Next' button. 9. 4. Click on the 'Browse...' is displayed, as is completed. If the message "Windows needs..." Click "Properties" in...

User's Manual_E2060SWD
Page 44
Start Windows® 8 2. Open the "Update Driver Software-Generic PnP Monitor" window by AOC. Click the "OK" button. 13. The files will automatically select the maximum refresh rate and corresponding Color Matching Profiles. Windows 8 1. " and then click the "Browse my computer for the CD-ROM drive). 12. Select "Let me pick from the CD to your monitor display setting by " to adjust your hard disk drive. 14. Select the...
Start Windows® 8 2. Open the "Update Driver Software-Generic PnP Monitor" window by AOC. Click the "OK" button. 13. The files will automatically select the maximum refresh rate and corresponding Color Matching Profiles. Windows 8 1. " and then click the "Browse my computer for the CD-ROM drive). 12. Select "Let me pick from the CD to your monitor display setting by " to adjust your hard disk drive. 14. Select the...

User's Manual_E2060SWD
Page 46
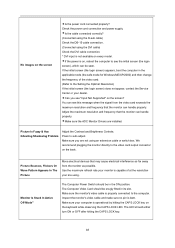
... sleep/stand-by AOC, Screen+ software is in minutes) for your preferences (see example below . Screen+ Welcome to "Screen+" software by mode. 4) The monitor will automatically shutdown 10 minutes after the screen saver appears. The example above illustrated: 1) The monitor will never shutdown when the PC is powered on "driver/e-Saver/setup.exe" to start installing the e-Saver software, follow the install wizard to a corresponding 46 Screen Saver); You only need...
... sleep/stand-by AOC, Screen+ software is in minutes) for your preferences (see example below . Screen+ Welcome to "Screen+" software by mode. 4) The monitor will automatically shutdown 10 minutes after the screen saver appears. The example above illustrated: 1) The monitor will never shutdown when the PC is powered on "driver/e-Saver/setup.exe" to start installing the e-Saver software, follow the install wizard to a corresponding 46 Screen Saver); You only need...
User's Manual_E2060SWD
Page 48
... screen Is the power cord connected properly? Is the cable connected correctly? (Connected using the D-sub cable) Check the DB-15 cable connection. (Connected using an extension cable or switch box. Adjust the maximum resolution and frequency that may cause electrical interference as far away from the video card exceeds the maximum resolution and frequency that the monitor can handle properly. The LED should be snugly fitted in the ON position. Make sure the AOC Monitor Drivers are not using the DVI cable) Check...
... screen Is the power cord connected properly? Is the cable connected correctly? (Connected using the D-sub cable) Check the DB-15 cable connection. (Connected using an extension cable or switch box. Adjust the maximum resolution and frequency that may cause electrical interference as far away from the video card exceeds the maximum resolution and frequency that the monitor can handle properly. The LED should be snugly fitted in the ON position. Make sure the AOC Monitor Drivers are not using the DVI cable) Check...

User's Manual_E2060SWD
Page 49
Press to the computer. Horizontal or vertical disturbances on the screen Use Windows 95/98/2000/ME/XP shut-down mode Adjust CLOCK and FOCUS. Make sure the monitor's video cable is not centered Adjust H-Position and V-Position or press hot-key (AUTO). or sized properly Picture has color defects (white does not look white) Adjust RGB color or select desired color temperature. Screen image is properly connected to auto-adjust. 49 Missing one of the primary colors (RED, GREEN, or BLUE) Inspect the monitor's video cable and make sure that no pin is damaged.
Press to the computer. Horizontal or vertical disturbances on the screen Use Windows 95/98/2000/ME/XP shut-down mode Adjust CLOCK and FOCUS. Make sure the monitor's video cable is not centered Adjust H-Position and V-Position or press hot-key (AUTO). or sized properly Picture has color defects (white does not look white) Adjust RGB color or select desired color temperature. Screen image is properly connected to auto-adjust. 49 Missing one of the primary colors (RED, GREEN, or BLUE) Inspect the monitor's video cable and make sure that no pin is damaged.

User's Manual_E2060SWD
Page 50
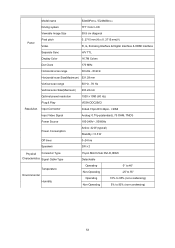
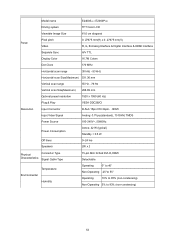
... range Horizontal scan Size(Maximum) Vertical scan range Vertical scan Size(Maximum) Optimal preset resolution Plug & Play Input Connector E960SRDA/ E960PRDA/ E960SRD TFT Color LCD 48.2cm diagonal 0.294mm(H)X0.294mm(V) R, G, B Analog lnterface & Digital Interface H/V TTL 16.7M Colors 108MHz 30 kHz - 83 kHz 376.32mm 50 Hz - 76 Hz 301.056mm 1280x 1024 (60 Hz) VESA DDC2B/CI D-Sub 15pin; Specification General Specification Panel Resolution Model name Driving system Viewable Image Size Pixel pitch Video Separate Sync. DVI 24pin Input Video Signal Power Source Power...
... range Horizontal scan Size(Maximum) Vertical scan range Vertical scan Size(Maximum) Optimal preset resolution Plug & Play Input Connector E960SRDA/ E960PRDA/ E960SRD TFT Color LCD 48.2cm diagonal 0.294mm(H)X0.294mm(V) R, G, B Analog lnterface & Digital Interface H/V TTL 16.7M Colors 108MHz 30 kHz - 83 kHz 376.32mm 50 Hz - 76 Hz 301.056mm 1280x 1024 (60 Hz) VESA DDC2B/CI D-Sub 15pin; Specification General Specification Panel Resolution Model name Driving system Viewable Image Size Pixel pitch Video Separate Sync. DVI 24pin Input Video Signal Power Source Power...
User's Manual_E2060SWD
Page 53
... TFT Color LCD Viewable Image Size 59.8 cm diagonal Panel Pixel pitch Video 0. 2715 mm(H) x 0. 2715 mm(V) R, G, B Analog lnterface & Digital Interface & HDMI lnterface Separate Sync H/V TTL Display Color 16.7M Colors Dot Clock 170 MHz Horizontal scan range 30 kHz - 83 kHz Horizontal scan Size(Maximum) 521.28 mm Vertical scan range 50 Hz - 76 Hz Vertical scan Size(Maximum) 293.22 mm Optimal preset resolution 1920 x 1080 (60 Hz) Plug & Play Resolution Input Connector VESA DDC2B/CI D-Sub 15pin DVI...
... TFT Color LCD Viewable Image Size 59.8 cm diagonal Panel Pixel pitch Video 0. 2715 mm(H) x 0. 2715 mm(V) R, G, B Analog lnterface & Digital Interface & HDMI lnterface Separate Sync H/V TTL Display Color 16.7M Colors Dot Clock 170 MHz Horizontal scan range 30 kHz - 83 kHz Horizontal scan Size(Maximum) 521.28 mm Vertical scan range 50 Hz - 76 Hz Vertical scan Size(Maximum) 293.22 mm Optimal preset resolution 1920 x 1080 (60 Hz) Plug & Play Resolution Input Connector VESA DDC2B/CI D-Sub 15pin DVI...
User's Manual_E2060SWD
Page 54
... TFT Color LCD Viewable Image Size 61.0 cm diagonal Panel Pixel pitch Video 0. 27675 mm(H) x 0. 27675 mm(V) R, G, B Analog lnterface & Digital Interface & HDMI lnterface Separate Sync H/V TTL Display Color 16.7M Colors Dot Clock 170 MHz Horizontal scan range 30 kHz - 83 kHz Horizontal scan Size(Maximum) 531.36 mm Vertical scan range 55 Hz - 76 Hz Vertical scan Size(Maximum) 298.89 mm Optimal preset resolution 1920 x 1080 (60 Hz) Resolution Plug & Play Input Connector VESA DDC2B/CI D-Sub 15pin DVI...
... TFT Color LCD Viewable Image Size 61.0 cm diagonal Panel Pixel pitch Video 0. 27675 mm(H) x 0. 27675 mm(V) R, G, B Analog lnterface & Digital Interface & HDMI lnterface Separate Sync H/V TTL Display Color 16.7M Colors Dot Clock 170 MHz Horizontal scan range 30 kHz - 83 kHz Horizontal scan Size(Maximum) 531.36 mm Vertical scan range 55 Hz - 76 Hz Vertical scan Size(Maximum) 298.89 mm Optimal preset resolution 1920 x 1080 (60 Hz) Resolution Plug & Play Input Connector VESA DDC2B/CI D-Sub 15pin DVI...

User's Manual_E2060SWD
Page 59
...; TMDS data 5+ TMDS Clock Shield TMDS Clock + TMDS Clock - 59 Pin Assignments Pin Number 1 2 3 s 5 6 7 8 9 10 11 12 13 14 15 15-Pin Side of the Signal Cable Video-Red Video-Green Video-Blue N.C. DDC-Serial data H-sync V-sync DDC-Serial clock Pin Number 1 2 3 4 5 6 7 8 9 10 11 12 24-Pin Color Display Signal Cable TMDS data 2- TMDS data 2+ TMDS data 2/4 Shield TMDS data 4- TMDS data...
...; TMDS data 5+ TMDS Clock Shield TMDS Clock + TMDS Clock - 59 Pin Assignments Pin Number 1 2 3 s 5 6 7 8 9 10 11 12 13 14 15 15-Pin Side of the Signal Cable Video-Red Video-Green Video-Blue N.C. DDC-Serial data H-sync V-sync DDC-Serial clock Pin Number 1 2 3 4 5 6 7 8 9 10 11 12 24-Pin Color Display Signal Cable TMDS data 2- TMDS data 2+ TMDS data 2/4 Shield TMDS data 4- TMDS data...

User's Manual_E2060SWD
Page 65
...monitor well enough during transport due to the service and support section on the product. AOC International (Europe) B.V. is not responsible for collection when the currier attends, you will , at its option, either repair the defective product with new or rebuilt parts, or replace... other than ordinary commercial or industrial application Adjustment by non-authorized source Repair, modification, or installation of product across international borders. will be free from defects in a proper carton box (AOC prefers the original carton box to protects your local ...
...monitor well enough during transport due to the service and support section on the product. AOC International (Europe) B.V. is not responsible for collection when the currier attends, you will , at its option, either repair the defective product with new or rebuilt parts, or replace... other than ordinary commercial or industrial application Adjustment by non-authorized source Repair, modification, or installation of product across international borders. will be free from defects in a proper carton box (AOC prefers the original carton box to protects your local ...
Data Sheet_e2060Swda
Page 2
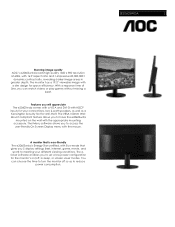
... your connections, two 2-watt speakers, as well as to set a low power configuration for the monitor's on the wall with the mouse. With a response time of 5ms, you to access the user-friendly On Screen Display menu with the appropriate mounting accessory. Features you to have the e2060Swda mounted on /off so as a Kensington Security Slot for your different viewing conditions. E2060SWDA Stunning image quality AOC's e2060Swda boasts...
... your connections, two 2-watt speakers, as well as to set a low power configuration for the monitor's on the wall with the mouse. With a response time of 5ms, you to access the user-friendly On Screen Display menu with the appropriate mounting accessory. Features you to have the e2060Swda mounted on /off so as a Kensington Security Slot for your different viewing conditions. E2060SWDA Stunning image quality AOC's e2060Swda boasts...


