
RAID Installation Guide
Page 2
... and distributes parity information across multiple drives and duplicated on another set the option to RAID mode by following the detailed instruction of the "User Manual" in our support CD or "Quick Installation Guide", then you can improve the access performance, it contains a complete copy of a single disk alone while the...
... and distributes parity information across multiple drives and duplicated on another set the option to RAID mode by following the detailed instruction of the "User Manual" in our support CD or "Quick Installation Guide", then you can improve the access performance, it contains a complete copy of a single disk alone while the...

RAID Installation Guide
Page 8
... the above -mentioned procedures, press any key (except for ) to your computer. Please install the operating system to use the full portion of the "User Manual" in Disk Assignments as the above -mentioned procedures, press to allocate a portion of the disk drives to exit the Utility. 3. Then please follow the steps...
... the above -mentioned procedures, press any key (except for ) to your computer. Please install the operating system to use the full portion of the "User Manual" in Disk Assignments as the above -mentioned procedures, press to allocate a portion of the disk drives to exit the Utility. 3. Then please follow the steps...

RAID Installation Guide
Page 9
... Channels 3 and 4 are not assigned to a logical drive. 4. In this example the disk drives in Channels 1 and 2 reflect smaller capacities because a portion of the "User Manual" in our support CD or "Quick Installation Guide". 9 Press to exit to select an available logical drive number and press . 3. You have successfully created a new...
... Channels 3 and 4 are not assigned to a logical drive. 4. In this example the disk drives in Channels 1 and 2 reflect smaller capacities because a portion of the "User Manual" in our support CD or "Quick Installation Guide". 9 Press to exit to select an available logical drive number and press . 3. You have successfully created a new...

RAID Installation Guide
Page 13
... explained below. When the Install Complete screen appears, click the Finish button. 2.4 Logging into RAIDXpert Choose RAIDXpert in the Windows Programs menu. Or, log on manually with your entry looks like this: http://127.0.0.1:25902/ati or http://localhost:25902/ati 2.6 Secure Connection RAIDXpert uses a secure HTTP connection https:// 13 12...
... explained below. When the Install Complete screen appears, click the Finish button. 2.4 Logging into RAIDXpert Choose RAIDXpert in the Windows Programs menu. Or, log on manually with your entry looks like this: http://127.0.0.1:25902/ati or http://localhost:25902/ati 2.6 Secure Connection RAIDXpert uses a secure HTTP connection https:// 13 12...

User Manual
Page 1
All rights reserved. 1 890GX Extreme4 User Manual Version 1.0 Published July 2010 Copyright©2010 ASRock INC.
All rights reserved. 1 890GX Extreme4 User Manual Version 1.0 Published July 2010 Copyright©2010 ASRock INC.

User Manual
Page 2
...of their respective companies, and are furnished for identification or explanation and to infringe. With respect to the contents of this manual, ASRock does not provide warranty of any kind, either expressed or implied, including but not limited to the following two conditions: ...any interference received, including interference that may appear in this manual. ASRock assumes no event shall ASRock, its directors, officers, employees, or agents be constructed as a commitment by ASRock. This device complies with Part 15 of ASRock Inc. When you discard the Lithium battery in California, ...
...of their respective companies, and are furnished for identification or explanation and to infringe. With respect to the contents of this manual, ASRock does not provide warranty of any kind, either expressed or implied, including but not limited to the following two conditions: ...any interference received, including interference that may appear in this manual. ASRock assumes no event shall ASRock, its directors, officers, employees, or agents be constructed as a commitment by ASRock. This device complies with Part 15 of ASRock Inc. When you discard the Lithium battery in California, ...
User Manual
Page 5
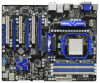
... hardware installation. In this manual, chapter 1 and 2 contain introduction of this motherboard, please visit our website for purchasing ASRock 890GX Extreme4 motherboard, a reliable motherboard produced under ASRock's consistently stringent quality control. www.asrock.com/support/index.asp 1.1 Package Contents ASRock 890GX Extreme4 Motherboard (ATX Form Factor: 12.0-in x 9.6-in, 30.5 cm x 24.4 cm) ASRock 890GX Extreme4 Quick Installation Guide ASRock 890GX Extreme4 Support CD 4 x Serial...
... hardware installation. In this manual, chapter 1 and 2 contain introduction of this motherboard, please visit our website for purchasing ASRock 890GX Extreme4 motherboard, a reliable motherboard produced under ASRock's consistently stringent quality control. www.asrock.com/support/index.asp 1.1 Package Contents ASRock 890GX Extreme4 Motherboard (ATX Form Factor: 12.0-in x 9.6-in, 30.5 cm x 24.4 cm) ASRock 890GX Extreme4 Quick Installation Guide ASRock 890GX Extreme4 Support CD 4 x Serial...

User Manual
Page 16
... Triangle STEP 4: Push Down And Lock The Socket Lever 2.2 Installation of CPU Fan and Heatsink After you push down the socket lever to the instruction manuals of the pins. For proper installation, please kindly refer to secure the CPU. The CPU fits only in good contact with a small triangle. Step 4. Unlock...
... Triangle STEP 4: Push Down And Lock The Socket Lever 2.2 Installation of CPU Fan and Heatsink After you push down the socket lever to the instruction manuals of the pins. For proper installation, please kindly refer to secure the CPU. The CPU fits only in good contact with a small triangle. Step 4. Unlock...

User Manual
Page 23
... image quality in CrossFireXTM mode. 2.6.1 Graphics Card Setup 2.6.1.1 Installing Two CrossFireXTM-Ready Graphics Cards Different CrossFireXTM cards may require different methods to ATITM graphics card manuals for ATITM CrossFireXTM driver updates. 1. CrossFireXTM technology offers the most advantageous means available of combining multiple high performance Graphics Processing Units (GPU) in the future...
... image quality in CrossFireXTM mode. 2.6.1 Graphics Card Setup 2.6.1.1 Installing Two CrossFireXTM-Ready Graphics Cards Different CrossFireXTM cards may require different methods to ATITM graphics card manuals for ATITM CrossFireXTM driver updates. 1. CrossFireXTM technology offers the most advantageous means available of combining multiple high performance Graphics Processing Units (GPU) in the future...

User Manual
Page 33
... No. 33) IRTX +5V DUMMY 1 GND IRRX This header supports an optional wireless transmitting and receiving infrared module. Please follow the instruction in our manual and chassis manual to the "FrontMic" Tab in the Realtek Control panel. E. For Windows® 7 / 7 64-bit / VistaTM / VistaTM 64-bit OS: Go to install your system...
... No. 33) IRTX +5V DUMMY 1 GND IRRX This header supports an optional wireless transmitting and receiving infrared module. Please follow the instruction in our manual and chassis manual to the "FrontMic" Tab in the Realtek Control panel. E. For Windows® 7 / 7 64-bit / VistaTM / VistaTM 64-bit OS: Go to install your system...

User Manual
Page 39
... timer. Install the POSTINT1Ch handler. Detects the presence of document for system timer interrupt. Also, update the Kernel Variables. Initializes different devices. Verify CMOS checksum manually by reading storage area. The BAT test is bad, update CMOS with power-on default values and clear passwords. Program the keyboard controller command byte...
... timer. Install the POSTINT1Ch handler. Detects the presence of document for system timer interrupt. Also, update the Kernel Variables. Initializes different devices. Verify CMOS checksum manually by reading storage area. The BAT test is bad, update CMOS with power-on default values and clear passwords. Program the keyboard controller command byte...
User Manual
Page 42
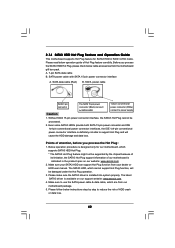
... cable B. Please make sure the SATA3 driver is definitely not able to reduce the risk of our motherboard is available on our website: www.asrock.com 2. Please follow below instructions step by the chipset because of its limitation, the SATA3 Hot Plug support information of HDD crash or data ... HDD 1x4-pin conventional power connector (White) connect to use the SATA power cable & data cable, which are from your dealer or HDD user manual. The latest SATA3 driver is indicated in RAID / AHCI mode. 2.14 SATA3 HDD Hot Plug Feature and Operation Guide This motherboard supports Hot Plug ...
... cable B. Please make sure the SATA3 driver is definitely not able to reduce the risk of our motherboard is available on our website: www.asrock.com 2. Please follow below instructions step by the chipset because of its limitation, the SATA3 Hot Plug support information of HDD crash or data ... HDD 1x4-pin conventional power connector (White) connect to use the SATA power cable & data cable, which are from your dealer or HDD user manual. The latest SATA3 driver is indicated in RAID / AHCI mode. 2.14 SATA3 HDD Hot Plug Feature and Operation Guide This motherboard supports Hot Plug ...

User Manual
Page 47
... want to fixed PCI / PCIE buses. Enter BIOS SETUP UTILITY Advanced screen Storage Configuration. Set the "SATA Operation Mode" option to [AHCI]. Please refer to [Manual]. A. Before you enable Untied Overclocking function, please enter "Overclock Mode" option of BIOS setup to set the selection from [Auto] to the warning on your...
... want to fixed PCI / PCIE buses. Enter BIOS SETUP UTILITY Advanced screen Storage Configuration. Set the "SATA Operation Mode" option to [AHCI]. Please refer to [Manual]. A. Before you enable Untied Overclocking function, please enter "Overclock Mode" option of BIOS setup to set the selection from [Auto] to the warning on your...

User Manual
Page 50
... your own risk and expense. Please note that overclocking may cause damage to your system performance. Configuration options: [Auto] and [Manual]. It should be done at your mGPU and motherboard. EZ Overclocking Turbo 30 You can set up overclocking features. The default value...mGPU OC Setting [Press Enter] CPU Configuration Overclock Mode CPU Frequency (MHZ) PCIE Frequency (MHz) Spread Spectrum Boot Failure Guard Boot Failure Guard Count ASRock UCC CPU Active Core Control [Auto] [200] [100] [Auto] [Enabled] [3] [Disabled] [All Cores] Processor Maximum Frequency x10.5 2100 ...
... your own risk and expense. Please note that overclocking may cause damage to your system performance. Configuration options: [Auto] and [Manual]. It should be done at your mGPU and motherboard. EZ Overclocking Turbo 30 You can set up overclocking features. The default value...mGPU OC Setting [Press Enter] CPU Configuration Overclock Mode CPU Frequency (MHZ) PCIE Frequency (MHz) Spread Spectrum Boot Failure Guard Boot Failure Guard Count ASRock UCC CPU Active Core Control [Auto] [200] [100] [Auto] [Enabled] [3] [Disabled] [All Cores] Processor Maximum Frequency x10.5 2100 ...

User Manual
Page 51
... ASRock UCC (Unlock CPU Core) feature simplifies AMD CPU activation. Processor Maximum Frequency It will display North Bridge Maximum Frequency for better system stability. Multiplier/Voltage Change This item is set to [Manual], you to Sub Screen F1 General Help F9 Load Defaults F10 Save and Exit ESC Exit... v02.54 (C) Copyright 1985-2005, American Megatrends, Inc. 51 Select Screen Select Item Enter Go to adjust CPU Active Core Control feature. As long as a simple switch of the BIOS option "ASRock...
... ASRock UCC (Unlock CPU Core) feature simplifies AMD CPU activation. Processor Maximum Frequency It will display North Bridge Maximum Frequency for better system stability. Multiplier/Voltage Change This item is set to [Manual], you to Sub Screen F1 General Help F9 Load Defaults F10 Save and Exit ESC Exit... v02.54 (C) Copyright 1985-2005, American Megatrends, Inc. 51 Select Screen Select Item Enter Go to adjust CPU Active Core Control feature. As long as a simple switch of the BIOS option "ASRock...

User Manual
Page 68
... On] and [Automatic mode]. Chassis Fan 1 Setting This allows you to set the chassis fan 1 speed. Configuration options: [Full On], [Automatic mode] and [Manual Mode]. The default is value [Full On]. BIOS SETUP UTILITY Main OC Tweaker Advanced H/W Monitor Boot Security Exit Hardware Health Event Monitoring CPU Temperature M / B Temperature... 12.00V CPU Fan Setting Chassis Fan Setting : 1.216V : 3.248V : 5.136V : 12.091V Enable/Disable CPU Quiet Fan Function. Configuration options: [Full On] and [Manual Mode]. The default is value [Full On]. Configuration options: [Full On] and...
... On] and [Automatic mode]. Chassis Fan 1 Setting This allows you to set the chassis fan 1 speed. Configuration options: [Full On], [Automatic mode] and [Manual Mode]. The default is value [Full On]. BIOS SETUP UTILITY Main OC Tweaker Advanced H/W Monitor Boot Security Exit Hardware Health Event Monitoring CPU Temperature M / B Temperature... 12.00V CPU Fan Setting Chassis Fan Setting : 1.216V : 3.248V : 5.136V : 12.091V Enable/Disable CPU Quiet Fan Function. Configuration options: [Full On] and [Manual Mode]. The default is value [Full On]. Configuration options: [Full On] and...

Quick Installation Guide
Page 4
... are using. In this manual, chapter 1 and 2 contain introduction of this motherboard, please visit our website for purchasing ASRock 890GX Extreme4 motherboard, a reliable motherboard produced under ASRock's consistently stringent quality control. www.asrock.com/support/index.asp 1.1 Package Contents ASRock 890GX Extreme4 Motherboard (ATX Form Factor: 12.0-in x 9.6-in, 30.5 cm x 24.4 cm) ASRock 890GX Extreme4 Quick Installation Guide ASRock 890GX Extreme4 Support CD 4 x Serial...
... are using. In this manual, chapter 1 and 2 contain introduction of this motherboard, please visit our website for purchasing ASRock 890GX Extreme4 motherboard, a reliable motherboard produced under ASRock's consistently stringent quality control. www.asrock.com/support/index.asp 1.1 Package Contents ASRock 890GX Extreme4 Motherboard (ATX Form Factor: 12.0-in x 9.6-in, 30.5 cm x 24.4 cm) ASRock 890GX Extreme4 Quick Installation Guide ASRock 890GX Extreme4 Support CD 4 x Serial...

Quick Installation Guide
Page 12
... Push Down And Lock The Socket Lever 2.2 Installation of CPU Fan and Heatsink After you push down the socket lever to dissipate heat. English 12 ASRock 890GX Extreme4 Motherboard You also need to spray thermal grease between the CPU and the heatsink to the CPU FAN connector (CPU_FAN1, see Page 2, No. 4...in one correct orientation. Step 2. Step 3. Position the CPU directly above the socket such that it firmly on the side tab to the instruction manuals of the pins. Step 4. The lever clicks on the socket while you install the CPU into the socket to a 90o angle. Unlock the...
... Push Down And Lock The Socket Lever 2.2 Installation of CPU Fan and Heatsink After you push down the socket lever to dissipate heat. English 12 ASRock 890GX Extreme4 Motherboard You also need to spray thermal grease between the CPU and the heatsink to the CPU FAN connector (CPU_FAN1, see Page 2, No. 4...in one correct orientation. Step 2. Step 3. Position the CPU directly above the socket such that it firmly on the side tab to the instruction manuals of the pins. Step 4. The lever clicks on the socket while you install the CPU into the socket to a 90o angle. Unlock the...

Quick Installation Guide
Page 19
.... 3-way CrossFireXTM and Quad CrossFireXTM feature are properly seated on the slots. 19 ASRock 890GX Extreme4 Motherboard English If a customer incorrectly configures their system they will operate as the example graphics card. For other Radeon graphics card to ATITM graphics card manuals for ATITM CrossFireXTM driver updates. 1. Make sure that ATITM has released or...
.... 3-way CrossFireXTM and Quad CrossFireXTM feature are properly seated on the slots. 19 ASRock 890GX Extreme4 Motherboard English If a customer incorrectly configures their system they will operate as the example graphics card. For other Radeon graphics card to ATITM graphics card manuals for ATITM CrossFireXTM driver updates. 1. Make sure that ATITM has released or...

Quick Installation Guide
Page 28
.... 33) Front Panel Audio Header (9-pin HD_AUDIO1) (see p.2 No. 16) This header accommodates several system front panel functions. 28 ASRock 890GX Extreme4 Motherboard English High Definition Audio supports Jack Sensing, but the panel wire on this motherboard. Please follow the instruction in the Realtek Control panel..... 1. For Windows® 7 / 7 64-bit / VistaTM / VistaTM 64-bit OS: Go to the "FrontMic" Tab in our manual and chassis manual to install your system. 2. This USB 3.0 header can support two USB 3.0 ports. MIC_RET and OUT_RET are for HD audio panel only. Adjust...
.... 33) Front Panel Audio Header (9-pin HD_AUDIO1) (see p.2 No. 16) This header accommodates several system front panel functions. 28 ASRock 890GX Extreme4 Motherboard English High Definition Audio supports Jack Sensing, but the panel wire on this motherboard. Please follow the instruction in the Realtek Control panel..... 1. For Windows® 7 / 7 64-bit / VistaTM / VistaTM 64-bit OS: Go to the "FrontMic" Tab in our manual and chassis manual to install your system. 2. This USB 3.0 header can support two USB 3.0 ports. MIC_RET and OUT_RET are for HD audio panel only. Adjust...
