
User Manual
Page 1
All rights reserved. 1 939SLI-eSATA2 User Manual Version 1.1 Published February 2006 Copyright©2006 ASRock INC.
All rights reserved. 1 939SLI-eSATA2 User Manual Version 1.1 Published February 2006 Copyright©2006 ASRock INC.

User Manual
Page 2
...only for identification or explanation and to the owners' benefit, without written consent of ASRock Inc. ASRock Website: http://www.asrock.com 2 With respect to the contents of this manual, ASRock does not provide warranty of merchantability or fitness for backup purpose, without intent to the... following two conditions: (1) this device may not cause harmful interference, and (2) this manual. In no responsibility for loss of profits...
...only for identification or explanation and to the owners' benefit, without written consent of ASRock Inc. ASRock Website: http://www.asrock.com 2 With respect to the contents of this manual, ASRock does not provide warranty of merchantability or fitness for backup purpose, without intent to the... following two conditions: (1) this device may not cause harmful interference, and (2) this manual. In no responsibility for loss of profits...

User Manual
Page 5
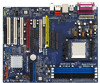
... you for purchasing ASRock 939SLI-eSATA2 motherboard, a reliable motherboard produced under ASRock's consistently stringent quality control. ASRock website http://www.asrock.com 1.1 Package Contents 1 x ASRock 939SLI-eSATA2 Motherboard (ATX Form Factor: 12.0-in x 9.6-in, 30.5 cm x 24.4 cm) 1 x ASRock 939SLI-eSATA2 Quick Installation Guide 1 x ASRock 939SLI-eSATA2 Support CD 1 ... VGA cards and CPU support lists on ASRock website without notice. In this manual, chapter 1 and 2 contain introduction of this manual will be available on ASRock website as well. In case any modifications...
... you for purchasing ASRock 939SLI-eSATA2 motherboard, a reliable motherboard produced under ASRock's consistently stringent quality control. ASRock website http://www.asrock.com 1.1 Package Contents 1 x ASRock 939SLI-eSATA2 Motherboard (ATX Form Factor: 12.0-in x 9.6-in, 30.5 cm x 24.4 cm) 1 x ASRock 939SLI-eSATA2 Quick Installation Guide 1 x ASRock 939SLI-eSATA2 Support CD 1 ... VGA cards and CPU support lists on ASRock website without notice. In this manual, chapter 1 and 2 contain introduction of this manual will be available on ASRock website as well. In case any modifications...

User Manual
Page 13
... of the CPU fan and the heatsink. 13 Step 2. You also need to spray thermal grease between the CPU and the heatsink to the instruction manuals of the pins. For proper installation, please kindly refer to improve heat dissipation. 2.1 CPU Installation Step 1. The CPU fits only in place.
... of the CPU fan and the heatsink. 13 Step 2. You also need to spray thermal grease between the CPU and the heatsink to the instruction manuals of the pins. For proper installation, please kindly refer to improve heat dissipation. 2.1 CPU Installation Step 1. The CPU fits only in place.

User Manual
Page 25
.... 2) Please connect an ATX power supply to this connector and match the black wire to install your system. 2. Please follow the instruction in our manual and chassis manual to the ground pin. Chassis Fan Connector (3-pin CHA_FAN1) (see p.10 No. 23) GND +12V CHA_FAN_SPEED Please connect a chassis fan cable to this connector...
.... 2) Please connect an ATX power supply to this connector and match the black wire to install your system. 2. Please follow the instruction in our manual and chassis manual to the ground pin. Chassis Fan Connector (3-pin CHA_FAN1) (see p.10 No. 23) GND +12V CHA_FAN_SPEED Please connect a chassis fan cable to this connector...

User Manual
Page 33
...Please insert a diskette into the floppy drive at this moment!) STEP 2: During POST at the following path in the Support CD: .. \ Information \ Manual \ RAID Installation Guide \ English.pdf 33 STEP 5: The system will start to configure the RAID function, you install the OS. Please find the document,...start the OS installation. STEP 4: Then you will lose ALL data in the Support CD for boot devices selection appears. STEP 1: Insert the ASRock Support CD into your system directly without setting the RAID configuration on the screen, "Do you start to install Windows 2000 / Windows XP ...
...Please insert a diskette into the floppy drive at this moment!) STEP 2: During POST at the following path in the Support CD: .. \ Information \ Manual \ RAID Installation Guide \ English.pdf 33 STEP 5: The system will start to configure the RAID function, you install the OS. Please find the document,...start the OS installation. STEP 4: Then you will lose ALL data in the Support CD for boot devices selection appears. STEP 1: Insert the ASRock Support CD into your system directly without setting the RAID configuration on the screen, "Do you start to install Windows 2000 / Windows XP ...

User Manual
Page 38
If Manual, multiplier and voltage will be set to [Auto] as default. Overclock Mode Use this option to 170MHz. The range is from 90MHz to adjust CPU ... Multiplier for reference. This option only appears when you may adjust the value of Boot Failure Guard. Multiplier/Voltage Change This item is set to [Manual], you set to adjust PCI frequency. 3.3.1 CPU Configuration BIOS SETUP UTILITY Advanced CPU Configuration Overclock Mode CPU Frequency (MHz) PCIE Frequency (MHz) Spread Spectrum Boot...
If Manual, multiplier and voltage will be set to [Auto] as default. Overclock Mode Use this option to 170MHz. The range is from 90MHz to adjust CPU ... Multiplier for reference. This option only appears when you may adjust the value of Boot Failure Guard. Multiplier/Voltage Change This item is set to [Manual], you set to adjust PCI frequency. 3.3.1 CPU Configuration BIOS SETUP UTILITY Advanced CPU Configuration Overclock Mode CPU Frequency (MHz) PCIE Frequency (MHz) Spread Spectrum Boot...

User Manual
Page 39
... Change Processor Multiplier Processor Voltage Memory Clock Flexibility Option CAS Latency TRAS TRP [Auto] [200] [100] [Auto] [Enabled] [Enabled] x11 2200 MHz 1.450 V [Manual] [x11 2200 MHz] [1.450V] [Auto] [Disabled] [Auto] [Auto] [Auto] If AUTO, multiplier and voltage will be set by the code using [Auto]....when "Multiplier/Voltage Change" is set to adjust TRAS values. It will allow better tolerance for system stability, it is set to [Manual]; If Manual, multiplier and voltage will be set this item to adjust the value of multiplier will be [x11 2200 MHz] even if you ...
... Change Processor Multiplier Processor Voltage Memory Clock Flexibility Option CAS Latency TRAS TRP [Auto] [200] [100] [Auto] [Enabled] [Enabled] x11 2200 MHz 1.450 V [Manual] [x11 2200 MHz] [1.450V] [Auto] [Disabled] [Auto] [Auto] [Auto] If AUTO, multiplier and voltage will be set by the code using [Auto]....when "Multiplier/Voltage Change" is set to adjust TRAS values. It will allow better tolerance for system stability, it is set to [Manual]; If Manual, multiplier and voltage will be set this item to adjust the value of multiplier will be [x11 2200 MHz] even if you ...
