
User Manual
Page 4
3.3.8 USB Configuration 48 3.4 Hardware Health Event Monitoring Screen 48 3.5 Boot Screen 49 3.5.1 Boot Settings Configuration 49 3.6 Security Screen 50 3.7 Exit Screen 51 4 . Software Support 52 4.1 Install Operating System 52 4.2 Support CD Information 52 4.2.1 Running Support CD 52 4.2.2 Drivers Menu 52 4.2.3 Utilities Menu 52 4.2.4 Contact Information 52 APPENDIX: AMD's Cool 'n' QuietTM Technology ...... 53 4
3.3.8 USB Configuration 48 3.4 Hardware Health Event Monitoring Screen 48 3.5 Boot Screen 49 3.5.1 Boot Settings Configuration 49 3.6 Security Screen 50 3.7 Exit Screen 51 4 . Software Support 52 4.1 Install Operating System 52 4.2 Support CD Information 52 4.2.1 Running Support CD 52 4.2.2 Drivers Menu 52 4.2.3 Utilities Menu 52 4.2.4 Contact Information 52 APPENDIX: AMD's Cool 'n' QuietTM Technology ...... 53 4
User Manual
Page 7
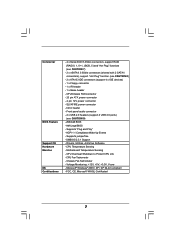
CPU/Chassis FAN connector - 20 pin ATX power connector - 4 pin 12V power connector - CD in header - Drivers, Utilities, AntiVirus Software - CPU Fan Tachometer - Voltage Monitoring: +12V, +5V, +3.3V, Vcore - FCC, CE, Microsoft® WHQL Certificated 7 Supports "Plug and Play" - SMBIOS 2.3.1 Support - SLI/...
CPU/Chassis FAN connector - 20 pin ATX power connector - 4 pin 12V power connector - CD in header - Drivers, Utilities, AntiVirus Software - CPU Fan Tachometer - Voltage Monitoring: +12V, +5V, +3.3V, Vcore - FCC, CE, Microsoft® WHQL Certificated 7 Supports "Plug and Play" - SMBIOS 2.3.1 Support - SLI/...
User Manual
Page 19
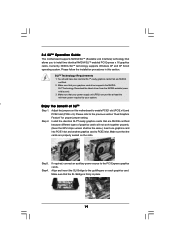
Adjust the jumpers on this section. Step4. Download the latest driver from the NVIDIA website (www. Install the identical SLITM-ready graphics cards that are NVIDIA certified. 2. Make sure that the SLI Bridge is firmly in ... of SLITM Step 1. nvidia.com). 3. Make sure that your power supply unit (PSU) can provide at least the minimum power required by your graphics card driver supports the NVIDIA SLITM technology. SLITM Technology Requirements 1. Currently, NVIDIA SLITM technology supports Windows XP and XP 64-bit operating system. 2.6 SLITM Operation Guide This...
Adjust the jumpers on this section. Step4. Download the latest driver from the NVIDIA website (www. Install the identical SLITM-ready graphics cards that are NVIDIA certified. 2. Make sure that the SLI Bridge is firmly in ... of SLITM Step 1. nvidia.com). 3. Make sure that your power supply unit (PSU) can provide at least the minimum power required by your graphics card driver supports the NVIDIA SLITM technology. SLITM Technology Requirements 1. Currently, NVIDIA SLITM technology supports Windows XP and XP 64-bit operating system. 2.6 SLITM Operation Guide This...
User Manual
Page 20
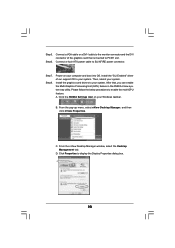
... cable or a DVI-I cable to the monitor connector and the DVI connector of our support CD to SLI/XFIRE power connector. Install the graphics card drivers to PCIE1 slot. A. Click the NVIDIA Settings icon on your system. B. From the pop-up menu, select nView Desktop Manager, and then click...the Display Properties dialog box. 20 Connect a 4-pin ATX power cable to your computer and boot into OS. Step8. Install the "SLI Enabled" driver of the graphics card that , you can enable the Multi-Graphics Processing Unit (GPU) feature in the NVIDIA nView system tray utility. Power on your...
... cable or a DVI-I cable to the monitor connector and the DVI connector of our support CD to SLI/XFIRE power connector. Install the graphics card drivers to PCIE1 slot. A. Click the NVIDIA Settings icon on your system. B. From the pop-up menu, select nView Desktop Manager, and then click...the Display Properties dialog box. 20 Connect a 4-pin ATX power cable to your computer and boot into OS. Step8. Install the "SLI Enabled" driver of the graphics card that , you can enable the Multi-Graphics Processing Unit (GPU) feature in the NVIDIA nView system tray utility. Power on your...
User Manual
Page 32
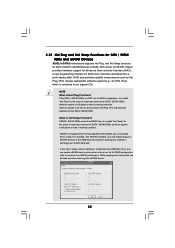
...been installed into the SATA / SATAII HDD. 2.12 Hot Plug and Hot Swap Functions for SATA / SATAII HDDs and eSATAII Devices 939SLI-eSATA2 motherboard supports Hot Plug and Hot Swap functions for SATA host controllers developed thru a joint industry effort. NOTE What is Hot Swap ...Interface (AHCI), a new programming interface for SATA / SATAII / eSATAII Devices in working condition. AHCI requires appropriate software support (e.g., an AHCI driver, which is equipped with eSATAII interface, you can be flush out when removing the eSATAII device. 32 If you obey "safely remove hardware"...
...been installed into the SATA / SATAII HDD. 2.12 Hot Plug and Hot Swap Functions for SATA / SATAII HDDs and eSATAII Devices 939SLI-eSATA2 motherboard supports Hot Plug and Hot Swap functions for SATA host controllers developed thru a joint industry effort. NOTE What is Hot Swap ...Interface (AHCI), a new programming interface for SATA / SATAII / eSATAII Devices in working condition. AHCI requires appropriate software support (e.g., an AHCI driver, which is equipped with eSATAII interface, you can be flush out when removing the eSATAII device. 32 If you obey "safely remove hardware"...

User Manual
Page 33
... at the following path in it! Before you start to configure the RAID function, you need to make a SATA / SATAII driver diskette before you install the OS. STEP 1: Insert the ASRock Support CD into your optical drive to boot your system. (Do NOT insert any floppy diskette into the floppy drive. WARNING...
... at the following path in it! Before you start to configure the RAID function, you need to make a SATA / SATAII driver diskette before you install the OS. STEP 1: Insert the ASRock Support CD into your optical drive to boot your system. (Do NOT insert any floppy diskette into the floppy drive. WARNING...
User Manual
Page 34
..., CPU FSB is untied during overclocking, FSB enjoys better margin due to fixed PCI / PCIE buses. For users who plan to [AHCI]. 2. B. Make a SATA / SATAII driver diskette by following the proper steps of BIOS setup to set the option from [RAID] to install Windows 2000, Windows XP, or Windows XP 64...
..., CPU FSB is untied during overclocking, FSB enjoys better margin due to fixed PCI / PCIE buses. For users who plan to [AHCI]. 2. B. Make a SATA / SATAII driver diskette by following the proper steps of BIOS setup to set the option from [RAID] to install Windows 2000, Windows XP, or Windows XP 64...
User Manual
Page 52
...EXE" from the BIN folder in the Support CD to display the menus. 4.2.2 Drivers Menu The Drivers Menu shows the available devices drivers including ASRock Express GbL PCI Express LAN card driver if the system detects the installed devices. Because motherboard settings and hardware options vary...in this chapter for more about ASRock, welcome to know more information. 4.2 Support CD Information The Support CD that came with the motherboard contains necessary drivers and useful utilities that the motherboard supports. Please install the necessary drivers to activate the devices. 4.2.3 ...
...EXE" from the BIN folder in the Support CD to display the menus. 4.2.2 Drivers Menu The Drivers Menu shows the available devices drivers including ASRock Express GbL PCI Express LAN card driver if the system detects the installed devices. Because motherboard settings and hardware options vary...in this chapter for more about ASRock, welcome to know more information. 4.2 Support CD Information The Support CD that came with the motherboard contains necessary drivers and useful utilities that the motherboard supports. Please install the necessary drivers to activate the devices. 4.2.3 ...
User Manual
Page 53
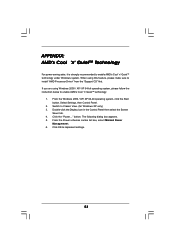
...'s Cool 'n' QuietTM technology: 1. Select Settings, then Control Panel. 2. From the Power schemes combo list box, select Minimal Power Management. 6. Click OK to install "AMD Processor Driver" from the "Support CD" first. If you are using this feature, please make sure to implement settings. 53 Click the "Power..." The following dialog box...
...'s Cool 'n' QuietTM technology: 1. Select Settings, then Control Panel. 2. From the Power schemes combo list box, select Minimal Power Management. 6. Click OK to install "AMD Processor Driver" from the "Support CD" first. If you are using this feature, please make sure to implement settings. 53 Click the "Power..." The following dialog box...


