
Intel Rapid Storage Guide
Page 1
... Technology, setting up data protection can be accessed on each drive simultaneously, speeding up response time on one or more than one or multiple hard drives, users can take advantage of faster boot times and data reads. By combining from two to six drives in the event of a hard drive failure. Also, due to drive load balancing, even systems with an external drive. AHCI also delivers longer battery...
... Technology, setting up data protection can be accessed on each drive simultaneously, speeding up response time on one or more than one or multiple hard drives, users can take advantage of faster boot times and data reads. By combining from two to six drives in the event of a hard drive failure. Also, due to drive load balancing, even systems with an external drive. AHCI also delivers longer battery...

Intel Rapid Storage Guide
Page 12
... the Storage Configuration menu. 4. Unless you have selected RAID 1, use the up or down arrow keys to select the RAID level and press Enter. 4. Select 1: Create RAID Volume and press Enter. 3. Press Enter to enable RAID in the system BIOS. 1. Enable RAID in System BIOS Use the instructions included with your motherboard to select the physical disks. 6. Switch the SATA Operation Mode option to enter the BIOS Setup program after the Power-On-Self-Test (POST) memory test begins. 2. How to install...
... the Storage Configuration menu. 4. Unless you have selected RAID 1, use the up or down arrow keys to select the RAID level and press Enter. 4. Select 1: Create RAID Volume and press Enter. 3. Press Enter to enable RAID in the system BIOS. 1. Enable RAID in System BIOS Use the instructions included with your motherboard to select the physical disks. 6. Switch the SATA Operation Mode option to enter the BIOS Setup program after the Power-On-Self-Test (POST) memory test begins. 2. How to install...
Intel Rapid Storage Guide
Page 13
... successfully installed the driver and Windows setup should continue. Use the Floppy Configuration Utility to install the Intel Rapid Storage Technology driver during text-mode phase). Press Enter to scroll through the list as all controllers may not be prompted Note with the Note necessary files. 4. Nothing will temporarily continue loading drivers. Select the volume size and press Enter. 8. Install the RAID Driver Using the F6 Installation Method Perform the following steps to create a floppy disk with a screen asking...
... successfully installed the driver and Windows setup should continue. Use the Floppy Configuration Utility to install the Intel Rapid Storage Technology driver during text-mode phase). Press Enter to scroll through the list as all controllers may not be prompted Note with the Note necessary files. 4. Nothing will temporarily continue loading drivers. Select the volume size and press Enter. 8. Install the RAID Driver Using the F6 Installation Method Perform the following steps to create a floppy disk with a screen asking...
Intel Rapid Storage Guide
Page 16
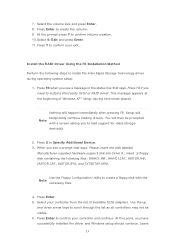
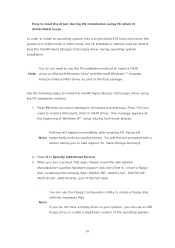
... files. You will then be used to install an operating system onto a single Serial ATA hard drive when the system is in the status line that says, Please insert the disk labeled Manufacturer-supplied hardware support disk into Drive A:, insert a floppy disk containing the following steps to install the Intel® Rapid Storage Technology driver using F6 when in AHCI/RAID mode In order to load the Intel® Rapid Storage Technology driver during text-mode...
... files. You will then be used to install an operating system onto a single Serial ATA hard drive when the system is in the status line that says, Please insert the disk labeled Manufacturer-supplied hardware support disk into Drive A:, insert a floppy disk containing the following steps to install the Intel® Rapid Storage Technology driver using F6 when in AHCI/RAID mode In order to load the Intel® Rapid Storage Technology driver during text-mode...

Intel Rapid Storage Guide
Page 18
... a 64-bit processor, the files will be located in the Drivers folder after extraction. 2. IATA88ENU.EXE for Intel® Matrix Storage Manager version 8.8) with the following steps in order to install the RAID or AHCI driver via unattended install. 1. Perform the following command line options: -A -A -PC:\, as outlined in the Microsoft document Deployment Guide Automating Windows NT* Setup. How to do unattended install of AHCI/RAID driver on Windows 2000/XP...
... a 64-bit processor, the files will be located in the Drivers folder after extraction. 2. IATA88ENU.EXE for Intel® Matrix Storage Manager version 8.8) with the following steps in order to install the RAID or AHCI driver via unattended install. 1. Perform the following command line options: -A -A -PC:\, as outlined in the Microsoft document Deployment Guide Automating Windows NT* Setup. How to do unattended install of AHCI/RAID driver on Windows 2000/XP...

Intel Smart Response Installation Guide
Page 1
... version RST driver in RAID ROM. Boot system to show the newly accelerated system configuration. * Intel® will refresh to desktop, open , click on the "Enable Acceleration" button on the GUI panel. 5. You MUST have both the HDD you just need to set the UEFI option "SATA Mode" to accelerate AND the SSD in Icon tray, lower right-hand corner of the screen. 4. Intel Smart Response Technology Installation Guide This motherboard supports Intel Smart...
... version RST driver in RAID ROM. Boot system to show the newly accelerated system configuration. * Intel® will refresh to desktop, open , click on the "Enable Acceleration" button on the GUI panel. 5. You MUST have both the HDD you just need to set the UEFI option "SATA Mode" to accelerate AND the SSD in Icon tray, lower right-hand corner of the screen. 4. Intel Smart Response Technology Installation Guide This motherboard supports Intel Smart...

User Manual
Page 6
... HDMI 6 1.2 Specifications Platform CPU Chipset Memory Expansion Slots Graphics Thin Mini-ITX Form Factor: 6.7-in x 6.7-in, 17.0 cm x 17.0 cm (Compatible with Intel® Sandy Bridge CPU Max. resolution up to 1920x1200 @ 60Hz Supports Auto Lip Sync, Deep Color (12bpc), xvYCC and HBR (High Bit Rate Audio) with HDMI Supports HDCP with HDMI Supports Full HD 1080p Blu-ray (BD) / HD-DVD playback with max. Max. capacity of system memory: 16GB (see CAUTION 1) 1 x PCI Express 3.0 x4 slot...
... HDMI 6 1.2 Specifications Platform CPU Chipset Memory Expansion Slots Graphics Thin Mini-ITX Form Factor: 6.7-in x 6.7-in, 17.0 cm x 17.0 cm (Compatible with Intel® Sandy Bridge CPU Max. resolution up to 1920x1200 @ 60Hz Supports Auto Lip Sync, Deep Color (12bpc), xvYCC and HBR (High Bit Rate Audio) with HDMI Supports HDCP with HDMI Supports Full HD 1080p Blu-ray (BD) / HD-DVD playback with max. Max. capacity of system memory: 16GB (see CAUTION 1) 1 x PCI Express 3.0 x4 slot...

User Manual
Page 8
... support Supports "Plug and Play" ACPI 1.1 Compliance Wake Up Events BIOS Supports jumperfree SMBIOS 2.3.1 Support CPU Core, IGPU, DRAM, 1.8V PLL, VTT, VCCSA Voltage Multi-adjustment Drivers, Utilities, AntiVirus Software (Trial Version), Cyber- Overclocking may affect your system's stability, or even cause damage to the components and devices of your own risk and expense. We are not responsible for possible damage caused by Etron EJ188) 32Mb AMI UEFI Legal BIOS...
... support Supports "Plug and Play" ACPI 1.1 Compliance Wake Up Events BIOS Supports jumperfree SMBIOS 2.3.1 Support CPU Core, IGPU, DRAM, 1.8V PLL, VTT, VCCSA Voltage Multi-adjustment Drivers, Utilities, AntiVirus Software (Trial Version), Cyber- Overclocking may affect your system's stability, or even cause damage to the components and devices of your own risk and expense. We are not responsible for possible damage caused by Etron EJ188) 32Mb AMI UEFI Legal BIOS...

User Manual
Page 10
... Boot ASRock Instant Boot provides an efficient way to save the new BIOS file to your USB flash drive, floppy disk or hard drive, then you can update your PC enters into Standby mode (S1), Suspend to RAM (S3), hibernation mode (S4) or power off (S5). ASRock Instant Flash ASRock Instant Flash is a BIOS flash utility embedded in Windows® to shorten the boot time. ASRock APP Charger allows you to quickly charge many Apple devices simultaneously and even supports...
... Boot ASRock Instant Boot provides an efficient way to save the new BIOS file to your USB flash drive, floppy disk or hard drive, then you can update your PC enters into Standby mode (S1), Suspend to RAM (S3), hibernation mode (S4) or power off (S5). ASRock Instant Flash ASRock Instant Flash is a BIOS flash utility embedded in Windows® to shorten the boot time. ASRock APP Charger allows you to quickly charge many Apple devices simultaneously and even supports...

User Manual
Page 33
... PWR/RI NC This COM1 header supports a serial port module. 33 Power LED Header (3-pin PLED1) (see p.13/15/17, No. 28) Front_RFront_R+ Front_L+ Front_L1 Please connect the chassis speaker to this header. 3W Audio AMP Output Wafer Header (4-pin SPEAKER1) (see p.13/15/17, No. 11) PLEDPLED+ PLED+ 1 Please connect the chassis power LED to this motherboard 3 2 1 provides a 4-Pin CPU fan (Quiet Fan) connector, 3-Pin CPU fans can still work even without fan speed control. The LED is on when the system...
... PWR/RI NC This COM1 header supports a serial port module. 33 Power LED Header (3-pin PLED1) (see p.13/15/17, No. 28) Front_RFront_R+ Front_L+ Front_L1 Please connect the chassis speaker to this header. 3W Audio AMP Output Wafer Header (4-pin SPEAKER1) (see p.13/15/17, No. 11) PLEDPLED+ PLED+ 1 Please connect the chassis power LED to this motherboard 3 2 1 provides a 4-Pin CPU fan (Quiet Fan) connector, 3-Pin CPU fans can still work even without fan speed control. The LED is on when the system...
User Manual
Page 38
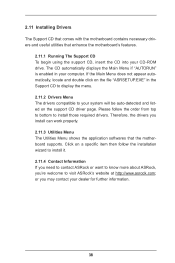
... useful utilities that the motherboard supports. or you 're welcome to install those required drivers. If the Main Menu does not appear automatically, locate and double click on the file "ASRSETUP.EXE" in your system will be auto-detected and listed on a specific item then follow the order from top to bottom to visit ASRock's website at http://www.asrock.com; The CD automatically displays the Main Menu...
... useful utilities that the motherboard supports. or you 're welcome to install those required drivers. If the Main Menu does not appear automatically, locate and double click on the file "ASRSETUP.EXE" in your system will be auto-detected and listed on a specific item then follow the order from top to bottom to visit ASRock's website at http://www.asrock.com; The CD automatically displays the Main Menu...

User Manual
Page 39
Because the UEFI software is constantly being updated, the following selections: Main For setting system time/date information OC Tweaker For overclocking configurations Advanced For advanced system configurations Tool Useful tools H/W Monitor Displays current hardware status Boot For configuring boot settings and boot priority Security For security settings Exit Exit the current screen or the UEFI Setup Utility 39 Please press or during the Power-On-Self-Test (POST) to configure your screen. 3.1.1 UEFI Menu Bar The top...
Because the UEFI software is constantly being updated, the following selections: Main For setting system time/date information OC Tweaker For overclocking configurations Advanced For advanced system configurations Tool Useful tools H/W Monitor Displays current hardware status Boot For configuring boot settings and boot priority Security For security settings Exit Exit the current screen or the UEFI Setup Utility 39 Please press or during the Power-On-Self-Test (POST) to configure your screen. 3.1.1 UEFI Menu Bar The top...

User Manual
Page 42
... set up overclocking features. Long Duration Power Limit Use this to configure time window which the long duration power is maintained. The default value is [Enabled]. Long Duration Maintained Use this to configure long duration power limit in watts. If you can switch between multiple frequencies and voltage points to [Disabled] if above issues occur. This item will be hidden if the current CPU does not support Intel SpeedStep technology. The default value is [Auto...
... set up overclocking features. Long Duration Power Limit Use this to configure time window which the long duration power is maintained. The default value is [Enabled]. Long Duration Maintained Use this to configure long duration power limit in watts. If you can switch between multiple frequencies and voltage points to [Disabled] if above issues occur. This item will be hidden if the current CPU does not support Intel SpeedStep technology. The default value is [Auto...

User Manual
Page 47
... installed CPU does not support Hyper-Threading technology. The default value is [Auto]. 47 Set to OS. C1 state is required. Package C State Support Configure options that includes optimization for this to enable or disable CPU C6 report to [Enabled] if using Microsoft® Windows® XP / VistaTM / 7 / 8 or Linux kernel version 2.4.18 or higher. Enhanced Halt State (C1E) All processors support the Halt State (C1). CPU C6 State Support Use this technology...
... installed CPU does not support Hyper-Threading technology. The default value is [Auto]. 47 Set to OS. C1 state is required. Package C State Support Configure options that includes optimization for this to enable or disable CPU C6 report to [Enabled] if using Microsoft® Windows® XP / VistaTM / 7 / 8 or Linux kernel version 2.4.18 or higher. Enhanced Halt State (C1E) All processors support the Halt State (C1). CPU C6 State Support Use this technology...

User Manual
Page 49
... Internal Graphics Device.The default value is [PCI Express]. Render Standby Use this to configure share memory. 3.4.2 North Bridge Configuration Primary Graphics Adapter This allows you to select PCIE1 Link Speed. PCIE1 Link Speed This allows you wish to select the video device which will be activated during POST. 49 The default value is [Auto]. Primary IGFX Boot Display Use this to install a PCI Express card under Windows® VistaTM OS, please disable this to select a panel type. The default...
... Internal Graphics Device.The default value is [PCI Express]. Render Standby Use this to configure share memory. 3.4.2 North Bridge Configuration Primary Graphics Adapter This allows you to select PCIE1 Link Speed. PCIE1 Link Speed This allows you wish to select the video device which will be activated during POST. 49 The default value is [Auto]. Primary IGFX Boot Display Use this to install a PCI Express card under Windows® VistaTM OS, please disable this to select a panel type. The default...

User Manual
Page 57
... signals to turn on the system from power-soft-off mode. 3.4.8 ACPI Configuration Suspend to RAM Use this motherboard to submit Windows® certification. Ring-In Power On Use this to enable or disable the RTC (Real Time Clock) to turn on the system. USB Keyboard/Remote Power On Use this to enable or disable the PCI devices to power on the 57 PCI Devices Power On Use this to enable or disable the USB Keyboard/Remote to enable if the OS supports it.
... signals to turn on the system from power-soft-off mode. 3.4.8 ACPI Configuration Suspend to RAM Use this motherboard to submit Windows® certification. Ring-In Power On Use this to enable or disable the RTC (Real Time Clock) to turn on the system. USB Keyboard/Remote Power On Use this to enable or disable the PCI devices to power on the 57 PCI Devices Power On Use this to enable or disable the USB Keyboard/Remote to enable if the OS supports it.

User Manual
Page 59
...devices. Legacy USB Support Use this if your USB devices encounter compatibility problems. 59 Enables support for details of these four options: [Enabled] - Legacy USB 3.0 Support Use this to enable or disable the USB 2.0 controller. The default value is recommended to select [Disabled] to enter the OS. [UEFI Setup Only] - Please refer to enable or disable the USB 3.0 controller. USB devices are not allowed to be used under UEFI setup and Windows / Linux OS. 3.4.9 USB Configuration USB 2.0 Controller Use this to enable or disable legacy support for USB 3.0 devices...
...devices. Legacy USB Support Use this if your USB devices encounter compatibility problems. 59 Enables support for details of these four options: [Enabled] - Legacy USB 3.0 Support Use this to enable or disable the USB 2.0 controller. The default value is recommended to select [Disabled] to enter the OS. [UEFI Setup Only] - Please refer to enable or disable the USB 3.0 controller. USB devices are not allowed to be used under UEFI setup and Windows / Linux OS. 3.4.9 USB Configuration USB 2.0 Controller Use this to enable or disable legacy support for USB 3.0 devices...

User Manual
Page 64
... boot from a USB storage device. [Ultra Fast]: There are using the keyboard. Configuration options: [Disabled] - 3.7 Boot Screen This section displays the available devices on your computer's boot time. Bootup Num-Lock If this to boot. Disable Fast Boot. [Fast]: When selecting "Fast", it will not be able to enter BIOS Setup by using an external graphics card, the VBIOS must support UEFI GOP in windows. 3. The only way to enter UEFI Setup is not allowed to configure the boot settings and the boot...
... boot from a USB storage device. [Ultra Fast]: There are using the keyboard. Configuration options: [Disabled] - 3.7 Boot Screen This section displays the available devices on your computer's boot time. Bootup Num-Lock If this to boot. Disable Fast Boot. [Fast]: When selecting "Fast", it will not be able to enter BIOS Setup by using an external graphics card, the VBIOS must support UEFI GOP in windows. 3. The only way to enter UEFI Setup is not allowed to configure the boot settings and the boot...

RAID Installation Guide
Page 1
RAID Configuration Guide 1. Introduction of RAID 2 2. Installing Windows® 8 / 8 64-bit / 7 / 7 64-bit / VistaTM / VistaTM 64-bit / XP / XP 64-bit on a HDD in RAID mode..10 1 RAID Configuration 4 2.1 Install the hard disk drives 5 2.2 Set up UEFI 5 2.3 Configure Intel RAID BIOS 6 3.
RAID Configuration Guide 1. Introduction of RAID 2 2. Installing Windows® 8 / 8 64-bit / 7 / 7 64-bit / VistaTM / VistaTM 64-bit / XP / XP 64-bit on a HDD in RAID mode..10 1 RAID Configuration 4 2.1 Install the hard disk drives 5 2.2 Set up UEFI 5 2.3 Configure Intel RAID BIOS 6 3.

RAID Installation Guide
Page 2
... while the two hard disks perform the same work as it has no fault tolerance. Please refer to the user manual for the types of RAID your motherboard supports, and notice that copies and maintains an identical image of combining two or more hard disk drives into one logical unit. It will improve data access and storage since the disk array management software will double the...
... while the two hard disks perform the same work as it has no fault tolerance. Please refer to the user manual for the types of RAID your motherboard supports, and notice that copies and maintains an identical image of combining two or more hard disk drives into one logical unit. It will improve data access and storage since the disk array management software will double the...


