

User Manual
Page 2
... energy hazard. • Disconnect the power cord from the wall outlet when installing or removing main system components, such as the motherboard and power supply unit. • Place the system on a stable and lat surface. • Use extreme caution when working with high-voltage components. • When handling parts, use . • Handle a board by its components, peripheral chips, memory modules or contacts.
... energy hazard. • Disconnect the power cord from the wall outlet when installing or removing main system components, such as the motherboard and power supply unit. • Place the system on a stable and lat surface. • Use extreme caution when working with high-voltage components. • When handling parts, use . • Handle a board by its components, peripheral chips, memory modules or contacts.
User Manual
Page 4
... Overview 4 2.1 Front View 4 2.2 Rear View 5 2.3 Inside View 6 Chapter 3 Hardware Installation 7 3.1 How to Remove the Bottom Case 7 3.2 How to Remove the Wireless Module 8 3.3 How to Install the mSATA SSD 9 3.4 How to Install the 2.5-inch Hard Drive 10 3.5 How to Install the Memory Modules (DDR3 Low Voltage (1.35V)) 12 3.6 How to Install the VESA Bracket 13 3.7 Positions of the Beebox series 14 Chapter 4 Software and Utilities Operation 15 4.1 Installing Drivers 15 4.2 ASRock APP Shop 16...
... Overview 4 2.1 Front View 4 2.2 Rear View 5 2.3 Inside View 6 Chapter 3 Hardware Installation 7 3.1 How to Remove the Bottom Case 7 3.2 How to Remove the Wireless Module 8 3.3 How to Install the mSATA SSD 9 3.4 How to Install the 2.5-inch Hard Drive 10 3.5 How to Install the Memory Modules (DDR3 Low Voltage (1.35V)) 12 3.6 How to Install the VESA Bracket 13 3.7 Positions of the Beebox series 14 Chapter 4 Software and Utilities Operation 15 4.1 Installing Drivers 15 4.2 ASRock APP Shop 16...
User Manual
Page 5
... Windows® 7 Installation Disk with USB 3.0 Drivers Packed 22 Chapter 5 UEFI SETUP UTILITY 26 5.1 Introduction 26 5.1.1 UEFI Menu Bar 26 5.1.2 Navigation Keys 27 5.2 Main Screen 28 5.3 Advanced Screen 29 5.3.1 CPU Coniguration 30 5.3.2 Chipset Coniguration 32 5.3.3 Storage Coniguration 34 5.3.4 IntelRMT Coniguration 36 5.3.5 Super IO Coniguration 37 5.3.6 ACPI Coniguration 38 5.3.7 USB Coniguration 40 5.3.8 Platform Trust Technology 41 5.4 Tools 42 5.5 Hardware Health Event Monitoring Screen 44 5.6 Security Screen 45 5.7 Boot Screen 46...
... Windows® 7 Installation Disk with USB 3.0 Drivers Packed 22 Chapter 5 UEFI SETUP UTILITY 26 5.1 Introduction 26 5.1.1 UEFI Menu Bar 26 5.1.2 Navigation Keys 27 5.2 Main Screen 28 5.3 Advanced Screen 29 5.3.1 CPU Coniguration 30 5.3.2 Chipset Coniguration 32 5.3.3 Storage Coniguration 34 5.3.4 IntelRMT Coniguration 36 5.3.5 Super IO Coniguration 37 5.3.6 ACPI Coniguration 38 5.3.7 USB Coniguration 40 5.3.8 Platform Trust Technology 41 5.4 Tools 42 5.5 Hardware Health Event Monitoring Screen 44 5.6 Security Screen 45 5.7 Boot Screen 46...
User Manual
Page 6
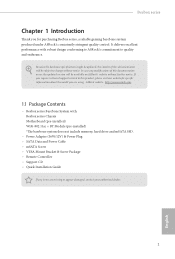
... include memory, hard drive and mSATA SSD. • Power Adapter (36W/12V) & Power Plug • SATA Data and Power Cable • mSATA Screw • VESA Mount Bracket & Screw Package • Remote Controller • Support CD • Quick Installation Guide If any modiications of this product, please visit our website for purchasing Beebox series, a reliable gaming barebone system produced under ASRock's consistently stringent quality control. In case any items are using. Beebox series Chapter...
... include memory, hard drive and mSATA SSD. • Power Adapter (36W/12V) & Power Plug • SATA Data and Power Cable • mSATA Screw • VESA Mount Bracket & Screw Package • Remote Controller • Support CD • Quick Installation Guide If any modiications of this product, please visit our website for purchasing Beebox series, a reliable gaming barebone system produced under ASRock's consistently stringent quality control. In case any items are using. Beebox series Chapter...
User Manual
Page 7
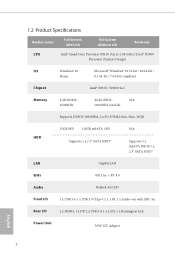
... / Home 8.1 64-bit / 7 64-bit compliant Chipset Intel® N3150 / N3000 SoC Memory 2GB DDR3L1600MHz 4GB DDR3L- N/A 1600MHz (2x2GB) Supports DDR3L 1600MHz, 2 x SO-DIMM slots, Max. 16GB HDD 32GB SSD 128GB mSATA SSD Supports 1 x 2.5" SATA HDD* N/A Supports 1 x mSATA SSD & 1 x 2.5" SATA HDD* LAN Gigabit LAN WiFi 802.11ac + BT 4.0 Audio Realtek ALC283 Front I/O 1 x USB 3.0, 1 x USB 3.0 (Type C), 1 x IR, 1 x Audio-out with MIC-In Rear I/O 2 x HDMI, 1 x DP, 2 x USB 3.0, 1 x LAN, 1 x Kensington lock Power Unit 36W/12V Adapter English 2
... / Home 8.1 64-bit / 7 64-bit compliant Chipset Intel® N3150 / N3000 SoC Memory 2GB DDR3L1600MHz 4GB DDR3L- N/A 1600MHz (2x2GB) Supports DDR3L 1600MHz, 2 x SO-DIMM slots, Max. 16GB HDD 32GB SSD 128GB mSATA SSD Supports 1 x 2.5" SATA HDD* N/A Supports 1 x mSATA SSD & 1 x 2.5" SATA HDD* LAN Gigabit LAN WiFi 802.11ac + BT 4.0 Audio Realtek ALC283 Front I/O 1 x USB 3.0, 1 x USB 3.0 (Type C), 1 x IR, 1 x Audio-out with MIC-In Rear I/O 2 x HDMI, 1 x DP, 2 x USB 3.0, 1 x LAN, 1 x Kensington lock Power Unit 36W/12V Adapter English 2

User Manual
Page 10
... Lock Slot 5 USB 3.0 (Type A) 6 *DisplayPort *To use DisplayPort as a display output, please connect your monitor/display to the table below for the LAN port LED indications. Please refer to HDMI Port when installing OS system. ACT/LINK LED SPEED LED LAN Port Activity / Link LED Status Of Blinking On Description No Link Data Activity Link Speed LED Status Of Orange Green Description 10Mbps connection 100Mbps connection 1Gbps connection 5 English 2.2 Rear View 12 32 4 Beebox series 6 5 No. his DisplayPort only supports...
... Lock Slot 5 USB 3.0 (Type A) 6 *DisplayPort *To use DisplayPort as a display output, please connect your monitor/display to the table below for the LAN port LED indications. Please refer to HDMI Port when installing OS system. ACT/LINK LED SPEED LED LAN Port Activity / Link LED Status Of Blinking On Description No Link Data Activity Link Speed LED Status Of Orange Green Description 10Mbps connection 100Mbps connection 1Gbps connection 5 English 2.2 Rear View 12 32 4 Beebox series 6 5 No. his DisplayPort only supports...
User Manual
Page 16
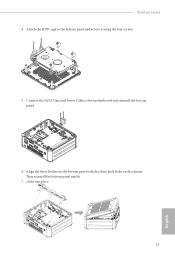
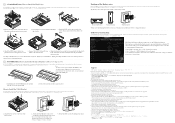
Beebox series 4. hen reinstall the bottom panel until it using the four screws. 5. clicks into place. 11 English Connect the SATA Data and Power Cable to the bottom panel and secure it 7. Align the three latches on the bottom panel with the three latch holes on the chassis. Attach the HDD cage to the motherboard and reinstall the bottom panel. 6.
Beebox series 4. hen reinstall the bottom panel until it using the four screws. 5. clicks into place. 11 English Connect the SATA Data and Power Cable to the bottom panel and secure it 7. Align the three latches on the bottom panel with the three latch holes on the chassis. Attach the HDD cage to the motherboard and reinstall the bottom panel. 6.

User Manual
Page 19
... Vertical Position Wall-mounted *Please note that keeping the Beebox series in vertical or horizontal position. English 14 USB Power On Function: USB Power On Function allows system power on /of the Beebox series he Beebox series can also easily power on via USB keyboard/mouse. Press F10 to "Enabled". 4. 3.7 Positions of the Beebox series by pressing or during device startup. 2. Set "USB Keyboard/ Remote Power On" and " USB Mouse Power On" settings to Save and Exit. Enter BIOS by using the remote controller.
... Vertical Position Wall-mounted *Please note that keeping the Beebox series in vertical or horizontal position. English 14 USB Power On Function: USB Power On Function allows system power on /of the Beebox series he Beebox series can also easily power on via USB keyboard/mouse. Press F10 to "Enabled". 4. 3.7 Positions of the Beebox series by pressing or during device startup. 2. Set "USB Keyboard/ Remote Power On" and " USB Mouse Power On" settings to Save and Exit. Enter BIOS by using the remote controller.
User Manual
Page 20
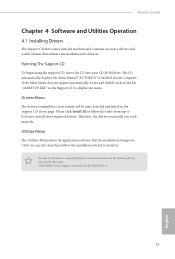
..., locate and double click on the ile "ASRSETUP.EXE" in your CD-ROM drive. Please click Install All or follow the installation wizard to install those required drivers. Running The Support CD To begin using the support CD, insert the CD into your computer. Beebox series Chapter 4 Software and Utilities Operation 4.1 Installing Drivers he Support CD that comes with the motherboard contains necessary drivers and useful utilities that the motherboard supports. To improve Windows 7 compatibility, please download...
..., locate and double click on the ile "ASRSETUP.EXE" in your CD-ROM drive. Please click Install All or follow the installation wizard to install those required drivers. Running The Support CD To begin using the support CD, insert the CD into your computer. Beebox series Chapter 4 Software and Utilities Operation 4.1 Installing Drivers he Support CD that comes with the motherboard contains necessary drivers and useful utilities that the motherboard supports. To improve Windows 7 compatibility, please download...

User Manual
Page 21
... apps and support utilities, such as USB Key, XFast LAN, XFast RAM and more . 16 English Information Panel: he ASRock APP Shop is an online store for purchasing and downloading sotware applications for your ASRock computer. 4.2 ASRock APP Shop he information panel in the center displays data about the currently selected category and allows users to perform job-related tasks. Click on your motherboard up to...
... apps and support utilities, such as USB Key, XFast LAN, XFast RAM and more . 16 English Information Panel: he ASRock APP Shop is an online store for purchasing and downloading sotware applications for your ASRock computer. 4.2 ASRock APP Shop he information panel in the center displays data about the currently selected category and allows users to perform job-related tasks. Click on your motherboard up to...

User Manual
Page 27
... CD drive. Step 2 Create another two subfolders. Step 4 Copy "boot.wim" and "install.wim" iles from the "Sources" folder in the ASRock Support CD) • Windows® 7 64-bit PC Instructions Step 1 Create a new folder on your motherboard require the USB 3.0 drivers to function properly. Requirements • A program that can create and modify ISO iles, such as UltraISO • Windows® 7 installation disk • USB 3.0 drivers...
... CD drive. Step 2 Create another two subfolders. Step 4 Copy "boot.wim" and "install.wim" iles from the "Sources" folder in the ASRock Support CD) • Windows® 7 64-bit PC Instructions Step 1 Create a new folder on your motherboard require the USB 3.0 drivers to function properly. Requirements • A program that can create and modify ISO iles, such as UltraISO • Windows® 7 installation disk • USB 3.0 drivers...

User Manual
Page 29
... the each process completes. dism /mount-wim /wimile:boot.wim /index:2 /mountdir:mount dism /image:mount /add-driver /driver:usb3\iusb3hub.inf dism /image:mount /add-driver /driver:usb3\iusb3xhc.inf dism /image:mount /add-driver /driver:usb3\iusb3hcs.inf dism /unmount-wim /mountdir:mount /commit Step 10 To add the drivers into "boot.wim" in order to install Windows® 7 by lash3.0, please input the following commands...
... the each process completes. dism /mount-wim /wimile:boot.wim /index:2 /mountdir:mount dism /image:mount /add-driver /driver:usb3\iusb3hub.inf dism /image:mount /add-driver /driver:usb3\iusb3xhc.inf dism /image:mount /add-driver /driver:usb3\iusb3hcs.inf dism /unmount-wim /mountdir:mount /commit Step 10 To add the drivers into "boot.wim" in order to install Windows® 7 by lash3.0, please input the following commands...

User Manual
Page 31
... for reference purpose only, and they may run the UEFI SETUP UTILITY by turning the system of the screen has a menu bar with its test routines. Chapter 5 UEFI SETUP UTILITY 5.1 Introduction his section explains how to use the UEFI SETUP UTILITY to enter the UEFI SETUP UTILITY ater POST, restart the system by pressing + + , or by pressing the reset button on the system chassis. If you see...
... for reference purpose only, and they may run the UEFI SETUP UTILITY by turning the system of the screen has a menu bar with its test routines. Chapter 5 UEFI SETUP UTILITY 5.1 Introduction his section explains how to use the UEFI SETUP UTILITY to enter the UEFI SETUP UTILITY ater POST, restart the system by pressing + + , or by pressing the reset button on the system chassis. If you see...

User Manual
Page 32
Beebox series 5.1.2 Navigation Keys Use < > key or < > key to choose among the selections on the menu bar, and use the mouse to click your required item. Please check the following table for the descriptions of the screen To display the General Help Screen Discard changes and exit the SETUP UTILITY Load optimal default values for the selected items Switch to next function Go to the previous page Go...
Beebox series 5.1.2 Navigation Keys Use < > key or < > key to choose among the selections on the menu bar, and use the mouse to click your required item. Please check the following table for the descriptions of the screen To display the General Help Screen Discard changes and exit the SETUP UTILITY Load optimal default values for the selected items Switch to next function Go to the previous page Go...
User Manual
Page 46
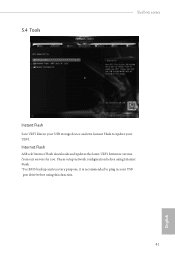
Internet Flash ASRock Internet Flash downloads and updates the latest UEFI irmware version from our servers for you. Please setup network coniguration before using this function. 41 English 5.4 Tools Beebox series Instant Flash Save UEFI iles in your USB storage device and run Instant Flash to update your USB pen drive before using Internet Flash. *For BIOS backup and recovery purpose, it is recommended to plug in your UEFI.
Internet Flash ASRock Internet Flash downloads and updates the latest UEFI irmware version from our servers for you. Please setup network coniguration before using this function. 41 English 5.4 Tools Beebox series Instant Flash Save UEFI iles in your USB storage device and run Instant Flash to update your USB pen drive before using Internet Flash. *For BIOS backup and recovery purpose, it is recommended to plug in your UEFI.

User Manual
Page 47
UEFI Download Server Select a server to conigure internet connection settings for Internet Flash. Network Coniguration Use this to download the UEFI irmware. 42 English Internet Setting Enable or disable sound efects in the setup utility.
UEFI Download Server Select a server to conigure internet connection settings for Internet Flash. Network Coniguration Use this to download the UEFI irmware. 42 English Internet Setting Enable or disable sound efects in the setup utility.

User Manual
Page 49
... Setup Utility. User Password Set or change the password for the administrator account. Only the administrator has authority to change the password for the user account. Secure Boot Enable to remove the password. Supervisor Password Set or change the settings in the UEFI Setup Utility. Users are unable to remove the password. Leave it blank and press enter to change the supervisor/user password for the system. Leave it blank and press enter to support Windows 8.1 Secure Boot. 44 English 5.6 Security Screen...
... Setup Utility. User Password Set or change the password for the administrator account. Only the administrator has authority to change the password for the user account. Secure Boot Enable to remove the password. Supervisor Password Set or change the settings in the UEFI Setup Utility. Users are unable to remove the password. Leave it blank and press enter to change the supervisor/user password for the system. Leave it blank and press enter to support Windows 8.1 Secure Boot. 44 English 5.6 Security Screen...
User Manual
Page 50
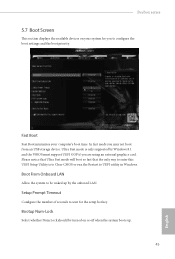
... external graphics card. Beebox series 5.7 Boot Screen his section displays the available devices on or of seconds to wait for you to conigure the boot settings and the boot priority. Ultra Fast mode is to Clear CMOS or run the Restart to UEFI utility in Windows. Bootup Num-Lock Select whether Num Lock should be waked up . 45 English Boot From Onboard LAN Allow the system to enter this UEFI Setup Utility is only supported...
... external graphics card. Beebox series 5.7 Boot Screen his section displays the available devices on or of seconds to wait for you to conigure the boot settings and the boot priority. Ultra Fast mode is to Clear CMOS or run the Restart to UEFI utility in Windows. Bootup Num-Lock Select whether Num Lock should be waked up . 45 English Boot From Onboard LAN Allow the system to enter this UEFI Setup Utility is only supported...

User Manual
Page 51
AddOn ROM Display Enable AddOn ROM Display to show normal POST messages. Disable for a number of when the system boots up. Boot Failure Guard If the computer fails to boot for faster boot speed. Boot Beep Select whether the Boot Beep should be turned on or of times the system automatically restores the default settings. 46 English Full Screen Logo Enable to display the boot logo or disable to see the AddOn ROM messages or conigure the AddOn ROM if you've enabled Full Screen Logo. Please note that a buzzer is needed.
AddOn ROM Display Enable AddOn ROM Display to show normal POST messages. Disable for a number of when the system boots up. Boot Failure Guard If the computer fails to boot for faster boot speed. Boot Beep Select whether the Boot Beep should be turned on or of times the system automatically restores the default settings. 46 English Full Screen Logo Enable to display the boot logo or disable to see the AddOn ROM messages or conigure the AddOn ROM if you've enabled Full Screen Logo. Please note that a buzzer is needed.
Quick Installation Guide
Page 2
... serie Beebox Beebox / Posições de série Beebox / Beebox Beebox e Beebox series can also easily power on/o the Beebox series by using the remote controller. Unscrew the four screws that are supported; Carefully insert the SO-DIMM memory modules into place. is function is useful when the Beebox series is not recommended to install 2.5" HDD. Set "USB Keyboard/ Remote Power On" and " USB Mouse Power On" settings to the base of the Beebox series. 2. emSATA e2.5" SATA HDDe BIOS http:/www.asrock...
... serie Beebox Beebox / Posições de série Beebox / Beebox Beebox e Beebox series can also easily power on/o the Beebox series by using the remote controller. Unscrew the four screws that are supported; Carefully insert the SO-DIMM memory modules into place. is function is useful when the Beebox series is not recommended to install 2.5" HDD. Set "USB Keyboard/ Remote Power On" and " USB Mouse Power On" settings to the base of the Beebox series. 2. emSATA e2.5" SATA HDDe BIOS http:/www.asrock...


