
User Manual
Page 4
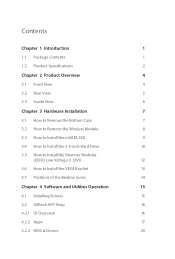
... 2.5-inch Hard Drive 10 3.5 How to Install the Memory Modules (DDR3 Low Voltage (1.35V)) 12 3.6 How to Install the VESA Bracket 13 3.7 Positions of the Beebox series 14 Chapter 4 Software and Utilities Operation 15 4.1 Installing Drivers 15 4.2 ASRock APP Shop 16 4.2.1 UI Overview 16 4.2.2 Apps 17 4.2.3 BIOS & Drivers 20
... 2.5-inch Hard Drive 10 3.5 How to Install the Memory Modules (DDR3 Low Voltage (1.35V)) 12 3.6 How to Install the VESA Bracket 13 3.7 Positions of the Beebox series 14 Chapter 4 Software and Utilities Operation 15 4.1 Installing Drivers 15 4.2 ASRock APP Shop 16 4.2.1 UI Overview 16 4.2.2 Apps 17 4.2.3 BIOS & Drivers 20
User Manual
Page 6
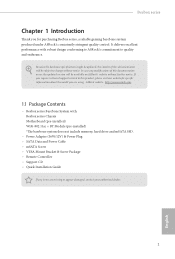
... • Remote Controller • Support CD • Quick Installation Guide If any modiications of this product, please visit our website for purchasing Beebox series, a reliable gaming barebone system produced under ASRock's consistently stringent quality control. If you for speciic information about the model you are missing or appear damaged, contact your authorized dealer...
... • Remote Controller • Support CD • Quick Installation Guide If any modiications of this product, please visit our website for purchasing Beebox series, a reliable gaming barebone system produced under ASRock's consistently stringent quality control. If you for speciic information about the model you are missing or appear damaged, contact your authorized dealer...
User Manual
Page 7
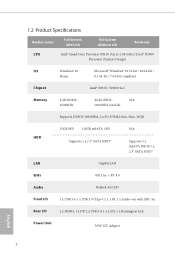
1.2 Product Speciications Beebox series Full System (With OS) Full System (Without OS) Barebone CPU Intel® Quad-Core Processor N3150 (Up to 2.08 GHz) / Intel® N3000 Processor (Fanless ...
1.2 Product Speciications Beebox series Full System (With OS) Full System (Without OS) Barebone CPU Intel® Quad-Core Processor N3150 (Up to 2.08 GHz) / Intel® N3000 Processor (Fanless ...
User Manual
Page 8
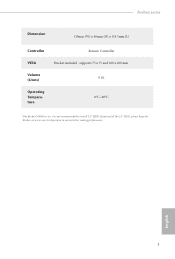
English 3 Beebox series Dimension 110mm (W) x 46mm (H) x 118.5mm (L) Controller Remote Controller VESA Bracket included , supports 75 x 75 and 100 x 100 mm Volume 0.6L (Liters) Operating Temperature 0°C~40°C * For Beebox N3000 series, it is not recommended to ensure better cooling performance. If you install the 2.5" HDD, please keep the Beebox series in a vertical position to install 2.5" HDD.
English 3 Beebox series Dimension 110mm (W) x 46mm (H) x 118.5mm (L) Controller Remote Controller VESA Bracket included , supports 75 x 75 and 100 x 100 mm Volume 0.6L (Liters) Operating Temperature 0°C~40°C * For Beebox N3000 series, it is not recommended to ensure better cooling performance. If you install the 2.5" HDD, please keep the Beebox series in a vertical position to install 2.5" HDD.

User Manual
Page 9
Chapter 2 Product Overview his chapter provides diagrams showing the location of important components of the Beebox series. 2.1 Front View 12 3 4 No. Description 1 Headphone & Microphone 2 USB 3.0 (Type A) 3 USB 3.0 (Type C) 4 IR Sensor Window English 4
Chapter 2 Product Overview his chapter provides diagrams showing the location of important components of the Beebox series. 2.1 Front View 12 3 4 No. Description 1 Headphone & Microphone 2 USB 3.0 (Type A) 3 USB 3.0 (Type C) 4 IR Sensor Window English 4

User Manual
Page 10
... 5 USB 3.0 (Type A) 6 *DisplayPort *To use DisplayPort as a display output, please connect your monitor/display to HDMI Port when installing OS system. 2.2 Rear View 12 32 4 Beebox series 6 5 No.
... 5 USB 3.0 (Type A) 6 *DisplayPort *To use DisplayPort as a display output, please connect your monitor/display to HDMI Port when installing OS system. 2.2 Rear View 12 32 4 Beebox series 6 5 No.

User Manual
Page 12
Remove the four screws on the bottom case. 2. hen lit up and remove the bottom panel.. 1 2 Beebox series English 7 Chapter 3 Hardware Installation his chapter helps you install or remove important components. 3.1 How to Remove the Bottom Case 1.
Remove the four screws on the bottom case. 2. hen lit up and remove the bottom panel.. 1 2 Beebox series English 7 Chapter 3 Hardware Installation his chapter helps you install or remove important components. 3.1 How to Remove the Bottom Case 1.

User Manual
Page 14
English 9 Tighten the screw to secure the mSATA SSD to Install the mSATA SSD 1. Locate the mSATA slot on the motherboard. 2. Carefully insert the mSATA SSD into the slot. 3.3 How to the motherboard. Beebox series 3.
English 9 Tighten the screw to secure the mSATA SSD to Install the mSATA SSD 1. Locate the mSATA slot on the motherboard. 2. Carefully insert the mSATA SSD into the slot. 3.3 How to the motherboard. Beebox series 3.
User Manual
Page 16
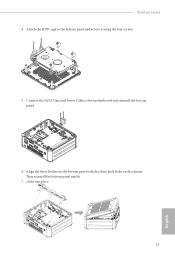
hen reinstall the bottom panel until it using the four screws. 5. Beebox series 4. Connect the SATA Data and Power Cable to the bottom panel and secure it 7. Align the three latches on the bottom panel with the three latch holes on the chassis. Attach the HDD cage to the motherboard and reinstall the bottom panel. 6. clicks into place. 11 English
hen reinstall the bottom panel until it using the four screws. 5. Beebox series 4. Connect the SATA Data and Power Cable to the bottom panel and secure it 7. Align the three latches on the bottom panel with the three latch holes on the chassis. Attach the HDD cage to the motherboard and reinstall the bottom panel. 6. clicks into place. 11 English

User Manual
Page 17
he Beebox series requires DDR3L SO-DIMM (1.35V). 2. Carefully insert the SO-DIMM memory modules into the slot at incorrect orientation. 1. 3.5 How to the motherboard and the DIMM if you always need to install identical (the same brand, speed, size and chip-type) DDR3L SO-DIMM pairs. It will cause permanent damage to Install the Memory Modules (DDR3 Low Voltage (1.35V)) 1. he SO-DIMM only its in one correct orientation. Push down until the modules snap into place. 12 English For dual channel coniguration, you force the DIMM into the slot at a 30-degree angle. 2.
he Beebox series requires DDR3L SO-DIMM (1.35V). 2. Carefully insert the SO-DIMM memory modules into the slot at incorrect orientation. 1. 3.5 How to the motherboard and the DIMM if you always need to install identical (the same brand, speed, size and chip-type) DDR3L SO-DIMM pairs. It will cause permanent damage to Install the Memory Modules (DDR3 Low Voltage (1.35V)) 1. he SO-DIMM only its in one correct orientation. Push down until the modules snap into place. 12 English For dual channel coniguration, you force the DIMM into the slot at a 30-degree angle. 2.

User Manual
Page 18
Attach the two screws to the rear of a compatible display using the four screws. *Choose mounting holes depending on the mounting hole pattern of the Beebox series. Attach the VESA Bracket to the base of your LCD screen (75 mm × 75 mm or 100 mm × 100 mm). 3. Mount the Beebox series by sliding it into place. 13 English 3.6 How to Install the VESA Bracket 1. Beebox series 2. 2.
Attach the two screws to the rear of a compatible display using the four screws. *Choose mounting holes depending on the mounting hole pattern of the Beebox series. Attach the VESA Bracket to the base of your LCD screen (75 mm × 75 mm or 100 mm × 100 mm). 3. Mount the Beebox series by sliding it into place. 13 English 3.6 How to Install the VESA Bracket 1. Beebox series 2. 2.

User Manual
Page 19
... "Enabled". 4. To enable USB Power On Function: 1. English 14 Horizontal Position Vertical Position Wall-mounted *Please note that keeping the Beebox series in vertical or horizontal position. Set "USB Keyboard/ Remote Power On" and " USB Mouse Power On" settings to Save and Exit. 3.7... Positions of the Beebox series he Beebox series can also easily power on via USB keyboard/mouse. USB Power On Function: USB Power On Function allows system power on /of the Beebox series by pressing or during device startup. 2.
... "Enabled". 4. To enable USB Power On Function: 1. English 14 Horizontal Position Vertical Position Wall-mounted *Please note that keeping the Beebox series in vertical or horizontal position. Set "USB Keyboard/ Remote Power On" and " USB Mouse Power On" settings to Save and Exit. 3.7... Positions of the Beebox series he Beebox series can also easily power on via USB keyboard/mouse. USB Power On Function: USB Power On Function allows system power on /of the Beebox series by pressing or during device startup. 2.
User Manual
Page 20
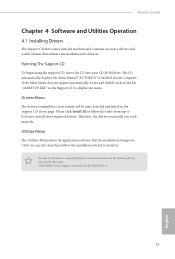
...-us 15 English Please click Install All or follow the installation wizard to your CD-ROM drive. Drivers Menu he drivers compatible to install it. Beebox series Chapter 4 Software and Utilities Operation 4.1 Installing Drivers he Support CD that comes with the motherboard contains necessary drivers and useful utilities that the motherboard supports...
...-us 15 English Please click Install All or follow the installation wizard to your CD-ROM drive. Drivers Menu he drivers compatible to install it. Beebox series Chapter 4 Software and Utilities Operation 4.1 Installing Drivers he Support CD that comes with the motherboard contains necessary drivers and useful utilities that the motherboard supports...

User Manual
Page 22
... app is free of charge. - he other various apps are shown on screen for you to download. You can check the price of the screen. Beebox series 4.2.2 Apps When the "Apps" tab is selected, you will see more apps listed. Step 2 Click on the app icon to see all the available apps...
... app is free of charge. - he other various apps are shown on screen for you to download. You can check the price of the screen. Beebox series 4.2.2 Apps When the "Apps" tab is selected, you will see more apps listed. Step 2 Click on the app icon to see all the available apps...

User Manual
Page 24
Beebox series Upgrading an App You can only upgrade the apps you will ind the mark of "New Version" appears below the installed app icon. Step 2 Click on the app icon to start upgrading. When there is an available new version for your app, you have already installed. English 19 Step 1 Click on the yellow icon to see more details.
Beebox series Upgrading an App You can only upgrade the apps you will ind the mark of "New Version" appears below the installed app icon. Step 2 Click on the app icon to start upgrading. When there is an available new version for your app, you have already installed. English 19 Step 1 Click on the yellow icon to see more details.
User Manual
Page 26
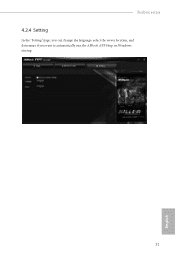
Beebox series 4.2.4 Setting In the "Setting" page, you can change the language, select the server location, and determine if you want to automatically run the ASRock APP Shop on Windows startup. 21 English
Beebox series 4.2.4 Setting In the "Setting" page, you can change the language, select the server location, and determine if you want to automatically run the ASRock APP Shop on Windows startup. 21 English

User Manual
Page 28
"cd.." : go to the subfolder "usb3" created in Step 2. Beebox series Step 6 Copy all 12 iles under the folders "HCSwitch" (x64) and "Win7" (x64) in the "Drivers" to the upper level "cd (folder name)" : enter the assigned folder 23 English Step 7 Open the "Start" menu and type "command" or "cmd" to the screenshot below. Step 8 Enter the folder created in Step 1, by inputting "cd.." and "cd (folder name)" commands. Refer to launch the command prompt as an administrator.
"cd.." : go to the subfolder "usb3" created in Step 2. Beebox series Step 6 Copy all 12 iles under the folders "HCSwitch" (x64) and "Win7" (x64) in the "Drivers" to the upper level "cd (folder name)" : enter the assigned folder 23 English Step 7 Open the "Start" menu and type "command" or "cmd" to the screenshot below. Step 8 Enter the folder created in Step 1, by inputting "cd.." and "cd (folder name)" commands. Refer to launch the command prompt as an administrator.

User Manual
Page 30
... and cover the original iles. (We recommend backing up the original version just in the irst command. Index represents the diferent versions of Windows® 7. Beebox series In this step, please particularly pay attention to the Index number in case.) Save as UltraISO, to copy the modiied "boot.wim" and "install.win...
... and cover the original iles. (We recommend backing up the original version just in the irst command. Index represents the diferent versions of Windows® 7. Beebox series In this step, please particularly pay attention to the Index number in case.) Save as UltraISO, to copy the modiied "boot.wim" and "install.win...

User Manual
Page 32
... Go to the previous page Go to the next page Go to the top of the screen Go to the bottom of each navigation key. Beebox series 5.1.2 Navigation Keys Use < > key or < > key to choose among the selections on the menu bar, and use the mouse to click your required item...
... Go to the previous page Go to the next page Go to the top of the screen Go to the bottom of each navigation key. Beebox series 5.1.2 Navigation Keys Use < > key or < > key to choose among the selections on the menu bar, and use the mouse to click your required item...
User Manual
Page 34
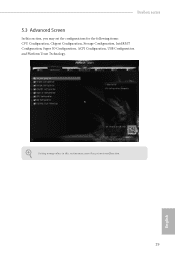
Setting wrong values in this section, you may cause the system to malfunction. 29 English Beebox series 5.3 Advanced Screen In this section may set the conigurations for the following items: CPU Coniguration, Chipset Coniguration, Storage Coniguration, IntelRMT Coniguration, Super IO Coniguration, ACPI Coniguration, USB Coniguration and Platform Trust Technology.
Setting wrong values in this section, you may cause the system to malfunction. 29 English Beebox series 5.3 Advanced Screen In this section may set the conigurations for the following items: CPU Coniguration, Chipset Coniguration, Storage Coniguration, IntelRMT Coniguration, Super IO Coniguration, ACPI Coniguration, USB Coniguration and Platform Trust Technology.
