
Intel Rapid Storage Guide
Page 1
...data loss or system downtime. By combining from two to six drives in the event of a hard drive failure. Combined with Intel® Rapid Recover Technology, setting up data protection can be accomplished easily with RAID 1 can also improve the performance of ... battery life with version 9.5, a brand new user interface makes creating and managing your storage simple and intuitive. Guide to Intel Rapid Storage Overview Intel® Rapid Storage Technology provides new levels of protection, performance, and expandability for any hard drive can have additional protection against...
...data loss or system downtime. By combining from two to six drives in the event of a hard drive failure. Combined with Intel® Rapid Recover Technology, setting up data protection can be accomplished easily with RAID 1 can also improve the performance of ... battery life with version 9.5, a brand new user interface makes creating and managing your storage simple and intuitive. Guide to Intel Rapid Storage Overview Intel® Rapid Storage Technology provides new levels of protection, performance, and expandability for any hard drive can have additional protection against...

Intel Rapid Storage Guide
Page 2
Click Continue (if needed) to a known location on your computer's hard drive. 2. Click Next at the Welcome screen. 5. Download the Intel Rapid Storage Technology software from Intel website. Click Next. 2 Locate the file on your hard drive and double-click it. 3. Installation Instructions 1. Save the file to launch the installation program. 4.
Click Continue (if needed) to a known location on your computer's hard drive. 2. Click Next at the Welcome screen. 5. Download the Intel Rapid Storage Technology software from Intel website. Click Next. 2 Locate the file on your hard drive and double-click it. 3. Installation Instructions 1. Save the file to launch the installation program. 4.

Intel Rapid Storage Guide
Page 5
You will find the "Intel Rapid Storage Technology" icon on the Windows task bar. 5 Restart your system. 10.
You will find the "Intel Rapid Storage Technology" icon on the Windows task bar. 5 Restart your system. 10.

Intel Rapid Storage Guide
Page 6
Here we take RAID 1 for example. 3. In "Select Volume Type", click "Real-time data protection (RAID 1)". Double-click "Intel Rapid Storage Technology" icon, then below main screen appears. 2. Click the "Create" icon to create a RAID array. Create a RAID Array 1. Click "Next". 6
Here we take RAID 1 for example. 3. In "Select Volume Type", click "Real-time data protection (RAID 1)". Double-click "Intel Rapid Storage Technology" icon, then below main screen appears. 2. Click the "Create" icon to create a RAID array. Create a RAID Array 1. Click "Next". 6

Intel Rapid Storage Guide
Page 12
Enetr the Advanced menu. 3. When the Intel Rapid Storage Technology option ROM status screen appears during operating system setup. Press Enter to enter the option ROM user interface. 2. When finished press Enter. ... onto a RAID volume (F6 install method) In order to install an operating system onto a RAID volume, the RAID option must be used to load the Intel® Rapid Storage Technology driver during POST, press Ctrl and i at the same time to select the physical disks. 6.
Enetr the Advanced menu. 3. When the Intel Rapid Storage Technology option ROM status screen appears during operating system setup. Press Enter to enter the option ROM user interface. 2. When finished press Enter. ... onto a RAID volume (F6 install method) In order to install an operating system onto a RAID volume, the RAID option must be used to load the Intel® Rapid Storage Technology driver during POST, press Ctrl and i at the same time to select the physical disks. 6.
Intel Rapid Storage Guide
Page 13
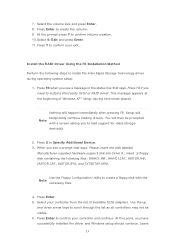
Select 4: Exit and press Enter. 11. Press F6 when you need to install the Intel Rapid Storage Technology driver during text-mode phase). This message appears at the beginning of available SCSI adapters. Press Enter. 5. Leave 13 7. At the prompt ...
Select 4: Exit and press Enter. 11. Press F6 when you need to install the Intel Rapid Storage Technology driver during text-mode phase). This message appears at the beginning of available SCSI adapters. Press Enter. 5. Leave 13 7. At the prompt ...

Intel Rapid Storage Guide
Page 14
...reboot as you will need to the Windows installation folders. Windows setup will need to copy the files again from the floppy to install Intel Rapid Storage Technology by Note running the Setup.exe process after these steps have been completed and the operating system has been successfully installed.... 14 If you wish to use the Intel Rapid Storage Technology user interface in the floppy drive until the system reboots. the floppy disk in Windows, you would on the RAID ...
...reboot as you will need to the Windows installation folders. Windows setup will need to copy the files again from the floppy to install Intel Rapid Storage Technology by Note running the Setup.exe process after these steps have been completed and the operating system has been successfully installed.... 14 If you wish to use the Intel Rapid Storage Technology user interface in the floppy drive until the system reboots. the floppy disk in Windows, you would on the RAID ...

Intel Rapid Storage Guide
Page 15
...you wish to enable it, you will need to a RAID volume that includes that hard drive plus the newly added hard drive(s). Install Intel® Rapid Storage Technology. 2. Turn on your operating system is already installed, you can still use the following conditions are met, use ...is already installed? Enabling the RAID controller may cause an immediate blue screen with an 0x0000007b error code, followed by a reboot. Use the Intel Rapid Storage Technology user interface to use RAID Note without installing a third-party RAID controller card. • Your RAID controller is the ...
...you wish to enable it, you will need to a RAID volume that includes that hard drive plus the newly added hard drive(s). Install Intel® Rapid Storage Technology. 2. Turn on your operating system is already installed, you can still use the following conditions are met, use ...is already installed? Enabling the RAID controller may cause an immediate blue screen with an 0x0000007b error code, followed by a reboot. Use the Intel Rapid Storage Technology user interface to use RAID Note without installing a third-party RAID controller card. • Your RAID controller is the ...
Intel Rapid Storage Guide
Page 16
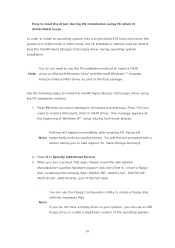
... you to load support for mass storage device(s). 2. You do not have a floppy drive on Microsoft Windows Vista* and Microsoft Windows 7* because Intel provided a RAID driver as part of Windows XP* setup (during text-mode phase). Press F6 when you see a prompt that says, Press ... the operating system. 16 Setup will happen immediately after pressing F6. Nothing will Note temporarily continue loading drivers. Press S to install the Intel® Rapid Storage Technology driver using F6 when in AHCI/RAID mode In order to install an operating system onto a single Serial ATA...
... you to load support for mass storage device(s). 2. You do not have a floppy drive on Microsoft Windows Vista* and Microsoft Windows 7* because Intel provided a RAID driver as part of Windows XP* setup (during text-mode phase). Press F6 when you see a prompt that says, Press ... the operating system. 16 Setup will happen immediately after pressing F6. Nothing will Note temporarily continue loading drivers. Press S to install the Intel® Rapid Storage Technology driver using F6 when in AHCI/RAID mode In order to install an operating system onto a single Serial ATA...

Intel Rapid Storage Guide
Page 17
... through the list as needed. Use the up and down arrow keys to confirm your controller from within Windows, you have successfully installed the Intel Rapid Storage Technology driver and Windows setup should continue. Windows setup will need to copy the files again from the floppy to run Setup.exe... from the list of available SCSI adapters. If you wish to use the Intel Rapid Storage Technology user interface Note within Windows. 17 4. Leave the floppy disk in the floppy drive until the system reboots. Once Windows setup...
... through the list as needed. Use the up and down arrow keys to confirm your controller from within Windows, you have successfully installed the Intel Rapid Storage Technology driver and Windows setup should continue. Windows setup will need to copy the files again from the floppy to run Setup.exe... from the list of available SCSI adapters. If you wish to use the Intel Rapid Storage Technology user interface Note within Windows. 17 4. Leave the floppy disk in the floppy drive until the system reboots. Once Windows setup...

Intel Rapid Storage Guide
Page 18
...supported RAID Note controller hub by replacing the text within the quotation marks. // Insert the lines below , as applicable, into the UNATTEND.TXT file [MassStorageDrivers] "Intel(R) 82801R/DO/DH SATA RAID Controller" = OEM 18 o If the system has a 32-bit processor, the files will be located in order to do ... procedure can be used to install the RAID or AHCI driver, as described in the Advanced Installation Instructions section of installation is used for Intel® Matrix Storage Manager version 8.8) with the following steps in the Drivers folder after extraction. 2.
...supported RAID Note controller hub by replacing the text within the quotation marks. // Insert the lines below , as applicable, into the UNATTEND.TXT file [MassStorageDrivers] "Intel(R) 82801R/DO/DH SATA RAID Controller" = OEM 18 o If the system has a 32-bit processor, the files will be located in order to do ... procedure can be used to install the RAID or AHCI driver, as described in the Advanced Installation Instructions section of installation is used for Intel® Matrix Storage Manager version 8.8) with the following steps in the Drivers folder after extraction. 2.

Intel Rapid Storage Guide
Page 19
Place IAAHCI.CAT, IAAHCI.INF, IASTOR.CAT, IASTOR.INF, IASTOR.SYS, and TXTSETUP.OEM into the UNATTEND.TXT file [MassStorageDrivers] "Intel(R) 82801R/DO/DH SATA AHCI Controller" = OEM [OEMBootFiles] iaAhci.inf iaStor.sys iaAhci.cat Txtsetup.oem 3. [OEMBootFiles] iaStor.inf iaStor.sys iaStor.cat Txtsetup.oem ...
Place IAAHCI.CAT, IAAHCI.INF, IASTOR.CAT, IASTOR.INF, IASTOR.SYS, and TXTSETUP.OEM into the UNATTEND.TXT file [MassStorageDrivers] "Intel(R) 82801R/DO/DH SATA AHCI Controller" = OEM [OEMBootFiles] iaAhci.inf iaStor.sys iaAhci.cat Txtsetup.oem 3. [OEMBootFiles] iaStor.inf iaStor.sys iaStor.cat Txtsetup.oem ...

Intel Smart Response Installation Guide
Page 1
...from either Start Menu or by step instructions below. For the new version RST driver, please check our website for the latest information: http://www.asrock.com * Before you use Enhanced or Maximized Mode. 6. You MUST have both the HDD you just need to set the UEFI option "SATA Mode.... For all required drivers, including RST storage driver version 10.5 or later. 2. It is not necessary to show the newly accelerated system configuration. * Intel® will update the new version RST driver in Icon tray, lower right-hand corner of the screen. 4. After clicking OK button, SRT will enable...
...from either Start Menu or by step instructions below. For the new version RST driver, please check our website for the latest information: http://www.asrock.com * Before you use Enhanced or Maximized Mode. 6. You MUST have both the HDD you just need to set the UEFI option "SATA Mode.... For all required drivers, including RST storage driver version 10.5 or later. 2. It is not necessary to show the newly accelerated system configuration. * Intel® will update the new version RST driver in Icon tray, lower right-hand corner of the screen. 4. After clicking OK button, SRT will enable...

Intel Smart Response Installation Guide
Page 2
... for Cache Volume. Your GUI window will now change to Accelerate. Click on "Enable Acceleration" button on tray icon or open through RST GUI: 1. Enabling Intel Smart Response Technology Setup through Start menu. The "System View" area (Green) now shows the SSD broken up as a Cache Volume and the spare capacity...
... for Cache Volume. Your GUI window will now change to Accelerate. Click on "Enable Acceleration" button on tray icon or open through RST GUI: 1. Enabling Intel Smart Response Technology Setup through Start menu. The "System View" area (Green) now shows the SSD broken up as a Cache Volume and the spare capacity...

Intel Smart Response Installation Guide
Page 3
A pop-up window will appear, click "Yes" RST Cache is guaranteed to be written to the HDD. This could take a few seconds or even a few minutes depending on the "Disable Acceleration" button. 2. Smart Response Technology is now DISABLED and all data is now DISABLED. Click on how much modified data there was. Disabling Intel Smart Response Technology Setup through RST GUI: 1. Open RST GUI and click on the "Accelerate" tab.
A pop-up window will appear, click "Yes" RST Cache is guaranteed to be written to the HDD. This could take a few seconds or even a few minutes depending on the "Disable Acceleration" button. 2. Smart Response Technology is now DISABLED and all data is now DISABLED. Click on how much modified data there was. Disabling Intel Smart Response Technology Setup through RST GUI: 1. Open RST GUI and click on the "Accelerate" tab.
User Manual
Page 6
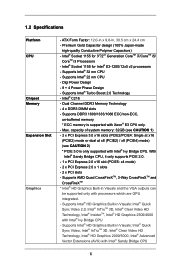
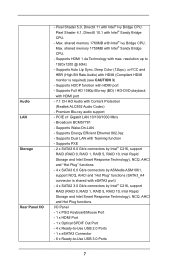
... CPU - ATX Form Factor: 12.0-in x 9.6-in Visuals: Intel® Quick Sync Video, Intel® InTruTM 3D, Intel® Clear Video HD Technology, Intel® HD Graphics 2000/3000, Intel® Advanced Vector Extensions (AVX) with Xeon® E3 CPU only. - Supports Intel® Turbo Boost 2.0 Technology - Intel® C216 - capacity of system memory: 32GB (see CAUTION 1) - 2 x PCI...
... CPU - ATX Form Factor: 12.0-in x 9.6-in Visuals: Intel® Quick Sync Video, Intel® InTruTM 3D, Intel® Clear Video HD Technology, Intel® HD Graphics 2000/3000, Intel® Advanced Vector Extensions (AVX) with Xeon® E3 CPU only. - Supports Intel® Turbo Boost 2.0 Technology - Intel® C216 - capacity of system memory: 32GB (see CAUTION 1) - 2 x PCI...
User Manual
Page 7
... support - Supports PXE - 2 x SATA3 6.0 Gb/s connectors by Intel® C216, support RAID (RAID 0, RAID 1, RAID 5, RAID 10, Intel Rapid Storage and Intel Smart Response Technology), NCQ, AHCI and "Hot Plug" functions - 4 x SATA3 6.0 Gb/s connectors by Intel® C216, support RAID (RAID 0, RAID 1, RAID 5, RAID 10, Intel Rapid Storage and Intel Smart Response Technology), NCQ, AHCI and Hot Plug...
... support - Supports PXE - 2 x SATA3 6.0 Gb/s connectors by Intel® C216, support RAID (RAID 0, RAID 1, RAID 5, RAID 10, Intel Rapid Storage and Intel Smart Response Technology), NCQ, AHCI and "Hot Plug" functions - 4 x SATA3 6.0 Gb/s connectors by Intel® C216, support RAID (RAID 0, RAID 1, RAID 5, RAID 10, Intel Rapid Storage and Intel Smart Response Technology), NCQ, AHCI and Hot Plug...
User Manual
Page 8
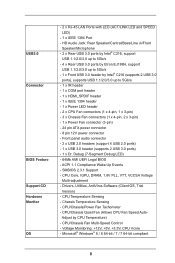
...-45 LAN Ports with LED (ACT/LINK LED and SPEED LED) - 1 x IEEE 1394 Port - CPU/Chassis Quiet Fan (Allows CPU Fan Speed Auto- Adjust by Intel® C216 (supports 2 USB 3.0 ports), supports USB 1.1/2.0/3.0 up to 5Gb/s - 1 x IR header - 1 x COM port header - 1 x HDMI_SPDIF header - 1 x IEEE ... power connector - 8 pin 12V power connector - HD Audio Jack: Rear Speaker/Central/Bass/Line in/Front Speaker/Microphone - 2 x Rear USB 3.0 ports by Intel® C216, support USB 1.1/2.0/3.0 up to 5Gb/s - 4 x Rear USB 3.0 ports by Etron EJ188H, support USB 1.1/2.0/3.0 up to 5Gb/s - 1 x Front USB ...
...-45 LAN Ports with LED (ACT/LINK LED and SPEED LED) - 1 x IEEE 1394 Port - CPU/Chassis Quiet Fan (Allows CPU Fan Speed Auto- Adjust by Intel® C216 (supports 2 USB 3.0 ports), supports USB 1.1/2.0/3.0 up to 5Gb/s - 1 x IR header - 1 x COM port header - 1 x HDMI_SPDIF header - 1 x IEEE ... power connector - 8 pin 12V power connector - HD Audio Jack: Rear Speaker/Central/Bass/Line in/Front Speaker/Microphone - 2 x Rear USB 3.0 ports by Intel® C216, support USB 1.1/2.0/3.0 up to 5Gb/s - 4 x Rear USB 3.0 ports by Etron EJ188H, support USB 1.1/2.0/3.0 up to 5Gb/s - 1 x Front USB ...

User Manual
Page 11
...CODEC PCIE2 33 PCI1 PCIE3 CMOS Battery 32 Super I/O 31 PCIE4 8 USB3_6_7 9 10 11 Intel 12 C216 13 14 30 29 28 RoHS HD_AUDIO1 1 HDMI_SPDIF1 COM1 1 1 PCI2 C216 WS PCIE5 IR1 1 FRONT_1394 1 CLRCMOS1 1 CHA_FAN1 USB8_9 1 USB6_7 1 Dr. Debug 64Mb BIOS ... (DDR3_A1, DDR3_B1) 6 2 x 240-pin DDR3 DIMM Slots (DDR3_A2, DDR3_B2) 7 ATX Power Connector (ATXPWR1) 8 USB 3.0 Header (USB3_6_7) 9 Intel C216 Chipset 10 SATA3 Connectors (SATA3_A3_A4) 11 SATA3 Connectors (SATA3_A1_A2) 12 SATA3 Connectors (SATA3_0_1) 13 SATA2 Connectors (SATA2_2_3) 14 SATA2 Connectors (SATA2_4_5) 15 Dr...
...CODEC PCIE2 33 PCI1 PCIE3 CMOS Battery 32 Super I/O 31 PCIE4 8 USB3_6_7 9 10 11 Intel 12 C216 13 14 30 29 28 RoHS HD_AUDIO1 1 HDMI_SPDIF1 COM1 1 1 PCI2 C216 WS PCIE5 IR1 1 FRONT_1394 1 CLRCMOS1 1 CHA_FAN1 USB8_9 1 USB6_7 1 Dr. Debug 64Mb BIOS ... (DDR3_A1, DDR3_B1) 6 2 x 240-pin DDR3 DIMM Slots (DDR3_A2, DDR3_B2) 7 ATX Power Connector (ATXPWR1) 8 USB 3.0 Header (USB3_6_7) 9 Intel C216 Chipset 10 SATA3 Connectors (SATA3_A3_A4) 11 SATA3 Connectors (SATA3_A1_A2) 12 SATA3 Connectors (SATA3_0_1) 13 SATA2 Connectors (SATA2_2_3) 14 SATA2 Connectors (SATA2_4_5) 15 Dr...

User Manual
Page 16
... load plate. 2.3 CPU Installation In order to provide the LGA 1155 CPU sockets more protection and make the installation process easier, ASRock has added a new protection cover on top of Intel® 1155-Pin CPUs with the new protection cover, please follow the steps below. Hold the CPU by pressing it down...
... load plate. 2.3 CPU Installation In order to provide the LGA 1155 CPU sockets more protection and make the installation process easier, ASRock has added a new protection cover on top of Intel® 1155-Pin CPUs with the new protection cover, please follow the steps below. Hold the CPU by pressing it down...


