
User Manual
Page 5
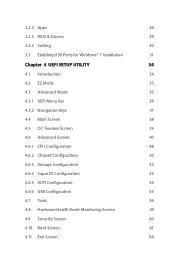
3.2.2 Apps 26 3.2.3 BIOS & Drivers 29 3.2.4 Setting 30 3.3 Enabling USB Ports for Windows® 7 Installation 31 Chapter 4 UEFI SETUP UTILITY 34 4.1 Introduction 34 4.2 EZ Mode 35 4.3 Advanced Mode 36 4.3.1 ...
3.2.2 Apps 26 3.2.3 BIOS & Drivers 29 3.2.4 Setting 30 3.3 Enabling USB Ports for Windows® 7 Installation 31 Chapter 4 UEFI SETUP UTILITY 34 4.1 Introduction 34 4.2 EZ Mode 35 4.3 Advanced Mode 36 4.3.1 ...

User Manual
Page 8
... your system's stability, or even cause damage to the components and devices of your own risk and expense. It should be done at your system. DeskMini series Onboard Connectors Drive Bays • 2 x USB 2.0 Headers • 1 x COM Port Header (Optional) • 1 x Front Panel Header • 1 x CPU_Fan_1 Connector (4-Pin... Operation Temp. • 120W/19V Power Adapter • 0~35°C * For detailed product information, please visit our website: http://www.asrock.com Please realize that there is a certain risk involved with overclocking, including adjusting the setting in the...
... your system's stability, or even cause damage to the components and devices of your own risk and expense. It should be done at your system. DeskMini series Onboard Connectors Drive Bays • 2 x USB 2.0 Headers • 1 x COM Port Header (Optional) • 1 x Front Panel Header • 1 x CPU_Fan_1 Connector (4-Pin... Operation Temp. • 120W/19V Power Adapter • 0~35°C * For detailed product information, please visit our website: http://www.asrock.com Please realize that there is a certain risk involved with overclocking, including adjusting the setting in the...
User Manual
Page 11
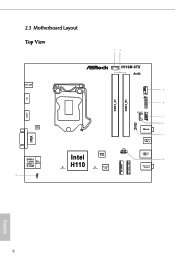
2.3 Motherboard Layout Top View 12 DC Jack DP1 HDMI1 Audio CODEC VGA1 USB 2.0 T: USB3 Top: USB 3.0 RJ-45 B: USB4 9 1 CI1 H110M-STX CPU_FAN2 RoHS DDR4_A1 DDR4_B1 3 CPU_FAN1 1 4 LPC1 SPEAKER1 USB_5_6 1 5 1 COM1 6 1 Mic In 7 USB 3.0 USB_2 Intel H110 M2_1_CT1 BIOS ROM M2_2_CT1 Super I/O PANEL1 PLED PWRBTN 1 HDLED RESET USB 3.0 USB_1 8 Headphone / Headset M.2 WiFi M.2 PCIe SSD English 6
2.3 Motherboard Layout Top View 12 DC Jack DP1 HDMI1 Audio CODEC VGA1 USB 2.0 T: USB3 Top: USB 3.0 RJ-45 B: USB4 9 1 CI1 H110M-STX CPU_FAN2 RoHS DDR4_A1 DDR4_B1 3 CPU_FAN1 1 4 LPC1 SPEAKER1 USB_5_6 1 5 1 COM1 6 1 Mic In 7 USB 3.0 USB_2 Intel H110 M2_1_CT1 BIOS ROM M2_2_CT1 Super I/O PANEL1 PLED PWRBTN 1 HDLED RESET USB 3.0 USB_1 8 Headphone / Headset M.2 WiFi M.2 PCIe SSD English 6

User Manual
Page 34
Step 1 Please check the item information before update. Click on Step 2 to see more items you will see a list of recommended or critical updates for the BIOS or drivers. Please update them all soon. Click to select one or more details. Step 3 Click Update to start the update process. 29 English DeskMini series 3.2.3 BIOS & Drivers Installing BIOS or Drivers When the "BIOS & Drivers" tab is selected, you want to update.
Step 1 Please check the item information before update. Click on Step 2 to see more items you will see a list of recommended or critical updates for the BIOS or drivers. Please update them all soon. Click to select one or more details. Step 3 Click Update to start the update process. 29 English DeskMini series 3.2.3 BIOS & Drivers Installing BIOS or Drivers When the "BIOS & Drivers" tab is selected, you want to update.
User Manual
Page 40
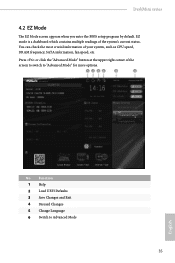
... Mode" button at the upper right corner of your system, such as CPU speed, DRAM frequency, SATA information, fan speed, etc. DeskMini series 4.2 EZ Mode The EZ Mode screen appears when you enter the BIOS setup program by default. EZ mode is a dashboard which contains multiple readings of the system's current status.
... Mode" button at the upper right corner of your system, such as CPU speed, DRAM frequency, SATA information, fan speed, etc. DeskMini series 4.2 EZ Mode The EZ Mode screen appears when you enter the BIOS setup program by default. EZ mode is a dashboard which contains multiple readings of the system's current status.

User Manual
Page 41
... boot settings and boot priority Security For security settings Exit Exit the current screen or the UEFI Setup Utility English 36 Refer to configure the BIOS settings. To access the EZ Mode, press or click the "EZ Mode" button at the upper right corner of the screen. 4.3.1 UEFI Menu Bar The...
... boot settings and boot priority Security For security settings Exit Exit the current screen or the UEFI Setup Utility English 36 Refer to configure the BIOS settings. To access the EZ Mode, press or click the "EZ Mode" button at the upper right corner of the screen. 4.3.1 UEFI Menu Bar The...

User Manual
Page 43
My Favorite Display your collection of BIOS items. Press F5 to add/remove your favorite items. 38 English 4.4 Main Screen When you enter the UEFI SETUP UTILITY, the Main screen will appear and display the system overview.
My Favorite Display your collection of BIOS items. Press F5 to add/remove your favorite items. 38 English 4.4 Main Screen When you enter the UEFI SETUP UTILITY, the Main screen will appear and display the system overview.

User Manual
Page 62
DHCP (Auto IP), Auto ASRock Internet Flash downloads and updates the latest UEFI firmware version from our servers for... Configure the number of seconds to update your UEFI. Please setup network configuration before using Internet Flash. *For BIOS backup and recovery purpose, it is specifically designed for the dual OS platform/multi-OS platform users to easily ...and manage the boot menu. *Please connect more than one boot devices to use this function. 57 English DeskMini series Boot Manager Boot Manager is recommended to plug in your USB storage device and run Instant Flash to wait...
DHCP (Auto IP), Auto ASRock Internet Flash downloads and updates the latest UEFI firmware version from our servers for... Configure the number of seconds to update your UEFI. Please setup network configuration before using Internet Flash. *For BIOS backup and recovery purpose, it is specifically designed for the dual OS platform/multi-OS platform users to easily ...and manage the boot menu. *Please connect more than one boot devices to use this function. 57 English DeskMini series Boot Manager Boot Manager is recommended to plug in your USB storage device and run Instant Flash to wait...
