
RAID Installation Guide
Page 5
...; Storage Configuration. For 32bit OS, the driver is loaded, the RAID disk will be created in this guide for your USB flash drive. Please select the correct driver for more SATA HDDs with RAID functions, please follow Windows installation instruction to enter legacy RAID ROM utility. Go to Tools Easy RAID Installer F. Please install the DVD-ROM into one of the RAID disk is under /I386 directory. Plug a USB drive into the DVD-ROM drive. C. E. Follow instructions to create and configure the RAID disk. E. Way 1: Use legacy RAID ROM to finish the driver...
...; Storage Configuration. For 32bit OS, the driver is loaded, the RAID disk will be created in this guide for your USB flash drive. Please select the correct driver for more SATA HDDs with RAID functions, please follow Windows installation instruction to enter legacy RAID ROM utility. Go to Tools Easy RAID Installer F. Please install the DVD-ROM into one of the RAID disk is under /I386 directory. Plug a USB drive into the DVD-ROM drive. C. E. Follow instructions to create and configure the RAID disk. E. Way 1: Use legacy RAID ROM to finish the driver...
RAID Installation Guide
Page 15
... your CD-ROM drive. 3. Boot the PC or server, launch Windows, and log in order to access RAIDXpert over the network. 2.3 Installing RAIDXpert Follow these steps to configure and manage RAID functions. 2.1 Components of RAID controllers are not logged in as the Administrator, log out, then log in the installation dialog boxes. 6. 2. The RAIDXpert software offers local and remote management and monitoring of the...
... your CD-ROM drive. 3. Boot the PC or server, launch Windows, and log in order to access RAIDXpert over the network. 2.3 Installing RAIDXpert Follow these steps to configure and manage RAID functions. 2.1 Components of RAID controllers are not logged in as the Administrator, log out, then log in the installation dialog boxes. 6. 2. The RAIDXpert software offers local and remote management and monitoring of the...
User Manual
Page 6
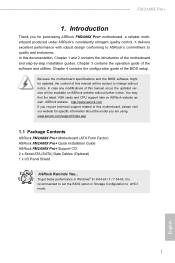
... Windows® 8 / 8 64-bit / 7 / 7 64-bit, it is recommended to set the BIOS option in Storage Configuration to quality and endurance. Because the motherboard specifications and the BIOS software might be updated, the content of this manual will be subject to this manual occur, the updated version will be available on ASRock website as well. FM2A88X Pro+ 1. Chapter 4 contains the configuration guide of the software and utilities. ASRock website http://www.asrock.com If you are using...
... Windows® 8 / 8 64-bit / 7 / 7 64-bit, it is recommended to set the BIOS option in Storage Configuration to quality and endurance. Because the motherboard specifications and the BIOS software might be updated, the content of this manual will be subject to this manual occur, the updated version will be available on ASRock website as well. FM2A88X Pro+ 1. Chapter 4 contains the configuration guide of the software and utilities. ASRock website http://www.asrock.com If you are using...

User Manual
Page 9
...Connector (4-pin) • 2 x Chassis Fan Connectors (2 x 4-pin) • 1 x 24 pin ATX Power Connector • 1 x 8 pin 12V Power Connector • 1 x Front Panel Audio Connector • 2 x USB 2.0 Headers (Support 4 USB 2.0 ports) • 1 x USB 3.0 Header by AMD A88X (Bolton-D4) (Supports 2 USB 3.0 ports) • 64Mb AMI UEFI Legal BIOS with GUI support • Supports "Plug and Play" • ACPI 1.1 Compliant wake up events • Supports jumperfree • SMBIOS 2.3.1 support • DRAM, CPU Voltage multi-adjustment • Drivers, Utilities, AntiVirus Software (Trial Version...
...Connector (4-pin) • 2 x Chassis Fan Connectors (2 x 4-pin) • 1 x 24 pin ATX Power Connector • 1 x 8 pin 12V Power Connector • 1 x Front Panel Audio Connector • 2 x USB 2.0 Headers (Support 4 USB 2.0 ports) • 1 x USB 3.0 Header by AMD A88X (Bolton-D4) (Supports 2 USB 3.0 ports) • 64Mb AMI UEFI Legal BIOS with GUI support • Supports "Plug and Play" • ACPI 1.1 Compliant wake up events • Supports jumperfree • SMBIOS 2.3.1 support • DRAM, CPU Voltage multi-adjustment • Drivers, Utilities, AntiVirus Software (Trial Version...

User Manual
Page 13
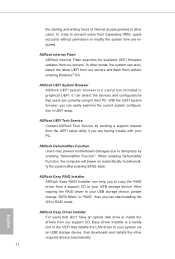
... RAID Installer ASRock Easy RAID Installer can detect the devices and configurations that don't have an optical disk drive to your PC. After copying the RAID driver to copy the RAID driver from bypassing OMG, guest accounts without entering Windows® OS. In order to prevent users from a support CD to your USB storage device, please change "SATA Mode" to "RAID", then you can autodetect the latest UEFI from the UEFI setup utility if you to your USB storage device. ASRock UEFI Tech Service...
... RAID Installer ASRock Easy RAID Installer can detect the devices and configurations that don't have an optical disk drive to your PC. After copying the RAID driver to copy the RAID driver from bypassing OMG, guest accounts without entering Windows® OS. In order to prevent users from a support CD to your USB storage device, please change "SATA Mode" to "RAID", then you can autodetect the latest UEFI from the UEFI setup utility if you to your USB storage device. ASRock UEFI Tech Service...

User Manual
Page 16
... Connector (ATX12V1) 2 CPU Fan Connector (CPU_FAN1) 3 Chassis Fan Connector (CHA_FAN2) 4 2 x 240-pin DDR3 DIMM Slots (DDR3_A1, DDR3_B1) 5 ATX Power Connector (ATXPWR1) 6 USB 3.0 Header (USB3_2_3) 7 SATA3 Connector (SATA_2) 8 SATA3 Connector (SATA_1) 9 SATA3 Connector (SATA_8) 10 SATA3 Connector (SATA_7) 11 Chassis Fan Connector (CHA_FAN1) 12 Chassis Speaker Header (SPEAKER1) 13 System Panel Header (PANEL1) 14 Clear CMOS Jumper (CLRCMOS1) 15 Power LED Header (PLED1) 16 SATA3 Connector (SATA_4) 17 SATA3 Connector (SATA_6) 18 SATA3 Connector (SATA_5) 19 SATA3 Connector (SATA_3) 20 USB 2.0 Header...
... Connector (ATX12V1) 2 CPU Fan Connector (CPU_FAN1) 3 Chassis Fan Connector (CHA_FAN2) 4 2 x 240-pin DDR3 DIMM Slots (DDR3_A1, DDR3_B1) 5 ATX Power Connector (ATXPWR1) 6 USB 3.0 Header (USB3_2_3) 7 SATA3 Connector (SATA_2) 8 SATA3 Connector (SATA_1) 9 SATA3 Connector (SATA_8) 10 SATA3 Connector (SATA_7) 11 Chassis Fan Connector (CHA_FAN1) 12 Chassis Speaker Header (SPEAKER1) 13 System Panel Header (PANEL1) 14 Clear CMOS Jumper (CLRCMOS1) 15 Power LED Header (PLED1) 16 SATA3 Connector (SATA_4) 17 SATA3 Connector (SATA_6) 18 SATA3 Connector (SATA_5) 19 SATA3 Connector (SATA_3) 20 USB 2.0 Header...

User Manual
Page 31
... refer to your graphics card driver supports AMD CrossFireXTM technology. Please refer to the AMD's website for details. 4. Download the drivers from the AMD's website: www.amd.com 3. Please refer to AMD graphics card manuals for details.) English 26 Make sure that the cards are supported with Windows® 7 / 7 64-bit / 8 / 8 64-bit OS. 1. Different CrossFireXTM cards may require different methods to PCIE5 slot. CrossFire Bridge Step 2 Connect two graphics cards by installing a CrossFire Bridge on...
... refer to your graphics card driver supports AMD CrossFireXTM technology. Please refer to the AMD's website for details. 4. Download the drivers from the AMD's website: www.amd.com 3. Please refer to AMD graphics card manuals for details.) English 26 Make sure that the cards are supported with Windows® 7 / 7 64-bit / 8 / 8 64-bit OS. 1. Different CrossFireXTM cards may require different methods to PCIE5 slot. CrossFire Bridge Step 2 Connect two graphics cards by installing a CrossFire Bridge on...
User Manual
Page 33
... your graphics card and click Apply. The Catalyst Uninstaller is an optional download. AMD Catalyst Control Center Step 4 Double-click the AMD Catalyst Control Center icon in your computer and boot into OS. English 28 Please check AMD's website for details. Please check AMD's website for AMD driver updates. Select the GPU number according to installation. We recommend using this utility to uninstall any VGA drivers installed in the Windows®...
... your graphics card and click Apply. The Catalyst Uninstaller is an optional download. AMD Catalyst Control Center Step 4 Double-click the AMD Catalyst Control Center icon in your computer and boot into OS. English 28 Please check AMD's website for details. Please check AMD's website for AMD driver updates. Select the GPU number according to installation. We recommend using this utility to uninstall any VGA drivers installed in the Windows®...
User Manual
Page 34
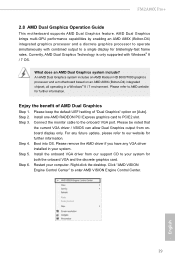
... a motherboard based on [Auto]. Step 3. Boot into OS. Install the onboard VGA driver from onboard display only. Please refer to your system for further information. Please keep the default UEFI setting of AMD Dual Graphics Step 1. Connect the monitor cable to enter AMD VISION Engine Control Center. 29 English Please be noted that the current VGA driver / VBIOS can allow Dual Graphics output from our support CD to AMD website for both the onboard VGA and the discrete graphics card. Please remove...
... a motherboard based on [Auto]. Step 3. Boot into OS. Install the onboard VGA driver from onboard display only. Please refer to your system for further information. Please keep the default UEFI setting of AMD Dual Graphics Step 1. Connect the monitor cable to enter AMD VISION Engine Control Center. 29 English Please be noted that the current VGA driver / VBIOS can allow Dual Graphics output from our support CD to AMD website for both the onboard VGA and the discrete graphics card. Please remove...
User Manual
Page 36
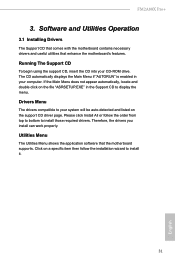
... to install those required drivers. Therefore, the drivers you install can work properly. Utilities Menu The Utilities Menu shows the application software that enhance the motherboard's features. FM2A88X Pro+ 3. Running The Support CD To begin using the support CD, insert the CD into your CD-ROM drive. If the Main Menu does not appear automatically, locate and double click on the file "ASRSETUP.EXE" in your system will be auto-detected and listed on a specific...
... to install those required drivers. Therefore, the drivers you install can work properly. Utilities Menu The Utilities Menu shows the application software that enhance the motherboard's features. FM2A88X Pro+ 3. Running The Support CD To begin using the support CD, insert the CD into your CD-ROM drive. If the Main Menu does not appear automatically, locate and double click on the file "ASRSETUP.EXE" in your system will be auto-detected and listed on a specific...
User Manual
Page 44
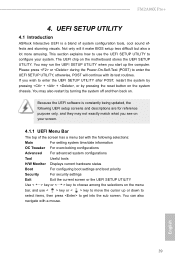
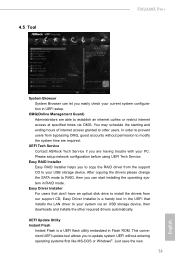
... For overclocking configurations Advanced For advanced system configurations Tool Useful tools H/W Monitor Displays current hardware status Boot For configuring boot settings and boot priority Security For security settings Exit Exit the current screen or the UEFI Setup Utility Use < > key or < > key to enter the UEFI Setup Utility after POST, restart the system by pressing + + , or by turning the system off and then back on the motherboard stores the UEFI Setup Utility. Because the UEFI software is a blend of the screen has a menu...
... For overclocking configurations Advanced For advanced system configurations Tool Useful tools H/W Monitor Displays current hardware status Boot For configuring boot settings and boot priority Security For security settings Exit Exit the current screen or the UEFI Setup Utility Use < > key or < > key to enter the UEFI Setup Utility after POST, restart the system by pressing + + , or by turning the system off and then back on the motherboard stores the UEFI Setup Utility. Because the UEFI software is a blend of the screen has a menu...

User Manual
Page 51
... can use Dual Link DVI monitor without audio function. The default value is [Auto]. The default value of multiple video controllers. Onboard HDMI HD Audio This allows you to DVI port. If you select [as Dual Link DVI]. 46 English Configuration options: [Onboard], [PCI] and [PCI Express]. Primary Graphics Adapter This item will switch the PCI Bus scanning order while searching for video card. It allows you to set the share memory feature. DVI Function Use this feature is [PCI Express]. Configuration options: [Auto...
... can use Dual Link DVI monitor without audio function. The default value is [Auto]. The default value of multiple video controllers. Onboard HDMI HD Audio This allows you to DVI port. If you select [as Dual Link DVI]. 46 English Configuration options: [Onboard], [PCI] and [PCI Express]. Primary Graphics Adapter This item will switch the PCI Bus scanning order while searching for video card. It allows you to set the share memory feature. DVI Function Use this feature is [PCI Express]. Configuration options: [Auto...
User Manual
Page 53
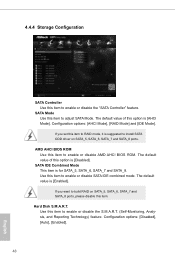
... Disk S.M.A.R.T. AMD AHCI BIOS ROM Use this item to enable or disable the S.M.A.R.T. (Self-Monitoring, Analysis, and Reporting Technology) feature. Configuration options: [Disabled], [Auto], [Enabled]. 48 English Configuration options: [AHCI Mode], [RAID Mode] and [IDE Mode]. Use this item to enable or disable AMD AHCI BIOS ROM. The default value is for SATA_5, SATA_6, SATA_7 and SATA_8. If you set this option is suggested to install SATA ODD driver on SATA_5, SATA_6, SATA_7 and SATA_8 ports, please disable this item. Use this item to enable or disable the "SATA Controller...
... Disk S.M.A.R.T. AMD AHCI BIOS ROM Use this item to enable or disable the S.M.A.R.T. (Self-Monitoring, Analysis, and Reporting Technology) feature. Configuration options: [Disabled], [Auto], [Enabled]. 48 English Configuration options: [AHCI Mode], [RAID Mode] and [IDE Mode]. Use this item to enable or disable AMD AHCI BIOS ROM. The default value is for SATA_5, SATA_6, SATA_7 and SATA_8. If you set this option is suggested to install SATA ODD driver on SATA_5, SATA_6, SATA_7 and SATA_8 ports, please disable this item. Use this item to enable or disable the "SATA Controller...

User Manual
Page 55
... AC/power remains off mode. Deep Sleep Configure deep sleep mode for better system compatibility and stability. PCI Devices Power On Use this item to enable or disable PS/2 keyboard to turn on the system from the power-soft-off mode. If [Power Off] is shut down. RTC Alarm Power On Use this feature if the OS supports it. Select [Auto] will enable this item to enable or disable RTC (Real Time Clock) to auto-detect or disable...
... AC/power remains off mode. Deep Sleep Configure deep sleep mode for better system compatibility and stability. PCI Devices Power On Use this item to enable or disable PS/2 keyboard to turn on the system from the power-soft-off mode. If [Power Off] is shut down. RTC Alarm Power On Use this feature if the OS supports it. Select [Auto] will enable this item to enable or disable RTC (Real Time Clock) to auto-detect or disable...

User Manual
Page 57
... option to enable or disable legacy support for USB devices. If you have USB compatibility issue, it is [Enabled]. USB devices are not allowed to use of these four options: [Enabled] - Enables support for the details of USB 3.0 controller. 4.4.7 USB Configuration USB 2.0 Controller Use this item to enable or disable the use only under legacy OS and UEFI setup when [Disabled] is selected. The default value is recommended to select [Disabled] to enable or disable the use under UEFI setup and Windows / Linux OS. A88X USB 3.0 Controller Use this item to enter OS. [UEFI...
... option to enable or disable legacy support for USB devices. If you have USB compatibility issue, it is [Enabled]. USB devices are not allowed to use of these four options: [Enabled] - Enables support for the details of USB 3.0 controller. 4.4.7 USB Configuration USB 2.0 Controller Use this item to enable or disable the use only under legacy OS and UEFI setup when [Disabled] is selected. The default value is recommended to select [Disabled] to enable or disable the use under UEFI setup and Windows / Linux OS. A88X USB 3.0 Controller Use this item to enter OS. [UEFI...
User Manual
Page 58
... setup network configuration before using UEFI Tech Service. Just save the new 53 English Easy Driver Installer For users that installs the LAN driver to your USB storage device. After copying the drivers please change the SATA mode to other required drivers automatically. In order to prevent users from bypassing OMG, guest accounts without entering operating systems first like MS-DOS or Windows®. Easy RAID Installer Easy RAID Installer helps you to copy the RAID driver from our support...
... setup network configuration before using UEFI Tech Service. Just save the new 53 English Easy Driver Installer For users that installs the LAN driver to your USB storage device. After copying the drivers please change the SATA mode to other required drivers automatically. In order to prevent users from bypassing OMG, guest accounts without entering operating systems first like MS-DOS or Windows®. Easy RAID Installer Easy RAID Installer helps you to copy the RAID driver from our support...

Quick Installation Guide
Page 4
... Connector (ATX12V1) 2 CPU Fan Connector (CPU_FAN1) 3 Chassis Fan Connector (CHA_FAN2) 4 2 x 240-pin DDR3 DIMM Slots (DDR3_A1, DDR3_B1) 5 ATX Power Connector (ATXPWR1) 6 USB 3.0 Header (USB3_2_3) 7 SATA3 Connector (SATA_2) 8 SATA3 Connector (SATA_1) 9 SATA3 Connector (SATA_8) 10 SATA3 Connector (SATA_7) 11 Chassis Fan Connector (CHA_FAN1) 12 Chassis Speaker Header (SPEAKER1) 13 System Panel Header (PANEL1) 14 Clear CMOS Jumper (CLRCMOS1) 15 Power LED Header (PLED1) 16 SATA3 Connector (SATA_4) 17 SATA3 Connector (SATA_6) 18 SATA3 Connector (SATA_5) 19 SATA3 Connector (SATA_3) 20 USB 2.0 Header...
... Connector (ATX12V1) 2 CPU Fan Connector (CPU_FAN1) 3 Chassis Fan Connector (CHA_FAN2) 4 2 x 240-pin DDR3 DIMM Slots (DDR3_A1, DDR3_B1) 5 ATX Power Connector (ATXPWR1) 6 USB 3.0 Header (USB3_2_3) 7 SATA3 Connector (SATA_2) 8 SATA3 Connector (SATA_1) 9 SATA3 Connector (SATA_8) 10 SATA3 Connector (SATA_7) 11 Chassis Fan Connector (CHA_FAN1) 12 Chassis Speaker Header (SPEAKER1) 13 System Panel Header (PANEL1) 14 Clear CMOS Jumper (CLRCMOS1) 15 Power LED Header (PLED1) 16 SATA3 Connector (SATA_4) 17 SATA3 Connector (SATA_6) 18 SATA3 Connector (SATA_5) 19 SATA3 Connector (SATA_3) 20 USB 2.0 Header...
Quick Installation Guide
Page 7
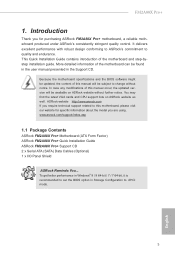
Because the motherboard specifications and the BIOS software might be updated, the content of this manual will be found in the user manual presented in Storage Configuration to AHCI mode. 5 English In case any modifications of this manual occur, the updated version will be subject to this motherboard, please visit our website for specific information about the model you for purchasing ASRock FM2A88X Pro+ motherboard, a reliable motherboard produced under ASRock's consistently stringent quality control. ASRock website http://www...
Because the motherboard specifications and the BIOS software might be updated, the content of this manual will be found in the user manual presented in Storage Configuration to AHCI mode. 5 English In case any modifications of this manual occur, the updated version will be subject to this motherboard, please visit our website for specific information about the model you for purchasing ASRock FM2A88X Pro+ motherboard, a reliable motherboard produced under ASRock's consistently stringent quality control. ASRock website http://www...
Quick Installation Guide
Page 14
... easily examine the current system configuration in UEFI setup. ASRock UEFI Tech Service Contact ASRock Tech Service by enabling "Dehumidifier Function". After copying the RAID driver to your system via an USB storage device, then downloads and installs the other users. It can detect the devices and configurations that installs the LAN driver to your USB storage device, please change "SATA Mode" to "RAID", then you can autodetect the latest UEFI from our servers and flash them without permission to modify...
... easily examine the current system configuration in UEFI setup. ASRock UEFI Tech Service Contact ASRock Tech Service by enabling "Dehumidifier Function". After copying the RAID driver to your system via an USB storage device, then downloads and installs the other users. It can detect the devices and configurations that installs the LAN driver to your USB storage device, please change "SATA Mode" to "RAID", then you can autodetect the latest UEFI from our servers and flash them without permission to modify...
Quick Installation Guide
Page 28
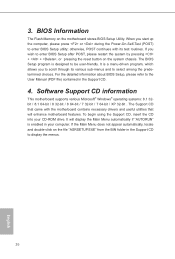
... chassis. Software Support CD information This motherboard supports various Microsoft® Windows® operating systems: 8.1 32bit / 8.1 64-bit / 8 32-bit / 8 64-bit / 7 32-bit / 7 64-bit / XP 32-bit . To begin using the Support CD, insert the CD into your computer. If the Main Menu does not appear automatically, locate and double-click on the motherboard stores BIOS Setup Utility. If you wish to be user-friendly. It is enabled in your CD-ROM drive...
... chassis. Software Support CD information This motherboard supports various Microsoft® Windows® operating systems: 8.1 32bit / 8.1 64-bit / 8 32-bit / 8 64-bit / 7 32-bit / 7 64-bit / XP 32-bit . To begin using the Support CD, insert the CD into your computer. If the Main Menu does not appear automatically, locate and double-click on the motherboard stores BIOS Setup Utility. If you wish to be user-friendly. It is enabled in your CD-ROM drive...


