

User Manual
Page 4
... Specifications 2 1.3 Motherboard Layout 6 1.4 I/O Panel 8 Chapter 2 Installation 9 2.1 Installing the CPU 10 2.2 Installing the CPU Fan and Heatsink 13 2.3 Installing Memory Modules (SO-DIMM) 14 2.4 Jumpers Setup 15 2.5 Onboard Headers and Connectors 16 2.6 M.2 WiFi/BT Module Installation Guide 22 Chapter 3 Software and Utilities Operation 24 3.1 Installing Drivers 24 3.2 ASRock Live Update & APP Shop 25 3.2.1 UI Overview 25 3.2.2 Apps 26 3.2.3 BIOS & Drivers 29 3.2.4 Setting 30 3.3 Enabling USB Ports for Windows® 7 Installation 31 Chapter 4 UEFI SETUP...
... Specifications 2 1.3 Motherboard Layout 6 1.4 I/O Panel 8 Chapter 2 Installation 9 2.1 Installing the CPU 10 2.2 Installing the CPU Fan and Heatsink 13 2.3 Installing Memory Modules (SO-DIMM) 14 2.4 Jumpers Setup 15 2.5 Onboard Headers and Connectors 16 2.6 M.2 WiFi/BT Module Installation Guide 22 Chapter 3 Software and Utilities Operation 24 3.1 Installing Drivers 24 3.2 ASRock Live Update & APP Shop 25 3.2.1 UI Overview 25 3.2.2 Apps 26 3.2.3 BIOS & Drivers 29 3.2.4 Setting 30 3.3 Enabling USB Ports for Windows® 7 Installation 31 Chapter 4 UEFI SETUP...
User Manual
Page 6
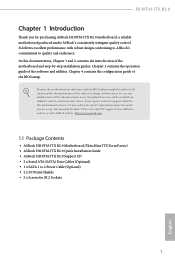
... guide of the BIOS setup. If you for specific information about the model you are using. Chapter 4 contains the configuration guide of the software and utilities. In case any modifications of this documentation occur, the updated version will be available on ASRock's website as well. ASRock website http://www.asrock.com. 1.1 Package Contents • ASRock H110TM-ITX R2.0 Motherboard (Thin Mini-ITX Form Factor) • ASRock H110TM-ITX R2.0 Quick Installation Guide • ASRock H110TM-ITX R2.0 Support CD • 2 x Serial ATA (SATA) Data Cables (Optional) • 1 x SATA...
... guide of the BIOS setup. If you for specific information about the model you are using. Chapter 4 contains the configuration guide of the software and utilities. In case any modifications of this documentation occur, the updated version will be available on ASRock's website as well. ASRock website http://www.asrock.com. 1.1 Package Contents • ASRock H110TM-ITX R2.0 Motherboard (Thin Mini-ITX Form Factor) • ASRock H110TM-ITX R2.0 Quick Installation Guide • ASRock H110TM-ITX R2.0 Support CD • 2 x Serial ATA (SATA) Data Cables (Optional) • 1 x SATA...
User Manual
Page 8
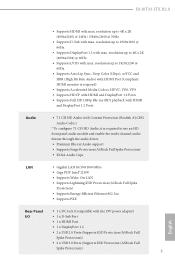
resolution up to use an HD front panel audio module and enable the multi-channel audio feature through the audio driver. • Premium Blu-ray Audio support • Supports Surge Protection (ASRock Full Spike Protection) • ELNA Audio Caps LAN • Gigabit LAN 10/100/1000 Mb/s • Giga PHY Intel® I219V • Supports Wake-On-LAN • Supports Lightning/ESD Protection (ASRock Full Spike Protection) • Supports Energy Efficient Ethernet 802...
resolution up to use an HD front panel audio module and enable the multi-channel audio feature through the audio driver. • Premium Blu-ray Audio support • Supports Surge Protection (ASRock Full Spike Protection) • ELNA Audio Caps LAN • Gigabit LAN 10/100/1000 Mb/s • Giga PHY Intel® I219V • Supports Wake-On-LAN • Supports Lightning/ESD Protection (ASRock Full Spike Protection) • Supports Energy Efficient Ethernet 802...
User Manual
Page 10
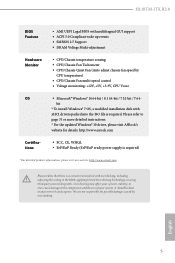
... detailed instructions. * For the updated Windows® 10 driver, please visit ASRock's website for possible damage caused by CPU temperature) • CPU/Chassis Fan multi-speed control • Voltage monitoring: +12V, +5V, +3.3V, CPU Vcore OS Certifications • Microsoft® Windows® 10 64-bit / 8.1 64-bit / 7 32-bit / 7 64bit * To install Windows® 7 OS, a modified installation disk with xHCI drivers packed into the ISO file is a certain risk involved with multilingual GUI support • ACPI 5.0 Compliant wake...
... detailed instructions. * For the updated Windows® 10 driver, please visit ASRock's website for possible damage caused by CPU temperature) • CPU/Chassis Fan multi-speed control • Voltage monitoring: +12V, +5V, +3.3V, CPU Vcore OS Certifications • Microsoft® Windows® 10 64-bit / 8.1 64-bit / 7 32-bit / 7 64bit * To install Windows® 7 OS, a modified installation disk with xHCI drivers packed into the ISO file is a certain risk involved with multilingual GUI support • ACPI 5.0 Compliant wake...

User Manual
Page 12
... Power Header (ATX19V_IN1) 2 Clear CMOS Jumper (CLRMOS1) 3 USB 2.0 Header (USB6) 4 USB 2.0 Header (USB4_5) 5 USB 3.0 Header (USB3_4_5) 6 Chassis Fan Connector (CHA_FAN1) 7 SATA3 Connector (SATA3_0) 8 SATA3 Connector (SATA3_1) 9 SATA Power Connector (SATA_POW1) 10 Monitor Switch Header (MONITOR_SWITCH1) 11 System Panel Header (PANEL1) 12 Consumer Infrared Module Header (CIR1) 13 Backlight Power Jumper (BKT_PWR1) 14 Panel Power Jumper (PNL_PWR1) 15 LVDS Connector (LVDS1) 16 Backlight Control Header (BLT_VOL1) 17 COM Port Header (COM1) 18 2 x 260-pin DDR4 SO-DIMM Slots (DDR4_A1, DDR4_B1) 19 CPU...
... Power Header (ATX19V_IN1) 2 Clear CMOS Jumper (CLRMOS1) 3 USB 2.0 Header (USB6) 4 USB 2.0 Header (USB4_5) 5 USB 3.0 Header (USB3_4_5) 6 Chassis Fan Connector (CHA_FAN1) 7 SATA3 Connector (SATA3_0) 8 SATA3 Connector (SATA3_1) 9 SATA Power Connector (SATA_POW1) 10 Monitor Switch Header (MONITOR_SWITCH1) 11 System Panel Header (PANEL1) 12 Consumer Infrared Module Header (CIR1) 13 Backlight Power Jumper (BKT_PWR1) 14 Panel Power Jumper (PNL_PWR1) 15 LVDS Connector (LVDS1) 16 Backlight Control Header (BLT_VOL1) 17 COM Port Header (COM1) 18 2 x 260-pin DDR4 SO-DIMM Slots (DDR4_A1, DDR4_B1) 19 CPU...

User Manual
Page 20
... the power supply. When the jumper cap is placed on CLRMOS1 for 15 seconds, use a jumper cap to clear the CMOS when you just finish updating the BIOS, you need to short pin2 and pin3 on the pins, the jumper is "Short". After waiting for 5 seconds. If you must boot up the system first, and then shut it may damage the panel. 15 English H110TM-ITX R2.0 2.4 Jumpers Setup The...
... the power supply. When the jumper cap is placed on CLRMOS1 for 15 seconds, use a jumper cap to clear the CMOS when you just finish updating the BIOS, you need to short pin2 and pin3 on the pins, the jumper is "Short". After waiting for 5 seconds. If you must boot up the system first, and then shut it may damage the panel. 15 English H110TM-ITX R2.0 2.4 Jumpers Setup The...
User Manual
Page 24
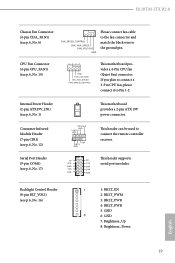
...19 H110TM-ITX R2.0 Chassis Fan Connector (4-pin CHA_FAN1) (see p.6, No. 6) FAN_SPEED_CONTROL CHA_FAN_SPEED FAN_VOLTAGE GND Please connect fan cable to the fan connector and match the black wire to connect the remote controller receiver. Backlight Control Header (8-pin BLT_VOL1) (see p.6, No. 19) 4 3 21 GND FAN_VOLTAGE CPU_FAN_SPEED FAN_SPEED_CONTROL This motherboard provides a 4-Pin CPU fan (Quiet Fan) connector. Serial Port Header (9-pin COM1) (see p.6, No. 1) This motherboard provides a 2-pin ATX 19V power connector. If you plan to connect a 3-Pin CPU fan, please connect it...
...19 H110TM-ITX R2.0 Chassis Fan Connector (4-pin CHA_FAN1) (see p.6, No. 6) FAN_SPEED_CONTROL CHA_FAN_SPEED FAN_VOLTAGE GND Please connect fan cable to the fan connector and match the black wire to connect the remote controller receiver. Backlight Control Header (8-pin BLT_VOL1) (see p.6, No. 19) 4 3 21 GND FAN_VOLTAGE CPU_FAN_SPEED FAN_SPEED_CONTROL This motherboard provides a 4-Pin CPU fan (Quiet Fan) connector. Serial Port Header (9-pin COM1) (see p.6, No. 1) This motherboard provides a 2-pin ATX 19V power connector. If you plan to connect a 3-Pin CPU fan, please connect it...
User Manual
Page 26
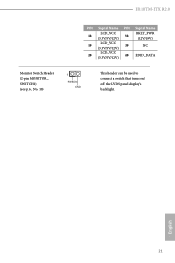
H110TM-ITX R2.0 PIN Signal Name PIN Signal Name LCD_VCC 18 38 (3.3V/5V/12V) BKLT_PWR (12V/19V) LCD_VCC 19 39 NC (3.3V/5V/12V) LCD_VCC 20 40 EDID_DATA (3.3V/5V/12V) Monitor Switch Header (2-pin MONITOR_ SWITCH1) (see p.6, No. 10) 1 PWRDN GND This header can be used to connect a switch that turns on/ off the LVDS panel display's backlight. English 21
H110TM-ITX R2.0 PIN Signal Name PIN Signal Name LCD_VCC 18 38 (3.3V/5V/12V) BKLT_PWR (12V/19V) LCD_VCC 19 39 NC (3.3V/5V/12V) LCD_VCC 20 40 EDID_DATA (3.3V/5V/12V) Monitor Switch Header (2-pin MONITOR_ SWITCH1) (see p.6, No. 10) 1 PWRDN GND This header can be used to connect a switch that turns on/ off the LVDS panel display's backlight. English 21

User Manual
Page 29
... CD-ROM drive. Click on the support CD driver page. Chapter 3 Software and Utilities Operation 3.1 Installing Drivers The Support CD that comes with the motherboard contains necessary drivers and useful utilities that the motherboard supports. Please click Install All or follow the order from top to bottom to your system will be auto-detected and listed on a specific item then follow the installation wizard to display the menu. To improve Windows 7 compatibility, please download and install...
... CD-ROM drive. Click on the support CD driver page. Chapter 3 Software and Utilities Operation 3.1 Installing Drivers The Support CD that comes with the motherboard contains necessary drivers and useful utilities that the motherboard supports. Please click Install All or follow the order from top to bottom to your system will be auto-detected and listed on a specific item then follow the installation wizard to display the menu. To improve Windows 7 compatibility, please download and install...
User Manual
Page 36
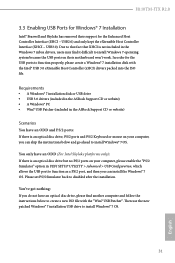
..." option in the Windows 7 inbox drivers, users may find another computer and follow the instructions below and go ahead to function properly, please create a Windows® 7 installation disk with the "Win7 USB Patcher". In order for the USB ports to install Windows® 7 OS. H110TM-ITX R2.0 3.3 Enabling USB Ports for Windows® 7 Installation Intel® Braswell and Skylake has removed their motherboard won't work. Requirements • A Windows® 7 installation disk or USB drive • USB 3.0 drivers (included in the ASRock Support CD...
..." option in the Windows 7 inbox drivers, users may find another computer and follow the instructions below and go ahead to function properly, please create a Windows® 7 installation disk with the "Win7 USB Patcher". In order for the USB ports to install Windows® 7 OS. H110TM-ITX R2.0 3.3 Enabling USB Ports for Windows® 7 Installation Intel® Braswell and Skylake has removed their motherboard won't work. Requirements • A Windows® 7 installation disk or USB drive • USB 3.0 drivers (included in the ASRock Support CD...

User Manual
Page 37
Instructions Step 1 Insert the Windows® 7 installation disk or USB drive to your CD-ROM. 32 English If you are using ASRock's Support CD for the USB 3.0 driver, please select your system. Step 4 Select the "USB Driver Folder" by clicking the red circle as shown as the picture below . Step 2 Extract the tool (Win7 USB Patcher) and launch it. Step 3 Select the "Win7 Folder" from Step1 by clicking the red circle as shown as the picture below .
Instructions Step 1 Insert the Windows® 7 installation disk or USB drive to your CD-ROM. 32 English If you are using ASRock's Support CD for the USB 3.0 driver, please select your system. Step 4 Select the "USB Driver Folder" by clicking the red circle as shown as the picture below . Step 2 Extract the tool (Win7 USB Patcher) and launch it. Step 3 Select the "Win7 Folder" from Step1 by clicking the red circle as shown as the picture below .

User Manual
Page 55
... installed. Onboard HDMI HD Audio Enable audio for lower power consumption. Good Night LED By enabling Good Night LED, the Power/HDD LEDs will also automatically switch off when the power recovers. Onboard LAN Enable or disable the onboard network interface controller. WAN Radio Enable/disable the WiFi module's connectivity. If [Power Off] is selected, the system will remain off the Power and Keyboard LEDs when the system enters into Standby/Hibernation mode. If [Power On] is selected, the power will start to enable onboard HD audio...
... installed. Onboard HDMI HD Audio Enable audio for lower power consumption. Good Night LED By enabling Good Night LED, the Power/HDD LEDs will also automatically switch off when the power recovers. Onboard LAN Enable or disable the onboard network interface controller. WAN Radio Enable/disable the WiFi module's connectivity. If [Power Off] is selected, the system will remain off the Power and Keyboard LEDs when the system enters into Standby/Hibernation mode. If [Power On] is selected, the power will start to enable onboard HD audio...

User Manual
Page 60
... an USB storage device, then downloads and installs the other users. UEFI Tech Service Contact ASRock Tech Service if you are able to modify the system time are required. 4.7 Tools H110TM-ITX R2.0 OMG (Online Management Guard) Administrators are having trouble with your system via OMG. Please setup network configuration before using UEFI Tech Service. In order to prevent users from our support CD, Easy Driver Installer is a handy tool in the UEFI that installs the LAN driver...
... an USB storage device, then downloads and installs the other users. UEFI Tech Service Contact ASRock Tech Service if you are able to modify the system time are required. 4.7 Tools H110TM-ITX R2.0 OMG (Online Management Guard) Administrators are having trouble with your system via OMG. Please setup network configuration before using UEFI Tech Service. In order to prevent users from our support CD, Easy Driver Installer is a handy tool in the UEFI that installs the LAN driver...

User Manual
Page 61
... (Auto IP), Auto ASRock Internet Flash downloads and updates the latest UEFI firmware version from our servers for the Boot Manager. Please setup network configuration before using Internet Flash. *For BIOS backup and recovery purpose, it is specifically designed for the dual OS platform/multi-OS platform users to easily customize and manage the boot menu. *Please connect more than one boot devices to use this function. 56 English Boot Manager Timeout Enable/disable the Boot Manager Timeout. Instant Flash Save UEFI files...
... (Auto IP), Auto ASRock Internet Flash downloads and updates the latest UEFI firmware version from our servers for the Boot Manager. Please setup network configuration before using Internet Flash. *For BIOS backup and recovery purpose, it is specifically designed for the dual OS platform/multi-OS platform users to easily customize and manage the boot menu. *Please connect more than one boot devices to use this function. 56 English Boot Manager Timeout Enable/disable the Boot Manager Timeout. Instant Flash Save UEFI files...

User Manual
Page 62
Network Configuration Use this to download the UEFI firmware. UEFI Download Server Select a server to configure internet connection settings for Internet Flash. H110TM-ITX R2.0 Internet Setting Enable or disable sound effects in the setup utility. English 57
Network Configuration Use this to download the UEFI firmware. UEFI Download Server Select a server to configure internet connection settings for Internet Flash. H110TM-ITX R2.0 Internet Setting Enable or disable sound effects in the setup utility. English 57

User Manual
Page 64
... Windows 8.1 Secure Boot. Secure Boot Use this option to enable or disable support for the administrator account. Disable this item to use discrete TPM Module. 59 English Intel(R) Platform Trust Technology Enable/disable Intel PTT in the UEFI Setup Utility. User Password Set or change the settings in ME. Leave it blank and press enter to remove the password. Leave it blank and press enter to remove the password. H110TM-ITX R2.0 4.9 Security Screen In this section you may also clear the user password...
... Windows 8.1 Secure Boot. Secure Boot Use this option to enable or disable support for the administrator account. Disable this item to use discrete TPM Module. 59 English Intel(R) Platform Trust Technology Enable/disable Intel PTT in the UEFI Setup Utility. User Password Set or change the settings in ME. Leave it blank and press enter to remove the password. Leave it blank and press enter to remove the password. H110TM-ITX R2.0 4.9 Security Screen In this section you may also clear the user password...

Quick Installation Guide
Page 6
... control. ASRock website http://www.asrock.com. 1.1 Package Contents • ASRock H110TM-ITX R2.0 Motherboard (Thin Mini-ITX Form Factor) • ASRock H110TM-ITX R2.0 Quick Installation Guide • ASRock H110TM-ITX R2.0 Support CD • 2 x Serial ATA (SATA) Data Cables (Optional) • 1 x SATA 1 to quality and endurance. In case any modifications of this motherboard, please visit our website for specific information about the model you are using. Chapter 1 Introduction Thank you for M.2 Sockets 4 English You may find the latest VGA cards and CPU support list...
... control. ASRock website http://www.asrock.com. 1.1 Package Contents • ASRock H110TM-ITX R2.0 Motherboard (Thin Mini-ITX Form Factor) • ASRock H110TM-ITX R2.0 Quick Installation Guide • ASRock H110TM-ITX R2.0 Support CD • 2 x Serial ATA (SATA) Data Cables (Optional) • 1 x SATA 1 to quality and endurance. In case any modifications of this motherboard, please visit our website for specific information about the model you are using. Chapter 1 Introduction Thank you for M.2 Sockets 4 English You may find the latest VGA cards and CPU support list...

Quick Installation Guide
Page 9
... 7 H110TM-ITX R2.0 • 1 x RJ-45 LAN Port with USB4_5. SATA3_0: RST utility port2; SATA3_1: RST utility port3 Connector • 1 x CIR Header • 1 x COM Port Header • 1 x SPDIF Out Connector • 1 x Monitor Switch Header • 1 x Backlight Power Jumper • 1 x Panel Power Jumper • 1 x Backlight Control Header • 1 x LVDS Connector • 1 x Home Theater PC Header • 1 x CPU Fan Connector (4-pin) • 1 x Chassis Fan Connector (4-pin) (Smart Fan Speed Con- trol) * CHA_FAN1 can auto detect if 3-pin or 4-pin fan is in use. * The CPU Fan...
... 7 H110TM-ITX R2.0 • 1 x RJ-45 LAN Port with USB4_5. SATA3_0: RST utility port2; SATA3_1: RST utility port3 Connector • 1 x CIR Header • 1 x COM Port Header • 1 x SPDIF Out Connector • 1 x Monitor Switch Header • 1 x Backlight Power Jumper • 1 x Panel Power Jumper • 1 x Backlight Control Header • 1 x LVDS Connector • 1 x Home Theater PC Header • 1 x CPU Fan Connector (4-pin) • 1 x Chassis Fan Connector (4-pin) (Smart Fan Speed Con- trol) * CHA_FAN1 can auto detect if 3-pin or 4-pin fan is in use. * The CPU Fan...
Quick Installation Guide
Page 163
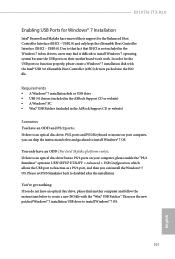
... drivers, users may find it difficult to install Windows 7 operating system because the USB ports on your computer, you do not have an optical disc drive, please find another computer and follow the instructions below and go ahead to function as a PS/2 port, and then you can install the Windows® 7 OS. H110TM-ITX R2.0 Enabling USB Ports for Windows® 7 Installation Intel® Braswell and Skylake has removed their motherboard...
... drivers, users may find it difficult to install Windows 7 operating system because the USB ports on your computer, you do not have an optical disc drive, please find another computer and follow the instructions below and go ahead to function as a PS/2 port, and then you can install the Windows® 7 OS. H110TM-ITX R2.0 Enabling USB Ports for Windows® 7 Installation Intel® Braswell and Skylake has removed their motherboard...

Quick Installation Guide
Page 164
Step 4 Select the "USB Driver Folder" by clicking the red circle as shown as the picture below . If you are using ASRock's Support CD for the USB 3.0 driver, please select your system. Step 3 Select the "Win7 Folder" from Step1 by clicking the red circle as shown as the picture below . Step 2 Extract the tool (Win7 USB Patcher) and launch it. Instructions Step 1 Insert the Windows® 7 installation disk or USB drive to your CD-ROM. 162 English
Step 4 Select the "USB Driver Folder" by clicking the red circle as shown as the picture below . If you are using ASRock's Support CD for the USB 3.0 driver, please select your system. Step 3 Select the "Win7 Folder" from Step1 by clicking the red circle as shown as the picture below . Step 2 Extract the tool (Win7 USB Patcher) and launch it. Instructions Step 1 Insert the Windows® 7 installation disk or USB drive to your CD-ROM. 162 English


