
User Manual
Page 3
... walk on the power cord or allow anything to disassemble/reassemble the system or modifying the hardware configuration. 3 Safety instructions Your system is designed and tested to ensure your safety, it is important that you read the following technical problems with ambient temperatures between 0o C and 40o C. • If you operate your system. • Do not use this product near...
... walk on the power cord or allow anything to disassemble/reassemble the system or modifying the hardware configuration. 3 Safety instructions Your system is designed and tested to ensure your safety, it is important that you read the following technical problems with ambient temperatures between 0o C and 40o C. • If you operate your system. • Do not use this product near...

User Manual
Page 5
...APP Charger 32 6 BIOS SETUP UTILITY 33 6.1 Introduction 33 6.1.1 BIOS Menu Bar 33 6.1.2 Navigation Keys 34 6.2 Main Screen 34 6.3 OC Tweaker Screen 35 6.4 Advanced Screen 38 6.4.1 CPU Configuration 39 6.4.2 Chipset Configuration 40 6.4.3 ACPI Configuration 41 6.4.4 Storage Configuration 42 6.4.5 PCIPnP Configuration 42 6.4.6 USB Configuration 43 5 Contents 1 Introduction 7 1.1 Package Contents 7 1.2 Specifications 8 1.3 System Motherboard Components 9 1.4 Rear Panel Connections 11 1.5 System Chassis 12 1.6 Remote Controller 13 2 System Quick Installation 14 3 Reinstalling...
...APP Charger 32 6 BIOS SETUP UTILITY 33 6.1 Introduction 33 6.1.1 BIOS Menu Bar 33 6.1.2 Navigation Keys 34 6.2 Main Screen 34 6.3 OC Tweaker Screen 35 6.4 Advanced Screen 38 6.4.1 CPU Configuration 39 6.4.2 Chipset Configuration 40 6.4.3 ACPI Configuration 41 6.4.4 Storage Configuration 42 6.4.5 PCIPnP Configuration 42 6.4.6 USB Configuration 43 5 Contents 1 Introduction 7 1.1 Package Contents 7 1.2 Specifications 8 1.3 System Motherboard Components 9 1.4 Rear Panel Connections 11 1.5 System Chassis 12 1.6 Remote Controller 13 2 System Quick Installation 14 3 Reinstalling...

User Manual
Page 6
6.5 Hardware Health Event Monitoring Screen 44 6.6 Boot Screen 44 6.6.1 Boot Settings Configuration 45 6.7 Security Screen 46 6.8 Exit Screen 47 7 Software Support 48 7.1 Install Operating System 48 7.2 Support CD Information 48 7.2.1 Running Support CD 48 7.2.2 Drivers Menu 48 7.2.3 Utilities Menu 48 7.2.4 Contact Information 48 6
6.5 Hardware Health Event Monitoring Screen 44 6.6 Boot Screen 44 6.6.1 Boot Settings Configuration 45 6.7 Security Screen 46 6.8 Exit Screen 47 7 Software Support 48 7.1 Install Operating System 48 7.2 Support CD Information 48 7.2.1 Running Support CD 48 7.2.2 Drivers Menu 48 7.2.3 Utilities Menu 48 7.2.4 Contact Information 48 6
User Manual
Page 7
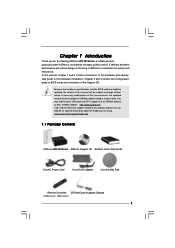
... to ASRock's commitment to BIOS setup and information of this manual occur, the updated version will be subject to the hardware installation. You may find the latest VGA cards and CPU support lists on ASRock website without notice. ASRock website http://www.asrock.com If you are using. www.asrock.com/support/index.asp 1.1 Package Contents ASRock ION 3D Series ASRock Support CD ASRock Quick Start Guide One AC Power Cord One AC/DC Adapter One Anti-Slip Pad Remote Controller 3D...
... to ASRock's commitment to BIOS setup and information of this manual occur, the updated version will be subject to the hardware installation. You may find the latest VGA cards and CPU support lists on ASRock website without notice. ASRock website http://www.asrock.com If you are using. www.asrock.com/support/index.asp 1.1 Package Contents ASRock ION 3D Series ASRock Support CD ASRock Quick Start Guide One AC Power Cord One AC/DC Adapter One Anti-Slip Pad Remote Controller 3D...
User Manual
Page 8
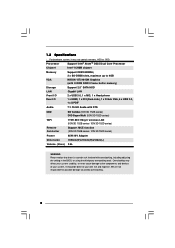
... even cause damage to 4GB NVIDIA® GT218-ION Graphics (with 512MB DDR3 Frame buffer memory) Support 2.5" SATA HDD Gigabit LAN 2 x USB 3.0, 1 x MIC, 1 x Head phone 1 x HDMI, 1 x DVI (Dual-Link), 1 x D-Sub VGA, 6 x USB 2.0, 1 x S/PDIF Audio 7.1 Ch HD Audio with DTS ODD BD Combo (ION 3D 152B series) DVD Super Multi (ION 3D 152D series) WiFi 1T2R 802.11b/g/n wireless LAN (ION 3D 152B series / ION 3D 152D series) Remote Controller Support MCE function (ION 3D 152B series / ION 3D 152D series) Power 65W/19V Adapter Dimension 195mm(W)x70mm(H)x186m(L) Volume (liters) 2.5L...
... even cause damage to 4GB NVIDIA® GT218-ION Graphics (with 512MB DDR3 Frame buffer memory) Support 2.5" SATA HDD Gigabit LAN 2 x USB 3.0, 1 x MIC, 1 x Head phone 1 x HDMI, 1 x DVI (Dual-Link), 1 x D-Sub VGA, 6 x USB 2.0, 1 x S/PDIF Audio 7.1 Ch HD Audio with DTS ODD BD Combo (ION 3D 152B series) DVD Super Multi (ION 3D 152D series) WiFi 1T2R 802.11b/g/n wireless LAN (ION 3D 152B series / ION 3D 152D series) Remote Controller Support MCE function (ION 3D 152B series / ION 3D 152D series) Power 65W/19V Adapter Dimension 195mm(W)x70mm(H)x186m(L) Volume (liters) 2.5L...

User Manual
Page 9
1.3 System Motherboard Components 1. Memory socket 6. Fan connector 5. Infrared module header 7. CPU Fan 9. ATX5V output power connector for slim ODD & 2.5" HDD 12. SATA connector: For HDD SATA data cable 9 Clear CMOS jumper 3. Mini-PCI Express expansion slot: (USB interface only) For WiFi module 10. Fan connector 4. SATA connector: For ODD SATA data cable 11. CPU heatsink 8. Southbridge heatsink 2.
1.3 System Motherboard Components 1. Memory socket 6. Fan connector 5. Infrared module header 7. CPU Fan 9. ATX5V output power connector for slim ODD & 2.5" HDD 12. SATA connector: For HDD SATA data cable 9 Clear CMOS jumper 3. Mini-PCI Express expansion slot: (USB interface only) For WiFi module 10. Fan connector 4. SATA connector: For ODD SATA data cable 11. CPU heatsink 8. Southbridge heatsink 2.

User Manual
Page 10
SATA and Power Connections SATA & Power Connections HDD ODD Connect to ODD Connect to HDD Connect to SATA Connector (10) Connect to ATX5V Power Connector (11) Connect to SATA Connector (12) 2. Fan Connection Fan connector Rotation +12V Ground 10 NOTE. 1.
SATA and Power Connections SATA & Power Connections HDD ODD Connect to ODD Connect to HDD Connect to SATA Connector (10) Connect to ATX5V Power Connector (11) Connect to SATA Connector (12) 2. Fan Connection Fan connector Rotation +12V Ground 10 NOTE. 1.

User Manual
Page 12
Power ON/OFF button with status indicator 27. USB3.0 ports: USB devices 12 Drive activity indicator 28. Slide the top panel backwards. 25. Optical Disc Drive 26. Headphone 29. 1.5 System Chassis Opening the system chassis 1. Remove the screws on the backside. 2. Microphone 30.
Power ON/OFF button with status indicator 27. USB3.0 ports: USB devices 12 Drive activity indicator 28. Slide the top panel backwards. 25. Optical Disc Drive 26. Headphone 29. 1.5 System Chassis Opening the system chassis 1. Remove the screws on the backside. 2. Microphone 30.

User Manual
Page 16
Connecting Side Speakers (Side Port for 4/6/8 Channel) 11. Connecting Center / Subwoofer Speakers (Center/LEF Port) 10. Connecting Power (DC-In Jack Port) 16 Connecting Optical Device (Optical S/PDIF Out Port) 12. 9.
Connecting Side Speakers (Side Port for 4/6/8 Channel) 11. Connecting Center / Subwoofer Speakers (Center/LEF Port) 10. Connecting Power (DC-In Jack Port) 16 Connecting Optical Device (Optical S/PDIF Out Port) 12. 9.
User Manual
Page 20
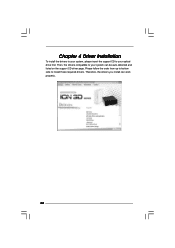
Chapter 4 Driver Installation To install the drivers to your system, please insert the support CD to install those required drivers. Please follow the order from up to bottom side to your system can work properly. 20 Then, the drivers compatible to your optical drive first. Therefore, the drivers you install can be auto-detected and listed on the support CD driver page.
Chapter 4 Driver Installation To install the drivers to your system, please insert the support CD to install those required drivers. Please follow the order from up to bottom side to your system can work properly. 20 Then, the drivers compatible to your optical drive first. Therefore, the drivers you install can be auto-detected and listed on the support CD driver page.
User Manual
Page 22
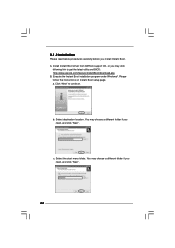
Execute the Instant Boot installation program under Windows®. a. Select the start menu folder. Please follow the instructions on Instant Boot setup page. b. c. Select destination location. You may choose a different folder if you may choose a different folder if you install Instant Boot. Click "Next" to get the latest utility and BIOS: http://www.asrock.com/feature/InstantBoot/download.asp B. Install Instant Boot driver from ASRock support CD, or you need , and click...
Execute the Instant Boot installation program under Windows®. a. Select the start menu folder. Please follow the instructions on Instant Boot setup page. b. c. Select destination location. You may choose a different folder if you may choose a different folder if you install Instant Boot. Click "Next" to get the latest utility and BIOS: http://www.asrock.com/feature/InstantBoot/download.asp B. Install Instant Boot driver from ASRock support CD, or you need , and click...

User Manual
Page 23
..., please simply select "Shut Down" from Windows® "Start menu". Please notice that , please click "Apply" to save the change. When you need to begin installing Instant Boot driver. Double click ASRock Instant Boot icon on the desktop, then Instant Boot main menu will find an ASRock Instant Boot icon on if you can choose "Fast Mode", "Regular Mode" or "Disable Instant Boot". After that you want to complete...
..., please simply select "Shut Down" from Windows® "Start menu". Please notice that , please click "Apply" to save the change. When you need to begin installing Instant Boot driver. Double click ASRock Instant Boot icon on the desktop, then Instant Boot main menu will find an ASRock Instant Boot icon on if you can choose "Fast Mode", "Regular Mode" or "Disable Instant Boot". After that you want to complete...

User Manual
Page 26
... you power on the desktop, then ASRock OC Tuner main menu will start with the default settings. ASRock is running very stably. C. Auto run some test programs to make sure your own risk and expense. There are three sections in ASRock OC Tuner main menu: System Health, Hardware Monitor, Overclocking and Voltage Control. 26 And next time when you run OC Tuner, it is recommended to run when Windows starts If...
... you power on the desktop, then ASRock OC Tuner main menu will start with the default settings. ASRock is running very stably. C. Auto run some test programs to make sure your own risk and expense. There are three sections in ASRock OC Tuner main menu: System Health, Hardware Monitor, Overclocking and Voltage Control. 26 And next time when you run OC Tuner, it is recommended to run when Windows starts If...

User Manual
Page 33
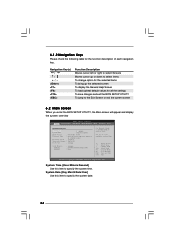
... advanced BIOS features H/W Monitor To display current CPU/MB temperature & Vcore voltage Boot To set up the default system device to locate and load the Operating System Security To set up the computer. Chapter 6 BIOS SETUP UTILITY 6.1 Introduction This section explains how to use the BIOS SETUP UTILITY to enter the BIOS SETUP UTILITY, otherwise, POST will continue with the following BIOS setup screens and descriptions are for reference purpose only, and they may run the BIOS SETUP UTILITY...
... advanced BIOS features H/W Monitor To display current CPU/MB temperature & Vcore voltage Boot To set up the default system device to locate and load the Operating System Security To set up the computer. Chapter 6 BIOS SETUP UTILITY 6.1 Introduction This section explains how to use the BIOS SETUP UTILITY to enter the BIOS SETUP UTILITY, otherwise, POST will continue with the following BIOS setup screens and descriptions are for reference purpose only, and they may run the BIOS SETUP UTILITY...
User Manual
Page 34
... exit the current screen 6.2 Main Screen When you enter the BIOS SETUP UTILITY, the Main screen will appear and display the system overview BIOS SETUP UTILITY Main OC Tweaker Advanced H/W Monitor Boot Security Exit System Overview System Time System Date [14:00:09] [Tue 08/31/2010] BIOS Version : ION3D-HT P1.00 Processor Type : Intel (R) Atom (TM) CPU D525 @ @ 1.8GHz (64bit) Processor Speed : 1800MHz Microcode Update : 106CA/107 Cache...
... exit the current screen 6.2 Main Screen When you enter the BIOS SETUP UTILITY, the Main screen will appear and display the system overview BIOS SETUP UTILITY Main OC Tweaker Advanced H/W Monitor Boot Security Exit System Overview System Time System Date [14:00:09] [Tue 08/31/2010] BIOS Version : ION3D-HT P1.00 Processor Type : Intel (R) Atom (TM) CPU D525 @ @ 1.8GHz (64bit) Processor Speed : 1800MHz Microcode Update : 106CA/107 Cache...
User Manual
Page 38
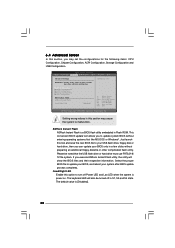
... turned off Power LED and Lan LED when the system is power on. Setting wrong values in this tool and save the new BIOS file to your USB flash drive, floppy disk or hard drive, then you can update your system after BIOS update process completes. The keyboard LED will show the BIOS files and their respective information. ASRock Instant Flash ASRock Instant Flash is [Disabled]. 38 6.4 Advanced Screen In this section, you may set the configurations for CPU CPU Configuration Chipset Configuration...
... turned off Power LED and Lan LED when the system is power on. Setting wrong values in this tool and save the new BIOS file to your USB flash drive, floppy disk or hard drive, then you can update your system after BIOS update process completes. The keyboard LED will show the BIOS files and their respective information. ASRock Instant Flash ASRock Instant Flash is [Disabled]. 38 6.4 Advanced Screen In this section, you may set the configurations for CPU CPU Configuration Chipset Configuration...

User Manual
Page 43
The default value is recommended to select [Disabled] to enter OS. [BIOS Setup Only] - Please refer to enable or disable USB Keyboard/Remote Power On on the system. 43 Enables support for the details of USB 3.0 controller. Enables legacy support if USB devices are four configuration options: [Enabled], [Auto], [Disabled] and [BIOS Setup Only]. USB 3.0 Controller Use this item to below descriptions for legacy USB. [Auto] - USB Keyboard/Remote Power On Use this item to use under BIOS setup and Windows / Linux OS. If you have USB compatibility issue, it...
The default value is recommended to select [Disabled] to enter OS. [BIOS Setup Only] - Please refer to enable or disable USB Keyboard/Remote Power On on the system. 43 Enables support for the details of USB 3.0 controller. Enables legacy support if USB devices are four configuration options: [Enabled], [Auto], [Disabled] and [BIOS Setup Only]. USB 3.0 Controller Use this item to below descriptions for legacy USB. [Auto] - USB Keyboard/Remote Power On Use this item to use under BIOS setup and Windows / Linux OS. If you have USB compatibility issue, it...
User Manual
Page 44
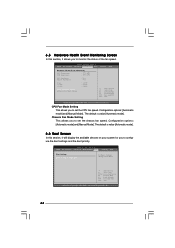
... devices on your system for you to configure the boot settings and the boot priority. Chassis Fan Mode Setting This allows you to set the chassis fan speed. Configuration options: [Automatic mode] and [Manual Mode]. CPU Fan Mode Setting This allows you to set the CPU fan speed. Select Screen Select Item Enter Go to Sub Screen F1 General Help F9 Load Defaults F10 Save and Exit ESC Exit v02.54 (C) Copyright 1985-2005, American Megatrends, Inc. 44 BIOS SETUP UTILITY...
... devices on your system for you to configure the boot settings and the boot priority. Chassis Fan Mode Setting This allows you to set the chassis fan speed. Configuration options: [Automatic mode] and [Manual Mode]. CPU Fan Mode Setting This allows you to set the CPU fan speed. Select Screen Select Item Enter Go to Sub Screen F1 General Help F9 Load Defaults F10 Save and Exit ESC Exit v02.54 (C) Copyright 1985-2005, American Megatrends, Inc. 44 BIOS SETUP UTILITY...
User Manual
Page 46
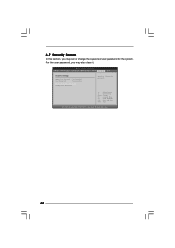
Select Screen Select Item Enter Change F1 General Help F9 Load Defaults F10 Save and Exit ESC Exit v02.54 (C) Copyright 1985-2005, American Megatrends, Inc. 46 BIOS SETUP UTILITY Main OC Tweaker Advanced H/W Monitor Boot Security Exit Security Settings Supervisor Password : Not Installed User Password : Not Installed Change Supervisor Password Change User Password Install or Change the password. 6.7 Security Screen In this section, you may set or change the supervisor/user password for the system. For the user password, you may also clear it.
Select Screen Select Item Enter Change F1 General Help F9 Load Defaults F10 Save and Exit ESC Exit v02.54 (C) Copyright 1985-2005, American Megatrends, Inc. 46 BIOS SETUP UTILITY Main OC Tweaker Advanced H/W Monitor Boot Security Exit Security Settings Supervisor Password : Not Installed User Password : Not Installed Change Supervisor Password Change User Password Install or Change the password. 6.7 Security Screen In this section, you may set or change the supervisor/user password for the system. For the user password, you may also clear it.
User Manual
Page 48
... available devices drivers if the system detects installed devices. or you need to contact ASRock or want to know more information. 7.2 Support CD Information The Support CD contains necessary drivers and useful utilities that the system supports. Refer to activate the devices. 7.2.3 Utilities Menu The Utilities Menu shows the applications software that enhance the system features. 7.2.1 Running The Support CD To begin using the support CD, insert the CD into your CD-ROM drive...
... available devices drivers if the system detects installed devices. or you need to contact ASRock or want to know more information. 7.2 Support CD Information The Support CD contains necessary drivers and useful utilities that the system supports. Refer to activate the devices. 7.2.3 Utilities Menu The Utilities Menu shows the applications software that enhance the system features. 7.2.1 Running The Support CD To begin using the support CD, insert the CD into your CD-ROM drive...


