User Manual
Page 3
...Contents 1 Introduction 4 1.1 Package Contents 4 1.2 Specifications 5 1.3 Motherboard Layout 7 1.4 ASRock I/OTM 8 2 Installation 9 2.1 Screw Holes 9 2.2 Pre-installation Precautions 9 2.3 CPU Installation 10 2.4 Installation of Heatsink and CPU fan 10 2.5 Installation of Memory Modules (DIMM 11 2.6 Expansion Slots 11 2.7 Jumpers Setup 12 2.8 Connectors 15 3 ...Information 21 4.2.1 Running Support CD 21 4.2.2 Drivers Menu 21 4.2.3 Utilities Menu 21 4.2.4 ASRock "PC-DIY Live Demo" Program 21 4.2.5 Contact Information 21 Appendix 22 1. Advanced Menu 22 2. Security Menu 26 3.
...Contents 1 Introduction 4 1.1 Package Contents 4 1.2 Specifications 5 1.3 Motherboard Layout 7 1.4 ASRock I/OTM 8 2 Installation 9 2.1 Screw Holes 9 2.2 Pre-installation Precautions 9 2.3 CPU Installation 10 2.4 Installation of Heatsink and CPU fan 10 2.5 Installation of Memory Modules (DIMM 11 2.6 Expansion Slots 11 2.7 Jumpers Setup 12 2.8 Connectors 15 3 ...Information 21 4.2.1 Running Support CD 21 4.2.2 Drivers Menu 21 4.2.3 Utilities Menu 21 4.2.4 ASRock "PC-DIY Live Demo" Program 21 4.2.5 Contact Information 21 Appendix 22 1. Advanced Menu 22 2. Security Menu 26 3.

User Manual
Page 4
.../100/133) 1 cable for purchasing ASRock K7VM4 motherboard, a reliable motherboard produced under ASRock's consistently stringent quality control. It delivers excellent performance with robust design conforming to ASRock's commitment to change without further notice. For advanced users' reference, the Appendix appearing on ASRock website without notice. You may find the latest memory and CPU support lists on...
.../100/133) 1 cable for purchasing ASRock K7VM4 motherboard, a reliable motherboard produced under ASRock's consistently stringent quality control. It delivers excellent performance with robust design conforming to ASRock's commitment to change without further notice. For advanced users' reference, the Appendix appearing on ASRock website without notice. You may find the latest memory and CPU support lists on...

User Manual
Page 5
...: VIA KM400, FSB@333/266/200 MHz, AGP 8X/4X South Bridge: VIA VT8235CE, supports USB 2.0, ATA 133 VGA: VIA UniChrome Graphics, Max. 64MB VRAM Memory: 2 DDR DIMM slots: DDR1 and DDR2 PC2700 (DDR333) / PC2100 (DDR266) / PC1600 (DDR200), Max. 2GB (see CAUTION 4) PS/2: 1 keyboard port / 1 ...: 3 slots with PCI Specification 2.2 AGP slot: 1 AGP slot, supports 1.5V, 8X/4X AGP card (see CAUTION 3) AMR slot: 1 slot, supports ASRock MR card (optional) USB 2.0: 4 default USB 2.0 ports and 1 extra set of header for advanced users' reference, see CAUTION 2); CPU frequency stepless control ...
...: VIA KM400, FSB@333/266/200 MHz, AGP 8X/4X South Bridge: VIA VT8235CE, supports USB 2.0, ATA 133 VGA: VIA UniChrome Graphics, Max. 64MB VRAM Memory: 2 DDR DIMM slots: DDR1 and DDR2 PC2700 (DDR333) / PC2100 (DDR266) / PC1600 (DDR200), Max. 2GB (see CAUTION 4) PS/2: 1 keyboard port / 1 ...: 3 slots with PCI Specification 2.2 AGP slot: 1 AGP slot, supports 1.5V, 8X/4X AGP card (see CAUTION 3) AMR slot: 1 slot, supports ASRock MR card (optional) USB 2.0: 4 default USB 2.0 ports and 1 extra set of header for advanced users' reference, see CAUTION 2); CPU frequency stepless control ...
User Manual
Page 6
...to Microsoft® official document at http://www.microsoft.com/whdc/hwdev/bus/USB/USB2support.mspx 5. It may cause permanent damage! 4. Although K7VM4 offers stepless control, it is set to spray thermal grease between the CPU and the heatsink when you resume the system. Frequencies other ...clocks, such as PCI clock, AGP clock, and Memory clock will automatically shutdown. To improve heat dissipation, remember to perform over clocking. Do NOT insert a 3.3V AGP card into the AGP ...
...to Microsoft® official document at http://www.microsoft.com/whdc/hwdev/bus/USB/USB2support.mspx 5. It may cause permanent damage! 4. Although K7VM4 offers stepless control, it is set to spray thermal grease between the CPU and the heatsink when you resume the system. Frequencies other ...clocks, such as PCI clock, AGP clock, and Memory clock will automatically shutdown. To improve heat dissipation, remember to perform over clocking. Do NOT insert a 3.3V AGP card into the AGP ...
User Manual
Page 7
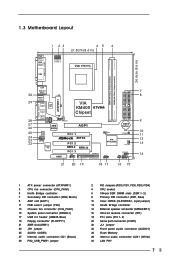
... 25 24 23 22 LAN USB 2.0 Ports USB 2.0 Ports GGAAMMEE AAUUDDIIOO11 ATXPWR1 Line out LiLInnineein MMIniicc in LAN PHY 1 PS2_USB_PWR1 CPU_FAN1 2MB BIOS VIA KM400 K7VM4 Chipset AGP1 01 23 IDE2 IDE1 CMOS Battery AUDIO CODEC AUDIO1 1 JR1 JL1 Super I/O AMR1 PCI 1 AGP 8X PCI 2 USB2.0 PCI 3 COM1 1 ATA133 FLOPPY1 1 FS0... 1) 16 Infrared module connector (IR1) 18 PCI slots (PCI 1- 3) 20 Serial port connector (COM1) 22 JL1 jumper 24 Front panel audio connector (AUDIO1) 26 Flash Memory 28 Internal audio connector: AUX1 (White) 30 LAN PHY 7
... 25 24 23 22 LAN USB 2.0 Ports USB 2.0 Ports GGAAMMEE AAUUDDIIOO11 ATXPWR1 Line out LiLInnineein MMIniicc in LAN PHY 1 PS2_USB_PWR1 CPU_FAN1 2MB BIOS VIA KM400 K7VM4 Chipset AGP1 01 23 IDE2 IDE1 CMOS Battery AUDIO CODEC AUDIO1 1 JR1 JL1 Super I/O AMR1 PCI 1 AGP 8X PCI 2 USB2.0 PCI 3 COM1 1 ATA133 FLOPPY1 1 FS0... 1) 16 Infrared module connector (IR1) 18 PCI slots (PCI 1- 3) 20 Serial port connector (COM1) 22 JL1 jumper 24 Front panel audio connector (AUDIO1) 26 Flash Memory 28 Internal audio connector: AUX1 (White) 30 LAN PHY 7

User Manual
Page 11
...hardware settings for later use . Step 3. PCI slots: PCI slots are 3 PCI slots, 1 AMR slot, and 1 AGP slot on K7VM4 motherboard. The ASRock AGP slot has a special locking mechanism which can securely fasten the graphics card inserted. Installing an expansion card Step 1. Remove the bracket ... used to install a graphics card. Align the card connector with v.92 Modem functionality. 2.5 Installation of K7VM4 motherboard! Firmly insert the DIMM into the AGP slot of Memory Modules (DIMM) K7VM4 motherboard provides two 184-pin DDR (Double Data Rate) DIMM slots. AGP slot: The AGP slot is...
...hardware settings for later use . Step 3. PCI slots: PCI slots are 3 PCI slots, 1 AMR slot, and 1 AGP slot on K7VM4 motherboard. The ASRock AGP slot has a special locking mechanism which can securely fasten the graphics card inserted. Installing an expansion card Step 1. Remove the bracket ... used to install a graphics card. Align the card connector with v.92 Modem functionality. 2.5 Installation of K7VM4 motherboard! Firmly insert the DIMM into the AGP slot of Memory Modules (DIMM) K7VM4 motherboard provides two 184-pin DDR (Double Data Rate) DIMM slots. AGP slot: The AGP slot is...

User Manual
Page 17
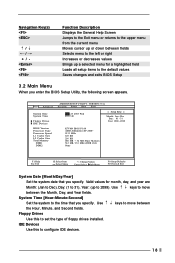
..., which allows you start up the security features POWER Configures Power Management features BOOT Configures the default system device that is a legend bar. The Flash Memory on .
..., which allows you start up the security features POWER Configures Power Management features BOOT Configures the default system device that is a legend bar. The Flash Memory on .
User Manual
Page 18
... Dec), Day: (1 to 31), Year: (up to 2099). Dec Day: 01 - 31 Year: 1980 - 2099 K7VM4 BIOS P1.00 AMD Athlon(tm) XP 2600+ 2133 MHz 128 KB 256 KB 480 MB + 32 MB Share Memory 512 MB / 133 MHz (DDR 266) None F1:Help Esc:Exit :Select Item :Select Menu +/-:Change... drives installed. Main Advanced System Date System Time Floppy Drives IDE Devices BIOS Version Processor Type Processor Speed L1 Cache Size L2 Cache Size Total Memory DDR1 DDR2 AMIBIOS SETUP UTILITY - IDE Devices Use this to move between the Hour, Minute, and Second fields. System Time [Hour:Minute:Second] Set the...
... Dec), Day: (1 to 31), Year: (up to 2099). Dec Day: 01 - 31 Year: 1980 - 2099 K7VM4 BIOS P1.00 AMD Athlon(tm) XP 2600+ 2133 MHz 128 KB 256 KB 480 MB + 32 MB Share Memory 512 MB / 133 MHz (DDR 266) None F1:Help Esc:Exit :Select Item :Select Menu +/-:Change... drives installed. Main Advanced System Date System Time Floppy Drives IDE Devices BIOS Version Processor Type Processor Speed L1 Cache Size L2 Cache Size Total Memory DDR1 DDR2 AMIBIOS SETUP UTILITY - IDE Devices Use this to move between the Hour, Minute, and Second fields. System Time [Hour:Minute:Second] Set the...
User Manual
Page 22
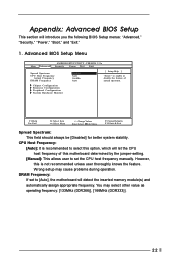
... frequency: [133MHz (DDR266)], [166MHz (DDR333)]. 22 DRAM Frequency: If set the CPU host frequency manually. Appendix: Advanced BIOS Setup This section will detect the inserted memory module(s) and automatically assign appropriate frequency. You may cause problems during operation. Chipset Configuration Resource Configuration Peripheral Configuration System Hardware Monitor F1:Help Esc:Exit...
... frequency: [133MHz (DDR266)], [166MHz (DDR333)]. 22 DRAM Frequency: If set the CPU host frequency manually. Appendix: Advanced BIOS Setup This section will detect the inserted memory module(s) and automatically assign appropriate frequency. You may cause problems during operation. Chipset Configuration Resource Configuration Peripheral Configuration System Hardware Monitor F1:Help Esc:Exit...
User Manual
Page 23
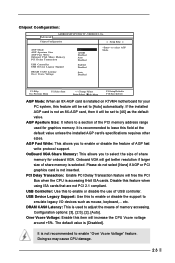
...will get better resolution if larger size of share memory for graphics memory. The default value is not inserted. OnBoard VGA Share Memory: This allows you to emulate legacy I/O devices such as the default value. It is installed on K7VM4 motherboard for your PC system, this to enable or...to select AGP Mode. VERSION 3.31a Chipset Configuration [ Setup Help ] AGP Mode AGP Aperture Size AGP Fast Write Onboard VGA Share Memory PCI Delay Transaction USB Controller USB Device Legacy Support DRAM CAS# Latency Over Vcore Voltage Auto 128MB Disabled Auto Disabled Enabled Disabled Auto ...
...will get better resolution if larger size of share memory for graphics memory. The default value is not inserted. OnBoard VGA Share Memory: This allows you to emulate legacy I/O devices such as the default value. It is installed on K7VM4 motherboard for your PC system, this to enable or...to select AGP Mode. VERSION 3.31a Chipset Configuration [ Setup Help ] AGP Mode AGP Aperture Size AGP Fast Write Onboard VGA Share Memory PCI Delay Transaction USB Controller USB Device Legacy Support DRAM CAS# Latency Over Vcore Voltage Auto 128MB Disabled Auto Disabled Enabled Disabled Auto ...

User Manual
Page 28
...] will automatically activate the Numeric Lock function after boot-up. Boot From Network: Use this is enabled, it will enable boot-up routine by skipping memory retestings. VERSION 3.31a Security Power Boot Exit Quick Boot Mode Boot Up Num-Lock Boot To OS/2 Boot From Network Enabled On No Disabled [ Setup...
...] will automatically activate the Numeric Lock function after boot-up. Boot From Network: Use this is enabled, it will enable boot-up routine by skipping memory retestings. VERSION 3.31a Security Power Boot Exit Quick Boot Mode Boot Up Num-Lock Boot To OS/2 Boot From Network Enabled On No Disabled [ Setup...

