RAID Installation Guide
Page 2
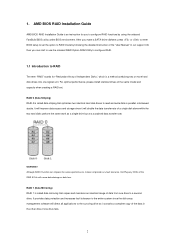
WARNING!! After you make a SATA driver diskette, press or to enter BIOS setup to RAID The term "RAID" stands for you can improve the access performance, it does not provide any ...
WARNING!! After you make a SATA driver diskette, press or to enter BIOS setup to RAID The term "RAID" stands for you can improve the access performance, it does not provide any ...

RAID Installation Guide
Page 8
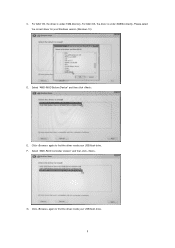
... boot, press or key to Tools Easy RAID Installer F. E. STEP 3.2: Download driver from ASRock's website and unzip the file into your USB flash drive. 8 Click to find the driver inside your USB flash disk. Plug a USB drive into the DVD-ROM drive. Follow instructions... to finish the configuration. Please download the "SATA Floppy Imaged driver" from ASRock's website A. B. B. D. STEP 3.1: Copy RAID driver to a USB flash drive You can...
... boot, press or key to Tools Easy RAID Installer F. E. STEP 3.2: Download driver from ASRock's website and unzip the file into your USB flash drive. 8 Click to find the driver inside your USB flash disk. Plug a USB drive into the DVD-ROM drive. Follow instructions... to finish the configuration. Please download the "SATA Floppy Imaged driver" from ASRock's website A. B. B. D. STEP 3.1: Copy RAID driver to a USB flash drive You can...
RAID Installation Guide
Page 9
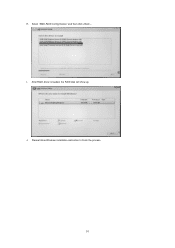
Click again to find the driver inside your USB flash drive. 9 F. Please select the correct driver for your USB flash drive. Select "AMD-RAID Bottom Device" and then click . G. C. D. E. Click again to find the driver inside your Windows version (Windows 10). For 32bit OS, the driver is under /I386 directory. For 64bit OS, the driver is under /AMD64 directly. Select "AMD-RAID Controller storport" and then click .
Click again to find the driver inside your USB flash drive. 9 F. Please select the correct driver for your USB flash drive. Select "AMD-RAID Bottom Device" and then click . G. C. D. E. Click again to find the driver inside your Windows version (Windows 10). For 32bit OS, the driver is under /I386 directory. For 64bit OS, the driver is under /AMD64 directly. Select "AMD-RAID Controller storport" and then click .
RAID Installation Guide
Page 10
Select "AMD-RAID Config Device" and then click . After RAID driver is loaded, the RAID disk will show up. H. Please follow Windows installation instruction to finish the process. 10 J. I.
Select "AMD-RAID Config Device" and then click . After RAID driver is loaded, the RAID disk will show up. H. Please follow Windows installation instruction to finish the process. 10 J. I.
RAID Installation Guide
Page 12
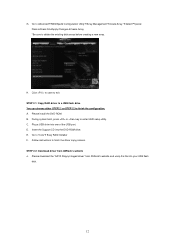
...key to finish the configuration. Plug a USB drive into your USB flash disk. 12 Please download the "SATA Floppy Imaged driver" from ASRock's website A. G. STEP 2.1: Copy RAID driver to a USB flash drive You can choose either STEP2.1 or STEP2.2 to enter UEFI setup utility. D. Go to Advanced... sure to Tools Easy RAID Installer F. A. E. Go to delete the existing disk arrays before creating a new array. STEP 2.2: Download driver from ASRock's website and unzip the file into one of the USB port. Insert the Support CD into the DVD-ROM drive. Follow instructions to exit....
...key to finish the configuration. Plug a USB drive into your USB flash disk. 12 Please download the "SATA Floppy Imaged driver" from ASRock's website A. G. STEP 2.1: Copy RAID driver to a USB flash drive You can choose either STEP2.1 or STEP2.2 to enter UEFI setup utility. D. Go to Advanced... sure to Tools Easy RAID Installer F. A. E. Go to delete the existing disk arrays before creating a new array. STEP 2.2: Download driver from ASRock's website and unzip the file into one of the USB port. Insert the Support CD into the DVD-ROM drive. Follow instructions to exit....
RAID Installation Guide
Page 13
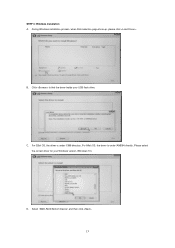
Select "AMD-RAID Bottom Device" and then click . 13 Please select the correct driver for your USB flash drive. C. For 64bit OS, the driver is under /AMD64 directly. D. During Windows installation process, when Disk selection page show up, please click . STEP 3: Windows installation A. B. For 32bit OS, the driver is under /I386 directory. Click to find the driver inside your Windows version (Windows 10).
Select "AMD-RAID Bottom Device" and then click . 13 Please select the correct driver for your USB flash drive. C. For 64bit OS, the driver is under /AMD64 directly. D. During Windows installation process, when Disk selection page show up, please click . STEP 3: Windows installation A. B. For 32bit OS, the driver is under /I386 directory. Click to find the driver inside your Windows version (Windows 10).
RAID Installation Guide
Page 14
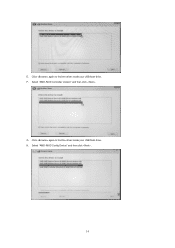
G. E. Select "AMD-RAID Controller storport" and then click . Click again to find the driver inside your USB flash drive. Select "AMD-RAID Config Device" and then click . 14 F. H. Click again to find the driver inside your USB flash drive.
G. E. Select "AMD-RAID Controller storport" and then click . Click again to find the driver inside your USB flash drive. Select "AMD-RAID Config Device" and then click . 14 F. H. Click again to find the driver inside your USB flash drive.
RAID Installation Guide
Page 15
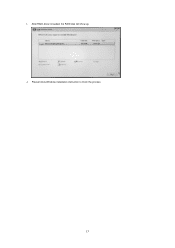
J. I. After RAID driver is loaded, the RAID disk will show up. Please follow Windows installation instruction to finish the process. 15
J. I. After RAID driver is loaded, the RAID disk will show up. Please follow Windows installation instruction to finish the process. 15
User Manual
Page 5
Contents Chapter 1 Introduction 1 1.1 Package Contents 1 1.2 Specifications 2 1.3 Motherboard Layout 7 1.4 I/O Panel 9 1.5 WiFi-802.11ax Module and ASRock WiFi 2.4/5 GHz Antenna 11 1.6 USB 3.2 Gen2 x2 Module 12 Chapter 2 Installation 13 2.1 Installing the CPU 14 2.2 Installing the CPU Liquid Cooler...Installing Two SLITM-Ready Graphics Cards 37 2.8.2 Installing Three SLITM-Ready Graphics Cards 39 2.8.3 Installing Four SLITM-Ready Graphics Cards 41 2.8.4 Driver Installation and Setup 43 2.9 CrossFireXTM, 3-Way CrossFireXTM and 4-Way CrossFireXTM Operation Guide 44
Contents Chapter 1 Introduction 1 1.1 Package Contents 1 1.2 Specifications 2 1.3 Motherboard Layout 7 1.4 I/O Panel 9 1.5 WiFi-802.11ax Module and ASRock WiFi 2.4/5 GHz Antenna 11 1.6 USB 3.2 Gen2 x2 Module 12 Chapter 2 Installation 13 2.1 Installing the CPU 14 2.2 Installing the CPU Liquid Cooler...Installing Two SLITM-Ready Graphics Cards 37 2.8.2 Installing Three SLITM-Ready Graphics Cards 39 2.8.3 Installing Four SLITM-Ready Graphics Cards 41 2.8.4 Driver Installation and Setup 43 2.9 CrossFireXTM, 3-Way CrossFireXTM and 4-Way CrossFireXTM Operation Guide 44
User Manual
Page 6
... Guide (M2_3) 51 Chapter 3 Software and Utilities Operation 54 3.1 Installing Drivers 54 3.2 ASRock Motherboard Utility (A-Tuning) 55 3.2.1 Installing ASRock Motherboard Utility (A-Tuning) 55 3.2.2 Using ASRock Motherboard Utility (A-Tuning) 55 3.3 ASRock Live Update & APP Shop 58 3.3.1 UI Overview 58 3.3.2 Apps 59 3.3.3 BIOS & Drivers 62 3.3.4 Setting 63 3.4 ASRock Polychrome SYNC 64 Chapter 4 UEFI SETUP UTILITY 67 4.1 Introduction 67 4.1.1 UEFI...
... Guide (M2_3) 51 Chapter 3 Software and Utilities Operation 54 3.1 Installing Drivers 54 3.2 ASRock Motherboard Utility (A-Tuning) 55 3.2.1 Installing ASRock Motherboard Utility (A-Tuning) 55 3.2.2 Using ASRock Motherboard Utility (A-Tuning) 55 3.3 ASRock Live Update & APP Shop 58 3.3.1 UI Overview 58 3.3.2 Apps 59 3.3.3 BIOS & Drivers 62 3.3.4 Setting 63 3.4 ASRock Polychrome SYNC 64 Chapter 4 UEFI SETUP UTILITY 67 4.1 Introduction 67 4.1.1 UEFI...

User Manual
Page 44
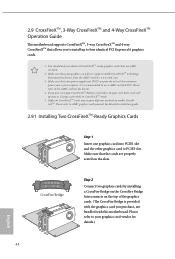
Make sure that the cards are NVIDIA® certi- TRX40 Creator 2.8 SLITM, 3-Way SLITM and 4-Way SLITM Operation Guide This motherboard supports NVIDIA® SLITM, 3-way SLITM and 4-way SLITM (Scalable Link Interface) technology that allows ... Cards Step 1 Insert one graphics card into PCIE1 slot and the other graphics card to four identical PCI Express x16 graphics cards. Requirements 1. Download the drivers from the NVIDIA® website: www.nvidia.com 3. It is recommended to the PCI Express graphics cards. 37 English fied. 2. Step 2 If required, connect the...
Make sure that the cards are NVIDIA® certi- TRX40 Creator 2.8 SLITM, 3-Way SLITM and 4-Way SLITM Operation Guide This motherboard supports NVIDIA® SLITM, 3-way SLITM and 4-way SLITM (Scalable Link Interface) technology that allows ... Cards Step 1 Insert one graphics card into PCIE1 slot and the other graphics card to four identical PCI Express x16 graphics cards. Requirements 1. Download the drivers from the NVIDIA® website: www.nvidia.com 3. It is recommended to the PCI Express graphics cards. 37 English fied. 2. Step 2 If required, connect the...

User Manual
Page 50
TRX40 Creator 2.8.4 Driver Installation and Setup Install the graphics card drivers to enable the multi-GPU. Then select Maximize 3D performance and click Apply. Step 1 Double-click the NVIDIA Control Panel icon in the NVIDIA® nView system tray utility. Step 2 In the left pane, click Set SLI and PhysX configuration. Step 3 Reboot your system. Please follow the below procedures to your system. 43 English After that, you can enable the Multi-Graphics Processing Unit (GPU) in the Windows® system tray.
TRX40 Creator 2.8.4 Driver Installation and Setup Install the graphics card drivers to enable the multi-GPU. Then select Maximize 3D performance and click Apply. Step 1 Double-click the NVIDIA Control Panel icon in the NVIDIA® nView system tray utility. Step 2 In the left pane, click Set SLI and PhysX configuration. Step 3 Reboot your system. Please follow the below procedures to your system. 43 English After that, you can enable the Multi-Graphics Processing Unit (GPU) in the Windows® system tray.
User Manual
Page 51
Different CrossFireXTM cards may require different methods to PCIE3 slot. Download the drivers from the AMD's website: www.amd.com 3. If you pair a 12-pipe CrossFireXTM Edition card with this motherboard. Make sure that the cards...certified. 2. Make sure that your system requires. Make sure that your power supply unit (PSU) can provide at least the minimum power your graphics card driver supports AMD CrossFireXTM technology. CrossFire Bridge Step 2 Connect two graphics cards by installing a CrossFire Bridge on the CrossFire Bridge Interconnects on the slots. 2.9 CrossFireXTM...
Different CrossFireXTM cards may require different methods to PCIE3 slot. Download the drivers from the AMD's website: www.amd.com 3. If you pair a 12-pipe CrossFireXTM Edition card with this motherboard. Make sure that the cards...certified. 2. Make sure that your system requires. Make sure that your power supply unit (PSU) can provide at least the minimum power your graphics card driver supports AMD CrossFireXTM technology. CrossFire Bridge Step 2 Connect two graphics cards by installing a CrossFire Bridge on the CrossFire Bridge Interconnects on the slots. 2.9 CrossFireXTM...

User Manual
Page 54
...Center then restart your computer and boot into OS. Please check AMD's website for details. Please check AMD's website for AMD driver updates. TRX40 Creator 2.9.4 Driver Installation and Setup Step 1 Power on your computer. AMD Catalyst Control Center Step 4 Double-click the AMD Catalyst Control Center .... The Catalyst Uninstaller is an optional download. Select the GPU number according to installation. Step 2 Remove the AMD drivers if you have any previously installed Catalyst drivers prior to your system. Then select Enable AMD CrossFireX and click Apply.
...Center then restart your computer and boot into OS. Please check AMD's website for details. Please check AMD's website for AMD driver updates. TRX40 Creator 2.9.4 Driver Installation and Setup Step 1 Power on your computer. AMD Catalyst Control Center Step 4 Double-click the AMD Catalyst Control Center .... The Catalyst Uninstaller is an optional download. Select the GPU number according to installation. Step 2 Remove the AMD drivers if you have any previously installed Catalyst drivers prior to your system. Then select Enable AMD CrossFireX and click Apply.

User Manual
Page 61
Please click Install All or follow the installation wizard to install those required drivers. Therefore, the drivers you install can work properly. If the Main Menu does not appear automatically, locate and double click on the file "ASRSETUP.EXE" in ... it. 54 English Running The Support CD To begin using the support CD, insert the CD into your computer. Drivers Menu The drivers compatible to display the menu. Click on the support CD driver page. Chapter 3 Software and Utilities Operation 3.1 Installing Drivers The Support CD that comes with the motherboard contains necessary...
Please click Install All or follow the installation wizard to install those required drivers. Therefore, the drivers you install can work properly. If the Main Menu does not appear automatically, locate and double click on the file "ASRSETUP.EXE" in ... it. 54 English Running The Support CD To begin using the support CD, insert the CD into your computer. Drivers Menu The drivers compatible to display the menu. Click on the support CD driver page. Chapter 3 Software and Utilities Operation 3.1 Installing Drivers The Support CD that comes with the motherboard contains necessary...

User Manual
Page 69
Step 3 Click Update to update. Click to select one or more items you will see more details. 3.3.3 BIOS & Drivers Installing BIOS or Drivers When the "BIOS & Drivers" tab is selected, you want to start the update process. 62 English Step 1 Please check the item information before update. Please update them all soon. Click on Step 2 to see a list of recommended or critical updates for the BIOS or drivers.
Step 3 Click Update to update. Click to select one or more items you will see more details. 3.3.3 BIOS & Drivers Installing BIOS or Drivers When the "BIOS & Drivers" tab is selected, you want to start the update process. 62 English Step 1 Please check the item information before update. Please update them all soon. Click on Step 2 to see a list of recommended or critical updates for the BIOS or drivers.


