User Manual
Page 4
... 2.23.2 Installing Windows® 7 / 7 64-bit / VistaTM / VistaTM 64-bit Without RAID Functions 68 2.24 Teaming Function Operation Guide (X79 Extreme6/GB 69 2.25 Untied Overclocking Technology 72 3 UEFI SETUP UTILITY 73 3.1 Introduction 73 3.1.1 UEFI Menu Bar 73 3.1.2 Navigation Keys 74 3.2 Main Screen 74 3.3 OC Tweaker Screen 76 3.4 Advanced Screen 81 3.4.1 CPU Configuration...
... 2.23.2 Installing Windows® 7 / 7 64-bit / VistaTM / VistaTM 64-bit Without RAID Functions 68 2.24 Teaming Function Operation Guide (X79 Extreme6/GB 69 2.25 Untied Overclocking Technology 72 3 UEFI SETUP UTILITY 73 3.1 Introduction 73 3.1.1 UEFI Menu Bar 73 3.1.2 Navigation Keys 74 3.2 Main Screen 74 3.3 OC Tweaker Screen 76 3.4 Advanced Screen 81 3.4.1 CPU Configuration...
User Manual
Page 8
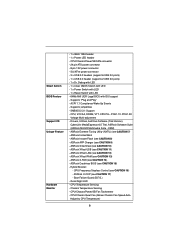
...) - 1 x Dr. Debug with LED - 1 x Clear CMOS Switch with LED - 1 x Power Switch with LED - 1 x Reset Switch with LED - 64Mb AMI UEFI Legal BIOS with GUI support - Supports jumperfree - ASRock U-COP (see CAUTION 13) - ASRock Crashless BIOS (see CAUTION 8) - Boot Failure Guard (B.F.G.) - SMBIOS 2.3.1 Support - Smart Switch BIOS Feature Support CD Unique Feature Hardware Monitor - 1 x IEEE...
...) - 1 x Dr. Debug with LED - 1 x Clear CMOS Switch with LED - 1 x Power Switch with LED - 1 x Reset Switch with LED - 64Mb AMI UEFI Legal BIOS with GUI support - Supports jumperfree - ASRock U-COP (see CAUTION 13) - ASRock Crashless BIOS (see CAUTION 8) - Boot Failure Guard (B.F.G.) - SMBIOS 2.3.1 Support - Smart Switch BIOS Feature Support CD Unique Feature Hardware Monitor - 1 x IEEE...

User Manual
Page 11
...Before you to be used under heavy-loading or overclocking. It fully utilizes the memory space that it reduces the frequency of failing. ASRock X-FAN will automatically shutdown. While CPU overheat is a new function that BIOS files need to check with the power supply manufacturer...(AXTU). If power loss occurs during the BIOS update process, ASRock Crashless BIOS will remain deactivated to EuP, the total AC power of your application's priority ideally and/or add new programs. Lower Latency in the UEFI setup utility. 15. Another advantage of 5v, and the standby...
...Before you to be used under heavy-loading or overclocking. It fully utilizes the memory space that it reduces the frequency of failing. ASRock X-FAN will automatically shutdown. While CPU overheat is a new function that BIOS files need to check with the power supply manufacturer...(AXTU). If power loss occurs during the BIOS update process, ASRock Crashless BIOS will remain deactivated to EuP, the total AC power of your application's priority ideally and/or add new programs. Lower Latency in the UEFI setup utility. 15. Another advantage of 5v, and the standby...
User Manual
Page 16
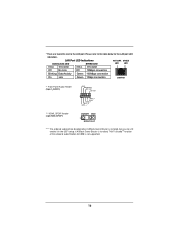
... for the LAN port LED indications. Please refer to the LAN port. If ASRock Game Blaster is installed, THX TruStudioTM function of the onboard audio Realtek ALC898 is installed, but you can still enable it in the UEFI setup. LAN Port LED Indications Activity/Link LED SPEED LED ACT/LINK SPEED LED... F_AUDIO1) GND PRESENCE# MIC_RET OUT_RET 1 OUT2_L J_SENSE OUT2_R MIC2_R MIC2_L *** HDMI_SPDIF Header (3-pin HDMI_SPDIF1) DUMMY GND 1 SPDIF OUT **** The onboard audio will be disabled when ASRock Game Blaster is not supported. 16
... for the LAN port LED indications. Please refer to the LAN port. If ASRock Game Blaster is installed, THX TruStudioTM function of the onboard audio Realtek ALC898 is installed, but you can still enable it in the UEFI setup. LAN Port LED Indications Activity/Link LED SPEED LED ACT/LINK SPEED LED... F_AUDIO1) GND PRESENCE# MIC_RET OUT_RET 1 OUT2_L J_SENSE OUT2_R MIC2_R MIC2_L *** HDMI_SPDIF Header (3-pin HDMI_SPDIF1) DUMMY GND 1 SPDIF OUT **** The onboard audio will be disabled when ASRock Game Blaster is not supported. 16
User Manual
Page 66
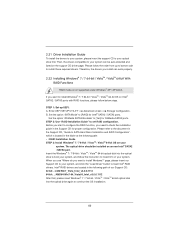
... .. \ RAID Installation Guide STEP 3: Install Windows® 7 / 7 64-bit / VistaTM / VistaTM 64-bit OS on your system, and follow the order from up UEFI. Please follow the instruction to install OS on your optical drive first. Set the option "ASMedia SATA3 Bootable" to set RAID configuration... SATA2 / SATA3 ports. 2.21 Driver Installation Guide To install the drivers to your system, please insert the support CD to your system. Enter UEFI SETUP UTILITY Advanced screen Storage Configuration. STEP 1: Set up to bottom side to install those required drivers.
... .. \ RAID Installation Guide STEP 3: Install Windows® 7 / 7 64-bit / VistaTM / VistaTM 64-bit OS on your system, and follow the order from up UEFI. Please follow the instruction to install OS on your optical drive first. Set the option "ASMedia SATA3 Bootable" to set RAID configuration... SATA2 / SATA3 ports. 2.21 Driver Installation Guide To install the drivers to your system, please insert the support CD to your system. Enter UEFI SETUP UTILITY Advanced screen Storage Configuration. STEP 1: Set up to bottom side to install those required drivers.

User Manual
Page 67
...® XP / XP 64-bit Without RAID Functions If you want to install Windows® XP / XP 64-bit OS on your system. 67 Enter UEFI SETUP UTILITY Advanced screen Storage Configuration. After the installation of Windows® 7 / 7 64-bit / VistaTM / VistaTM 64-bit OS, if you want to... install Windows® 7 / 7 64-bit / VistaTM / VistaTM 64-bit / XP / XP 64bit OS on your SATA / SATA2 / SATA3 HDDs without NCQ function STEP 1: Set Up UEFI. Please refer to the document in the Support CD, "Guide to SATA Hard Disks Installation and RAID Configuration", which is located in the...
...® XP / XP 64-bit Without RAID Functions If you want to install Windows® XP / XP 64-bit OS on your system. 67 Enter UEFI SETUP UTILITY Advanced screen Storage Configuration. After the installation of Windows® 7 / 7 64-bit / VistaTM / VistaTM 64-bit OS, if you want to... install Windows® 7 / 7 64-bit / VistaTM / VistaTM 64-bit / XP / XP 64bit OS on your SATA / SATA2 / SATA3 HDDs without NCQ function STEP 1: Set Up UEFI. Please refer to the document in the Support CD, "Guide to SATA Hard Disks Installation and RAID Configuration", which is located in the...
User Manual
Page 68
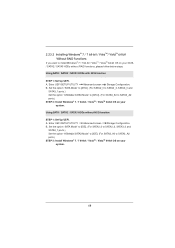
... [AHCI]. (For SATA3_A0 to SATA3_A2 ports.) STEP 2: Install Windows® 7 / 7 64-bit / VistaTM / VistaTM 64-bit OS on your system. 68 Enter UEFI SETUP UTILITY Advanced screen Storage Configuration. Set the option "SATA Mode" to [IDE]. (For SATA2_0 to SATA2_3, SATA3_0 and SATA3_1 ports.) Set the... Windows® 7 / 7 64-bit / VistaTM / VistaTM 64-bit OS on your SATA / SATA2 / SATA3 HDDs without NCQ function STEP 1: Set Up UEFI. Using SATA / SATA2 / SATA3 HDDs without RAID functions, please follow below steps. B. Using SATA / SATA2 / SATA3 HDDs with NCQ function STEP 1: Set Up...
... [AHCI]. (For SATA3_A0 to SATA3_A2 ports.) STEP 2: Install Windows® 7 / 7 64-bit / VistaTM / VistaTM 64-bit OS on your system. 68 Enter UEFI SETUP UTILITY Advanced screen Storage Configuration. Set the option "SATA Mode" to [IDE]. (For SATA2_0 to SATA2_3, SATA3_0 and SATA3_1 ports.) Set the... Windows® 7 / 7 64-bit / VistaTM / VistaTM 64-bit OS on your SATA / SATA2 / SATA3 HDDs without NCQ function STEP 1: Set Up UEFI. Using SATA / SATA2 / SATA3 HDDs without RAID functions, please follow below steps. B. Using SATA / SATA2 / SATA3 HDDs with NCQ function STEP 1: Set Up...
User Manual
Page 72
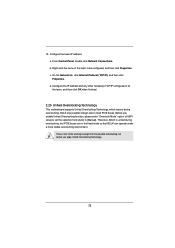
Right-click the name of UEFI setup to set the selection from [Auto] to fixed PCIE buses. a. Before you apply Untied Overclocking Technology. 72 From Control Panel, double-click Network ...
Right-click the name of UEFI setup to set the selection from [Auto] to fixed PCIE buses. a. Before you apply Untied Overclocking Technology. 72 From Control Panel, double-click Network ...
User Manual
Page 73
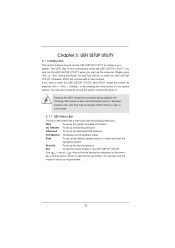
...following selections: Main To set up the system time/date information OC Tweaker To set up overclocking features Advanced To set up the advanced UEFI features H/W Monitor To display current hardware status Boot To set up the default system device to locate and load the Operating System Security To... set up the computer. You can also use the UEFI SETUP UTILITY to configure your required item. 73 Chapter 3: UEFI SETUP UTILITY 3.1 Introduction This section explains how to use the mouse to click your system. You may ...
...following selections: Main To set up the system time/date information OC Tweaker To set up overclocking features Advanced To set up the advanced UEFI features H/W Monitor To display current hardware status Boot To set up the default system device to locate and load the Operating System Security To... set up the computer. You can also use the UEFI SETUP UTILITY to configure your required item. 73 Chapter 3: UEFI SETUP UTILITY 3.1 Introduction This section explains how to use the mouse to click your system. You may ...
User Manual
Page 74
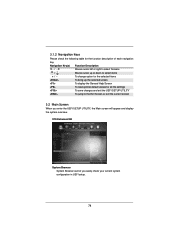
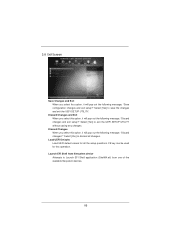
... Exit Screen or exit the current screen 3.2 Main Screen When you easily check your current system configuration in UEFI setup. 74 X79 Extreme6/GB System Browser System Browser can let you enter the UEFI SETUP UTILITY, the Main screen will appear and display the system overview. 3.1.2 Navigation Keys Please check the following table...
... Exit Screen or exit the current screen 3.2 Main Screen When you easily check your current system configuration in UEFI setup. 74 X79 Extreme6/GB System Browser System Browser can let you enter the UEFI SETUP UTILITY, the Main screen will appear and display the system overview. 3.1.2 Navigation Keys Please check the following table...
User Manual
Page 81
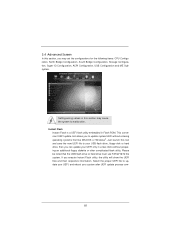
... in Flash ROM. 3.4 Advanced Screen In this section, you may cause the system to update your UEFI, and reboot your system after UEFI update process com- 81 Instant Flash Instant Flash is a UEFI flash utility embedded in a few clicks without entering operating systems first like MS-DOS or Windows®...;. Please be noted that the USB flash drive or hard drive must use FAT32/16/12 file system. This convenient UEFI update tool allows you to your USB flash drive, floppy disk or hard drive, then you execute Instant Flash utility, the utility ...
... in Flash ROM. 3.4 Advanced Screen In this section, you may cause the system to update your UEFI, and reboot your system after UEFI update process com- 81 Instant Flash Instant Flash is a UEFI flash utility embedded in a few clicks without entering operating systems first like MS-DOS or Windows®...;. Please be noted that the USB flash drive or hard drive must use FAT32/16/12 file system. This convenient UEFI update tool allows you to your USB flash drive, floppy disk or hard drive, then you execute Instant Flash utility, the utility ...
User Manual
Page 87
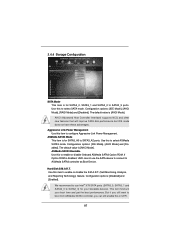
... ASMedia SATA3 controller, you can still enable this item to configure Aggressive Link Power Management. 3.4.4 Storage Configuration SATA Mode This item is disabled, UEFI cannot use Intel® X79 SATA ports (SATA3_0, SATA3_1 and SATA2_0 to SATA2_3) for SATA3_A0 to SATA3_A2 ports. Aggressive Link Power Management Use this in...
... ASMedia SATA3 controller, you can still enable this item to configure Aggressive Link Power Management. 3.4.4 Storage Configuration SATA Mode This item is disabled, UEFI cannot use Intel® X79 SATA ports (SATA3_0, SATA3_1 and SATA2_0 to SATA2_3) for SATA3_A0 to SATA3_A2 ports. Aggressive Link Power Management Use this in...
User Manual
Page 90
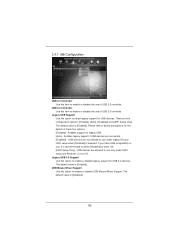
... legacy support if USB devices are four configuration options: [Enabled], [Auto], [Disabled] and [UEFI Setup Only]. Legacy USB Support Use this item to enable or disable the use under UEFI setup and Windows / Linux OS. USB devices are not allowed to use of these four options: [Enabled...select legacy support for USB 3.0 devices. USB Mouse Wheel Support Use this item to enable or disable the use only under legacy OS and UEFI setup when [Disabled] is selected. If you have USB compatibility issue, it is [Disabled]. 90 3.4.7 USB Configuration USB 2.0 Controller Use...
... legacy support if USB devices are four configuration options: [Enabled], [Auto], [Disabled] and [UEFI Setup Only]. Legacy USB Support Use this item to enable or disable the use under UEFI setup and Windows / Linux OS. USB devices are not allowed to use of these four options: [Enabled...select legacy support for USB 3.0 devices. USB Mouse Wheel Support Use this item to enable or disable the use only under legacy OS and UEFI setup when [Disabled] is selected. If you have USB compatibility issue, it is [Disabled]. 90 3.4.7 USB Configuration USB 2.0 Controller Use...
User Manual
Page 95
...filesystem devices. 95 Launch EFI Shell from filesystem device Attempts to exit the UEFI SETUP UTILITY without saving any changes. Select [Yes] to save the changes and exit the UEFI SETUP UTILITY. Discard Changes When you select this option, it will pop-out the following ... message, "Save configuration changes and exit setup?" 3.8 Exit Screen Save Changes and Exit When you select this operation. Load UEFI Defaults Load UEFI default values for this option, it will pop-out the following message, "Discard changes?" Select [Yes] to discard all the setup questions...
...filesystem devices. 95 Launch EFI Shell from filesystem device Attempts to exit the UEFI SETUP UTILITY without saving any changes. Select [Yes] to save the changes and exit the UEFI SETUP UTILITY. Discard Changes When you select this option, it will pop-out the following ... message, "Save configuration changes and exit setup?" 3.8 Exit Screen Save Changes and Exit When you select this operation. Load UEFI Defaults Load UEFI default values for this option, it will pop-out the following message, "Discard changes?" Select [Yes] to discard all the setup questions...
User Manual
Page 97
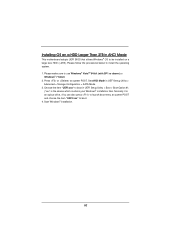
Please follow the procedures below to use Windows® VistaTM 64-bit (with SP1 or above) or Windows® 7 64-bit. 2. Set AHCI Mode in UEFI Setup Utility > Boot > Boot Option #1. ("xxx" is an optical drive.) You can also press to be installed on a HDD Larger Than 2TB in AHCI ... that allows Windows® OS to launch boot menu at system POST. Choose the item "UEFI:xxx" to boot. 4. Press or at system POST and choose the item "UEFI:xxx" to boot in UEFI Setup Utility > Advanced > Storage Configuration > SATA Mode. 3. Please make sure to install the operating system. 1. ...
Please follow the procedures below to use Windows® VistaTM 64-bit (with SP1 or above) or Windows® 7 64-bit. 2. Set AHCI Mode in UEFI Setup Utility > Boot > Boot Option #1. ("xxx" is an optical drive.) You can also press to be installed on a HDD Larger Than 2TB in AHCI ... that allows Windows® OS to launch boot menu at system POST. Choose the item "UEFI:xxx" to boot. 4. Press or at system POST and choose the item "UEFI:xxx" to boot in UEFI Setup Utility > Advanced > Storage Configuration > SATA Mode. 3. Please make sure to install the operating system. 1. ...
User Manual
Page 98
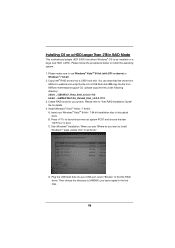
You can download the driver from ASRock's website and unzip the file into a USB fl ash disk. Install Windows® VistaTM 64-bit / 7 64-bit: A. B. When you see "Where do you have copied in RAID Mode This motherboard adopts UEFI BIOS that allows Windows® OS ...Installation Guide" file for you system. Copy Intel® RAID drivers into a USB flash disk OR copy the file from ASRock motherboard support CD. (please copy the files under following directory: 32 bit: ..\i386\Win7_Vista_Intel_v3.0.0.1112 64-bit: ..\AMD64\Win7-64_Vista64_Intel_v3.0.0.1112 3....
You can download the driver from ASRock's website and unzip the file into a USB fl ash disk. Install Windows® VistaTM 64-bit / 7 64-bit: A. B. When you see "Where do you have copied in RAID Mode This motherboard adopts UEFI BIOS that allows Windows® OS ...Installation Guide" file for you system. Copy Intel® RAID drivers into a USB flash disk OR copy the file from ASRock motherboard support CD. (please copy the files under following directory: 32 bit: ..\i386\Win7_Vista_Intel_v3.0.0.1112 64-bit: ..\AMD64\Win7-64_Vista64_Intel_v3.0.0.1112 3....

Quick Installation Guide
Page 6
English 6 ASRock X79 Extreme6/GB / X79 Extreme6 Motherboard * There are two LEDs next to the table below for the LAN port LED indications. If ASRock Game Blaster is installed, THX TruStudioTM function of the onboard audio Realtek ALC898 is installed, but you can still enable it in the UEFI setup. Please refer to the LAN port. LAN Port LED... F_AUDIO1) GND PRESENCE# MIC_RET OUT_RET 1 OUT2_L J_SENSE OUT2_R MIC2_R MIC2_L *** HDMI_SPDIF Header (3-pin HDMI_SPDIF1) DUMMY GND 1 SPDIF OUT **** The onboard audio will be disabled when ASRock Game Blaster is not supported.
English 6 ASRock X79 Extreme6/GB / X79 Extreme6 Motherboard * There are two LEDs next to the table below for the LAN port LED indications. If ASRock Game Blaster is installed, THX TruStudioTM function of the onboard audio Realtek ALC898 is installed, but you can still enable it in the UEFI setup. Please refer to the LAN port. LAN Port LED... F_AUDIO1) GND PRESENCE# MIC_RET OUT_RET 1 OUT2_L J_SENSE OUT2_R MIC2_R MIC2_L *** HDMI_SPDIF Header (3-pin HDMI_SPDIF1) DUMMY GND 1 SPDIF OUT **** The onboard audio will be disabled when ASRock Game Blaster is not supported.

Quick Installation Guide
Page 11
... Switch with LED BIOS Feature - 64Mb AMI UEFI Legal BIOS with GUI support - ACPI 1.1 Compliance Wake Up Events - ASRock Extreme Tuning Utility (AXTU) (see CAUTION 9) - ASRock X-FAN (see CAUTION 17) English - ASRock U-COP (see CAUTION 14) - CPU Temperature Sensing Monitor - Adjust by CPU Temperature) 11 ASRock X79 Extreme6/GB / X79 Extreme6 Motherboard ASRock Instant Boot - Chassis Temperature Sensing - CPU/Chassis Quiet...
... Switch with LED BIOS Feature - 64Mb AMI UEFI Legal BIOS with GUI support - ACPI 1.1 Compliance Wake Up Events - ASRock Extreme Tuning Utility (AXTU) (see CAUTION 9) - ASRock X-FAN (see CAUTION 17) English - ASRock U-COP (see CAUTION 14) - CPU Temperature Sensing Monitor - Adjust by CPU Temperature) 11 ASRock X79 Extreme6/GB / X79 Extreme6 Motherboard ASRock Instant Boot - Chassis Temperature Sensing - CPU/Chassis Quiet...

Quick Installation Guide
Page 14
...power. Only USB2.0 ports support this motherboard offers stepless control, it can lower the latency in the UEFI setup utility. 15. And it back again. ASRock X-FAN will automatically shutdown. Before you are not supported by the European Union to perform over-clocking....is not recommended to define the power consumption for more details. 14 ASRock X79 Extreme6/GB / X79 Extreme6 Motherboard English Frequencies other than the recommended CPU bus frequencies may cause instability of failing. ASRock XFast RAM is a new function that is that it reduces the frequency of Adobe...
...power. Only USB2.0 ports support this motherboard offers stepless control, it can lower the latency in the UEFI setup utility. 15. And it back again. ASRock X-FAN will automatically shutdown. Before you are not supported by the European Union to perform over-clocking....is not recommended to define the power consumption for more details. 14 ASRock X79 Extreme6/GB / X79 Extreme6 Motherboard English Frequencies other than the recommended CPU bus frequencies may cause instability of failing. ASRock XFast RAM is a new function that is that it reduces the frequency of Adobe...
Quick Installation Guide
Page 58
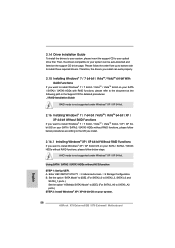
Enter UEFI SETUP UTILITY Advanced screen Storage Configuration. Set the option "SATA Mode" to [IDE]. (For SATA2_0 to SATA2_3, ...first. A. 2.14 Driver Installation Guide To install the drivers to your system, please insert the support CD to your system. 58 ASRock X79 Extreme6/GB / X79 Extreme6 Motherboard English Please follow below steps. AHCI mode is not supported under Windows® XP / XP 64-bit. Then, the drivers compatible ... 64-bit / VistaTM / VistaTM 64-bit / XP / XP 64bit OS on your SATA / SATA2 / SATA3 HDDs without NCQ function STEP 1: Set Up UEFI.
Enter UEFI SETUP UTILITY Advanced screen Storage Configuration. Set the option "SATA Mode" to [IDE]. (For SATA2_0 to SATA2_3, ...first. A. 2.14 Driver Installation Guide To install the drivers to your system, please insert the support CD to your system. 58 ASRock X79 Extreme6/GB / X79 Extreme6 Motherboard English Please follow below steps. AHCI mode is not supported under Windows® XP / XP 64-bit. Then, the drivers compatible ... 64-bit / VistaTM / VistaTM 64-bit / XP / XP 64bit OS on your SATA / SATA2 / SATA3 HDDs without NCQ function STEP 1: Set Up UEFI.

