
User Guide
Page 2
... noninfringement. Documentation Updates ATI is strictly prohibited. Features, performance and specifications are trademarks and/or registered trademarks of ATI Technologies Inc. To maximize the value of ATI Technologies Inc. All rights reserved. assumes no liability with the furnishing, performance, or use of ATI hardware, software or other products and documentation described herein, for any act or omission of ATI concerning such products or this manual, or parts thereof...
... noninfringement. Documentation Updates ATI is strictly prohibited. Features, performance and specifications are trademarks and/or registered trademarks of ATI Technologies Inc. To maximize the value of ATI Technologies Inc. All rights reserved. assumes no liability with the furnishing, performance, or use of ATI hardware, software or other products and documentation described herein, for any act or omission of ATI concerning such products or this manual, or parts thereof...

User Guide
Page 5
...and Part Numbers 2 Uninstall Previous Graphics Card Drivers 3 Installing Hardware 5 Quick Installation 5 Detailed Installation 5 Connecting Display Devices 8 Turning on the System 11 Installing Software 13 HYDRAVISION™ Multi-monitor Management 13 Installing Drivers and Software in Windows® 13 Software Installation Prerequisites 13 Monitor Configuration 15 Reinstalling Drivers 16 Display Properties 17 ATI Displays Tab 17 Dynamic Display Reassignment 19 ATI Color Tab 19 Hotkeys 22 ATI Options Tab 24 ATI Configuration Tab 25 ATI Advanced Settings...
...and Part Numbers 2 Uninstall Previous Graphics Card Drivers 3 Installing Hardware 5 Quick Installation 5 Detailed Installation 5 Connecting Display Devices 8 Turning on the System 11 Installing Software 13 HYDRAVISION™ Multi-monitor Management 13 Installing Drivers and Software in Windows® 13 Software Installation Prerequisites 13 Monitor Configuration 15 Reinstalling Drivers 16 Display Properties 17 ATI Displays Tab 17 Dynamic Display Reassignment 19 ATI Color Tab 19 Hotkeys 22 ATI Options Tab 24 ATI Configuration Tab 25 ATI Advanced Settings...

User Guide
Page 7
... power supply (recommended). AMD Athlon® 64/K7/XP or compatible. • 128 MB of your FireGL™ V7100 card. Features of system memory; 256 MB or more for best performance. • Motherboard with available X16 lane PCI Express slot and correct chipset driver. • CD-ROM drive (required for efficient Z-buffer bandwidth consumption. Hardware • Intel® Pentium® 4/Xeon®; System Requirements 1 CHAPTER 1: Getting Started Your ATI FireGL...
... power supply (recommended). AMD Athlon® 64/K7/XP or compatible. • 128 MB of your FireGL™ V7100 card. Features of system memory; 256 MB or more for best performance. • Motherboard with available X16 lane PCI Express slot and correct chipset driver. • CD-ROM drive (required for efficient Z-buffer bandwidth consumption. Hardware • Intel® Pentium® 4/Xeon®; System Requirements 1 CHAPTER 1: Getting Started Your ATI FireGL...
User Guide
Page 8
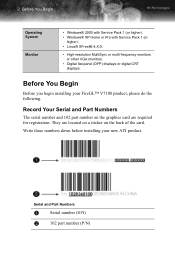
... numbers down before installing your FireGL™ V7100 product, please do the following. Serial and Part Numbers X Serial number (S/N) Y 102 part number (P/N) Before You Begin Before you begin installing your new ATI product. They are located on a sticker on the graphics card are required for registration. Record Your Serial and Part Numbers The serial number and 102 part number on the back of the card. 2 Before You Begin Operating System Monitor • Windows® 2000 with Service...
... numbers down before installing your FireGL™ V7100 product, please do the following. Serial and Part Numbers X Serial number (S/N) Y 102 part number (P/N) Before You Begin Before you begin installing your new ATI product. They are located on a sticker on the graphics card are required for registration. Record Your Serial and Part Numbers The serial number and 102 part number on the back of the card. 2 Before You Begin Operating System Monitor • Windows® 2000 with Service...
User Guide
Page 11
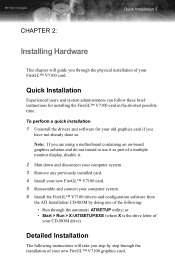
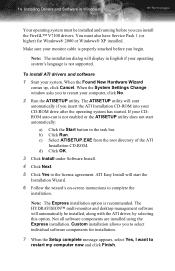
Note: If you are using a motherboard containing an on-board graphics solution and do not intend to use it as part of a multiple monitor display, disable it. 2 Shut down and disconnect your computer system. 3 Remove any previously installed card. 4 Install your new FireGL™ V7100 card. 5 Reassemble and connect your computer system. 6 Install the FireGL™ V7100 drivers and configuration software from the ATI Installation CD-ROM by step through the installation of your FireGL™ V7100 card. or • Start...
Note: If you are using a motherboard containing an on-board graphics solution and do not intend to use it as part of a multiple monitor display, disable it. 2 Shut down and disconnect your computer system. 3 Remove any previously installed card. 4 Install your new FireGL™ V7100 card. 5 Reassemble and connect your computer system. 6 Install the FireGL™ V7100 drivers and configuration software from the ATI Installation CD-ROM by step through the installation of your FireGL™ V7100 card. or • Start...
User Guide
Page 12
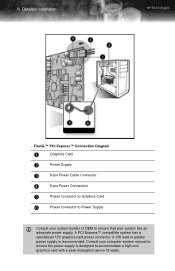
...Detailed Installation FireGL™ PCI Express™ Connection Diagram X Graphics Card Y Power Supply Z 6-pin Power Cable Connector [ 6-pin Power Connection \ Power connector to Graphics Card ] Power connector to Power Supply L Consult your system builder or OEM to ensure that your computer system manual to ensure the power supply is recommended. Consult your system has an adequate power supply. A PCI Express™ compatible system has a specialized 12V graphics card power connector. A 350 watt or greater power supply is designed to accommodate a high-end graphics card...
...Detailed Installation FireGL™ PCI Express™ Connection Diagram X Graphics Card Y Power Supply Z 6-pin Power Cable Connector [ 6-pin Power Connection \ Power connector to Graphics Card ] Power connector to Power Supply L Consult your system builder or OEM to ensure that your computer system manual to ensure the power supply is recommended. Consult your system has an adequate power supply. A PCI Express™ compatible system has a specialized 12V graphics card power connector. A 350 watt or greater power supply is designed to accommodate a high-end graphics card...
User Guide
Page 13
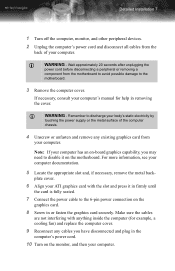
... computer's manual for example, a cooling fan) and replace the computer cover. 9 Reconnect any existing graphics card from the back of the computer chassis. 4 Unscrew or unfasten and remove any cables you may need to the 6-pin power connection on the motherboard. L WARNING - Note: If your ATI graphics card with anything inside the computer (for help in the computer's power cord. 10 Turn on -board graphics capability, you...
... computer's manual for example, a cooling fan) and replace the computer cover. 9 Reconnect any existing graphics card from the back of the computer chassis. 4 Unscrew or unfasten and remove any cables you may need to the 6-pin power connection on the motherboard. L WARNING - Note: If your ATI graphics card with anything inside the computer (for help in the computer's power cord. 10 Turn on -board graphics capability, you...
User Guide
Page 15
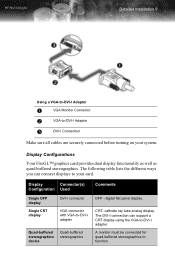
... CRT display DVI-I connector VGA connector with VGA-to your system. cathode ray tube analog display. digital flat panel display. CRT- A monitor must be connected for quad-buffered stereographics to -DVI-I adapter. Display Configurations Your FireGL™ graphics card provides dual display functionality as well as quad-buffered stereographics. The DVI-I connection can connect displays to -DVI-I adapter Quad-buffered stereographics device Quad-buffered stereographics DFP - Detailed Installation 9 Using a VGA-to-DVI-I Adaptor X VGA Monitor Connector Y VGA-to-DVI...
... CRT display DVI-I connector VGA connector with VGA-to your system. cathode ray tube analog display. digital flat panel display. CRT- A monitor must be connected for quad-buffered stereographics to -DVI-I adapter. Display Configurations Your FireGL™ graphics card provides dual display functionality as well as quad-buffered stereographics. The DVI-I connection can connect displays to -DVI-I adapter Quad-buffered stereographics device Quad-buffered stereographics DFP - Detailed Installation 9 Using a VGA-to-DVI-I Adaptor X VGA Monitor Connector Y VGA-to-DVI...

User Guide
Page 17
...; V7100 drivers and software, you have properly installed your graphics card, operating system messages will be running in a basic video mode. Turn on your monitor before you turn on the System L WARNING - Detailed Installation 11 Turning on your computer. Higher refresh rates are not available at this stage of the installation. Your monitor will appear once the boot procedure is finished. Failure to adjust the video settings and configure multiple monitors.
...; V7100 drivers and software, you have properly installed your graphics card, operating system messages will be running in a basic video mode. Turn on your monitor before you turn on the System L WARNING - Detailed Installation 11 Turning on your computer. Higher refresh rates are not available at this stage of the installation. Your monitor will appear once the boot procedure is finished. Failure to adjust the video settings and configure multiple monitors.

User Guide
Page 19
...™ Multi-monitor Management The HYDRAVISION™ multi-monitor and desktop management software will install automatically with the Express driver installation of the drivers and software associated with administrator rights. L Linux drivers and installation instructions are available from ati.com/support Software Installation Prerequisites To install or remove the drivers, you through the installation of the ATISETUP utility. For more information concerning HYDRAVISION™ , consult the user's guide included on as a user with your FireGL™ V7100 card. If...
...™ Multi-monitor Management The HYDRAVISION™ multi-monitor and desktop management software will install automatically with the Express driver installation of the drivers and software associated with administrator rights. L Linux drivers and installation instructions are available from ati.com/support Software Installation Prerequisites To install or remove the drivers, you through the installation of the ATISETUP utility. For more information concerning HYDRAVISION™ , consult the user's guide included on as a user with your FireGL™ V7100 card. If...
User Guide
Page 20
... started. The ATISETUP utility will display in English if your CDROM auto-run is not supported. ATI Easy Install will automatically be installed and running before you begin. The HYDRAVISION™ multi-monitor and desktop management software will start the Installation Wizard. 6 Follow the wizard's on-screen instructions to complete the installation. Not all software components are installed using the Express installation. Custom installation allows you can install the FireGL™ V7100 drivers. c) Select ATISETUP.EXE...
... started. The ATISETUP utility will display in English if your CDROM auto-run is not supported. ATI Easy Install will automatically be installed and running before you begin. The HYDRAVISION™ multi-monitor and desktop management software will start the Installation Wizard. 6 Follow the wizard's on-screen instructions to complete the installation. Not all software components are installed using the Express installation. Custom installation allows you can install the FireGL™ V7100 drivers. c) Select ATISETUP.EXE...

User Guide
Page 22
... the ATI Installation CD-ROM and click OK. Any additional monitors will always be designated as if you have installed a new card for your FireGL™ V7100 card, one monitor will be Primary. If your CD-ROM auto-run is not enabled or the ATISETUP utility does not start automatically if you use multiple monitors with your graphics card after the operating system has started. Reinstalling Drivers The software installation procedure...
... the ATI Installation CD-ROM and click OK. Any additional monitors will always be designated as if you have installed a new card for your FireGL™ V7100 card, one monitor will be Primary. If your CD-ROM auto-run is not enabled or the ATISETUP utility does not start automatically if you use multiple monitors with your graphics card after the operating system has started. Reinstalling Drivers The software installation procedure...
User Guide
Page 24
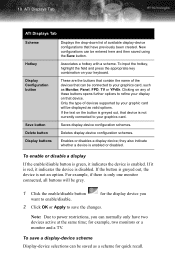
... only one monitor connected, all buttons will be connected to your graphics card. For example, if there is not currently connected to your display on the button is greyed out, that device. for quick recall. To save the changes. 18 ATI Displays Tab ATI Displays Tab Scheme Hotkey Display Configuration button Save button Delete button Display buttons Displays the drop-down list of available display-device configurations that can...
... only one monitor connected, all buttons will be connected to your graphics card. For example, if there is not currently connected to your display on the button is greyed out, that device. for quick recall. To save the changes. 18 ATI Displays Tab ATI Displays Tab Scheme Hotkey Display Configuration button Save button Delete button Display buttons Displays the drop-down list of available display-device configurations that can...
User Guide
Page 25
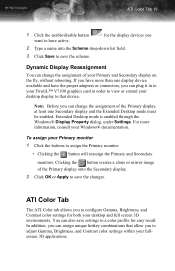
...; documentation. You can plug it in to your FireGL™ V7100 graphics card in order to view or extend your desktop display to adjust Gamma, Brightness, and Contrast color settings within your Primary and Secondary display on the fly, without rebooting. Extended Desktop mode is enabled through the Windows® Display Property dialog, under Settings. ATI Color Tab 19 1 Click the enable/disable button want to a color profile for easy recall. In addition, you can change...
...; documentation. You can plug it in to your FireGL™ V7100 graphics card in order to view or extend your desktop display to adjust Gamma, Brightness, and Contrast color settings within your Primary and Secondary display on the fly, without rebooting. Extended Desktop mode is enabled through the Windows® Display Property dialog, under Settings. ATI Color Tab 19 1 Click the enable/disable button want to a color profile for easy recall. In addition, you can change...
User Guide
Page 30
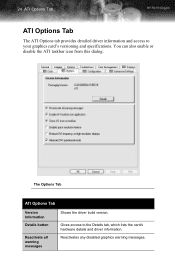
The Options Tab ATI Options Tab Version Information Details button Reactivate all warning messages Shows the driver build version. Gives access to your graphics card's versioning and specifications. Reactivates any disabled graphics warning messages. 24 ATI Options Tab ATI Options Tab The ATI Options tab provides detailed driver information and access to the Details tab, which lists the card's hardware details and driver information. You can also enable or disable the ATI taskbar icon from this dialog.
The Options Tab ATI Options Tab Version Information Details button Reactivate all warning messages Shows the driver build version. Gives access to your graphics card's versioning and specifications. Reactivates any disabled graphics warning messages. 24 ATI Options Tab ATI Options Tab The ATI Options tab provides detailed driver information and access to the Details tab, which lists the card's hardware details and driver information. You can also enable or disable the ATI taskbar icon from this dialog.
User Guide
Page 38
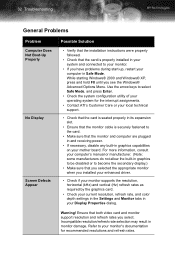
... you installed your enhanced driver. • Check if your monitor supports the resolution, horizontal (kHz) and vertical (Hz) refresh rates as required by the graphics card. • Check your current resolution, refresh rate, and color depth settings in the Settings and Monitor tabs in your Display Properties dialog. While starting Windows® 2000 and Windows® XP, press and hold F8 until you select. Use the arrow keys to select Safe Mode, and...
... you installed your enhanced driver. • Check if your monitor supports the resolution, horizontal (kHz) and vertical (Hz) refresh rates as required by the graphics card. • Check your current resolution, refresh rate, and color depth settings in the Settings and Monitor tabs in your Display Properties dialog. While starting Windows® 2000 and Windows® XP, press and hold F8 until you select. Use the arrow keys to select Safe Mode, and...

User Guide
Page 39
... monitor users: Make sure that Video Card Isn't Properly Configured Stereo Glasses Not Working • Try adjusting the brightness, sharpness, contrast, and color balance controls of your monitor. • Try adjusting the centering and positioning controls of your operating system and applications. • Reinstall the ATI drivers for information on the screen. Note: The Screen Position settings in the Advanced Settings tab of the Display Properties. Troubleshooting 33 Problem Possible Solution Off-Center Screen Image...
... monitor users: Make sure that Video Card Isn't Properly Configured Stereo Glasses Not Working • Try adjusting the brightness, sharpness, contrast, and color balance controls of your monitor. • Try adjusting the centering and positioning controls of your operating system and applications. • Reinstall the ATI drivers for information on the screen. Note: The Screen Position settings in the Advanced Settings tab of the Display Properties. Troubleshooting 33 Problem Possible Solution Off-Center Screen Image...

User Guide
Page 40
...: Standard VGA I/O: 3B0-3DF Memory Addresses: Video RAM: A000-BFFF Video ROM: C000-C7FF Note: You cannot change the addresses of the add-on card that causes the conflict. • To support the special graphics processor on the FireGL™ card, the system BIOS should automatically assign a system interrupt to modify the I /O and memory addresses reserved for the graphics board are available: Online For product information, drivers...
...: Standard VGA I/O: 3B0-3DF Memory Addresses: Video RAM: A000-BFFF Video ROM: C000-C7FF Note: You cannot change the addresses of the add-on card that causes the conflict. • To support the special graphics processor on the FireGL™ card, the system BIOS should automatically assign a system interrupt to modify the I /O and memory addresses reserved for the graphics board are available: Online For product information, drivers...

User Guide
Page 42
Late model products are responsible for the cost of such product. If, at any time. • You are assumed to be limited to the repair or replacement of shipping the product to -new replacement parts. This warranty does not apply to the software component of the installation, usage not in accordance with a serviced product at their sole discretion at the time of repair, a product is successfully...
Late model products are responsible for the cost of such product. If, at any time. • You are assumed to be limited to the repair or replacement of shipping the product to -new replacement parts. This warranty does not apply to the software component of the installation, usage not in accordance with a serviced product at their sole discretion at the time of repair, a product is successfully...

User Guide
Page 44
...further compliance information: ATI Research Inc. 4 Mount Royal Ave. Cet appareil numérique de la Classe B est conforme à la norme NMB-003 du Canada. 38 Compliance Information • Increase the separation between the equipment and receiver. • Connect the equipment to an...ICES-003. The use of shielded cables for connection of the monitor to the graphics card is required to which the receiver is connected. • Consult the dealer or an experienced radio/TV technician for compliance could void the user's authority to operate this equipment. Changes or modifications to this...
...further compliance information: ATI Research Inc. 4 Mount Royal Ave. Cet appareil numérique de la Classe B est conforme à la norme NMB-003 du Canada. 38 Compliance Information • Increase the separation between the equipment and receiver. • Connect the equipment to an...ICES-003. The use of shielded cables for connection of the monitor to the graphics card is required to which the receiver is connected. • Consult the dealer or an experienced radio/TV technician for compliance could void the user's authority to operate this equipment. Changes or modifications to this...


