
User Guide
Page 1
... 41A604-786-2A 英文 1 Monitor 2. Contents Packing list 1 Precautions 2 Installation Instructions 3 Swivel Base 3 Power cord 3 Video cable 4 Operating Instructions 5 General Instructions 5 Front panel control 6 How to adjust a setting 6 Adjusting the picture 7-8 Plug and play 9 Technical Support (FAQ 10 Appendix A - Power Cord 4. This manual should include the following items: 1. Owner's Manual 3. Factory Preset Timing Table 13 PACKING LIST The product package should be retained for future reference. Specifications 11-12 Appendix B - Before operating...
... 41A604-786-2A 英文 1 Monitor 2. Contents Packing list 1 Precautions 2 Installation Instructions 3 Swivel Base 3 Power cord 3 Video cable 4 Operating Instructions 5 General Instructions 5 Front panel control 6 How to adjust a setting 6 Adjusting the picture 7-8 Plug and play 9 Technical Support (FAQ 10 Appendix A - Power Cord 4. This manual should include the following items: 1. Owner's Manual 3. Factory Preset Timing Table 13 PACKING LIST The product package should be retained for future reference. Specifications 11-12 Appendix B - Before operating...
User Guide
Page 2
... the kit instructions. If you are not blocked or covered. z Do not overload power strips and extension cords. This will fit only into the slot on the label. If your dealer or local power company. It could short circuit parts causing a fire or electric shock. z The wall socket shall be installed near water, e.g. PRECAUTIONS z Do not use a mounting kit approved...
... the kit instructions. If you are not blocked or covered. z Do not overload power strips and extension cords. This will fit only into the slot on the label. If your dealer or local power company. It could short circuit parts causing a fire or electric shock. z The wall socket shall be installed near water, e.g. PRECAUTIONS z Do not use a mounting kit approved...
User Guide
Page 3
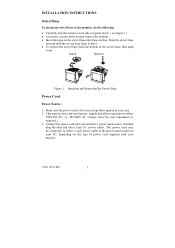
... on the type of power cord supplied with your monitor's power input socket, and then plug the other end into a 3-pin AC power outlet. Install Remove Figure 1 Installing and Removing the Swivel Base Power Cord Power Source: 1. Push the swivel base forward until the swivel base locks in your area. 2. INSTALLATION INSTRUCTIONS Swivel Base To attach the swivel base to either 100/120V AC or 220/240V AC voltage area ( No user adjustment is the correct...
... on the type of power cord supplied with your monitor's power input socket, and then plug the other end into a 3-pin AC power outlet. Install Remove Figure 1 Installing and Removing the Swivel Base Power Cord Power Source: 1. Push the swivel base forward until the swivel base locks in your area. 2. INSTALLATION INSTRUCTIONS Swivel Base To attach the swivel base to either 100/120V AC or 220/240V AC voltage area ( No user adjustment is the correct...

User Guide
Page 4
... grounded (with a built-in video cable. Connecting the Power Cord: Plug the power cord into the computer's video port and tighten the two screws on your PC. Plug the signal cable's 15-pin connector into the monitor's AC power socket. Caution:Don't bend the signal cable, otherwise it will break the inner wire. Figure 2 Connecting Cables 1. Video cable Connecting the Video Cable: The monitor comes with three holes), install the proper grounding adapter (not supplied). Power Cord 2. Signal Cable 41A604-786-2A 英文...
... grounded (with a built-in video cable. Connecting the Power Cord: Plug the power cord into the computer's video port and tighten the two screws on your PC. Plug the signal cable's 15-pin connector into the monitor's AC power socket. Caution:Don't bend the signal cable, otherwise it will break the inner wire. Figure 2 Connecting Cables 1. Video cable Connecting the Video Cable: The monitor comes with three holes), install the proper grounding adapter (not supplied). Power Cord 2. Signal Cable 41A604-786-2A 英文...
User Guide
Page 5
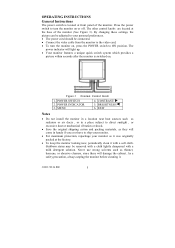
... the monitor is located at front panel of the monitor (See Figure 3). As a safety precaution, always unplug the monitor before cleaning it with a mild detergent solution. Never use strong solvents such as thinner, benzene, or abrasive cleaners, since these settings, the picture can be removed with a cloth lightly dampened with a soft cloth. Figure 3 External Control Knob 1. BRIGHTNESS/ 6. MENU 4. OPERATING INSTRUCTIONS General Instructions The power switch is switched on...
... the monitor is located at front panel of the monitor (See Figure 3). As a safety precaution, always unplug the monitor before cleaning it with a mild detergent solution. Never use strong solvents such as thinner, benzene, or abrasive cleaners, since these settings, the picture can be removed with a cloth lightly dampened with a soft cloth. Figure 3 External Control Knob 1. BRIGHTNESS/ 6. MENU 4. OPERATING INSTRUCTIONS General Instructions The power switch is switched on...
User Guide
Page 6
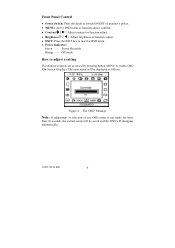
... Panel Control • Power Switch: Press this knob to switch ON/OFF of any OSD menu is not made for more than 10 seconds, the current setup will be saved and the OSD will be displayed as follows. Orange - Off mode. Figure 4 The OSD Message Note: If adjustment or selection of monitor's power. • MENU: Active OSD menu or function adjust confirm. • Contrast / : Adiust contrast or function adjust. • Brightness / : Adjust brightness or function adjust. •...
... Panel Control • Power Switch: Press this knob to switch ON/OFF of any OSD menu is not made for more than 10 seconds, the current setup will be saved and the OSD will be displayed as follows. Orange - Off mode. Figure 4 The OSD Message Note: If adjustment or selection of monitor's power. • MENU: Active OSD menu or function adjust confirm. • Contrast / : Adiust contrast or function adjust. • Brightness / : Adjust brightness or function adjust. •...
User Guide
Page 7
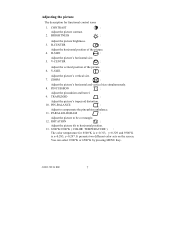
...CENTER : Adjust the vertical position of the picture. 4. PIN-BALANCE : Adjust to horizontal position. 13. 6500°K/9300°K ( COLOR TEMPERATURE ) : The color temperature for functional control icons 1. CONTRAST : Adjust the picture contrast. 2. H-SIZE : Adjust the picture's horizontal size. 5. PINCUSHION : Adjust the pincushion and barrel. 9. H-CENTER : Adjust the horizontal position of the picture. 6. V-SIZE : Adjust the picture's vertical size. 7. ROTATION : Adjust the picture tilt to compensate the pincushion unbalance. 11. Adjusting the picture The...
...CENTER : Adjust the vertical position of the picture. 4. PIN-BALANCE : Adjust to horizontal position. 13. 6500°K/9300°K ( COLOR TEMPERATURE ) : The color temperature for functional control icons 1. CONTRAST : Adjust the picture contrast. 2. H-SIZE : Adjust the picture's horizontal size. 5. PINCUSHION : Adjust the pincushion and barrel. 9. H-CENTER : Adjust the horizontal position of the picture. 6. V-SIZE : Adjust the picture's vertical size. 7. ROTATION : Adjust the picture tilt to compensate the pincushion unbalance. 11. Adjusting the picture The...

User Guide
Page 8
... optimum condition. USER COLOR ( Red / Blue ) : If the 9300°K normal white or 6500°K warmer white do not satisfy your optimum whiteness level. 15. EXIT : Close OSD window. 19. RECALL : Press RECALL to restore the monitor to enter in the moire reduce setting. Press the MENU to factory settings. 18. MOIRE REDUCE : Moire is the result of a setting will cause the picture to obtain your...
... optimum condition. USER COLOR ( Red / Blue ) : If the 9300°K normal white or 6500°K warmer white do not satisfy your optimum whiteness level. 15. EXIT : Close OSD window. 19. RECALL : Press RECALL to restore the monitor to enter in the moire reduce setting. Press the MENU to factory settings. 18. MOIRE REDUCE : Moire is the result of a setting will cause the picture to obtain your...

User Guide
Page 9
... set by pressing a key on the I²C protocol. Video Cable Pin Assignments: 1. Ground 9. V- This feature is a bidirectional data channel based on the keyboard, or clicking the mouse. This reduces the monitor's internal power supply consumption. Blue 4. Ground 14. DDC-Serial Data * FOR DDC 41A604-786-2A 英文 9 IN ORDER FOR THIS MONITOR TO OPERATE PROPERLY, THERE MUST BE A VIDEO INPUT SIGNAL. The display...
... set by pressing a key on the I²C protocol. Video Cable Pin Assignments: 1. Ground 9. V- This feature is a bidirectional data channel based on the keyboard, or clicking the mouse. This reduces the monitor's internal power supply consumption. Blue 4. Ground 14. DDC-Serial Data * FOR DDC 41A604-786-2A 英文 9 IN ORDER FOR THIS MONITOR TO OPERATE PROPERLY, THERE MUST BE A VIDEO INPUT SIGNAL. The display...
User Guide
Page 10
... LED should either turn ON or OFF after hitting the CAPS LOCK key. *Inspect the monitor's video cable and make sure that may cause electrical interference. *Computer Power Switch should be in the ON position *Computer Video Card should be connected *Check if the PC system is Plug & Play compatible *Check if the Video Card is Plug & Play compatible *Check if the D-15 plug pin of Video Cable is bent *Make sure the Monitor Drivers are installed *Adjust the Contrast and Brightness Controls...
... LED should either turn ON or OFF after hitting the CAPS LOCK key. *Inspect the monitor's video cable and make sure that may cause electrical interference. *Computer Power Switch should be in the ON position *Computer Video Card should be connected *Check if the PC system is Plug & Play compatible *Check if the Video Card is Plug & Play compatible *Check if the D-15 plug pin of Video Cable is bent *Make sure the Monitor Drivers are installed *Adjust the Contrast and Brightness Controls...

User Guide
Page 11
Resolution Video bandwidth Factory Preset Timings : User mode Timings : Misconvergence • Center • Corner Power Source Operating Humidity Weight Dimensions • Monitor Signal Cable External Controls: Switch 38cm(15"), 90º deflection, 29mm neck, 0.28mm dot pitch non-glare screen. 35.5cm (14"), diagonal Unlimited colors All timing that meets scanning frequencies Specification • Analog R, G, B 0.7Vpp positive/75 ohm • Horizontal sync. : Positive/Negative • Vertical sync. : Positive/Negative 30kHz to 54kHz automatically 50Hz to...
Resolution Video bandwidth Factory Preset Timings : User mode Timings : Misconvergence • Center • Corner Power Source Operating Humidity Weight Dimensions • Monitor Signal Cable External Controls: Switch 38cm(15"), 90º deflection, 29mm neck, 0.28mm dot pitch non-glare screen. 35.5cm (14"), diagonal Unlimited colors All timing that meets scanning frequencies Specification • Analog R, G, B 0.7Vpp positive/75 ohm • Horizontal sync. : Positive/Negative • Vertical sync. : Positive/Negative 30kHz to 54kHz automatically 50Hz to...
User Guide
Page 12
... ( OSD ) • CONTRAST • BRIGHTNESS • H-CENTER • H-SIZE • V-CENTER • V-SIZE • ZOOM • PINCUSHION • TRAPEZOID • PIN-BALANCE • PARALLELOGRAM • ROTATION • 6500°K • USER COLOR • 9300°K • DEGAUSS • MOIRE REDUCE • RECALL • EXIT • SELECT LANGUAGE Plug & Play DDC1/2B EPA ENERGY On mode ≤ 75W STAR® Off mode...
... ( OSD ) • CONTRAST • BRIGHTNESS • H-CENTER • H-SIZE • V-CENTER • V-SIZE • ZOOM • PINCUSHION • TRAPEZOID • PIN-BALANCE • PARALLELOGRAM • ROTATION • 6500°K • USER COLOR • 9300°K • DEGAUSS • MOIRE REDUCE • RECALL • EXIT • SELECT LANGUAGE Plug & Play DDC1/2B EPA ENERGY On mode ≤ 75W STAR® Off mode...
User Guide
Page 13
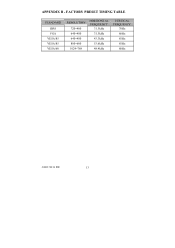
APPENDIX B - FACTORY PRESET TIMING TABLE STANDARD IBM VGA VESA/85 VESA/85 VESA/60 RESOLUTION 720×400 640×480 640×480 800×600 1024×768 HORIZONTAL FREQUENCY 31.5kHz 31.5kHz 43.3kHz 53.6kHz 48.4kHz VERTICAL FREQUENCY 70Hz 60Hz 85Hz 85Hz 60Hz 41A604-786-2A 英文 13
APPENDIX B - FACTORY PRESET TIMING TABLE STANDARD IBM VGA VESA/85 VESA/85 VESA/60 RESOLUTION 720×400 640×480 640×480 800×600 1024×768 HORIZONTAL FREQUENCY 31.5kHz 31.5kHz 43.3kHz 53.6kHz 48.4kHz VERTICAL FREQUENCY 70Hz 60Hz 85Hz 85Hz 60Hz 41A604-786-2A 英文 13


