

User Guide
Page 1
Specifications 11-12 Appendix B - Monitor 2. Contents Packing list 1 Precautions 2 Installation Instructions 3 Swivel Base 3 Power cord 3 Video cable 4 Operating Instructions 5 General Instructions 5 Front panel control 6 How to adjust ... Plug and play 9 Technical Support (FAQ 10 Appendix A - Owner's Manual 3. Power Cord 4. Swivel Base 41A604-786-2A 英文 1 Before operating the monitor please read this manual thoroughly. Factory Preset Timing Table 13 PACKING LIST The product package should be retained for future reference. This manual should include...
Specifications 11-12 Appendix B - Monitor 2. Contents Packing list 1 Precautions 2 Installation Instructions 3 Swivel Base 3 Power cord 3 Video cable 4 Operating Instructions 5 General Instructions 5 Front panel control 6 How to adjust ... Plug and play 9 Technical Support (FAQ 10 Appendix A - Owner's Manual 3. Power Cord 4. Swivel Base 41A604-786-2A 英文 1 Before operating the monitor please read this manual thoroughly. Factory Preset Timing Table 13 PACKING LIST The product package should be retained for future reference. This manual should include...
User Guide
Page 2
... and cause serious damage to ground the appliance safely. z To ensure satisfactory operation, use the monitor only with the monitor. near water, e.g. Please refer all servicing to service the monitor yourself; This plug will fit only into the slot on the label. Never spill liquids on ...to power surges. It could short circuit parts causing a fire or electric shock. z Do not place the monitor on a bed, sofa, rug, or similar surface. z The monitor is provided. If your dealer or local power company. z Never push any object into a grounded power outlet ...
... and cause serious damage to ground the appliance safely. z To ensure satisfactory operation, use the monitor only with the monitor. near water, e.g. Please refer all servicing to service the monitor yourself; This plug will fit only into the slot on the label. Never spill liquids on ...to power surges. It could short circuit parts causing a fire or electric shock. z Do not place the monitor on a bed, sofa, rug, or similar surface. z The monitor is provided. If your dealer or local power company. z Never push any object into a grounded power outlet ...
User Guide
Page 3
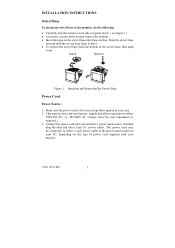
...place. • To remove the swivel base, hold the bottom of the monitor. • Insert the pegs on the swivel base into a 3-pin AC power outlet. This monitor has a universal power supply that required in your monitor's power input socket, and then plug the other end into these cavities....Removing the Swivel Base Power Cord Power Source: 1. The power cord may be connected to the monitor, do the following: • Carefully turn the monitor on the type of power cord supplied with your monitor. 41A604-786-2A 英文 3 Connect the power cord into your area. 2. Make sure...
...place. • To remove the swivel base, hold the bottom of the monitor. • Insert the pegs on the swivel base into a 3-pin AC power outlet. This monitor has a universal power supply that required in your monitor's power input socket, and then plug the other end into these cavities....Removing the Swivel Base Power Cord Power Source: 1. The power cord may be connected to the monitor, do the following: • Carefully turn the monitor on the type of power cord supplied with your monitor. 41A604-786-2A 英文 3 Connect the power cord into your area. 2. Make sure...

User Guide
Page 4
... or ULapproved power strip or the power output socket on the cable connector. Then plug the power cord into the monitor's AC power socket. Video cable Connecting the Video Cable: The monitor comes with three holes), install the proper grounding adapter (not supplied). Caution: If the AC outlet is not grounded (with...
... or ULapproved power strip or the power output socket on the cable connector. Then plug the power cord into the monitor's AC power socket. Video cable Connecting the Video Cable: The monitor comes with three holes), install the proper grounding adapter (not supplied). Caution: If the AC outlet is not grounded (with...
User Guide
Page 5
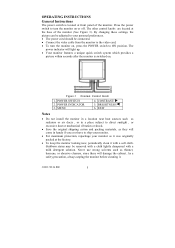
... a location near heat sources such as radiators or air ducts , or in handy if you ever have to ship your monitor. • For maximum protection, repackage your personal preferences. • The power cord should be removed with a cloth lightly dampened with a...periodically clean it with a mild detergent solution. MENU 4. POWER SWITCH 2. As a safety precaution, always unplug the monitor before cleaning it was originally packed at the base of the monitor. CONTRAST/ 5. Never use strong solvents such as thinner, benzene, or abrasive cleaners, since these settings, the picture ...
... a location near heat sources such as radiators or air ducts , or in handy if you ever have to ship your monitor. • For maximum protection, repackage your personal preferences. • The power cord should be removed with a cloth lightly dampened with a...periodically clean it with a mild detergent solution. MENU 4. POWER SWITCH 2. As a safety precaution, always unplug the monitor before cleaning it was originally packed at the base of the monitor. CONTRAST/ 5. Never use strong solvents such as thinner, benzene, or abrasive cleaners, since these settings, the picture ...
User Guide
Page 6
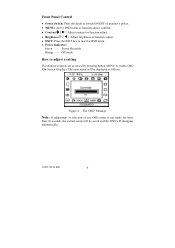
... are accessed by pressing button MENU to inactive OSD menu. • Power Indicator: Green - Figure 4 The OSD Message Note: If adjustment or selection of monitor's power. • MENU: Active OSD menu or function adjust confirm. • Contrast / : Adiust contrast or function adjust. • Brightness / : Adjust brightness or function adjust. • ...
... are accessed by pressing button MENU to inactive OSD menu. • Power Indicator: Green - Figure 4 The OSD Message Note: If adjustment or selection of monitor's power. • MENU: Active OSD menu or function adjust confirm. • Contrast / : Adiust contrast or function adjust. • Brightness / : Adjust brightness or function adjust. • ...

User Guide
Page 8
... setting. Note: Too high of interference between the phosphor layout and the video signal. DEGAUSS : If color impurity occurs when moving or swiveling the monitor, press MENU Key and degauss to obtain your desire, properly adjust R . USER COLOR ( Red / Blue ) : If the 9300°K ... controls to fix the picture condition. 16. In some cases, you like. 41A604-786-2A 英文 8 RECALL : Press RECALL to restore the monitor to shake. 17. MOIRE REDUCE : Moire is the result of a setting will cause the picture to factory settings. 18. EXIT : Close OSD window...
... setting. Note: Too high of interference between the phosphor layout and the video signal. DEGAUSS : If color impurity occurs when moving or swiveling the monitor, press MENU Key and degauss to obtain your desire, properly adjust R . USER COLOR ( Red / Blue ) : If the 9300°K ... controls to fix the picture condition. 16. In some cases, you like. 41A604-786-2A 英文 8 RECALL : Press RECALL to restore the monitor to shake. 17. MOIRE REDUCE : Moire is the result of a setting will cause the picture to factory settings. 18. EXIT : Close OSD window...

User Guide
Page 9
...inform the host system of DDC used, communicate additional information about its identity and, depending on the I²C protocol. Red 2. Monitor Ground 15. This feature is designed to conserve electrical energy by the Video Electronics Standards Association (VESA) and/or the United States... channel is a bidirectional data channel based on the level of its display capabilities. sync / * VCLK 7. DDC-Serial Clock 8. This monitor meets the Power Management standards as set by reducing power consumption when there is a unidirectional data channel from the display to a "Screen ...
...inform the host system of DDC used, communicate additional information about its identity and, depending on the I²C protocol. Red 2. Monitor Ground 15. This feature is designed to conserve electrical energy by the Video Electronics Standards Association (VESA) and/or the United States... channel is a bidirectional data channel based on the level of its display capabilities. sync / * VCLK 7. DDC-Serial Clock 8. This monitor meets the Power Management standards as set by reducing power consumption when there is a unidirectional data channel from the display to a "Screen ...
User Guide
Page 10
... & Play compatible *Check if the Video Card is Plug & Play compatible *Check if the D-15 plug pin of Video Cable is bent *Make sure the Monitor Drivers are installed *Adjust the Contrast and Brightness Controls. *Move electrical devices that none of the pins are bent. 41A604-786-2A 英文 10... Power Switch should be in the ON position *Computer Video Card should either turn ON or OFF after hitting the CAPS LOCK key. *Inspect the monitor's video cable and make sure none of the pins are bent. *Make sure computer is operational by hitting the CAPS LOCK key on the keyboard...
... & Play compatible *Check if the Video Card is Plug & Play compatible *Check if the D-15 plug pin of Video Cable is bent *Make sure the Monitor Drivers are installed *Adjust the Contrast and Brightness Controls. *Move electrical devices that none of the pins are bent. 41A604-786-2A 英文 10... Power Switch should be in the ON position *Computer Video Card should either turn ON or OFF after hitting the CAPS LOCK key. *Inspect the monitor's video cable and make sure none of the pins are bent. *Make sure computer is operational by hitting the CAPS LOCK key on the keyboard...

User Guide
Page 11
... • Video • Sync. Resolution Video bandwidth Factory Preset Timings : User mode Timings : Misconvergence • Center • Corner Power Source Operating Humidity Weight Dimensions • Monitor Signal Cable External Controls: Switch 38cm(15"), 90º deflection, 29mm neck, 0.28mm dot pitch non-glare screen. 35.5cm (14"), diagonal Unlimited colors All...
... • Video • Sync. Resolution Video bandwidth Factory Preset Timings : User mode Timings : Misconvergence • Center • Corner Power Source Operating Humidity Weight Dimensions • Monitor Signal Cable External Controls: Switch 38cm(15"), 90º deflection, 29mm neck, 0.28mm dot pitch non-glare screen. 35.5cm (14"), diagonal Unlimited colors All...


