
AF715 User's Guide
Page 1
Operating Instructions 5 - Adjusting the picture 6-8 Plug and play 9 - Factory Preset Timing Table 13 - 1 Contents Packing list 1 - General Instructions 5 - Appendix A - This manual should be retained for future reference. Technical Support (FAQ 10 - Before operating the monitor please read this manual thoroughly. Front panel control 6 - Precautions 2 Installation Instructions 3 Swivel Base 3 Power cord 3 Video cable 4 - How to adjust a setting 6 - Specifications 11-12 Appendix B -
Operating Instructions 5 - Adjusting the picture 6-8 Plug and play 9 - Factory Preset Timing Table 13 - 1 Contents Packing list 1 - General Instructions 5 - Appendix A - This manual should be retained for future reference. Technical Support (FAQ 10 - Before operating the monitor please read this manual thoroughly. Front panel control 6 - Precautions 2 Installation Instructions 3 Swivel Base 3 Power cord 3 Video cable 4 - How to adjust a setting 6 - Specifications 11-12 Appendix B -

AF715 User's Guide
Page 2
Owner's Manual 3. Power Cord 1. Swivel Base 2 Pure Flat Color Monitor 2. PACKING LIST The product package should include the following items: 1.
Owner's Manual 3. Power Cord 1. Swivel Base 2 Pure Flat Color Monitor 2. PACKING LIST The product package should include the following items: 1.
AF715 User's Guide
Page 3
... tub, swimming pool or in a wet basement. If the monitor falls, it will fit only into the slot on a wall or shelf, use a mounting kit approved by the manufacturer or sold with the monitor. Use only a cart or stand recommended by the manufacturer and follow the kit instructions. z Slots and openings in the back and bottom of the grounded plug.
... tub, swimming pool or in a wet basement. If the monitor falls, it will fit only into the slot on a wall or shelf, use a mounting kit approved by the manufacturer or sold with the monitor. Use only a cart or stand recommended by the manufacturer and follow the kit instructions. z Slots and openings in the back and bottom of the grounded plug.
AF715 User's Guide
Page 4
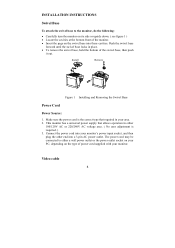
... user adjustment is the correct type that allows operation in your monitor's power input socket, and then plug the other end into a 3-pin AC power outlet. This monitor has a universal power supply that required in either a wall power outlet or the power outlet socket on your PC, depending on the swivel base into your area. 2. Video cable 4 Install Remove Figure 1 Installing and Removing the Swivel Base Power Cord Power Source: 1. Connect the power cord into these cavities. Make sure...
... user adjustment is the correct type that allows operation in your monitor's power input socket, and then plug the other end into a 3-pin AC power outlet. This monitor has a universal power supply that required in either a wall power outlet or the power outlet socket on your PC, depending on the swivel base into your area. 2. Video cable 4 Install Remove Figure 1 Installing and Removing the Swivel Base Power Cord Power Source: 1. Connect the power cord into these cavities. Make sure...
AF715 User's Guide
Page 5
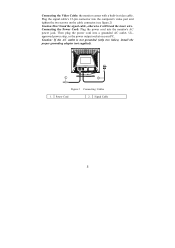
... holes), install the proper grounding adapter (not supplied). Connecting the Power Cord: Plug the power cord into the computer's video port and tighten the two screws on your PC. approved power strip, or the power output socket on the cable connector.(see figure 2) Caution:Don't bend the signal cable, otherwise it will break the inner wire. Figure 2 Connecting Cables 1. Signal Cable 5 Power Cord 2. Plug the signal cable′s 15-pin connector into the monitor's AC power jack. Then plug the power cord into...
... holes), install the proper grounding adapter (not supplied). Connecting the Power Cord: Plug the power cord into the computer's video port and tighten the two screws on your PC. approved power strip, or the power output socket on the cable connector.(see figure 2) Caution:Don't bend the signal cable, otherwise it will break the inner wire. Figure 2 Connecting Cables 1. Signal Cable 5 Power Cord 2. Plug the signal cable′s 15-pin connector into the monitor's AC power jack. Then plug the power cord into...
AF715 User's Guide
Page 6
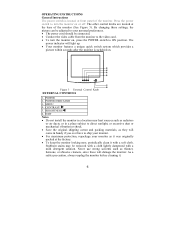
... POWER switch to the video card. • To turn the monitor on . The other control knobs are located at front panel of the monitor (See Figure 3). CONTRAST/ 5. As a safety precaution, always unplug the monitor before cleaning it with a mild detergent solution. Never use strong solvents such as it was originally packed at the factory. • To keep the monitor looking new, periodically clean it . 6 OPERATING INSTRUCTIONS General Instructions The power switch...
... POWER switch to the video card. • To turn the monitor on . The other control knobs are located at front panel of the monitor (See Figure 3). CONTRAST/ 5. As a safety precaution, always unplug the monitor before cleaning it with a mild detergent solution. Never use strong solvents such as it was originally packed at the factory. • To keep the monitor looking new, periodically clean it . 6 OPERATING INSTRUCTIONS General Instructions The power switch...
AF715 User's Guide
Page 7
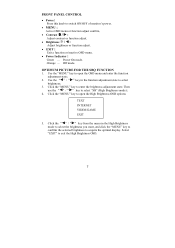
... to switch ON/OFF of monitor's power. • MENU : Active OSD menu or function adjust confirm. • Contrast / : Adjust contrast or function adjust. • Brightness / : Adjust brightness or function adjust. • EXIT : Exit a function or inactive OSD menu. • Power Indicator : Green - FRONT PANEL CONTROL • Power: Press this knob to select "SB" (High Brightness mode); 4. Click the "MENU" key to exit the High Brightness OSD. 7 Select "EXIT" to enter the brightness adjustment state. Use the " "/" "key in the High Brightness mode...
... to switch ON/OFF of monitor's power. • MENU : Active OSD menu or function adjust confirm. • Contrast / : Adjust contrast or function adjust. • Brightness / : Adjust brightness or function adjust. • EXIT : Exit a function or inactive OSD menu. • Power Indicator : Green - FRONT PANEL CONTROL • Power: Press this knob to select "SB" (High Brightness mode); 4. Click the "MENU" key to exit the High Brightness OSD. 7 Select "EXIT" to enter the brightness adjustment state. Use the " "/" "key in the High Brightness mode...
AF715 User's Guide
Page 8
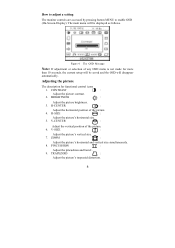
...Adjust the picture brightness. 3. ZOOM : Adjust the picture's horizontal and vertical size simultaneously. 8. Adjusting the picture The description for more than 10 seconds, the current setup will disappear automatically. H-CENTER : Adjust the horizontal position of the picture. 6. H-SIZE : Adjust the picture's horizontal size. 5. CONTRAST : Adjust the picture contrast. 2. TRAPEZOID : Adjust the picture's trapezoid distortion. 8 How to adjust a setting The monitor controls are accessed by pressing button MENU to enable OSD (On-Screen-Display). V-SIZE : Adjust...
...Adjust the picture brightness. 3. ZOOM : Adjust the picture's horizontal and vertical size simultaneously. 8. Adjusting the picture The description for more than 10 seconds, the current setup will disappear automatically. H-CENTER : Adjust the horizontal position of the picture. 6. H-SIZE : Adjust the picture's horizontal size. 5. CONTRAST : Adjust the picture contrast. 2. TRAPEZOID : Adjust the picture's trapezoid distortion. 8 How to adjust a setting The monitor controls are accessed by pressing button MENU to enable OSD (On-Screen-Display). V-SIZE : Adjust...
AF715 User's Guide
Page 9
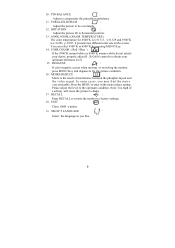
... moving or swiveling the monitor, press MENU Key and degauss to horizontal position. 13. 6500K /9300K (COLOR TEMPERATURE) : The color temperature for 6500°K is x=0.313, y=0.329 and 9300°K is the result of a setting will cause the picture to the optimum condition. SELECT LANGUAGE : Select the language as you may find the moire very noticeable. USER COLOR ( Red / Blue ) : If the 9300°...
... moving or swiveling the monitor, press MENU Key and degauss to horizontal position. 13. 6500K /9300K (COLOR TEMPERATURE) : The color temperature for 6500°K is x=0.313, y=0.329 and 9300°K is the result of a setting will cause the picture to the optimum condition. SELECT LANGUAGE : Select the language as you may find the moire very noticeable. USER COLOR ( Red / Blue ) : If the 9300°...
AF715 User's Guide
Page 10
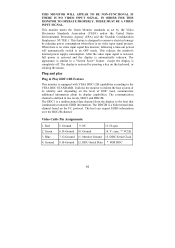
... A VIDEO INPUT SIGNAL. Green 3. R-Ground 10. THIS MONITOR WILL APPEAR TO BE NON-FUNCTIONAL IF THERE IS NO VIDEO INPUT SIGNAL. This monitor meets the Green Monitor standards as set by reducing power consumption when there is no video input signal present. The communication channel is automatically redrawn. The DDC2B is a bidirectional data channel based on the level of its display capabilities. Video Cable Pin Assignments: 1. H-sync 6. sync / * VCLK 7. G-Ground 11. DDC-Serial...
... A VIDEO INPUT SIGNAL. Green 3. R-Ground 10. THIS MONITOR WILL APPEAR TO BE NON-FUNCTIONAL IF THERE IS NO VIDEO INPUT SIGNAL. This monitor meets the Green Monitor standards as set by reducing power consumption when there is no video input signal present. The communication channel is automatically redrawn. The DDC2B is a bidirectional data channel based on the level of its display capabilities. Video Cable Pin Assignments: 1. H-sync 6. sync / * VCLK 7. G-Ground 11. DDC-Serial...

AF715 User's Guide
Page 11
... the keyboard while observing the CAPS LOCK LED. Missing one of the primary colors (RED, GREEN, or BLUE) Possible Solution *Check if the Power Switch is in the ON position *Power Cord should be connected *Check if the PC system is Plug & Play compatible *Check if the Video Card is Plug & Play compatible *Check if the D-15 plug pin of Video Cable is bent *Make sure the Monitor Drivers are installed *Adjust the Contrast and Brightness Controls. *Move electrical devices that none of...
... the keyboard while observing the CAPS LOCK LED. Missing one of the primary colors (RED, GREEN, or BLUE) Possible Solution *Check if the Power Switch is in the ON position *Power Cord should be connected *Check if the PC system is Plug & Play compatible *Check if the Video Card is Plug & Play compatible *Check if the D-15 plug pin of Video Cable is bent *Make sure the Monitor Drivers are installed *Adjust the Contrast and Brightness Controls. *Move electrical devices that none of...

AF715 User's Guide
Page 12
... • Center • Corner Power Source Operating 0.3mm Max. 0.4mm Max. SPECIFICATIONS CRT Viewable Image Size Display Color • Analog input Input Signal 43.2cm(17"), pure flat and 90º deflection, 29mm neck, 0.25mm dot pitch non-glare screen. 40.6cm (16"), diagonal Unlimited colors All timing that meets scanning frequencies Specification • Video • Sync. • Analog R, G, B 0.7Vpp positive/75 ohm • Horizontal sync. : Positive/Negative • Vertical sync. : Positive/Negative Synchronization • Horizontal • Vertical Max.
... • Center • Corner Power Source Operating 0.3mm Max. 0.4mm Max. SPECIFICATIONS CRT Viewable Image Size Display Color • Analog input Input Signal 43.2cm(17"), pure flat and 90º deflection, 29mm neck, 0.25mm dot pitch non-glare screen. 40.6cm (16"), diagonal Unlimited colors All timing that meets scanning frequencies Specification • Video • Sync. • Analog R, G, B 0.7Vpp positive/75 ohm • Horizontal sync. : Positive/Negative • Vertical sync. : Positive/Negative Synchronization • Horizontal • Vertical Max.
AF715 User's Guide
Page 13
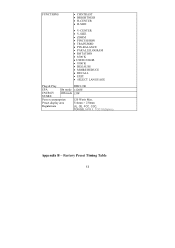
... B - Factory Preset Timing Table 13 FUNCTIONS • CONTRAST • BRIGHTNESS • H-CENTER • H-SIZE • V-CENTER • V-SIZE • ZOOM • PINCUSHION • TRAPEZOID • PIN-BALANCE • PARALLELOGRAM • ROTATION • 6500˚K • USER COLOR • 9300˚K • DEGAUSS • MOIRE REDUCE • RECALL • EXIT • SELECT LANGUAGE Plug & Play DDC1/2B EPA On mode ≤...
... B - Factory Preset Timing Table 13 FUNCTIONS • CONTRAST • BRIGHTNESS • H-CENTER • H-SIZE • V-CENTER • V-SIZE • ZOOM • PINCUSHION • TRAPEZOID • PIN-BALANCE • PARALLELOGRAM • ROTATION • 6500˚K • USER COLOR • 9300˚K • DEGAUSS • MOIRE REDUCE • RECALL • EXIT • SELECT LANGUAGE Plug & Play DDC1/2B EPA On mode ≤...

