
User Manual
Page 3
... Write Enable/Disable 5 JP3 ARMC Reset Button...5 JP6 Diagnostic and Recovery Mode Jumper 6 Step 2 Install the Optional Battery and Battery Clip 6 Installation ...6 Charging the Battery Pack ...7 Storage ...7 Changing the Battery Pack...7 Disposing of a Battery Pack ...8 Battery Disposal Laws...8 Other Laws in Other Areas...8 Step 3 Install the Optional Modem Daughterboard 9 Step 4 Plug in the ARMC Card into the Host System and Attach Internal Cables 9 Step 5 Connect External Cables 10 Step 6 Confirm the Motherboard's BIOS Settings 10 Step 7 Install the Operating System and ARMC Drivers...
... Write Enable/Disable 5 JP3 ARMC Reset Button...5 JP6 Diagnostic and Recovery Mode Jumper 6 Step 2 Install the Optional Battery and Battery Clip 6 Installation ...6 Charging the Battery Pack ...7 Storage ...7 Changing the Battery Pack...7 Disposing of a Battery Pack ...8 Battery Disposal Laws...8 Other Laws in Other Areas...8 Step 3 Install the Optional Modem Daughterboard 9 Step 4 Plug in the ARMC Card into the Host System and Attach Internal Cables 9 Step 5 Connect External Cables 10 Step 6 Confirm the Motherboard's BIOS Settings 10 Step 7 Install the Operating System and ARMC Drivers...
User Manual
Page 4
... Floppy Drive Redirection 75 Start CD-ROM Drive Redirection 76 Stop CD-ROM Drive Redirection 78 Stopping Console Redirection 79 Crash Screen ...80 ARMC Card Configurations ...81 Administrator Setup...82 Adding an Administrator ...83 Editing an Administrator ...85 Removing an Administrator ...87 Networking Options ...89 Setting up Date and Time...91 Maintenance/ Flash ...92 Updating Your ARMC Card's Firmware 93 Mail Configuration ...98 Alert Recipients ...99 Select Your Event Log Policy 100 Advanced ARMC Card Configurations...
... Floppy Drive Redirection 75 Start CD-ROM Drive Redirection 76 Stop CD-ROM Drive Redirection 78 Stopping Console Redirection 79 Crash Screen ...80 ARMC Card Configurations ...81 Administrator Setup...82 Adding an Administrator ...83 Editing an Administrator ...85 Removing an Administrator ...87 Networking Options ...89 Setting up Date and Time...91 Maintenance/ Flash ...92 Updating Your ARMC Card's Firmware 93 Mail Configuration ...98 Alert Recipients ...99 Select Your Event Log Policy 100 Advanced ARMC Card Configurations...

User Manual
Page 5
... ...112 Network Configuration Tab 113 Firmware Flash Tab ...114 Advanced Tab ...115 Server Information Tab...116 WinCuri ...117 WinCuri.exe Help File...117 LinCuri...119 LinCuri Help File...120 Appendix C ARMC Mouse Booster 123 ARMC Mouse Booster ...123 Appendix D ARMC Flash Utility 125 ARMC Card Flash Utility ...125 Appendix E Troubleshooting : Screen Distortion 131 Problem...131 Solution ...132 Appendix F Serial Over LAN 133 Hardware Setup ...133 Internal...133 External ...134 BIOS ...135 Connecting using Hyper...
... ...112 Network Configuration Tab 113 Firmware Flash Tab ...114 Advanced Tab ...115 Server Information Tab...116 WinCuri ...117 WinCuri.exe Help File...117 LinCuri...119 LinCuri Help File...120 Appendix C ARMC Mouse Booster 123 ARMC Mouse Booster ...123 Appendix D ARMC Flash Utility 125 ARMC Card Flash Utility ...125 Appendix E Troubleshooting : Screen Distortion 131 Problem...131 Solution ...132 Appendix F Serial Over LAN 133 Hardware Setup ...133 Internal...133 External ...134 BIOS ...135 Connecting using Hyper...
User Manual
Page 8
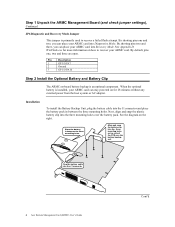
... transactions; This publication could include technical inaccuracies or typographical errors. therefore, this Acer Remote Management Card User's Guide (located on the inside of the publication. these changes will be made to your Acer authorized reseller or marketing representative. Packing List You should have received the following: • an Acer Remote Management Card (ARMC) • one USB cable • 20-pin flat ribbon cable • external power adapter • this statement may not...
... transactions; This publication could include technical inaccuracies or typographical errors. therefore, this Acer Remote Management Card User's Guide (located on the inside of the publication. these changes will be made to your Acer authorized reseller or marketing representative. Packing List You should have received the following: • an Acer Remote Management Card (ARMC) • one USB cable • 20-pin flat ribbon cable • external power adapter • this statement may not...
User Manual
Page 11
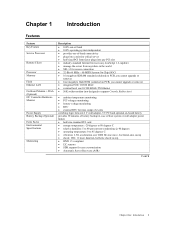
... Key Feature Service Processor Remote Client Processor Memory Flash Ethernet LAN On-Board Modem + DAA (Optional) I2C Controller Hardware Monitor Power Supply Battery Backup (Optional) Form Factor Environmental Specifications Monitoring Description • 100% out-of-band • 100% operating system independent • provides out-of-band connectivity • plugs into a mission critical server • half-sized PCI form factor plugs into any PCI slot • industry standard Internet browser (any JavaScript 1.2 capable) • manage...
... Key Feature Service Processor Remote Client Processor Memory Flash Ethernet LAN On-Board Modem + DAA (Optional) I2C Controller Hardware Monitor Power Supply Battery Backup (Optional) Form Factor Environmental Specifications Monitoring Description • 100% out-of-band • 100% operating system independent • provides out-of-band connectivity • plugs into a mission critical server • half-sized PCI form factor plugs into any PCI slot • industry standard Internet browser (any JavaScript 1.2 capable) • manage...
User Manual
Page 15
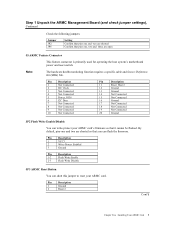
... 1 VCC3 2 Write-Protect Enabled 3 Ground Pin Description 1-2 Flash Write Enable 2-3 Flash Write Disable JP3 ARMC Reset Button You can short this jumper to reset your ARMC card's firmware so that it cannot be flashed. Step 1 Unpack the ARMC Management Board (and check jumper settings), Continued Check the following jumpers: Jumper JP2 JP6 Setting Confirm that pins one , two and three are shorted Confirm that you can flash the firmware. Note: The hardware health monitoring function requires a specific cable and Sensor Definition...
... 1 VCC3 2 Write-Protect Enabled 3 Ground Pin Description 1-2 Flash Write Enable 2-3 Flash Write Disable JP3 ARMC Reset Button You can short this jumper to reset your ARMC card's firmware so that it cannot be flashed. Step 1 Unpack the ARMC Management Board (and check jumper settings), Continued Check the following jumpers: Jumper JP2 JP6 Setting Confirm that pins one , two and three are shorted Confirm that you can flash the firmware. Note: The hardware health monitoring function requires a specific cable and Sensor Definition...
User Manual
Page 16
... right. Next, align and snap the plastic battery clip into Diagnostics Mode. Step 1 Unpack the ARMC Management Board (and check jumper settings), Continued JP6 Diagnostic and Recovery Mode Jumper This jumper is primarily used to recover your ARMC card. By default, pins one and two, you can place your ARMC card into the J1 connector 6 Acer Remote Management Card (ARMC) User's Guide Cont'd By shorting pins one , two and three are open. By shorting pins two and three, you...
... right. Next, align and snap the plastic battery clip into Diagnostics Mode. Step 1 Unpack the ARMC Management Board (and check jumper settings), Continued JP6 Diagnostic and Recovery Mode Jumper This jumper is primarily used to recover your ARMC card. By default, pins one and two, you can place your ARMC card into the J1 connector 6 Acer Remote Management Card (ARMC) User's Guide Cont'd By shorting pins one , two and three are open. By shorting pins two and three, you...
User Manual
Page 20
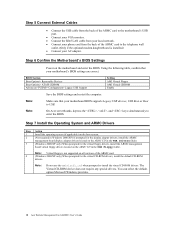
... prompted for the display adapter drivers, install the ARMC management board display adapter drivers located on the ARMC CD in the USB Floppy folder. Note: Virtual floppy is installed.) • Connect your motherboard BIOS supports Legacy USB devices, USB Boot or Boot to USB. You can select the default option Microsoft Windows provides. 10 Acer Remote Management Card (ARMC) User's Guide Step 5 Connect External Cables • Connect the USB cable from the back of the ARMC card to the motherboard's USB port. • Connect your VGA monitor. • Connect the RJ45 LAN cable from your...
... prompted for the display adapter drivers, install the ARMC management board display adapter drivers located on the ARMC CD in the USB Floppy folder. Note: Virtual floppy is installed.) • Connect your motherboard BIOS supports Legacy USB devices, USB Boot or Boot to USB. You can select the default option Microsoft Windows provides. 10 Acer Remote Management Card (ARMC) User's Guide Step 5 Connect External Cables • Connect the USB cable from the back of the ARMC card to the motherboard's USB port. • Connect your VGA monitor. • Connect the RJ45 LAN cable from your...
User Manual
Page 46
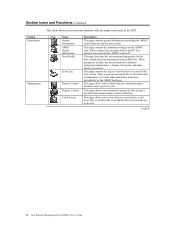
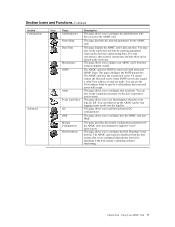
... boot. Remote Console This page allows you to , ambient/ component temperatures, voltages, fan speeds, and other parameters monitored periodically by the ARMC hardware. Cont'd 36 Acer Remote Management Card (ARMC) User's Guide Icon Name System Information Description This page contains general information describing the ARMC card's firmware and the host system. Crash Screen This page allows you to environmental circumstances as well as other chassis parameters. These events are generated due to remotely operate...
... boot. Remote Console This page allows you to , ambient/ component temperatures, voltages, fan speeds, and other parameters monitored periodically by the ARMC hardware. Cont'd 36 Acer Remote Management Card (ARMC) User's Guide Icon Name System Information Description This page contains general information describing the ARMC card's firmware and the host system. Crash Screen This page allows you to environmental circumstances as well as other chassis parameters. These events are generated due to remotely operate...
User Manual
Page 47
... address that your mail server will accept. This page allows you to the ARMC card. Networking This page describes the network parameters for the alert recipients to stop logging events or roll over the log files. Section Icons and Functions, Continued Section Configuration Advanced Icon Name Description Administrators This page allows you to configure the administrators who have access to update your ARMC card's firmware using an upgrade...
... address that your mail server will accept. This page allows you to the ARMC card. Networking This page describes the network parameters for the alert recipients to stop logging events or roll over the log files. Section Icons and Functions, Continued Section Configuration Advanced Icon Name Description Administrators This page allows you to configure the administrators who have access to update your ARMC card's firmware using an upgrade...

User Manual
Page 91
... are full. Function Icon Configure Administrators Configure Network Parameters Configure Date and Time Update Your ARMC Card Configure SMTP Configure Alerts Select Your Event Log Policy Description This page allows you to configure the administrators who have access to receive alerts. Some SMTP servers also require a valid From Address to send out E-mail alerts and SNMP Traps. Cont'd Chapter Four : Using Your ARMC Card 81 The ARMC card uses SMTP to send out...
... are full. Function Icon Configure Administrators Configure Network Parameters Configure Date and Time Update Your ARMC Card Configure SMTP Configure Alerts Select Your Event Log Policy Description This page allows you to configure the administrators who have access to receive alerts. Some SMTP servers also require a valid From Address to send out E-mail alerts and SNMP Traps. Cont'd Chapter Four : Using Your ARMC Card 81 The ARMC card uses SMTP to send out...
User Manual
Page 114
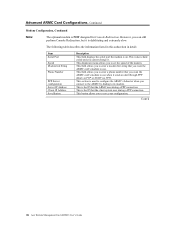
.... Advanced ARMC Card Configurations, Continued Modem Configuration, Continued Note: The optional modem is hard coded and you cannot change it. This button allows you to set the speed of the modem. However, you connect to the ARMC by dialing to use . The following table describes the information listed in this subsection in detail: Item Serial Port Speed Modem Init String Phone Number PPP Server configuration Server IP Address Client IP Address Save Button Description...
.... Advanced ARMC Card Configurations, Continued Modem Configuration, Continued Note: The optional modem is hard coded and you cannot change it. This button allows you to set the speed of the modem. However, you connect to the ARMC by dialing to use . The following table describes the information listed in this subsection in detail: Item Serial Port Speed Modem Init String Phone Number PPP Server configuration Server IP Address Client IP Address Save Button Description...
User Manual
Page 120
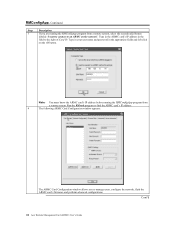
... button. Type in the ARMC card's IP address in the appropriate fields and left click on the network'. Type in your user name and password in the field to the right of Card IP. Note: You must know the ARMC card's IP address before running the RMConfigApp program from a remote system. Cont'd 110 Acer Remote Management Card (ARMC) User's Guide RMConfigApp, Continued Step Description 3 If you to manage users, configure the network, flash the ARMC card's firmware and perform advanced configurations...
... button. Type in the ARMC card's IP address in the appropriate fields and left click on the network'. Type in your user name and password in the field to the right of Card IP. Note: You must know the ARMC card's IP address before running the RMConfigApp program from a remote system. Cont'd 110 Acer Remote Management Card (ARMC) User's Guide RMConfigApp, Continued Step Description 3 If you to manage users, configure the network, flash the ARMC card's firmware and perform advanced configurations...
User Manual
Page 121
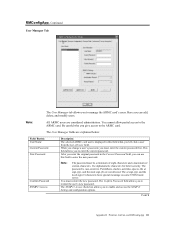
... partial access to enable and access the SNMPv3 Setting and configuration options. You must be a minimum of eight characters and a maximum of Users field. The Confirm Password field allows you give access to manage the ARMC card's users. The SNMPv3 Access check box allows you must enter the current password first. Note: All ARMC users are explained below: Field/ Button User Name Current Password New Password Confirm Password SNMPv3 Access Description The selected ARMC card user...
... partial access to enable and access the SNMPv3 Setting and configuration options. You must be a minimum of eight characters and a maximum of Users field. The Confirm Password field allows you give access to manage the ARMC card's users. The SNMPv3 Access check box allows you must enter the current password first. Note: All ARMC users are explained below: Field/ Button User Name Current Password New Password Confirm Password SNMPv3 Access Description The selected ARMC card user...
User Manual
Page 144
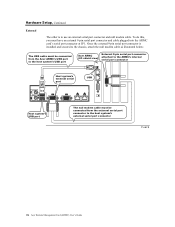
Hardware Setup, Continued External The other is installed and secured to the chassis, attach the null modem cable as illustrated below: The USB cable must be connected from the external serial port connector to the host system's external serial port connector Cont'd 134 Acer Remote Management Card (ARMC) User's Guide To do this, you must be connected from the Acer ARMC's USB port to the host system's USB port Acer ARMC (I/O shield view) External 9-pin serial port connector attached to use an external serial port connector and null modem...
Hardware Setup, Continued External The other is installed and secured to the chassis, attach the null modem cable as illustrated below: The USB cable must be connected from the external serial port connector to the host system's external serial port connector Cont'd 134 Acer Remote Management Card (ARMC) User's Guide To do this, you must be connected from the Acer ARMC's USB port to the host system's USB port Acer ARMC (I/O shield view) External 9-pin serial port connector attached to use an external serial port connector and null modem...
User Manual
Page 145
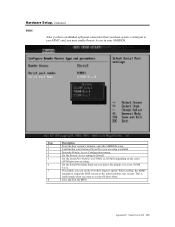
..., enter the AMIBIOS setup. 2 Confirm that your Onboard Serial Port you are using. 6 Set the Serial Port Mode baud rate you can set the Post-Boot Support option. When enabled, the ARMC attempts to output the DOS screens or the initial windows text screens. By default, it is enabled. 3 Enter the Remote Access Configurations menu. 4 Set the Remote Access setting to [Serial]. 5 Set the Serial Port Number to [COM1] or [COM2] depending on the serial (COM) port you are using is set to [19200...
..., enter the AMIBIOS setup. 2 Confirm that your Onboard Serial Port you are using. 6 Set the Serial Port Mode baud rate you can set the Post-Boot Support option. When enabled, the ARMC attempts to output the DOS screens or the initial windows text screens. By default, it is enabled. 3 Enter the Remote Access Configurations menu. 4 Set the Remote Access setting to [Serial]. 5 Set the Serial Port Number to [COM1] or [COM2] depending on the serial (COM) port you are using is set to [19200...
User Manual
Page 149
... text redirection Instructions located... Before You Start Avoid Electro-Static Discharge (ESD) Electro-Static Discharge (ESD) can still perform Console Redirection, but it is to do the following: Feature dial out and send alerts configure and reset the ARMC card update the ARMC card's firmware view the ARMC card's health information and event log view the host system's health information remotely control the host system's hardware reset and power cycle serial over LAN Note: Host...
... text redirection Instructions located... Before You Start Avoid Electro-Static Discharge (ESD) Electro-Static Discharge (ESD) can still perform Console Redirection, but it is to do the following: Feature dial out and send alerts configure and reset the ARMC card update the ARMC card's firmware view the ARMC card's health information and event log view the host system's health information remotely control the host system's hardware reset and power cycle serial over LAN Note: Host...
User Manual
Page 156
... the following : • configure and reset the ARMC card • update the ARMC card's firmware • view the ARMC card's health information and event log • view the host system's health information • remotely control the host system's hardware reset and power cycle Note: Use Dialup Networking to connect to the ARMC card's internal modem. Configuring the Modem, Continued Incoming Calls, Continued Step Action 4 Left click the Save button. Use the same username and password that you can now...
... the following : • configure and reset the ARMC card • update the ARMC card's firmware • view the ARMC card's health information and event log • view the host system's health information • remotely control the host system's hardware reset and power cycle Note: Use Dialup Networking to connect to the ARMC card's internal modem. Configuring the Modem, Continued Incoming Calls, Continued Step Action 4 Left click the Save button. Use the same username and password that you can now...

User Manual
Page 171
..., 8 Before You Start, 3, 139, 140 BIOS, 2, 3, 10, 135, 157 BSMI (Taiwan), ix C CD Contents, 151, 153, 154, 155 Changing the Battery Pack, 7 Charging the Battery Pack, 7 Check Your AMIBIOS Settings, 157 Clear Event Logs, 54, 55 Configuring the Modem, 142, 143, 144, 145, 146 Connecting using Hyper Terminal, 136, 137 Console Redirection Toolbar, 68, 69 Console Redirection Toolbar Status, 68 Console Redirection Toolbar Toggle Buttons, 69 Console Redirection Window, 65...
..., 8 Before You Start, 3, 139, 140 BIOS, 2, 3, 10, 135, 157 BSMI (Taiwan), ix C CD Contents, 151, 153, 154, 155 Changing the Battery Pack, 7 Charging the Battery Pack, 7 Check Your AMIBIOS Settings, 157 Clear Event Logs, 54, 55 Configuring the Modem, 142, 143, 144, 145, 146 Connecting using Hyper Terminal, 136, 137 Console Redirection Toolbar, 68, 69 Console Redirection Toolbar Status, 68 Console Redirection Toolbar Toggle Buttons, 69 Console Redirection Window, 65...
User Manual
Page 172
... Motherboard's BIOS Settings, 10 Step 7 Install the Operating System and ARMC Drivers, 10 Step 8 Install the Acer-ARMC Windows Host Components, 11, 12, 13, 14 Step 9 Setup Your Client Internet Browser, 15, 16, 17, 18 Stop CD-ROM Drive Redirection, 78 Stop Floppy Drive Redirection, 75 Stopping Console Redirection, 79 Storage, 7 System Information, 36, 39, 40, 116 T Tree Structure and Description of CD Contents, 151 Troubleshooting, 131 U Updating Your ARMC Card's Firmware...
... Motherboard's BIOS Settings, 10 Step 7 Install the Operating System and ARMC Drivers, 10 Step 8 Install the Acer-ARMC Windows Host Components, 11, 12, 13, 14 Step 9 Setup Your Client Internet Browser, 15, 16, 17, 18 Stop CD-ROM Drive Redirection, 78 Stop Floppy Drive Redirection, 75 Stopping Console Redirection, 79 Storage, 7 System Information, 36, 39, 40, 116 T Tree Structure and Description of CD Contents, 151 Troubleshooting, 131 U Updating Your ARMC Card's Firmware...


