
AT2001 Service Guide
Page 32
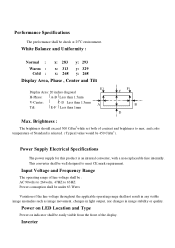
... visible image anomalies such as image movement, changes in light output, nor changes in image stability or quality. Power Supply Electrical Specifications The power supply for this product is selected. ( Typical value would be well designed to max. This converter shall be 450 Cd/m2... ). Power on LED Location and Type Power on indicator shall be check at 25oC environment. Performance Specifications The performance shall be easily visible...
... visible image anomalies such as image movement, changes in light output, nor changes in image stability or quality. Power Supply Electrical Specifications The power supply for this product is selected. ( Typical value would be well designed to max. This converter shall be 450 Cd/m2... ). Power on LED Location and Type Power on indicator shall be check at 25oC environment. Performance Specifications The performance shall be easily visible...
AT2001 User's Guide
Page 18
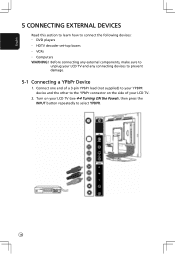
Connect one end of your LCD TV and any connecting devices to connect the following devices: DVD players HDTV decoder set-top boxes VCRs Computers WARNING! Englis h 5 CONNECTING EXTERNAL DEVICES Read this section to learn how to prevent damage. 5-1 Connecting a YPbPr Device 1. Before connecting any external components, make sure to select YPBPR. 18 Turn on the side of a 3-pin YPbPr lead (not supplied) to your YPBPR device and the other to the YPbPr connector on your LCD TV (see 4-4 Turning ON the Power), then press the INPUT button repeatedly to unplug your LCD TV. 2.
Connect one end of your LCD TV and any connecting devices to connect the following devices: DVD players HDTV decoder set-top boxes VCRs Computers WARNING! Englis h 5 CONNECTING EXTERNAL DEVICES Read this section to learn how to prevent damage. 5-1 Connecting a YPbPr Device 1. Before connecting any external components, make sure to select YPBPR. 18 Turn on the side of a 3-pin YPbPr lead (not supplied) to your YPBPR device and the other to the YPbPr connector on your LCD TV (see 4-4 Turning ON the Power), then press the INPUT button repeatedly to unplug your LCD TV. 2.
AT2001 User's Guide
Page 19
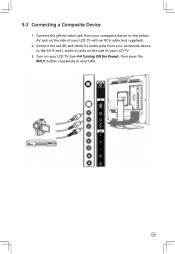
Connect the red (R) and white (L) audio jacks from your composite device to the AV R and L audio-in jacks on your LCD TV (see 4-4 Turning ON the Power), then press the INPUT button repeatedly to select AV. 19 Connect the yellow video jack from your composite device to the yellow AV jack on the side of your LCD TV with an RCA cable (not supplied). 2. Turn on the side of your LCD TV. 3. 5-2 Connecting a Composite Device 1.
Connect the red (R) and white (L) audio jacks from your composite device to the AV R and L audio-in jacks on your LCD TV (see 4-4 Turning ON the Power), then press the INPUT button repeatedly to select AV. 19 Connect the yellow video jack from your composite device to the yellow AV jack on the side of your LCD TV with an RCA cable (not supplied). 2. Turn on the side of your LCD TV. 3. 5-2 Connecting a Composite Device 1.
AT2001 User's Guide
Page 20
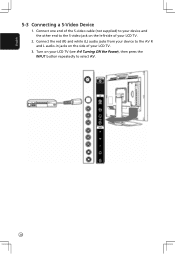
Connect the red (R) and white (L) audio jacks from your device to select AV. 20 Englis h 5-3 Connecting a S-Video Device 1. Turn on your LCD TV (see 4-4 Turning ON the Power), then press the INPUT button repeatedly to the AV R and L audio-in jacks on the left-side of your LCD TV. 2. Connect one end of the S-video cable (not supplied) to your device and the other end to the S-video jack on the side of your LCD TV. 3.
Connect the red (R) and white (L) audio jacks from your device to select AV. 20 Englis h 5-3 Connecting a S-Video Device 1. Turn on your LCD TV (see 4-4 Turning ON the Power), then press the INPUT button repeatedly to the AV R and L audio-in jacks on the left-side of your LCD TV. 2. Connect one end of the S-video cable (not supplied) to your device and the other end to the S-video jack on the side of your LCD TV. 3.
AT2001 User's Guide
Page 21
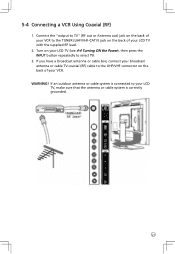
... grounded. 21 Turn on your LCD TV, make sure that the antenna or cable system is connected to your LCD TV (see 4-4 Turning ON the Power), then press the INPUT button repeatedly to the UHF/VHF connector on the back of your LCD TV with the...
... grounded. 21 Turn on your LCD TV, make sure that the antenna or cable system is connected to your LCD TV (see 4-4 Turning ON the Power), then press the INPUT button repeatedly to the UHF/VHF connector on the back of your LCD TV with the...
AT2001 User's Guide
Page 34
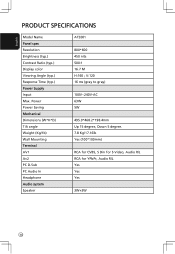
... Power Power Saving Mechanical Dimensions (W*H*D) Tilt angle Weight (Kg/1b) Wall Mounting Terminal AV1 Av2 PC D-Sub PC Audio In Headphone Audio system Speaker AT2001 800*600 450 nits 500:1 16.7 M H:160 ; Englis h PRODUCT SPECIFICATIONS Model Name Panel spec Resolution Brightness (typ.) Contrast Ratio (typ.) Display color Viewing Angle (typ.) Response Time (typ.) Power Supply...
... Power Power Saving Mechanical Dimensions (W*H*D) Tilt angle Weight (Kg/1b) Wall Mounting Terminal AV1 Av2 PC D-Sub PC Audio In Headphone Audio system Speaker AT2001 800*600 450 nits 500:1 16.7 M H:160 ; Englis h PRODUCT SPECIFICATIONS Model Name Panel spec Resolution Brightness (typ.) Contrast Ratio (typ.) Display color Viewing Angle (typ.) Response Time (typ.) Power Supply...

