

AT2001 Service Guide
Page 8
Others T T On screen display adjustment function ISP(In System Programming) function available for revising driver easily. 2 Chapter 1 T Input current: 1.5A T Max.Power output: 63 Watts T Stand-by: 5 Watts Max. Remote COntrollers T Multi-function remote controller Speaker T Internal speaker. 3W*2 stereo, volume adjustable.
Others T T On screen display adjustment function ISP(In System Programming) function available for revising driver easily. 2 Chapter 1 T Input current: 1.5A T Max.Power output: 63 Watts T Stand-by: 5 Watts Max. Remote COntrollers T Multi-function remote controller Speaker T Internal speaker. 3W*2 stereo, volume adjustable.
AT2001 Service Guide
Page 34
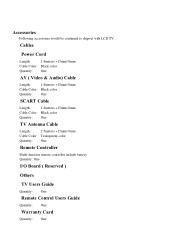
... Color: Black color Quantity: One TV Antenna Cable Length: 2.5meters +15mm/-0mm Cable Color: Transparent color Quantity: One Remote Controller Multi-function remote controller include battery Quantity: One I/O Board ( Reserved ) Others TV Users Guide Quantity: One Remote Control Users Guide Quantity: One Warranty Card Quantity: One Accessories Following accessories would be contained to shipout with LCD...
... Color: Black color Quantity: One TV Antenna Cable Length: 2.5meters +15mm/-0mm Cable Color: Transparent color Quantity: One Remote Controller Multi-function remote controller include battery Quantity: One I/O Board ( Reserved ) Others TV Users Guide Quantity: One Remote Control Users Guide Quantity: One Warranty Card Quantity: One Accessories Following accessories would be contained to shipout with LCD...
AT2001 Service Guide
Page 57
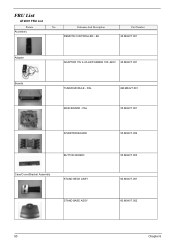
EU Part Number 25.M04V7.001 Adapter ADAPTER 15V 4.2A ADP-63BB B 100~240V 25.M04V7.001 Boards TUNER MODULE - PAL 6M.M04V7.001 55.M04V7.001 INVERTER BOARD BUTTON BOARD Case/Cover/Bracket Assembly STAND NECK ASSY STAND BASE ASSY 55.M04V7.002 55.M04V7.003 60.M04V7.001 60.M04V7.002 50 Chapter 6 PAL MAIN BOARD - FRU List AT2001 FRU List Picture Accessory No. Partname And Description REMOTE CONTROLLER -
EU Part Number 25.M04V7.001 Adapter ADAPTER 15V 4.2A ADP-63BB B 100~240V 25.M04V7.001 Boards TUNER MODULE - PAL 6M.M04V7.001 55.M04V7.001 INVERTER BOARD BUTTON BOARD Case/Cover/Bracket Assembly STAND NECK ASSY STAND BASE ASSY 55.M04V7.002 55.M04V7.003 60.M04V7.001 60.M04V7.002 50 Chapter 6 PAL MAIN BOARD - FRU List AT2001 FRU List Picture Accessory No. Partname And Description REMOTE CONTROLLER -
AT2001 User's Guide
Page 3
... Conformity 6 1 BEFORE YOU START 7 1-1 What's in the Box 7 2 YOUR LCD TV AT A GLANCE 8 2-1 Control Panel 8 2-2 Left-side Connectors 9 2-3 Back Connectors 10 3 YOUR REMOTE CONTROL AT A GLANCE 11 4 BASIC LCD TV SETUP 13 4-1 Connecting to the Aerial 13 4-2 Using the Remote Control (Basic Operation 13 4-3 Plugging In Your LCD TV 14 4-4 Turning ON the Power 15...
... Conformity 6 1 BEFORE YOU START 7 1-1 What's in the Box 7 2 YOUR LCD TV AT A GLANCE 8 2-1 Control Panel 8 2-2 Left-side Connectors 9 2-3 Back Connectors 10 3 YOUR REMOTE CONTROL AT A GLANCE 11 4 BASIC LCD TV SETUP 13 4-1 Connecting to the Aerial 13 4-2 Using the Remote Control (Basic Operation 13 4-3 Plugging In Your LCD TV 14 4-4 Turning ON the Power 15...
AT2001 User's Guide
Page 6
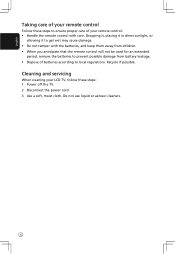
...not use liquid or aerosol cleaners. 6 Englis h Taking care of your remote control: • Handle the remote control with the batteries, and keep them away from children. • When you anticipate that the remote control will not be used for an extended period, remove the batteries to prevent... possible damage from battery leakage. • Dispose of batteries according to ensure proper care of your remote control Follow these steps: 1 Power off the TV...
...not use liquid or aerosol cleaners. 6 Englis h Taking care of your remote control: • Handle the remote control with the batteries, and keep them away from children. • When you anticipate that the remote control will not be used for an extended period, remove the batteries to prevent... possible damage from battery leakage. • Dispose of batteries according to ensure proper care of your remote control Follow these steps: 1 Power off the TV...
AT2001 User's Guide
Page 7
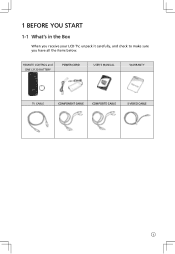
1 BEFORE YOU START 1-1 What's in the Box When you receive your LCD TV, unpack it carefully, and check to make sure you have all the items below. REMOTE CONTROL and ONE L3120 BATTERY POWER CORD USER'S MANUAL WARRANTY TV CABLE COMPONENT CABLE COMPOSITE CABLE S-VIDEO CABLE 7
1 BEFORE YOU START 1-1 What's in the Box When you receive your LCD TV, unpack it carefully, and check to make sure you have all the items below. REMOTE CONTROL and ONE L3120 BATTERY POWER CORD USER'S MANUAL WARRANTY TV CABLE COMPONENT CABLE COMPOSITE CABLE S-VIDEO CABLE 7

AT2001 User's Guide
Page 13
Make sure no objects are in the line of aim, otherwise the remote control may not operate properly. 13 See 2-2 Left-side Connectors for location. (supplied) RF lead 4-2 Using the Remote Control (Basic Operation) Point the remote control towards the remote control sensor window located on the back of your LCD TV. 4 BASIC LCD TV SETUP 4-1 Connecting to the Aerial Connect the outdoor aerial (antenna) cable lead or your cable TV box to the TUNER (UHF/VHF-CATV) jack on the front of your LCD TV using an RF (coaxial) lead.
Make sure no objects are in the line of aim, otherwise the remote control may not operate properly. 13 See 2-2 Left-side Connectors for location. (supplied) RF lead 4-2 Using the Remote Control (Basic Operation) Point the remote control towards the remote control sensor window located on the back of your LCD TV. 4 BASIC LCD TV SETUP 4-1 Connecting to the Aerial Connect the outdoor aerial (antenna) cable lead or your cable TV box to the TUNER (UHF/VHF-CATV) jack on the front of your LCD TV using an RF (coaxial) lead.
AT2001 User's Guide
Page 15
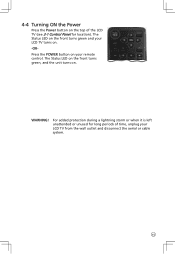
For added protection during a lightning storm or when it is left unattended or unused for location). WARNING! The Status LED on the front turns green, and the unit turns on. Press the POWER button on your LCD TV turns on. -OR- The Status LED on the front turns green and your remote control. 4-4 Turning ON the Power Press the Power button on the top of the LCD TV (see 2-1 Control Panel for long periods of time, unplug your LCD TV from the wall outlet and disconnect the aerial or cable system. 15
For added protection during a lightning storm or when it is left unattended or unused for location). WARNING! The Status LED on the front turns green, and the unit turns on. Press the POWER button on your LCD TV turns on. -OR- The Status LED on the front turns green and your remote control. 4-4 Turning ON the Power Press the Power button on the top of the LCD TV (see 2-1 Control Panel for long periods of time, unplug your LCD TV from the wall outlet and disconnect the aerial or cable system. 15

AT2001 User's Guide
Page 16
... for all channels that have a signal to open the OSD. 2. TO TUNE CHANNELS AUTOMATICALLY 1. Press to the channel list. Press the MENU button on the remote control to select AUTO SETUP. 5. Press the / buttons to open the Setup menu. 4.
... for all channels that have a signal to open the OSD. 2. TO TUNE CHANNELS AUTOMATICALLY 1. Press to the channel list. Press the MENU button on the remote control to select AUTO SETUP. 5. Press the / buttons to open the Setup menu. 4.
AT2001 User's Guide
Page 17
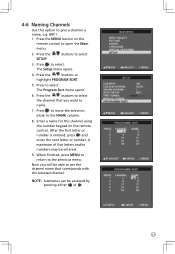
... menu opens. 4. Enter a name for this option to give a channel a name, e.g. When finished, press MENU to return to select. Press the MENU button on the remote control. Press the / buttons to select the channel that you will be able to see the channel name that corresponds with the selected channel. A maximum of...: Submenus can be entered. 9. Press the / buttons to select. Now you want to name. 7. 4-6 Naming Channels Use this channel using the number keypad on the remote control to open the Main menu. 2. Press to select SETUP. 3. BBC1. 1.
... menu opens. 4. Enter a name for this option to give a channel a name, e.g. When finished, press MENU to return to select. Press the MENU button on the remote control. Press the / buttons to select the channel that you will be able to see the channel name that corresponds with the selected channel. A maximum of...: Submenus can be entered. 9. Press the / buttons to select. Now you want to name. 7. 4-6 Naming Channels Use this channel using the number keypad on the remote control to open the Main menu. 2. Press to select SETUP. 3. BBC1. 1.
AT2001 User's Guide
Page 23
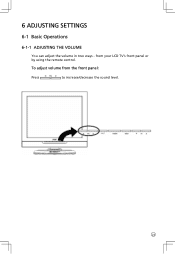
INPUT 23 from the front panel: Press to increase/decrease the sound level. To adjust volume from your LCD TV's front panel or by using the remote control. 6 ADJUSTING SETTINGS 6-1 Basic Operations 6-1-1 ADJUSTING THE VOLUME You can adjust the volume in two ways -
INPUT 23 from the front panel: Press to increase/decrease the sound level. To adjust volume from your LCD TV's front panel or by using the remote control. 6 ADJUSTING SETTINGS 6-1 Basic Operations 6-1-1 ADJUSTING THE VOLUME You can adjust the volume in two ways -
AT2001 User's Guide
Page 24
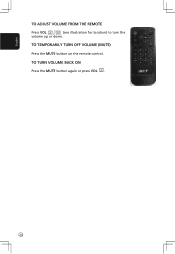
TO TURN VOLUME BACK ON Press the MUTE button again or press VOL . 24 Englis h TO ADJUST VOLUME FROM THE REMOTE Press VOL (see illustration for location) to turn the volume up or down. TO TEMPORARILY TURN OFF VOLUME (MUTE) Press the MUTE button on the remote control.
TO TURN VOLUME BACK ON Press the MUTE button again or press VOL . 24 Englis h TO ADJUST VOLUME FROM THE REMOTE Press VOL (see illustration for location) to turn the volume up or down. TO TEMPORARILY TURN OFF VOLUME (MUTE) Press the MUTE button on the remote control.

AT2001 User's Guide
Page 25
to select programs (see 6-1-1 Adjusting the Volume for TO SELECT PROGRAMS FROM THE REMOTE Press CH (see illustration for location)., OR Press the number buttons on the number pad (see 3 Your Remote Control At a Glance for location). 25 6-1-2 SELECTING PROGRAMS TO SELECT PROGRAMS FROM THE LCD TV Press location).
to select programs (see 6-1-1 Adjusting the Volume for TO SELECT PROGRAMS FROM THE REMOTE Press CH (see illustration for location)., OR Press the number buttons on the number pad (see 3 Your Remote Control At a Glance for location). 25 6-1-2 SELECTING PROGRAMS TO SELECT PROGRAMS FROM THE LCD TV Press location).

AT2001 User's Guide
Page 26
All the function settings are accessible either through the proper front display buttons or through the remote control. OSD menus may be different depending on -screen display (OSD) that lets you adjust and save contrast, brightness, and other settings. Press the / buttons to ...
All the function settings are accessible either through the proper front display buttons or through the remote control. OSD menus may be different depending on -screen display (OSD) that lets you adjust and save contrast, brightness, and other settings. Press the / buttons to ...

AT2001 User's Guide
Page 29
Select 30, 60, or 90 minutes. Turns the sleep timer ON/OFF. Special Features Menu Sleep Timer - Teletext - Choose between displaying the FASTEXT line and a LIST of the OSD menu between English, Spanish, and Portuguese. The FASTEXT line contains onscreen operating instructions associated with the colored buttons on the remote control. 29 Language Menu Use this menu to change the language of menu commands.
Select 30, 60, or 90 minutes. Turns the sleep timer ON/OFF. Special Features Menu Sleep Timer - Teletext - Choose between displaying the FASTEXT line and a LIST of the OSD menu between English, Spanish, and Portuguese. The FASTEXT line contains onscreen operating instructions associated with the colored buttons on the remote control. 29 Language Menu Use this menu to change the language of menu commands.
AT2001 User's Guide
Page 31
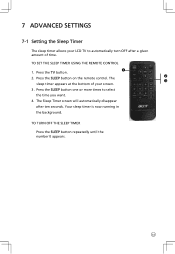
... sleep timer is now running in the background. Press the TV button. 2. Press the SLEEP button on the remote control. The Sleep Timer screen will automatically disappear after a given amount of your LCD TV to select the time you want. 4. TO TURN OFF THE SLEEP ...
... sleep timer is now running in the background. Press the TV button. 2. Press the SLEEP button on the remote control. The Sleep Timer screen will automatically disappear after a given amount of your LCD TV to select the time you want. 4. TO TURN OFF THE SLEEP ...
AT2001 User's Guide
Page 33
...digital capabilities exceed a digital broadcast signal, the signal is up-converted (increased) to your LCD TV, please contact your local dealer. 33 Remote Control Not Working Make sure that the H-Position and V-Position in the OSD is set correctly. Pixel defects within industry specifications are inserted correctly..... Wrong Image Size If you have other questions relating to match your LCD TV may not display correctly. Make sure the remote control sensor window is not covered by your audio input source cables are using an extremely high level of the device. Up-converting...
...digital capabilities exceed a digital broadcast signal, the signal is up-converted (increased) to your LCD TV, please contact your local dealer. 33 Remote Control Not Working Make sure that the H-Position and V-Position in the OSD is set correctly. Pixel defects within industry specifications are inserted correctly..... Wrong Image Size If you have other questions relating to match your LCD TV may not display correctly. Make sure the remote control sensor window is not covered by your audio input source cables are using an extremely high level of the device. Up-converting...

