
Power SV User Guide
Page 2
... of Acer Inc. This company makes no representations or warranties, either expressed or implied, with respect to the contents hereof and specifically disclaims the implied warranties of merchantability or fitness for identification purposes only and belong to your unit should include the serial number, model number, and purchase information. Copyright © 2003 Acer Incorporated All Rights Reserved AcerPower SV User's manual Changes may...
... of Acer Inc. This company makes no representations or warranties, either expressed or implied, with respect to the contents hereof and specifically disclaims the implied warranties of merchantability or fitness for identification purposes only and belong to your unit should include the serial number, model number, and purchase information. Copyright © 2003 Acer Incorporated All Rights Reserved AcerPower SV User's manual Changes may...
Power SV User Guide
Page 3
... dealer or an experienced radio/television technician for a Class B digital device pursuant to Part 15 of the FCC Rules. Operation with FCC regulations. Use conditions This part complies with the limits for help Notice: Shielded cables All connections to other computing devices must be attached to this device must accept any interference received, including interference that may cause undesired...
... dealer or an experienced radio/television technician for a Class B digital device pursuant to Part 15 of the FCC Rules. Operation with FCC regulations. Use conditions This part complies with the limits for help Notice: Shielded cables All connections to other computing devices must be attached to this device must accept any interference received, including interference that may cause undesired...
Power SV User Guide
Page 5
... Setup 9 Select location 9 Open package 9 Connecting the peripherals 10 Starting your computer 10 Shutting down your computer 11 Upgrading your computer 13 Installation Precautions 13 Reminder for guarding against static electricity 13 ESD Guard 13 Pre-installation Instructions 13 Post-installation Instructions 14 Opening your Computer 14 Remove the side panel 14 Replace the side panel 14 Replacing the HDD 14 Upgrade the HDD 14 Installing PCI cards 15 Install PCI card 15 Remove PCI card 15 Installing additional memory 15 Install...
... Setup 9 Select location 9 Open package 9 Connecting the peripherals 10 Starting your computer 10 Shutting down your computer 11 Upgrading your computer 13 Installation Precautions 13 Reminder for guarding against static electricity 13 ESD Guard 13 Pre-installation Instructions 13 Post-installation Instructions 14 Opening your Computer 14 Remove the side panel 14 Replace the side panel 14 Replacing the HDD 14 Upgrade the HDD 14 Installing PCI cards 15 Install PCI card 15 Remove PCI card 15 Installing additional memory 15 Install...
Power SV User Guide
Page 6
To reconfigure your computer 16 Upgrading CPU 16 Remove CPU 16 Install and upgrade CPU 17 Troubleshooting 19 Taking Care of your computer 23 Important tips 23 Cleaning and servicing 23 To clean your computer and keyboard 23 To clean your pointing device 24 To clean your optical mouse 24 To clean your monitor 24 When to contact a service technician 24 Asking for technical assistance 24 Remark: All the drawings in the Guide are diagrams. About components's quantity and style, substances shall take precedence.
To reconfigure your computer 16 Upgrading CPU 16 Remove CPU 16 Install and upgrade CPU 17 Troubleshooting 19 Taking Care of your computer 23 Important tips 23 Cleaning and servicing 23 To clean your computer and keyboard 23 To clean your pointing device 24 To clean your optical mouse 24 To clean your monitor 24 When to contact a service technician 24 Asking for technical assistance 24 Remark: All the drawings in the Guide are diagrams. About components's quantity and style, substances shall take precedence.
Power SV User Guide
Page 8
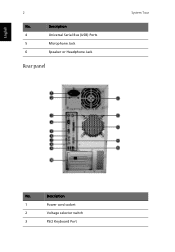
English 2 No. Description 4 Universal Serial Bus (USB) Ports 5 Microphone Jack 6 Speaker or Headphone Jack Rear panel System Tour No. Description 1 Power cord socket 2 Voltage selector switch 3 PS/2 Keyboard Port
English 2 No. Description 4 Universal Serial Bus (USB) Ports 5 Microphone Jack 6 Speaker or Headphone Jack Rear panel System Tour No. Description 1 Power cord socket 2 Voltage selector switch 3 PS/2 Keyboard Port
Power SV User Guide
Page 9
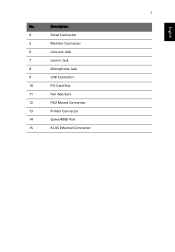
3 English No. Description 4 Serial Connector 5 Monitor Connector 6 Line-out Jack 7 Line-in Jack 8 Microphone Jack 9 USB Connector 10 PCI Card Slot 11 Fan Aperture 12 PS/2 Mouse Connector 13 Printer Connector 14 Game/MIDI Port 15 RJ-45 Ethernet Connector
3 English No. Description 4 Serial Connector 5 Monitor Connector 6 Line-out Jack 7 Line-in Jack 8 Microphone Jack 9 USB Connector 10 PCI Card Slot 11 Fan Aperture 12 PS/2 Mouse Connector 13 Printer Connector 14 Game/MIDI Port 15 RJ-45 Ethernet Connector
Power SV User Guide
Page 10
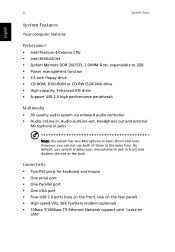
... Microphone-in front and disables the one at the same time. Connectivity • Two PS2 ports for keyboard and mouse • One serial port • One Parallel port • One VGA port • Four USB 2.0 ports (two on the front, two on the rear panel) • High speed V92, 56K fax/Data modem (optional) • 10Base-T/100Base-TX Ethernet Network support with "wake on LAN" By default, you system enables your microphone-in...
... Microphone-in front and disables the one at the same time. Connectivity • Two PS2 ports for keyboard and mouse • One serial port • One Parallel port • One VGA port • Four USB 2.0 ports (two on the front, two on the rear panel) • High speed V92, 56K fax/Data modem (optional) • 10Base-T/100Base-TX Ethernet Network support with "wake on LAN" By default, you system enables your microphone-in...

Power SV User Guide
Page 11
Mouse The included mouse is a standard two-button wheel mouse. Keyboard Connect the keyboard to the PS2 mouse port on the back panel of basic system peripherals. This section provides a brief description of the system. Connect the mouse to the PS2 keyboard port on the back panel of speakers (optional). English 5 System peripherals The AcerPower SV computer consists the system itself, and system peripherals, like a mouse, a keyboard and a set of the system.
Mouse The included mouse is a standard two-button wheel mouse. Keyboard Connect the keyboard to the PS2 mouse port on the back panel of basic system peripherals. This section provides a brief description of the system. Connect the mouse to the PS2 keyboard port on the back panel of speakers (optional). English 5 System peripherals The AcerPower SV computer consists the system itself, and system peripherals, like a mouse, a keyboard and a set of the system.
Power SV User Guide
Page 12
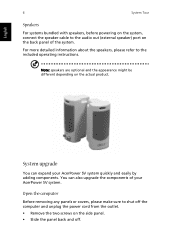
... the panel back and off. System upgrade You can also upgrade the components of the system. For more detailed information about the speakers, please refer to the included operating instructions. English 6 System Tour Speakers For systems bundled with speakers, before powering on the system, connect the speaker cable to the audio out (external speaker) port on the back panel of your AcerPower SV system quickly and easily by adding components...
... the panel back and off. System upgrade You can also upgrade the components of the system. For more detailed information about the speakers, please refer to the included operating instructions. English 6 System Tour Speakers For systems bundled with speakers, before powering on the system, connect the speaker cable to the audio out (external speaker) port on the back panel of your AcerPower SV system quickly and easily by adding components...

Power SV User Guide
Page 13
Upgrade to ensure proper setup and installation, please consult the instructions provided with AcerPower SV computers. Probable upgrades are: - In order to High Capacity HDD - Install additional interface cards in empty PCI slots e.g., PCI fax/modem card Expand high-level memory - English 7 Set up new components You can only use components compatible with your AcerPower SV system. Upgrade from a CD-ROM drive to CD-RW, DVD-ROM, or DVDRW - Before you choose new components, please ask your authorized Acer dealer whether the part will operate within your new components.
Upgrade to ensure proper setup and installation, please consult the instructions provided with AcerPower SV computers. Probable upgrades are: - In order to High Capacity HDD - Install additional interface cards in empty PCI slots e.g., PCI fax/modem card Expand high-level memory - English 7 Set up new components You can only use components compatible with your AcerPower SV system. Upgrade from a CD-ROM drive to CD-RW, DVD-ROM, or DVDRW - Before you choose new components, please ask your authorized Acer dealer whether the part will operate within your new components.

Power SV User Guide
Page 15
... support varied multimedia and software applications. Your system can accommodate extra peripheral equipment through those I /O (Input/Output) interfaces such as a serial port, parallel port, PS/2 keyboard and mouse ports, the system includes four USB ports, two microphone ports (one at front and one at rear panel), a stereo line-in any location that is excessively dusty or damp. The computer uses Peripheral Component Interface (PCI) and Accelerated Graphics Port...
... support varied multimedia and software applications. Your system can accommodate extra peripheral equipment through those I /O (Input/Output) interfaces such as a serial port, parallel port, PS/2 keyboard and mouse ports, the system includes four USB ports, two microphone ports (one at front and one at rear panel), a stereo line-in any location that is excessively dusty or damp. The computer uses Peripheral Component Interface (PCI) and Accelerated Graphics Port...
Power SV User Guide
Page 16
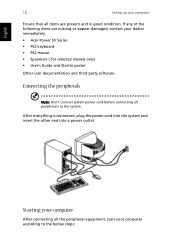
... below steps: After everything is connected, plug the power cord into the system and insert the other end into a power outlet. Starting your computer After connecting all the peripheral equipment, start your dealer immediately. • Acer Power SV Series • PS2 keyboard • PS2 mouse • Spearkers ( for selected models only) • User's Guide and Starter poster Other user documentation and third party software. If any of the...
... below steps: After everything is connected, plug the power cord into the system and insert the other end into a power outlet. Starting your computer After connecting all the peripheral equipment, start your dealer immediately. • Acer Power SV Series • PS2 keyboard • PS2 mouse • Spearkers ( for selected models only) • User's Guide and Starter poster Other user documentation and third party software. If any of the...
Power SV User Guide
Page 17
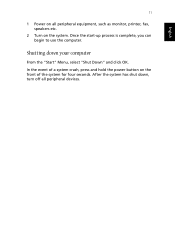
Shutting down , turn off all peripheral equipment, such as monitor, printer, fax, speakers etc. 2 Turn on the front of a system crash, press and hold the power button on the system. English 11 1 Power on all peripheral devices. Once the start-up process is complete, you can begin to use the computer. In the event of the system for four seconds. After the system has shut down your computer From the "Start" Menu, select "Shut Down" and click OK.
Shutting down , turn off all peripheral equipment, such as monitor, printer, fax, speakers etc. 2 Turn on the front of a system crash, press and hold the power button on the system. English 11 1 Power on all peripheral devices. Once the start-up process is complete, you can begin to use the computer. In the event of the system for four seconds. After the system has shut down your computer From the "Start" Menu, select "Shut Down" and click OK.
Power SV User Guide
Page 19
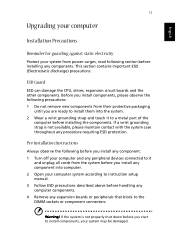
... or component connectors. ESD Guard ESD can damage the CPU, drives, expansion circuit boards and the other components. Pre-installation Instructions Always observe the following section before installing the components. Before you install components, please observe the following precautions: 1 Do not remove new components from power surges, read following before you install any component: 1 Turn off your computer and any peripheral devices connected to it...
... or component connectors. ESD Guard ESD can damage the CPU, drives, expansion circuit boards and the other components. Pre-installation Instructions Always observe the following section before installing the components. Before you install components, please observe the following precautions: 1 Do not remove new components from power surges, read following before you install any component: 1 Turn off your computer and any peripheral devices connected to it...
Power SV User Guide
Page 20
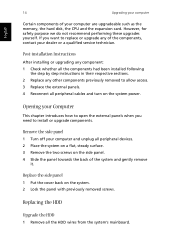
... your computer are upgradeable such as the memory, the hard disk, the CPU and the expansion card. Post-installation Instructions After installing or upgrading any component: 1 Check whether all peripheral cables and turn on the system. 2 Lock the panel with previously removed screws. Opening your computer and unplug all the HDD wires from the system's mainboard. Replace the side panel 1 Put the cover back on the system power. However, for safety...
... your computer are upgradeable such as the memory, the hard disk, the CPU and the expansion card. Post-installation Instructions After installing or upgrading any component: 1 Check whether all peripheral cables and turn on the system. 2 Lock the panel with previously removed screws. Opening your computer and unplug all the HDD wires from the system's mainboard. Replace the side panel 1 Put the cover back on the system power. However, for safety...
Power SV User Guide
Page 21
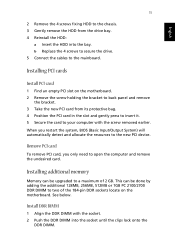
... bracket to back panel and remove the bracket. 3 Take the new PCI card from the drive bay. 4 Reinstall the HDD: a Insert the HDD into the socket until the clips lock onto the DDR DIMM. English 15 2 Remove the 4 screws fixing HDD to open the computer and remove the undesired card. See below. Installing PCI cards Install PCI card 1 Find an empty PCI slot on the motherboard. Installing additional memory Memory can be upgraded to your computer...
... bracket to back panel and remove the bracket. 3 Take the new PCI card from the drive bay. 4 Reinstall the HDD: a Insert the HDD into the socket until the clips lock onto the DDR DIMM. English 15 2 Remove the 4 screws fixing HDD to open the computer and remove the undesired card. See below. Installing PCI cards Install PCI card 1 Find an empty PCI slot on the motherboard. Installing additional memory Memory can be upgraded to your computer...

Power SV User Guide
Page 22
... motherboard: 1 Find the CPU on the motherboard If you insert a DDR DIMM but it does not fit easily into socket, you may have inserted it . To reconfigure your computer English Remark: The DDR DIMM sockets are slotted to view the new value for total system memory and make a note of it incorrectly. Run the BIOS utility to ensure proper installation. 16 Upgrading...
... motherboard: 1 Find the CPU on the motherboard If you insert a DDR DIMM but it does not fit easily into socket, you may have inserted it . To reconfigure your computer English Remark: The DDR DIMM sockets are slotted to view the new value for total system memory and make a note of it incorrectly. Run the BIOS utility to ensure proper installation. 16 Upgrading...

Power SV User Guide
Page 25
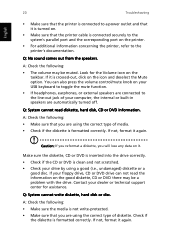
... (non system) diskette in and turned on the rear panel of the following: • Check if the voltage selector switch located on . A: Your computer's power management function automatically blanks the screen to turn the display back on the screen. This will automatically diagnose your dealer or the technical support center for assistance. If pressing a key does not work . If the LED is followed by simple answers and...
... (non system) diskette in and turned on the rear panel of the following: • Check if the voltage selector switch located on . A: Your computer's power management function automatically blanks the screen to turn the display back on the screen. This will automatically diagnose your dealer or the technical support center for assistance. If pressing a key does not work . If the LED is followed by simple answers and...
Power SV User Guide
Page 26
..., hard disk, CD or DVD information. If your drive by using the correct type of diskette. English 20 Troubleshooting • Make sure that the printer is connected to a power outlet and that it is turned on. • Make sure that the printer cable is connected securely to the system's parallel port and the corresponding port on the good diskette, CD or DVD there may be a problem with the drive...
..., hard disk, CD or DVD information. If your drive by using the correct type of diskette. English 20 Troubleshooting • Make sure that the printer is connected to a power outlet and that it is turned on. • Make sure that the printer cable is connected securely to the system's parallel port and the corresponding port on the good diskette, CD or DVD there may be a problem with the drive...
Power SV User Guide
Page 30
... the ball back and replace the cover. You may also access the Acer Web site (www.acersupport.com) for information on how and where to contact the service centers available in your local dealer or distributor. Asking for maintenance instructions. 24 Taking Care of an optical mouse, refer to the documentation that came with your monitor. For cleaning instructions, refer to the...
... the ball back and replace the cover. You may also access the Acer Web site (www.acersupport.com) for information on how and where to contact the service centers available in your local dealer or distributor. Asking for maintenance instructions. 24 Taking Care of an optical mouse, refer to the documentation that came with your monitor. For cleaning instructions, refer to the...


