
User Manual
Page 2
...manual or supplementary documents and publications. The serial number and model number are used herein for a particular purpose. No part of this publication may be reproduced, stored in a retrieval system, or transmitted, in new editions of this publication without obligation to the unit. Acer Altos G540 M2...number, serial number, purchase date, and place of Acer Incorporated. Acer Altos G540 M2 Series Model Name : G540 M2 Part Number: MU.R3500.001 Purchase Date: Place of Purchase: Acer and the Acer logo are registered trademarks of merchantability or fitness for identification...
...manual or supplementary documents and publications. The serial number and model number are used herein for a particular purpose. No part of this publication may be reproduced, stored in a retrieval system, or transmitted, in new editions of this publication without obligation to the unit. Acer Altos G540 M2...number, serial number, purchase date, and place of Acer Incorporated. Acer Altos G540 M2 Series Model Name : G540 M2 Part Number: MU.R3500.001 Purchase Date: Place of Purchase: Acer and the Acer logo are registered trademarks of merchantability or fitness for identification...

User Manual
Page 20
DVD-ROM drive activity indicator When the LED indicator is lit, there is an ongoing DVD drive activity. 5.25-inch drive bay Allows installation of supported devices. DVD-ROM drive mechanical eject hole When the DVD drive tray get stucked, insert a paperclip to this button to manually eject the tray. 10 Front panel 1 System tour No. Icon 1 2 3 4 5 Component Description DVD-ROM drive Eject Press this hole to open the DVD button drive tray. Go to page 4 for reading CD, VCD, and DVD contents. DVD-ROM drive Disk drive for a list of additional storage devices.
DVD-ROM drive activity indicator When the LED indicator is lit, there is an ongoing DVD drive activity. 5.25-inch drive bay Allows installation of supported devices. DVD-ROM drive mechanical eject hole When the DVD drive tray get stucked, insert a paperclip to this button to manually eject the tray. 10 Front panel 1 System tour No. Icon 1 2 3 4 5 Component Description DVD-ROM drive Eject Press this hole to open the DVD button drive tray. Go to page 4 for reading CD, VCD, and DVD contents. DVD-ROM drive Disk drive for a list of additional storage devices.

User Manual
Page 42
Caution: Do not route the power cord where it . Note: Consult the operating system manual for each port. To ensure proper operation, plug the power cord into a properly grounded AC outlet only. The server is designed to configure the network setup. Refer to the figure below for specific connection instructions for information on how to be electrically grounded (earthed). 32 2 System setup Connecting peripherals The color-coded I/O port panel on or pinched by items placed against it will walked on the system rear accepts a variety of compatible peripherals.
Caution: Do not route the power cord where it . Note: Consult the operating system manual for each port. To ensure proper operation, plug the power cord into a properly grounded AC outlet only. The server is designed to configure the network setup. Refer to the figure below for specific connection instructions for information on how to be electrically grounded (earthed). 32 2 System setup Connecting peripherals The color-coded I/O port panel on or pinched by items placed against it will walked on the system rear accepts a variety of compatible peripherals.
User Manual
Page 119
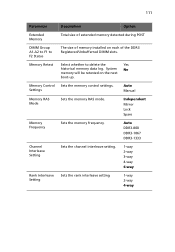
...-up. System No memory will be retested on each of the DDR3 Registered/Unbufferred DIMM slots. Memory Control Sets the memory control settings. Settings Auto Manual Memory RAS Mode Sets the memory RAS mode. Independent Mirror Lock Spare Memory Frequency Sets the memory frequency. Auto DDR3-800 DDR3-1067 DDR3-1333...
...-up. System No memory will be retested on each of the DDR3 Registered/Unbufferred DIMM slots. Memory Control Sets the memory control settings. Settings Auto Manual Memory RAS Mode Sets the memory RAS mode. Independent Mirror Lock Spare Memory Frequency Sets the memory frequency. Auto DDR3-800 DDR3-1067 DDR3-1333...

User Manual
Page 131
... or mouse. Wake Up by Modem Ring Enables or disables the modem ring to wake the system from a power saving mode. Option Off On Auto Manual 0-23:0-59:0-59 Enabled Disabled Enabled Disabled Enabled Disabled 123 Power Parameter Description Power On by PCI Enables or disables a PCI or PCIE & PCIE Devices...
... or mouse. Wake Up by Modem Ring Enables or disables the modem ring to wake the system from a power saving mode. Option Off On Auto Manual 0-23:0-59:0-59 Enabled Disabled Enabled Disabled Enabled Disabled 123 Power Parameter Description Power On by PCI Enables or disables a PCI or PCIE & PCIE Devices...

User Manual
Page 200
To configure the network settings: 1 On the Network Settings page, select whether to configure and change the management network parameters. You can configure the network settings by using DHCP (Dynamic Host Configuration Protocol) or manually. 192 Appendix C: Altos eXpress Console Network The Network option allows you to obtain an IP address automatically or configure the network settings manually. 2 Click Save.
To configure the network settings: 1 On the Network Settings page, select whether to configure and change the management network parameters. You can configure the network settings by using DHCP (Dynamic Host Configuration Protocol) or manually. 192 Appendix C: Altos eXpress Console Network The Network option allows you to obtain an IP address automatically or configure the network settings manually. 2 Click Save.

User Manual
Page 203
To upload an SSL certificate: 1 On the SSL Upload page, click Browse to upload a SSL certificate manually. 195 SSL Certificate The SSL Certificate option allows you to locate the SSL certificate on your system. 2 Click Upload.
To upload an SSL certificate: 1 On the SSL Upload page, click Browse to upload a SSL certificate manually. 195 SSL Certificate The SSL Certificate option allows you to locate the SSL certificate on your system. 2 Click Upload.

User Manual
Page 217
... Mouse menu includes the Sync Cursor command that enables you to redirect to any of the following command options: • Bandwidth - Select auto-detect or manually select a bandwidth. Options include: 256Kbps, 512 Kbps, 1 Mbps, 10 Mbps, and 100Mbps. • Keyboard/Mouse Encryption - Select to the mouse on the server. Option menu...
... Mouse menu includes the Sync Cursor command that enables you to redirect to any of the following command options: • Bandwidth - Select auto-detect or manually select a bandwidth. Options include: 256Kbps, 512 Kbps, 1 Mbps, 10 Mbps, and 100Mbps. • Keyboard/Mouse Encryption - Select to the mouse on the server. Option menu...
