Acer Altos G700 User's Guide
Page 5
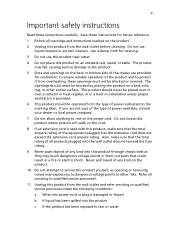
...the product on an unstable cart, stand, or table. to ensure reliable operation of the product and to protect it from the type of power indicated on the back or bottom side of the equipment plugged into the extension cord does not exceed the extension cord ampere rating. The ...or other risks. Refer all products plugged into the wall outlet does not exceed the fuse rating. 9 Never push objects of power available, consult your dealer or local power company. 7 Do not allow anything to service this product from the wall outlet and refer servicing to qualified service personnel under the...
...the product on an unstable cart, stand, or table. to ensure reliable operation of the product and to protect it from the type of power indicated on the back or bottom side of the equipment plugged into the extension cord does not exceed the extension cord ampere rating. The ...or other risks. Refer all products plugged into the wall outlet does not exceed the fuse rating. 9 Never push objects of power available, consult your dealer or local power company. 7 Do not allow anything to service this product from the wall outlet and refer servicing to qualified service personnel under the...
Acer Altos G700 User's Guide
Page 6
Batteries may present a risk of power supply cord set (provided in damage and will often require extensive work by a qualified technician to restore the product to a qualified service technician. 13 Warning! ...
Batteries may present a risk of power supply cord set (provided in damage and will often require extensive work by a qualified technician to restore the product to a qualified service technician. 13 Warning! ...

Acer Altos G700 User's Guide
Page 7
... 18 Connecting the PS/2 keyboard 18 Connecting the PS/2 mouse 19 Connecting the VGA monitor 20 Connecting a printer 21 Connecting the power cable 22 Turning on the system 23 Power-on problems 24 Operating system configuration 25 Network connection 26 Tower-to-rack option 27 Turning off the system 28 3 Upgrading the...
... 18 Connecting the PS/2 keyboard 18 Connecting the PS/2 mouse 19 Connecting the VGA monitor 20 Connecting a printer 21 Connecting the power cable 22 Turning on the system 23 Power-on problems 24 Operating system configuration 25 Network connection 26 Tower-to-rack option 27 Turning off the system 28 3 Upgrading the...
Acer Altos G700 User's Guide
Page 8
...remove a DIMM 49 To install a DIMM 50 Installing an expansion card 52 To install an expansion card 52 Installing a power supply module 54 To install a redundant power supply module 55 Installing a hot-swappable HDD fan 57 To remove a hot-swappable HDD fan 57 To install a ...67 IDE Configuration 68 Floppy Configuration 72 PCI/PnP Configuration 73 Boot Settings Configuration 75 Event Log Configuration 77 Onboard Devices Configuration 80 Power 81 Boot 83 Boot Device Priority 83 Hard Disk Drives 85 Removable Devices 86 ATAPI CD-ROM Devices 87 Security 88 To ...
...remove a DIMM 49 To install a DIMM 50 Installing an expansion card 52 To install an expansion card 52 Installing a power supply module 54 To install a redundant power supply module 55 Installing a hot-swappable HDD fan 57 To remove a hot-swappable HDD fan 57 To install a ...67 IDE Configuration 68 Floppy Configuration 72 PCI/PnP Configuration 73 Boot Settings Configuration 75 Event Log Configuration 77 Onboard Devices Configuration 80 Power 81 Boot 83 Boot Device Priority 83 Hard Disk Drives 85 Removable Devices 86 ATAPI CD-ROM Devices 87 Security 88 To ...

Acer Altos G700 User's Guide
Page 12
The system offers a new standard for flexible productivity ideal for general business applications, email, web service, file clustering and print services. The Acer Altos G700 server is a powerful dual-processor system loaded with a host of new and innovative features.
The system offers a new standard for flexible productivity ideal for general business applications, email, web service, file clustering and print services. The Acer Altos G700 server is a powerful dual-processor system loaded with a host of new and innovative features.
Acer Altos G700 User's Guide
Page 13
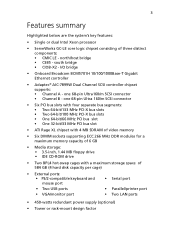
... mouse port • Two USB ports • VGA/monitor port • Serial port • Parallel/printer port • Two LAN ports • 450-watts redundant power supply (optional) • Tower or rack-mount design factor one 68-pin Ultra 160/m SCSI connector • Six PCI bus slots with four separate bus...
... mouse port • Two USB ports • VGA/monitor port • Serial port • Parallel/printer port • Two LAN ports • 450-watts redundant power supply (optional) • Tower or rack-mount design factor one 68-pin Ultra 160/m SCSI connector • Six PCI bus slots with four separate bus...
Acer Altos G700 User's Guide
Page 14
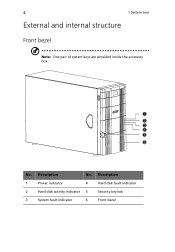
4 1 System tour External and internal structure Front bezel Note: One pair of system keys are provided inside the accessory box. No. Description No. Description 1 Power indicator 4 Hard disk fault indicator 2 Hard disk activity indicator 5 Security keylock 3 System fault indicator 6 Front bezel
4 1 System tour External and internal structure Front bezel Note: One pair of system keys are provided inside the accessory box. No. Description No. Description 1 Power indicator 4 Hard disk fault indicator 2 Hard disk activity indicator 5 Security keylock 3 System fault indicator 6 Front bezel
Acer Altos G700 User's Guide
Page 21
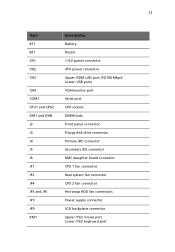
... CPU1 and CPU2 DM1 and DM6 J2 J3 J4 J5 J6 JF1 JF2 JF4 JF5 and JF6 JP3 JP5 KM1 Description Battery Buzzer +12V power connector ATX power connector Upper: RDM LAN port (10/100 Mbps) Lower: USB ports VGA/monitor port Serial port CPU sockets DIMM slots Front panel connector Floppy... Primary IDE connector Secondary IDE connector BMC daughter board connector CPU 1 fan connector Rear system fan connector CPU 2 fan connector Hot-swap HDD fan connectors Power supply connector SCSI backplane connector Upper: PS/2 mouse port Lower: PS/2 keyboard port
... CPU1 and CPU2 DM1 and DM6 J2 J3 J4 J5 J6 JF1 JF2 JF4 JF5 and JF6 JP3 JP5 KM1 Description Battery Buzzer +12V power connector ATX power connector Upper: RDM LAN port (10/100 Mbps) Lower: USB ports VGA/monitor port Serial port CPU sockets DIMM slots Front panel connector Floppy... Primary IDE connector Secondary IDE connector BMC daughter board connector CPU 1 fan connector Rear system fan connector CPU 2 fan connector Hot-swap HDD fan connectors Power supply connector SCSI backplane connector Upper: PS/2 mouse port Lower: PS/2 keyboard port
Acer Altos G700 User's Guide
Page 27
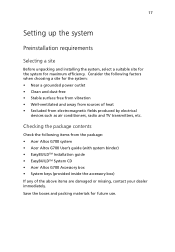
...system: • Near a grounded power outlet • Clean and dust-free • Stable surface free from vibration • Well-ventilated and away from sources of heat • Secluded from the package: • Acer Altos G700 system • Acer Altos G700 User's guide (with system binder)... • EasyBUILDTM Installation guide • EasyBUILDTM System CD • Acer Altos G700 Accessory box • System keys (provided inside the accessory box)...
...system: • Near a grounded power outlet • Clean and dust-free • Stable surface free from vibration • Well-ventilated and away from sources of heat • Secluded from the package: • Acer Altos G700 system • Acer Altos G700 User's guide (with system binder)... • EasyBUILDTM Installation guide • EasyBUILDTM System CD • Acer Altos G700 Accessory box • System keys (provided inside the accessory box)...
Acer Altos G700 User's Guide
Page 32
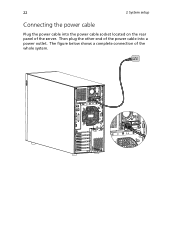
Then plug the other end of the power cable into the power cable socket located on the rear panel of the whole system. The figure below shows a complete connection of the server. 22 2 System setup Connecting the power cable Plug the power cable into a power outlet.
Then plug the other end of the power cable into the power cable socket located on the rear panel of the whole system. The figure below shows a complete connection of the server. 22 2 System setup Connecting the power cable Plug the power cable into a power outlet.
Acer Altos G700 User's Guide
Page 33
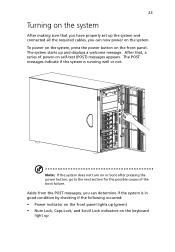
... messages, you can determine if the system is running well or not. To power on the system, press the power button on or boot after pressing the power button, go to the next section for the possible causes of power-on the keyboard light up The POST messages indicate if the system is in... good condition by checking if the following occurred: • Power indicator on the front panel lights up (green) • Num Lock, Caps Lock, and Scroll Lock indicators on self-test (POST) messages appears. Note: If ...
... messages, you can determine if the system is running well or not. To power on the system, press the power button on or boot after pressing the power button, go to the next section for the possible causes of power-on the keyboard light up The POST messages indicate if the system is in... good condition by checking if the following occurred: • Power indicator on the front panel lights up (green) • Num Lock, Caps Lock, and Scroll Lock indicators on self-test (POST) messages appears. Note: If ...
Acer Altos G700 User's Guide
Page 34
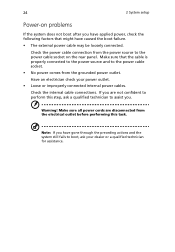
...through the preceding actions and the system still fails to the power cable socket. • No power comes from the power source to the power cable socket on problems If the system does not boot after you have applied power, check the following factors that the cable is properly connected ...to the power source and to boot, ask your power outlet. • Loose or improperly connected internal power cables. Warning! Make sure that might have caused the boot...
...through the preceding actions and the system still fails to the power cable socket. • No power comes from the power source to the power cable socket on problems If the system does not boot after you have applied power, check the following factors that the cable is properly connected ...to the power source and to boot, ask your power outlet. • Loose or improperly connected internal power cables. Warning! Make sure that might have caused the boot...
Acer Altos G700 User's Guide
Page 38
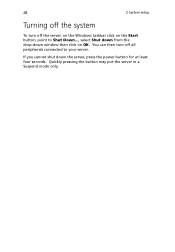
If you cannot shut down window then click on OK. Quickly pressing the button may put the server in a Suspend mode only. 28 2 System setup Turning off the system To turn off the server, on the Windows taskbar click on the Start button, point to your server. You can then turn off all peripherals connected to Shut Down..., select Shut down from the drop-down the server, press the power button for at least four seconds.
If you cannot shut down window then click on OK. Quickly pressing the button may put the server in a Suspend mode only. 28 2 System setup Turning off the system To turn off the server, on the Windows taskbar click on the Start button, point to your server. You can then turn off all peripherals connected to Shut Down..., select Shut down from the drop-down the server, press the power button for at least four seconds.
Acer Altos G700 User's Guide
Page 41
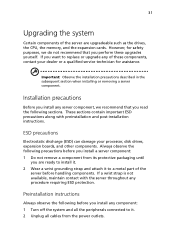
Always observe the following precautions before you install a server component: 1 Do not remove a component from the power outlets. 31 Upgrading the system Certain components of the server are ready to install it. 2 Wear a wrist grounding strap and attach it to replace or ...
Always observe the following precautions before you install a server component: 1 Do not remove a component from the power outlets. 31 Upgrading the system Certain components of the server are ready to install it. 2 Wear a wrist grounding strap and attach it to replace or ...
Acer Altos G700 User's Guide
Page 44
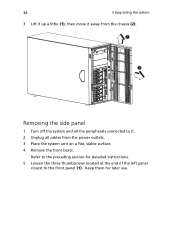
Keep them for detailed instructions. 5 Loosen the three thumbscrews located at the end of the left panel closest to the front panel (1). Refer to it away from the power outlets. 3 Place the system unit on a flat, stable surface. 4 Remove the front bezel. Removing the side panel 1 Turn off the system and all the peripherals connected to the preceding section for later use. 34 3 Upgrading the system 3 Lift it up a little (1), then move it . 2 Unplug all cables from the chassis (2).
Keep them for detailed instructions. 5 Loosen the three thumbscrews located at the end of the left panel closest to the front panel (1). Refer to it away from the power outlets. 3 Place the system unit on a flat, stable surface. 4 Remove the front bezel. Removing the side panel 1 Turn off the system and all the peripherals connected to the preceding section for later use. 34 3 Upgrading the system 3 Lift it up a little (1), then move it . 2 Unplug all cables from the chassis (2).
Acer Altos G700 User's Guide
Page 47
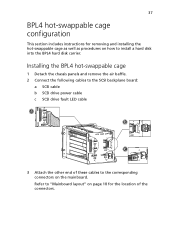
... hot-swappable cage 1 Detach the chassis panels and remove the air baffle. 2 Connect the following cables to the SCSI backplane board: a SCSI cable b SCSI drive power cable c SCSI drive fault LED cable 3 Attach the other end of the connectors.
... hot-swappable cage 1 Detach the chassis panels and remove the air baffle. 2 Connect the following cables to the SCSI backplane board: a SCSI cable b SCSI drive power cable c SCSI drive fault LED cable 3 Attach the other end of the connectors.
Acer Altos G700 User's Guide
Page 49
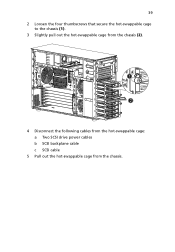
39 2 Loosen the four thumbscrews that secure the hot-swappable cage to the chassis (1). 3 Slightly pull out the hot-swappable cage from the chassis (2). 4 Disconnect the following cables from the hot-swappable cage: a Two SCSI drive power cables b SCSI backplane cable c SCSI cable 5 Pull out the hot-swappable cage from the chassis.
39 2 Loosen the four thumbscrews that secure the hot-swappable cage to the chassis (1). 3 Slightly pull out the hot-swappable cage from the chassis (2). 4 Disconnect the following cables from the hot-swappable cage: a Two SCSI drive power cables b SCSI backplane cable c SCSI cable 5 Pull out the hot-swappable cage from the chassis.
Acer Altos G700 User's Guide
Page 54
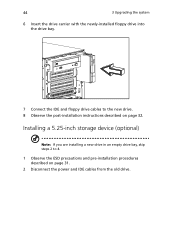
44 3 Upgrading the system 6 Insert the drive carrier with the newly-installed floppy drive into the drive bay. 7 Connect the IDE and floppy drive cables to 4. 1 Observe the ESD precautions and pre-installation procedures described on page 32. Installing a 5.25-inch storage device (optional) Note: If you are installing a new drive in an empty drive bay, skip steps 2 to the new drive. 8 Observe the post-installation instructions described on page 31. 2 Disconnect the power and IDE cables from the old drive.
44 3 Upgrading the system 6 Insert the drive carrier with the newly-installed floppy drive into the drive bay. 7 Connect the IDE and floppy drive cables to 4. 1 Observe the ESD precautions and pre-installation procedures described on page 32. Installing a 5.25-inch storage device (optional) Note: If you are installing a new drive in an empty drive bay, skip steps 2 to the new drive. 8 Observe the post-installation instructions described on page 31. 2 Disconnect the power and IDE cables from the old drive.

Acer Altos G700 User's Guide
Page 56
46 3 Upgrading the system 6 Insert the drive carrier with the newly-installed 5.25-inch drive into the drive bay. 7 Connect the power and IDE cables to the new drive. 8 Observe the post-installation instructions described on page 32.
46 3 Upgrading the system 6 Insert the drive carrier with the newly-installed 5.25-inch drive into the drive bay. 7 Connect the power and IDE cables to the new drive. 8 Observe the post-installation instructions described on page 32.
Acer Altos G700 User's Guide
Page 64
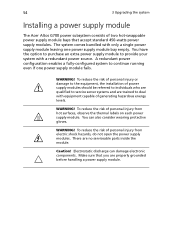
... of personal injury from electric shock hazards, do not open the power supply modules. You can damage electronic components. Electrostatic discharge can also consider wearing protective gloves. 54 3 Upgrading the system Installing a power supply module The Acer Altos G700 power subsystem consists of two hot-swappable power supply module bays that you are properly grounded before handling...
... of personal injury from electric shock hazards, do not open the power supply modules. You can damage electronic components. Electrostatic discharge can also consider wearing protective gloves. 54 3 Upgrading the system Installing a power supply module The Acer Altos G700 power subsystem consists of two hot-swappable power supply module bays that you are properly grounded before handling...

