Acer Altos G700 User's Guide
Page 8
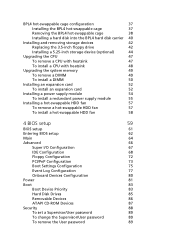
... cage 37 Removing the BPL4 hot-swappable cage 38 Installing a hard disk into the BPL4 hard disk carrier 40 Installing and removing storage devices 42 Replacing the 3.5-inch floppy drive 42 Installing a 5.25-inch storage device (optional) 44 Upgrading the CPU 47 To remove a CPU with heatsink 47 To install a CPU with heatsink 48 Upgrading the system memory...
... cage 37 Removing the BPL4 hot-swappable cage 38 Installing a hard disk into the BPL4 hard disk carrier 40 Installing and removing storage devices 42 Replacing the 3.5-inch floppy drive 42 Installing a 5.25-inch storage device (optional) 44 Upgrading the CPU 47 To remove a CPU with heatsink 47 To install a CPU with heatsink 48 Upgrading the system memory...
Acer Altos G700 User's Guide
Page 47
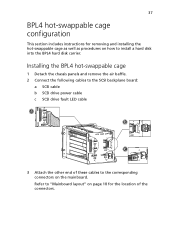
... on how to "Mainboard layout" on page 10 for the location of these cables to the corresponding connectors on the mainboard. Refer to install a hard disk into the BPL4 hard disk carrier. Installing the BPL4 hot-swappable cage 1 Detach the chassis panels and remove the air baffle. 2 Connect the following cables to the SCSI backplane board...
... on how to "Mainboard layout" on page 10 for the location of these cables to the corresponding connectors on the mainboard. Refer to install a hard disk into the BPL4 hard disk carrier. Installing the BPL4 hot-swappable cage 1 Detach the chassis panels and remove the air baffle. 2 Connect the following cables to the SCSI backplane board...
Acer Altos G700 User's Guide
Page 50
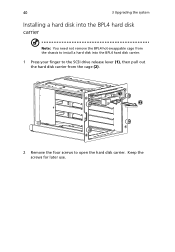
Keep the screws for later use. 40 3 Upgrading the system Installing a hard disk into the BPL4 hard disk carrier Note: You need not remove the BPL4 hot-swappable cage from the chassis to install a hard disk into the BPL4 hard disk carrier. 1 Press your finger to the SCSI drive release lever (1), then pull out the hard disk carrier from the cage (2). 2 Remove the four screws to open the hard disk carrier.
Keep the screws for later use. 40 3 Upgrading the system Installing a hard disk into the BPL4 hard disk carrier Note: You need not remove the BPL4 hot-swappable cage from the chassis to install a hard disk into the BPL4 hard disk carrier. 1 Press your finger to the SCSI drive release lever (1), then pull out the hard disk carrier from the cage (2). 2 Remove the four screws to open the hard disk carrier.
Acer Altos G700 User's Guide
Page 51
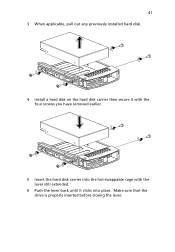
Make sure that the drive is properly inserted before closing the lever. 41 3 When applicable, pull out any previously installed hard disk. 4 Install a hard disk on the hard disk carrier then secure it with the four screws you have removed earlier. 5 Insert the hard disk carrier into the hot-swappable cage with the lever still extended. 6 Push the lever back until it clicks into place.
Make sure that the drive is properly inserted before closing the lever. 41 3 When applicable, pull out any previously installed hard disk. 4 Install a hard disk on the hard disk carrier then secure it with the four screws you have removed earlier. 5 Insert the hard disk carrier into the hot-swappable cage with the lever still extended. 6 Push the lever back until it clicks into place.
Acer Altos G700 User's Guide
Page 80
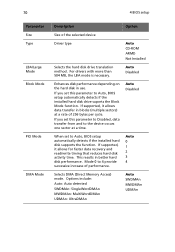
...successive increase of the selected device Driver type Auto CD-ROM ARMD Not Installed Selects the hard disk drive translation method. Auto Disabled Enhances disk performance depending on the hard disk in better hard disk performance. Mode 0 to Auto, BIOS setup automatically detects if the installed hard disk drive suports the Block Mode function. If you set to the device occurs...the LBA mode is necessary. Auto Disabled When set this parameter to Disabled, data transfer from and to Auto, BIOS setup automatically detects if the installed hard disk supports the function.
...successive increase of the selected device Driver type Auto CD-ROM ARMD Not Installed Selects the hard disk drive translation method. Auto Disabled Enhances disk performance depending on the hard disk in better hard disk performance. Mode 0 to Auto, BIOS setup automatically detects if the installed hard disk drive suports the Block Mode function. If you set to the device occurs...the LBA mode is necessary. Auto Disabled When set this parameter to Disabled, data transfer from and to Auto, BIOS setup automatically detects if the installed hard disk supports the function.
Acer Altos G700 User's Guide
Page 105
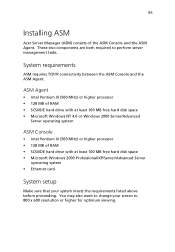
95 Installing ASM Acer Server Manager (ASM) consists of RAM • SCSI/IDE hard drive with at least 100 MB free hard disk space • Microsoft Windows 2000 Professional/XP/Server/Advanced Server operating system • Ethernet card System setup Make sure that your screen to 800 ... viewing. ASM Agent • Intel Pentium III (500 MHz) or higher processor • 128 MB of RAM • SCSI/IDE hard drive with at least 100 MB free hard disk space • Microsoft Windows NT 4.0 or Windows 2000 Server/Advanced Server operating system ASM Console • Intel Pentium III (500 MHz)...
95 Installing ASM Acer Server Manager (ASM) consists of RAM • SCSI/IDE hard drive with at least 100 MB free hard disk space • Microsoft Windows 2000 Professional/XP/Server/Advanced Server operating system • Ethernet card System setup Make sure that your screen to 800 ... viewing. ASM Agent • Intel Pentium III (500 MHz) or higher processor • 128 MB of RAM • SCSI/IDE hard drive with at least 100 MB free hard disk space • Microsoft Windows NT 4.0 or Windows 2000 Server/Advanced Server operating system ASM Console • Intel Pentium III (500 MHz)...
Acer Altos G700 User's Guide
Page 107
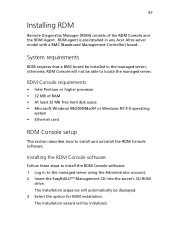
... 32 MB free hard disk space • Microsoft Windows 98/2000/Me/XP or Windows NT 4.0 operating system • Ethernet card RDM Console setup This section describes how to install and uninstall the RDM Console software. Installing the RDM Console software Follow these steps to install the RDM Console software: 1 Log in any Acer Altos server model...
... 32 MB free hard disk space • Microsoft Windows 98/2000/Me/XP or Windows NT 4.0 operating system • Ethernet card RDM Console setup This section describes how to install and uninstall the RDM Console software. Installing the RDM Console software Follow these steps to install the RDM Console software: 1 Log in any Acer Altos server model...
Acer Altos G700 User's Guide
Page 109
99 Index A Acer Server Manager (ASM) 95 system requirements 95 ASM Agent 95 ASM Console 95 system setup 95 install ASM Agent 96 install ASM Console 96 B BIOS setup 61 Advanced 66 Boot Settings Configuration 75 Event Log Configuration 77 Floppy Configuration 72 IDE ...password 89 Supervisor password 88 User password 88 BPL4 hot-swappable cage 37 installing cage 37 installing hard disk 40 removing 38 C CPU installing 48 removing 47 D DIMM installing 50 removing 49 E expansion card installing 52 H hot-swappable HDD fan 57 installing 58 removing 57 O opening the system 33 open front bezel 33 remove...
99 Index A Acer Server Manager (ASM) 95 system requirements 95 ASM Agent 95 ASM Console 95 system setup 95 install ASM Agent 96 install ASM Console 96 B BIOS setup 61 Advanced 66 Boot Settings Configuration 75 Event Log Configuration 77 Floppy Configuration 72 IDE ...password 89 Supervisor password 88 User password 88 BPL4 hot-swappable cage 37 installing cage 37 installing hard disk 40 removing 38 C CPU installing 48 removing 47 D DIMM installing 50 removing 49 E expansion card installing 52 H hot-swappable HDD fan 57 installing 58 removing 57 O opening the system 33 open front bezel 33 remove...


