

Altos R700 Chassis Subassembly
Page 7
... Cables 27 Installing Peripherals 35 Installing a PCI Card on a Riser Card 35 Installing the Riser Cards on the Server Board 36 Installing a Hard Drive 37 Installing a DVD drive/FDD or CD-ROM drive/FDD Module 39 Finishing Installation 41 Installing a Serial A port in the Rear I/O 41 Install the Cover 41 Installing the Power Cord...
... Cables 27 Installing Peripherals 35 Installing a PCI Card on a Riser Card 35 Installing the Riser Cards on the Server Board 36 Installing a Hard Drive 37 Installing a DVD drive/FDD or CD-ROM drive/FDD Module 39 Finishing Installation 41 Installing a Serial A port in the Rear I/O 41 Install the Cover 41 Installing the Power Cord...

Altos R700 Chassis Subassembly
Page 8
... and Supplies Needed 48 Safety: Before You Remove the Cover 48 Warnings and Cautions 49 Lithium Battery Replacement 49 Replacing Components 51 Replacing a Hard Drive 51 Replacing a DVD/CD-ROM drive/FDD Module 52 Replacing a PCI Add-in Card 54 Replacing a 500 Watt Power Supply Module 56 Replacing a Power Supply Cage 57 Installing...
... and Supplies Needed 48 Safety: Before You Remove the Cover 48 Warnings and Cautions 49 Lithium Battery Replacement 49 Replacing Components 51 Replacing a Hard Drive 51 Replacing a DVD/CD-ROM drive/FDD Module 52 Replacing a PCI Add-in Card 54 Replacing a 500 Watt Power Supply Module 56 Replacing a Power Supply Cage 57 Installing...

Altos R700 Chassis Subassembly
Page 10
...Altos R700 server chassis kit is designed to backplane board) • One Resource CD-ROM containing drivers, utilities, and product guide • Mounting screws (server board) • Front, mid, or 4-post rack mounting kit Your kit includes the following components: • 2U rack-mount chassis featuring: • Four hard drive... bays with carriers and two bays with plugs • Two hard drive bay plugs • One bay for an optional DVD/CD-ROM drive/FDD module (comes with filler panel and plug) • One ...
...Altos R700 server chassis kit is designed to backplane board) • One Resource CD-ROM containing drivers, utilities, and product guide • Mounting screws (server board) • Front, mid, or 4-post rack mounting kit Your kit includes the following components: • 2U rack-mount chassis featuring: • Four hard drive... bays with carriers and two bays with plugs • Two hard drive bay plugs • One bay for an optional DVD/CD-ROM drive/FDD module (comes with filler panel and plug) • One ...

Altos R700 Chassis Subassembly
Page 11
... separately: • Front bezel (optional) • Altos R700 Server Board • Minimum of one Intel® Xeon™ processor • Registered ECC DDR RAM memory DIMMs • SCSI hard disk drives (HDD) • Slimline DVD/CD-ROM drive/floppy disk drive module (optional) • PCI add-in cards • Hard drive carriers (over the four supplied) •...
... separately: • Front bezel (optional) • Altos R700 Server Board • Minimum of one Intel® Xeon™ processor • Registered ECC DDR RAM memory DIMMs • SCSI hard disk drives (HDD) • Slimline DVD/CD-ROM drive/floppy disk drive module (optional) • PCI add-in cards • Hard drive carriers (over the four supplied) •...
Altos R700 Chassis Subassembly
Page 13
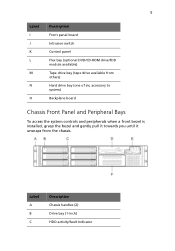
5 Label I J K L M N O Description Front panel board Intrusion switch Control panel Flex bay (optional DVD/CD-ROM drive/FDD module available) Tape drive bay (tape drive available from others) Hard drive bay (one of six, accessory to system) Backplane board Chassis Front Panel and Peripheral Bays To access the system controls and peripherals when a front bezel is installed, grasp the bezel and gently pull it towards you until it unsnaps from the chassis. Label A B C Description Chassis handles (2) Drive bay (1-inch) HDD activity/fault Indicator
5 Label I J K L M N O Description Front panel board Intrusion switch Control panel Flex bay (optional DVD/CD-ROM drive/FDD module available) Tape drive bay (tape drive available from others) Hard drive bay (one of six, accessory to system) Backplane board Chassis Front Panel and Peripheral Bays To access the system controls and peripherals when a front bezel is installed, grasp the bezel and gently pull it towards you until it unsnaps from the chassis. Label A B C Description Chassis handles (2) Drive bay (1-inch) HDD activity/fault Indicator
Altos R700 Chassis Subassembly
Page 18
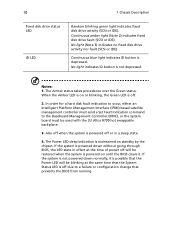
In order for a hard disk fault indication to occur, either an Intelligent Platform Management Interface (IPMI) based satellite management controller must send a Set Fault Indication command to a failure or configuration change that the Power LED will be used with the 2U Altos R700 hot swappable backplane. ...3. If the system is powered down normally, it . Notes: 1. Continuous amber light (Note 2) indicates fixed disk drive fault (SCSI or IDE). Also off when the system is not ...
In order for a hard disk fault indication to occur, either an Intelligent Platform Management Interface (IPMI) based satellite management controller must send a Set Fault Indication command to a failure or configuration change that the Power LED will be used with the 2U Altos R700 hot swappable backplane. ...3. If the system is powered down normally, it . Notes: 1. Continuous amber light (Note 2) indicates fixed disk drive fault (SCSI or IDE). Also off when the system is not ...
Altos R700 Chassis Subassembly
Page 19
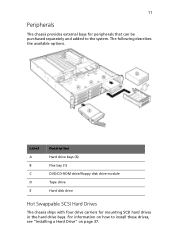
For information on page 37. 11 Peripherals The chassis provides external bays for mounting SCSI hard drives in the hard drive bays. Label A B C D E Description Hard drive bays (6) Flex bay (1) DVD/CD-ROM drive/floppy disk drive module Tape drive Hard disk drive Hot Swappable SCSI Hard Drives The chassis ships with four drive carriers for peripherals that can be purchased separately and added to install these drives, see "Installing a Hard Drive" on how to the system. The following describes the available options.
For information on page 37. 11 Peripherals The chassis provides external bays for mounting SCSI hard drives in the hard drive bays. Label A B C D E Description Hard drive bays (6) Flex bay (1) DVD/CD-ROM drive/floppy disk drive module Tape drive Hard disk drive Hot Swappable SCSI Hard Drives The chassis ships with four drive carriers for peripherals that can be purchased separately and added to install these drives, see "Installing a Hard Drive" on how to the system. The following describes the available options.

Altos R700 Chassis Subassembly
Page 20
... to provide a redundant, 1+1 system. System Cooling The chassis includes four 60-mm non-hot-swappable system fans for cooling the processor(s), hard drives, and add-in the middle of power each. The DVD/CD-ROM/FDD module may only be purchased to A second power supply module... 12 1 Chassis Description The SCSI hard drives are mounted in a fan module located in cards. When a drive fails, the SCSI backplane detects the failure, reports it, and powers down the failed drive. For information on installation, see "Installing a DVD drive/FDD or CDROM drive/FDD Module" on page 39. 500...
... to provide a redundant, 1+1 system. System Cooling The chassis includes four 60-mm non-hot-swappable system fans for cooling the processor(s), hard drives, and add-in the middle of power each. The DVD/CD-ROM/FDD module may only be purchased to A second power supply module... 12 1 Chassis Description The SCSI hard drives are mounted in a fan module located in cards. When a drive fails, the SCSI backplane detects the failure, reports it, and powers down the failed drive. For information on installation, see "Installing a DVD drive/FDD or CDROM drive/FDD Module" on page 39. 500...
Altos R700 Chassis Subassembly
Page 35
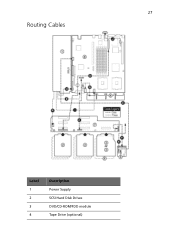
27 Routing Cables Label 1 2 3 4 Description Power Supply SCSI Hard Disk Drives DVD/CD-ROM/FDD module Tape Drive (optional)
27 Routing Cables Label 1 2 3 4 Description Power Supply SCSI Hard Disk Drives DVD/CD-ROM/FDD module Tape Drive (optional)

Altos R700 Chassis Subassembly
Page 43
Note: If you may encounter difficulty removing network cables connected to install PCI add-in cards, hard disk drives, a DVD/CD-ROM drive/floppy disk drive, and a tape drive. Note: If your system and must be purchased separately. PCI add-in the top slot of either the low profile riser or full height riser, ...
Note: If you may encounter difficulty removing network cables connected to install PCI add-in cards, hard disk drives, a DVD/CD-ROM drive/floppy disk drive, and a tape drive. Note: If your system and must be purchased separately. PCI add-in the top slot of either the low profile riser or full height riser, ...
Altos R700 Chassis Subassembly
Page 45
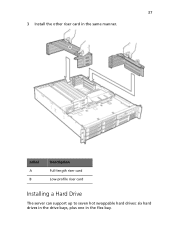
Label A B Description Full-length riser card Low-profile riser card Installing a Hard Drive The server can support up to seven hot swappable hard drives: six hard drives in the drive bays, plus one in the same manner. 37 3 Install the other riser card in the flex bay.
Label A B Description Full-length riser card Low-profile riser card Installing a Hard Drive The server can support up to seven hot swappable hard drives: six hard drives in the drive bays, plus one in the same manner. 37 3 Install the other riser card in the flex bay.
Altos R700 Chassis Subassembly
Page 46
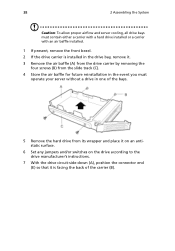
...airflow and server cooling, all drive bays must contain either a carrier with a hard drive installed or a carrier with an air baffle installed. 1 If present, remove the front bezel. 2 If the drive carrier is installed in the drive bay, remove it. 3 Remove the air baffle (A) from the drive carrier by removing the four ... (B) from the slide track (C). 4 Store the air baffle for future reinstallation in the event you must operate your server without a drive in one of the bays. 5 Remove the hard drive from its wrapper and place it on an antistatic surface. 6 Set any jumpers and/or switches on the...
...airflow and server cooling, all drive bays must contain either a carrier with a hard drive installed or a carrier with an air baffle installed. 1 If present, remove the front bezel. 2 If the drive carrier is installed in the drive bay, remove it. 3 Remove the air baffle (A) from the drive carrier by removing the four ... (B) from the slide track (C). 4 Store the air baffle for future reinstallation in the event you must operate your server without a drive in one of the bays. 5 Remove the hard drive from its wrapper and place it on an antistatic surface. 6 Set any jumpers and/or switches on the...
Altos R700 Chassis Subassembly
Page 59
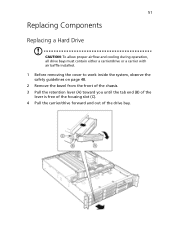
51 Replacing Components Replacing a Hard Drive CAUTION: To allow proper airflow and cooling during operation, all drive bays must contain either a carrier/drive or a carrier with air baffle installed. 1 Before removing the cover to work inside the system, observe the safety guidelines on page 48. 2 Remove the bezel from the front of the chassis. 3 Pull the retention lever (A) toward you until the tab end (B) of the lever is free of the housing slot (C). 4 Pull the carrier/drive forward and out of the drive bay.
51 Replacing Components Replacing a Hard Drive CAUTION: To allow proper airflow and cooling during operation, all drive bays must contain either a carrier/drive or a carrier with air baffle installed. 1 Before removing the cover to work inside the system, observe the safety guidelines on page 48. 2 Remove the bezel from the front of the chassis. 3 Pull the retention lever (A) toward you until the tab end (B) of the lever is free of the housing slot (C). 4 Pull the carrier/drive forward and out of the drive bay.
Altos R700 Chassis Subassembly
Page 60
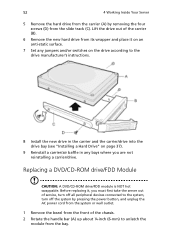
... must first take the server out of the carrier (B). 6 Remove the new hard drive from its wrapper and place it , you are not reinstalling a carrier/drive. 52 4 Working Inside Your Server 5 Remove the hard drive from the carrier (A) by pressing the power button, and unplug the AC power... the chassis. 2 Rotate the handle bar (A) up about ¼-inch (6-mm) to the drive manufacturer's instructions. 8 Install the new drive in the carrier and the carrier/drive into the drive bay (see "Installing a Hard Drive" on page 37). 9 Reinstall a carrier/air baffle in any jumpers and/or switches on ...
... must first take the server out of the carrier (B). 6 Remove the new hard drive from its wrapper and place it , you are not reinstalling a carrier/drive. 52 4 Working Inside Your Server 5 Remove the hard drive from the carrier (A) by pressing the power button, and unplug the AC power... the chassis. 2 Rotate the handle bar (A) up about ¼-inch (6-mm) to the drive manufacturer's instructions. 8 Install the new drive in the carrier and the carrier/drive into the drive bay (see "Installing a Hard Drive" on page 37). 9 Reinstall a carrier/air baffle in any jumpers and/or switches on ...
Altos R700 Chassis Subassembly
Page 70
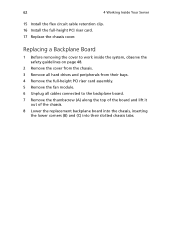
... Board 1 Before removing the cover to work inside the system, observe the safety guidelines on page 48. 2 Remove the cover from the chassis. 3 Remove all hard drives and peripherals from their bays. 4 Remove the full-height PCI riser card assembly. 5 Remove the fan module. 6 Unplug all cables connected to the backplane board...
... Board 1 Before removing the cover to work inside the system, observe the safety guidelines on page 48. 2 Remove the cover from the chassis. 3 Remove all hard drives and peripherals from their bays. 4 Remove the full-height PCI riser card assembly. 5 Remove the fan module. 6 Unplug all cables connected to the backplane board...

Altos R700 Chassis Subassembly
Page 71
63 9 Install and tighten the thumscrew. Replacing a Front Panel Board 1 Before removing the cover to the board. 11 Install the fan module. 12 Install the full-height PCI riser card. 13 Install all hard drives and peripherals in their bays. 14 Install the chassis cover. Caution: Carefully route cables in their original paths to minimize airflow blockage and cooling problems. 10 Connect all cables to work inside the system, observe the safety guidelines on page 48. 2 Remove the cover from the chassis.
63 9 Install and tighten the thumscrew. Replacing a Front Panel Board 1 Before removing the cover to the board. 11 Install the fan module. 12 Install the full-height PCI riser card. 13 Install all hard drives and peripherals in their bays. 14 Install the chassis cover. Caution: Carefully route cables in their original paths to minimize airflow blockage and cooling problems. 10 Connect all cables to work inside the system, observe the safety guidelines on page 48. 2 Remove the cover from the chassis.
Altos R700 Chassis Subassembly
Page 76
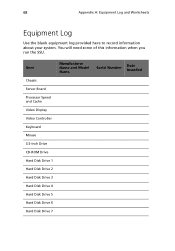
Item Manufacturer Name and Model Name Chassis Server Board Processor Speed and Cache Video Display Video Controller Keyboard Mouse 3.5-inch Drive CD-ROM Drive Hard Disk Drive 1 Hard Disk Drive 2 Hard Disk Drive 3 Hard Disk Drive 4 Hard Disk Drive 5 Hard Disk Drive 6 Hard Disk Drive 7 Serial Number Date Installed You will need some of this information when you run the SSU. 68 Appendix A: Equipment Log and Worksheets Equipment Log Use the blank equipment log provided here to record information about your system.
Item Manufacturer Name and Model Name Chassis Server Board Processor Speed and Cache Video Display Video Controller Keyboard Mouse 3.5-inch Drive CD-ROM Drive Hard Disk Drive 1 Hard Disk Drive 2 Hard Disk Drive 3 Hard Disk Drive 4 Hard Disk Drive 5 Hard Disk Drive 6 Hard Disk Drive 7 Serial Number Date Installed You will need some of this information when you run the SSU. 68 Appendix A: Equipment Log and Worksheets Equipment Log Use the blank equipment log provided here to record information about your system.
Altos R700 Chassis Subassembly
Page 79
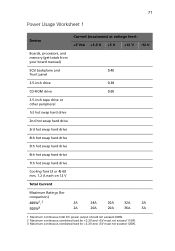
... your board manual) SCSI backplane and 0.40 front panel 3.5-inch drive 0.30 CD-ROM drive 0.60 3.5-inch tape drive or other peripheral 1st hot swap hard drive 2nd hot swap hard drive 3rd hot swap hard drive 4th hot swap hard drive 5th hot swap hard drive 6th hot swap hard drive 7th hot swap hard drive Cooling fans (3 or 4) 60 mm, 1.2 A each on 12 V Total Current...
... your board manual) SCSI backplane and 0.40 front panel 3.5-inch drive 0.30 CD-ROM drive 0.60 3.5-inch tape drive or other peripheral 1st hot swap hard drive 2nd hot swap hard drive 3rd hot swap hard drive 4th hot swap hard drive 5th hot swap hard drive 6th hot swap hard drive 7th hot swap hard drive Cooling fans (3 or 4) 60 mm, 1.2 A each on 12 V Total Current...


