Altos R720 User's Guide
Page 8
... installing the PCI riser board 67 Removing and installing a PCI card 69 Replacing a system fan 72 Upgrading the CPU 74 CPU upgrading guidelines 74 Upgrading the system memory 77 Memory module installation guidelines 77 DDR2 module population order 78 Installing and removing a power supply 81 Removing and installing... 104 Security 119 Server Management 121 Boot Options 125 Boot Manager 128 Error Manager 129 Exit 130 Upgrading the BIOS 132 5 Troubleshooting Troubleshooting Resetting the system Problems following initial system installation 133 135 135 135
... installing the PCI riser board 67 Removing and installing a PCI card 69 Replacing a system fan 72 Upgrading the CPU 74 CPU upgrading guidelines 74 Upgrading the system memory 77 Memory module installation guidelines 77 DDR2 module population order 78 Installing and removing a power supply 81 Removing and installing... 104 Security 119 Server Management 121 Boot Options 125 Boot Manager 128 Error Manager 129 Exit 130 Upgrading the BIOS 132 5 Troubleshooting Troubleshooting Resetting the system Problems following initial system installation 133 135 135 135
Altos R720 User's Guide
Page 45
These sections contain important ESD precautions along with the server throughout any hardware structure or cable that you must replace or upgrade. See the following sections for specific installation instructions on page 37. 5 Follow the ESD precautions described in this section when handling a server component. 6 Remove any ... to it to a metal part of the server before handling components. ESD precautions Electrostatic discharge (ESD) can damage the processor, disk drives, expansion boards, motherboard, memory modules and other server components.
These sections contain important ESD precautions along with the server throughout any hardware structure or cable that you must replace or upgrade. See the following sections for specific installation instructions on page 37. 5 Follow the ESD precautions described in this section when handling a server component. 6 Remove any ... to it to a metal part of the server before handling components. ESD precautions Electrostatic discharge (ESD) can damage the processor, disk drives, expansion boards, motherboard, memory modules and other server components.
Altos R720 User's Guide
Page 52
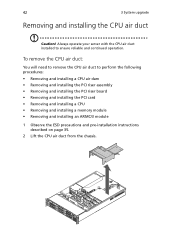
42 3 System upgrade Removing and installing the CPU air duct Caution! Always operate your server with the CPU air duct installed to perform the following procedures: • Removing ... assembly • Removing and installing the PCI riser board • Removing and installing the PCI card • Removing and installing a CPU • Removing and installing a memory module • Removing and installing an ARMC/3 module 1 Observe the ESD precautions and pre-installation instructions described on page 35. 2 Lift the CPU air duct...
42 3 System upgrade Removing and installing the CPU air duct Caution! Always operate your server with the CPU air duct installed to perform the following procedures: • Removing ... assembly • Removing and installing the PCI riser board • Removing and installing the PCI card • Removing and installing a CPU • Removing and installing a memory module • Removing and installing an ARMC/3 module 1 Observe the ESD precautions and pre-installation instructions described on page 35. 2 Lift the CPU air duct...
Altos R720 User's Guide
Page 54
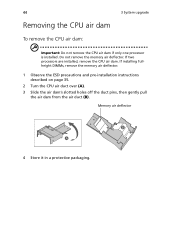
...air dam To remove the CPU air dam: 3 System upgrade Important: Do not remove the CPU air dam if only one processor is installed. If two processors are installed, remove the CPU air dam. If installing fullheight DIMMs, remove the memory air deflector. 1 Observe the ESD precautions and pre-...installation instructions described on page 35. 2 Turn the CPU air duct over (A). 3 Slide the air dam's slotted holes off the duct pins, then gently pull the air dam from the air duct (B). Do not remove the memory air deflector....
...air dam To remove the CPU air dam: 3 System upgrade Important: Do not remove the CPU air dam if only one processor is installed. If two processors are installed, remove the CPU air dam. If installing fullheight DIMMs, remove the memory air deflector. 1 Observe the ESD precautions and pre-...installation instructions described on page 35. 2 Turn the CPU air duct over (A). 3 Slide the air dam's slotted holes off the duct pins, then gently pull the air dam from the air duct (B). Do not remove the memory air deflector....
Altos R720 User's Guide
Page 87
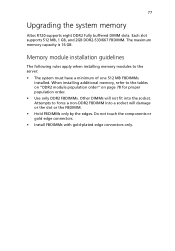
.... • Hold FBDIMMs only by the edges. Attempts to the server: • The system must have a minimum of one 512 MB FBDIMMs installed. 77 Upgrading the system memory Altos R720 supports eight DDR2 fully buffered DIMM slots. Do not touch the components or gold edge connectors. • Install FBDIMMs with gold-plated edge connectors...
.... • Hold FBDIMMs only by the edges. Attempts to the server: • The system must have a minimum of one 512 MB FBDIMMs installed. 77 Upgrading the system memory Altos R720 supports eight DDR2 fully buffered DIMM slots. Do not touch the components or gold edge connectors. • Install FBDIMMs with gold-plated edge connectors...
Altos R720 User's Guide
Page 90
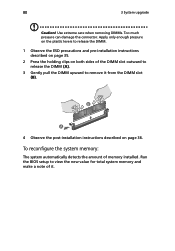
... the DIMM (A). 3 Gently pull the DIMM upward to view the new value for total system memory and make a note of memory installed. To reconfigure the system memory: The system automatically detects the amount of it from the DIMM slot (B). 4 Observe the post...-installation instructions described on page 36. Run the BIOS setup to remove it . Use extreme care when removing DIMMs. Too much pressure can damage the connector. 80 3 System upgrade...
... the DIMM (A). 3 Gently pull the DIMM upward to view the new value for total system memory and make a note of memory installed. To reconfigure the system memory: The system automatically detects the amount of it from the DIMM slot (B). 4 Observe the post...-installation instructions described on page 36. Run the BIOS setup to remove it . Use extreme care when removing DIMMs. Too much pressure can damage the connector. 80 3 System upgrade...
Altos R720 User's Guide
Page 142
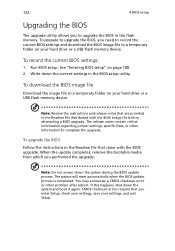
...Review the instructions and release notes that are provided in the flash memory. 132 4 BIOS setup Upgrading the BIOS The upgrade utility allows you to a temporary folder on your hard drive or a USB flash memory device. To upgrade the BIOS: Follow the instructions in the BIOS setup utility. See ..."Entering BIOS setup" on page 100. 2 Write down the current settings in the Readme file that you performed the upgrade. You may encounter a CMOS checksum ...
...Review the instructions and release notes that are provided in the flash memory. 132 4 BIOS setup Upgrading the BIOS The upgrade utility allows you to a temporary folder on your hard drive or a USB flash memory device. To upgrade the BIOS: Follow the instructions in the BIOS setup utility. See ..."Entering BIOS setup" on page 100. 2 Write down the current settings in the Readme file that you performed the upgrade. You may encounter a CMOS checksum ...
Altos R720 User's Guide
Page 145
... to clear the system memory and reload the operating system. Press Ctrl+Alt+Del Reset button Power button Problems following initial system installation Problems that occur at initial system startup are using the latest firmware and files. Resetting the system Before going through in your dealer or local Acer representative for components...
... to clear the system memory and reload the operating system. Press Ctrl+Alt+Del Reset button Power button Problems following initial system installation Problems that occur at initial system startup are using the latest firmware and files. Resetting the system Before going through in your dealer or local Acer representative for components...
Altos R720 User's Guide
Page 184
174 removing 52 L large air baffle installing 47 removing 46 M memory 81 reconfiguring 80 N NIC module installing 86 removing 84 O opening the system 37 installing the ...removing 65 PCI riser board installing 68 removing 68 peripherals 28 power cord 29 power supply installing 82 removing 83 processor upgrade guidelines 74 R rack installing 161 rack installation 155 mounting pattern 160 precautions 157 RAID activation key installing 92 removing ... small air baffle installing 46 removing 45 specification BMC 5 chipset 3 graphic interface 5 I/O ports 5 media storage 3 memory subsystem 3 networking 4
174 removing 52 L large air baffle installing 47 removing 46 M memory 81 reconfiguring 80 N NIC module installing 86 removing 84 O opening the system 37 installing the ...removing 65 PCI riser board installing 68 removing 68 peripherals 28 power cord 29 power supply installing 82 removing 83 processor upgrade guidelines 74 R rack installing 161 rack installation 155 mounting pattern 160 precautions 157 RAID activation key installing 92 removing ... small air baffle installing 46 removing 45 specification BMC 5 chipset 3 graphic interface 5 I/O ports 5 media storage 3 memory subsystem 3 networking 4

Altos R720 User's Guide
Page 185
...plane board SAS mid-plane board 21 system diagnostic LEDs 22 system fan replacing 72 system features 3 system jumpers 23 system memory reconfiguring 80 system tour 1 system upgrade 33 ESD precautions 35 installation precautions 35 post-installation instructions 36 preinstallation instructions 35 T tape drive installing 60 top cover ... POST error codes 147 problems 138 adapter stopped working 142 cannot connect to a network 141 cannot detect bootable drive 141 cannot detect memory 141 cannot eject DVD/CD tray 140 cannot read DVD/CD 140 controller stopped working 142 DVD/CD drive no light 140 HDD ...
...plane board SAS mid-plane board 21 system diagnostic LEDs 22 system fan replacing 72 system features 3 system jumpers 23 system memory reconfiguring 80 system tour 1 system upgrade 33 ESD precautions 35 installation precautions 35 post-installation instructions 36 preinstallation instructions 35 T tape drive installing 60 top cover ... POST error codes 147 problems 138 adapter stopped working 142 cannot connect to a network 141 cannot detect bootable drive 141 cannot detect memory 141 cannot eject DVD/CD tray 140 cannot read DVD/CD 140 controller stopped working 142 DVD/CD drive no light 140 HDD ...
