Aspire 1350 Service Guide
Page 7
... Keys 17 Hardware Specifications and Configurations 18 Chapter 2 System Utilities 27 BIOS Setup Utility 27 Navigating the BIOS Setup Utility 28 Information 29 Main 30 Advanced 32 Security 33 Boot 37 Exit 38 BIOS Flash Utility 39 System Diagnostic Diskette 39 Chapter 3 Machine Disassembly and Replacement 41 General Information 42 Before You Begin 42 Disassembly Procedure Flowchart 43 Removing the Battery Pack 45 Removing the Memory/MDC (Modem/Bluetooth)/HDD Module 46 Removing the Keyboard/ODD Module/FDD Module...
... Keys 17 Hardware Specifications and Configurations 18 Chapter 2 System Utilities 27 BIOS Setup Utility 27 Navigating the BIOS Setup Utility 28 Information 29 Main 30 Advanced 32 Security 33 Boot 37 Exit 38 BIOS Flash Utility 39 System Diagnostic Diskette 39 Chapter 3 Machine Disassembly and Replacement 41 General Information 42 Before You Begin 42 Disassembly Procedure Flowchart 43 Removing the Battery Pack 45 Removing the Memory/MDC (Modem/Bluetooth)/HDD Module 46 Removing the Keyboard/ODD Module/FDD Module...
Aspire 1350 Service Guide
Page 15
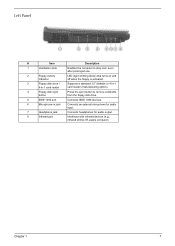
Left Panel # Item Description 1 Ventilation slots Enables the computer to stay cool, even after prolonged use. 2 Floppy activity indicator LED (light emitting diode) that turns on and off when the floppy is activated. 3 Floppy disk drive / Supports a standard 3.5" diskette or 4-in-1 4-in-1 card reader card reader (manufacturing option). 4 Floppy disk eject Press the eject button to remove a diskette button from the floppy disk drive. 5 IEEE 1394 port Connects IEEE 1394 devices. 6 Microphone-in jack Connects an external microphone for audio input. 7 Headphone jack ...
Left Panel # Item Description 1 Ventilation slots Enables the computer to stay cool, even after prolonged use. 2 Floppy activity indicator LED (light emitting diode) that turns on and off when the floppy is activated. 3 Floppy disk drive / Supports a standard 3.5" diskette or 4-in-1 4-in-1 card reader card reader (manufacturing option). 4 Floppy disk eject Press the eject button to remove a diskette button from the floppy disk drive. 5 IEEE 1394 port Connects IEEE 1394 devices. 6 Microphone-in jack Connects an external microphone for audio input. 7 Headphone jack ...
Aspire 1350 Service Guide
Page 17
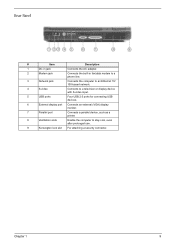
... Panel # Item Description 1 DC-in jack Connects the AC adapter. 2 Modem jack Connects the built-in fax/data modem to a phone line. 3 Network jack Connects the computer to an Ethernet 10/ 100-based network. 4 S-video Connects to a television or display device with S-video input. 5 USB ports Four USB 2.0 ports for connecting USB devices. 6 External display port Connects an external (VGA) display monitor. 7 Parallel port Connects a parallel device, such as a printer. 8 Ventilation slots Enable the computer to stay cool, even after prolonged use. 9 Kensington lock slot...
... Panel # Item Description 1 DC-in jack Connects the AC adapter. 2 Modem jack Connects the built-in fax/data modem to a phone line. 3 Network jack Connects the computer to an Ethernet 10/ 100-based network. 4 S-video Connects to a television or display device with S-video input. 5 USB ports Four USB 2.0 ports for connecting USB devices. 6 External display port Connects an external (VGA) display monitor. 7 Parallel port Connects a parallel device, such as a printer. 8 Ventilation slots Enable the computer to stay cool, even after prolonged use. 9 Kensington lock slot...
Aspire 1350 Service Guide
Page 22
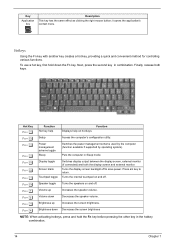
... mouse button; Next, press the second key in Sleep mode. Finally, release both the display screen and external monitor. Turns the internal touchpad on and off . Brightness down Decreases the screen brightness NOTE: When activating hotkeys, press and hold down Decreases the speaker volume. it opens the application's context menu. Power management scheme toggle Sleep Switches the power management scheme used by the computer (function available if supported by operating system). Display toggle Screen blank Touchpad toggle Switches display output between the display screen...
... mouse button; Next, press the second key in Sleep mode. Finally, release both the display screen and external monitor. Turns the internal touchpad on and off . Brightness down Decreases the screen brightness NOTE: When activating hotkeys, press and hold down Decreases the speaker volume. it opens the application's context menu. Power management scheme toggle Sleep Switches the power management scheme used by the computer (function available if supported by operating system). Display toggle Screen blank Touchpad toggle Switches display output between the display screen...
Aspire 1350 Service Guide
Page 26
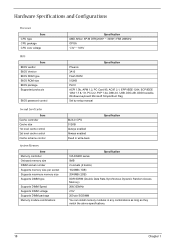
... Supports DIMM package Memory module combinations Specification AMD Athlon XP-M DTR(2000+ ~ 3000+) FSB 266MHz OPGA 1.3V ~ 1.65V Specification Phoenix 3A10 Flash ROM 512KB PLCC ACPI 1.0b, APM 1.2, PC Card 95, AC97 2.1, EPP/IEEE 1284, ECP/IEEE 1284 1.7 & 1.9, PCI 2.2, PnP 1.0a, DMI 2.0, USB, DDC-2B, ODD bootable, Windows keyboard Microsoft Simple Boot Flag Set by setup manual Built-in CPU 512KB Always enabled Always enabled Fixed in write-back Specification Specification...
... Supports DIMM package Memory module combinations Specification AMD Athlon XP-M DTR(2000+ ~ 3000+) FSB 266MHz OPGA 1.3V ~ 1.65V Specification Phoenix 3A10 Flash ROM 512KB PLCC ACPI 1.0b, APM 1.2, PC Card 95, AC97 2.1, EPP/IEEE 1284, ECP/IEEE 1284 1.7 & 1.9, PCI 2.2, PnP 1.0a, DMI 2.0, USB, DDC-2B, ODD bootable, Windows keyboard Microsoft Simple Boot Flag Set by setup manual Built-in CPU 512KB Always enabled Always enabled Fixed in write-back Specification Specification...
Aspire 1350 Service Guide
Page 39
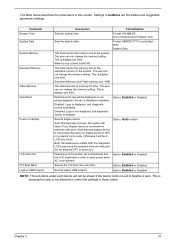
... user can not change the memory setting. Option: Enabled or Disabled Selects display device. If any display device is not allowed to control the settings in this screen. This is because the user is connected on external video port. Parameter System Time System Date System Memory Extended Memory Video Memory Quiet Boot Power on display will be in CRT (or projector) only mode. The user can not change the memory setting. Memory size is connected, the power on display LCD Auto Dim F12 Boot Menu Legacy USB Support Description Format/Option Sets the...
... user can not change the memory setting. Option: Enabled or Disabled Selects display device. If any display device is not allowed to control the settings in this screen. This is because the user is connected on external video port. Parameter System Time System Date System Memory Extended Memory Video Memory Quiet Boot Power on display will be in CRT (or projector) only mode. The user can not change the memory setting. Memory size is connected, the power on display LCD Auto Dim F12 Boot Menu Legacy USB Support Description Format/Option Sets the...
Aspire 1350 Service Guide
Page 42
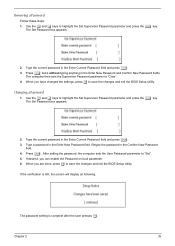
... Supervisor password for changes and should be written on HDD only when Supervisor password or user password is written to set . Press Enter to HDD only when Supervisor password is set , this password protects the BIOS Setup Utility from unauthorized access. Type a password in the "Confirm New Password" field. Retype the password in the "Enter New Password" field. After setting the password, the computer sets the User Password parameter to enable the Password on HDD is being set the user password. The following sub-options are...
... Supervisor password for changes and should be written on HDD only when Supervisor password or user password is written to set . Press Enter to HDD only when Supervisor password is set , this password protects the BIOS Setup Utility from unauthorized access. Type a password in the "Confirm New Password" field. Retype the password in the "Enter New Password" field. After setting the password, the computer sets the User Password parameter to enable the Password on HDD is being set the user password. The following sub-options are...
Aspire 1350 Service Guide
Page 43
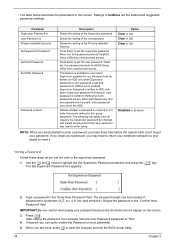
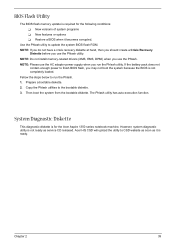
Changing a Password 1. Type a password in the Enter New Password and Confirm New Password fields. The password setting is OK, the screen will display as following. When you have changed the settings, press u to save the changes and exit the BIOS Setup Utility. Use the w and y keys to "Clear". 4. When you are done, press u to save the changes and exit the BIOS Setup Utility. If the verification is complete after the user presses u. The computer then sets the Supervisor Password parameter...
Changing a Password 1. Type a password in the Enter New Password and Confirm New Password fields. The password setting is OK, the screen will display as following. When you have changed the settings, press u to save the changes and exit the BIOS Setup Utility. Use the w and y keys to "Clear". 4. When you are done, press u to save the changes and exit the BIOS Setup Utility. If the verification is complete after the user presses u. The computer then sets the Supervisor Password parameter...
Aspire 1350 Service Guide
Page 47
... T New features or options T Restore a BIOS when it is ready. Chapter 2 39 Copy the Phlash utilities to update the system BIOS flash ROM. However, system diagnostic utility is not ready as it becomes corrupted. BIOS Flash Utility The BIOS flash memory update is required for the Acer Aspire 1350 series notebook machine. NOTE: If you do not have a crisis recovery diskette at hand, then you should create a Crisis Recovery Diskette before you may not boot the...
... T New features or options T Restore a BIOS when it is ready. Chapter 2 39 Copy the Phlash utilities to update the system BIOS flash ROM. However, system diagnostic utility is not ready as it becomes corrupted. BIOS Flash Utility The BIOS flash memory update is required for the Acer Aspire 1350 series notebook machine. NOTE: If you do not have a crisis recovery diskette at hand, then you should create a Crisis Recovery Diskette before you may not boot the...
Aspire 1350 Service Guide
Page 74
... Windows XP operating system, hold and press the power switch for more than 4 seconds. Keyboard (if the brightness function key doesn't work ). LCD cable LCD inverter LCD Main board Enter BIOS Utility to running "Load Default Settings" then reboot the system. See "Power System Check" on . LCD cable LCD inverter LCD Main board Reconnect the LCD cable LCD cable LCD Main board Indicator-Related Symptoms Symptom / Error Indicator incorrectly remains off or on, but system Main board runs correctly HDD/CD-ROM active indicators cannot work LCD is too dark LCD brightness cannot be adjusted...
... Windows XP operating system, hold and press the power switch for more than 4 seconds. Keyboard (if the brightness function key doesn't work ). LCD cable LCD inverter LCD Main board Enter BIOS Utility to running "Load Default Settings" then reboot the system. See "Power System Check" on . LCD cable LCD inverter LCD Main board Reconnect the LCD cable LCD cable LCD Main board Indicator-Related Symptoms Symptom / Error Indicator incorrectly remains off or on, but system Main board runs correctly HDD/CD-ROM active indicators cannot work LCD is too dark LCD brightness cannot be adjusted...
Aspire 1350 Service Guide
Page 75
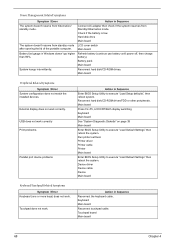
... case Main board Chapter 4 67 RAM module Main board Check BIOS revision Reinsert DIMM DIMM Main board Speaker-Related Symptoms Symptom / Error In Windows, multimedia programs, no sound. Battery pack Main board ODD/HDD/FDD/RAM module Main board PCMCIA-Related Symptoms Symptom / Error System cannot detect the PC Card (PCMCIA) PCMCIA slot pin is blank. Action in Sequence Power option in Windows XP Hard disk drive Main board Driver of the portable computer. Internal speakers make noise...
... case Main board Chapter 4 67 RAM module Main board Check BIOS revision Reinsert DIMM DIMM Main board Speaker-Related Symptoms Symptom / Error In Windows, multimedia programs, no sound. Battery pack Main board ODD/HDD/FDD/RAM module Main board PCMCIA-Related Symptoms Symptom / Error System cannot detect the PC Card (PCMCIA) PCMCIA slot pin is blank. Action in Sequence Power option in Windows XP Hard disk drive Main board Driver of the portable computer. Internal speakers make noise...
Aspire 1350 Service Guide
Page 76
...Error System configuration does not match the installed devices. USB does not work . Reconnect hard disk/CD-ROM drives/FDD or other peripherals. Main board Press Fn+F5, LCD/CRT/Both display switching Keyboard Main board See "System Diagnostic Diskette" on page 39 Main board Enter BIOS Setup Utility to execute "Load Default Settings" then reboot the system. Touchpad does not work correctly. Touchpad board Main board 68 Chapter 4 Refresh battery (continue use battery until power off, then charge battery). External display does not work . Action in Sequence Enter BIOS Setup...
...Error System configuration does not match the installed devices. USB does not work . Reconnect hard disk/CD-ROM drives/FDD or other peripherals. Main board Press Fn+F5, LCD/CRT/Both display switching Keyboard Main board See "System Diagnostic Diskette" on page 39 Main board Enter BIOS Setup Utility to execute "Load Default Settings" then reboot the system. Touchpad does not work correctly. Touchpad board Main board 68 Chapter 4 Refresh battery (continue use battery until power off, then charge battery). External display does not work . Action in Sequence Enter BIOS Setup...
Aspire 1350 Service Guide
Page 78
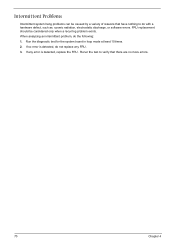
... Problems Intermittent system hang problems can be considered only when a recurring problem exists. If any FRU. 3. FRU replacement should be caused by a variety of reasons that there are no error is detected, replace the FRU. When analyzing an intermittent problem, do not replace any error is detected, do the following: 1. Run the diagnostic test for the system board in loop mode...
... Problems Intermittent system hang problems can be considered only when a recurring problem exists. If any FRU. 3. FRU replacement should be caused by a variety of reasons that there are no error is detected, replace the FRU. When analyzing an intermittent problem, do not replace any error is detected, do the following: 1. Run the diagnostic test for the system board in loop mode...
Aspire 1350 User Guide
Page 15
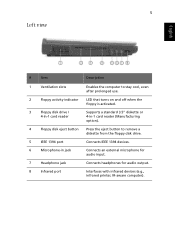
... slots Enables the computer to stay cool, even after prolonged use. 2 Floppy activity indicator LED that turns on and off when the floppy is activated. 3 Floppy disk drive / 4-in-1 card reader Supports a standard 3.5" diskette or 4-in-1 card reader (Manufacturing option). 4 Floppy disk eject button Press the eject button to remove a diskette from the floppy disk drive. 5 IEEE 1394 port Connects IEEE 1394 devices. 6 Microphone-in jack Connects an external microphone for audio input. 7 Headphone jack Connects headphones for audio output. 8 Infrared port Interfaces...
... slots Enables the computer to stay cool, even after prolonged use. 2 Floppy activity indicator LED that turns on and off when the floppy is activated. 3 Floppy disk drive / 4-in-1 card reader Supports a standard 3.5" diskette or 4-in-1 card reader (Manufacturing option). 4 Floppy disk eject button Press the eject button to remove a diskette from the floppy disk drive. 5 IEEE 1394 port Connects IEEE 1394 devices. 6 Microphone-in jack Connects an external microphone for audio input. 7 Headphone jack Connects headphones for audio output. 8 Infrared port Interfaces...
Aspire 1350 User Guide
Page 17
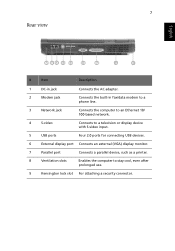
... 1 DC-in jack Connects the AC adapter. 2 Modem jack Connects the built-in fax/data modem to a phone line. 3 Network jack Connects the computer to an Ethernet 10/ 100-based network. 4 S-video Connects to a television or display device with S-video input. 5 USB ports Four 2.0 ports for connecting USB devices. 6 External display port Connects an external (VGA) display monitor. 7 Parallel port Connects a parallel device, such as a printer. 8 Ventilation slots Enables the computer to stay cool, even after prolonged use. 9 Kensington lock slot For attaching a security...
... 1 DC-in jack Connects the AC adapter. 2 Modem jack Connects the built-in fax/data modem to a phone line. 3 Network jack Connects the computer to an Ethernet 10/ 100-based network. 4 S-video Connects to a television or display device with S-video input. 5 USB ports Four 2.0 ports for connecting USB devices. 6 External display port Connects an external (VGA) display monitor. 7 Parallel port Connects a parallel device, such as a printer. 8 Ventilation slots Enables the computer to stay cool, even after prolonged use. 9 Kensington lock slot For attaching a security...
Aspire 1350 User Guide
Page 47
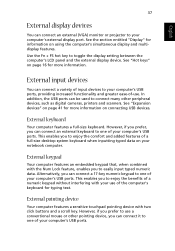
... an embedded keypad that, when combined with two click buttons and a scroll key. English English 37 External display devices You can connect an external (VGA) monitor or projector to your computer's USB ports, providing increased functionality and greater ease-of-use. Use the Fn + F5 hot key to toggle the display setting between the computer's LCD panel and the external display device. See "Expansion devices" on page 41 for information on page 16 for...
... an embedded keypad that, when combined with two click buttons and a scroll key. English English 37 External display devices You can connect an external (VGA) monitor or projector to your computer's USB ports, providing increased functionality and greater ease-of-use. Use the Fn + F5 hot key to toggle the display setting between the computer's LCD panel and the external display device. See "Expansion devices" on page 41 for information on page 16 for...
Aspire 1350 User Guide
Page 50
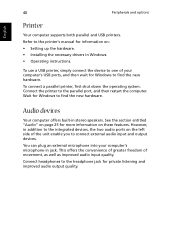
Refer to the printer's manual for information on: • Setting up the hardware. • Installing the necessary drivers in stereo speakers. To use a USB printer, simply connect the device to the integrated devices, the two audio ports on these features. Audio devices Your computer offers built-in Windows. • Operating instructions. This offers the convenience of greater freedom of your computer's microphone-in addition to one of movement, as...
Refer to the printer's manual for information on: • Setting up the hardware. • Installing the necessary drivers in stereo speakers. To use a USB printer, simply connect the device to the integrated devices, the two audio ports on these features. Audio devices Your computer offers built-in Windows. • Operating instructions. This offers the convenience of greater freedom of your computer's microphone-in addition to one of movement, as...
Aspire 1350 User Guide
Page 71
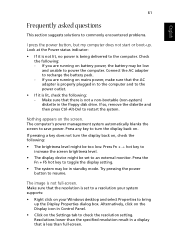
Connect the AC adapter to an external monitor. If pressing a key does not turn the display back on. The image is lit, check the following: - Press Fn + → hot key to increase the screen brightness level. • The display device might be in standby mode. Press the Fn + F5 hot key to resume. Try pressing the power button to toggle the display setting. • The system may be set to a resolution your...
Connect the AC adapter to an external monitor. If pressing a key does not turn the display back on. The image is lit, check the following: - Press Fn + → hot key to increase the screen brightness level. • The display device might be in standby mode. Press the Fn + F5 hot key to resume. Try pressing the power button to toggle the display setting. • The system may be set to a resolution your...
Aspire 1350 User Guide
Page 73
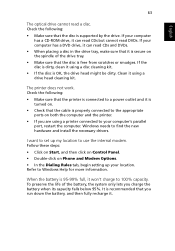
... the following : • Make sure that the disc is secure on Phone and Modem Options. • In the Dialing Rules tab, begin setting up my location to your computer has a CD-ROM drive, it using a printer connected to use the internal modem. Windows needs to Windows Help for more information. Refer to find the new hardware and install the necessary drivers. It is OK, the drive head might be...
... the following : • Make sure that the disc is secure on Phone and Modem Options. • In the Dialing Rules tab, begin setting up my location to your computer has a CD-ROM drive, it using a printer connected to use the internal modem. Windows needs to Windows Help for more information. Refer to find the new hardware and install the necessary drivers. It is OK, the drive head might be...
Aspire 1350 User Guide
Page 92
... connecting externally 37 L launch keys 20 left view 5 M memory compartment 8 installing 44 upgrade slot 8 upgrading 44 microphone troubleshooting 62 modem setting location 63 mouse connecting externally 37 N notice DVD copyright protection 78 num lock 13 on indicator 11 numeric keypad embedded 14 O optical drive 21 options hard disk upgrade 45 memory upgrade 44 PC Cards 41 spare AC adapter 43 spare battery 43 P palm rest 17 password 26 PC Card inserting 41 removing 42 ports external display 7 parallel 7 USB 5, 7 power management 33 Index printer connecting 40 troubleshooting 63 problems...
... connecting externally 37 L launch keys 20 left view 5 M memory compartment 8 installing 44 upgrade slot 8 upgrading 44 microphone troubleshooting 62 modem setting location 63 mouse connecting externally 37 N notice DVD copyright protection 78 num lock 13 on indicator 11 numeric keypad embedded 14 O optical drive 21 options hard disk upgrade 45 memory upgrade 44 PC Cards 41 spare AC adapter 43 spare battery 43 P palm rest 17 password 26 PC Card inserting 41 removing 42 ports external display 7 parallel 7 USB 5, 7 power management 33 Index printer connecting 40 troubleshooting 63 problems...


