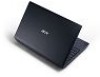
Quick Start Guide
Page 5
... a set of guides: First off, the setup poster helps you for making an Acer notebook your choice for your notebook. Such instances are only contained in certain models of your new computer. It covers basic topics such as system utilities, data recovery, expansion options and troubleshooting. In addition it : 1 Click on Start > All Programs > AcerSystem. 2 Click on how your computer can help you use Adobe Reader, access the...
... a set of guides: First off, the setup poster helps you for making an Acer notebook your choice for your notebook. Such instances are only contained in certain models of your new computer. It covers basic topics such as system utilities, data recovery, expansion options and troubleshooting. In addition it : 1 Click on Start > All Programs > AcerSystem. 2 Click on how your computer can help you use Adobe Reader, access the...

Quick Start Guide
Page 7
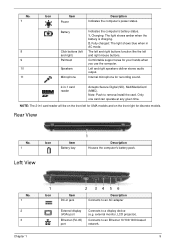
.... Indicates the computer's power status. Delivers audio output. Accepts Secure Digital (SD), MultiMediaCard (MMC). Indicates when the hard disk drive is charging. 2. Battery indicator Click buttons (left and right mouse buttons. Internal microphone for sound recording. Touch-sensitive pointing device which functions like the left and right) Touchpad Speaker Microphone 2-in AC mode. Communication indicator Power button / indicator Keyboard Power indicator Indicates the computer's wireless connectivity device status. 5 English # Icon 2 3 4 5 6 7 8 9 10 Item Display screen HDD...
.... Indicates the computer's power status. Delivers audio output. Accepts Secure Digital (SD), MultiMediaCard (MMC). Indicates when the hard disk drive is charging. 2. Battery indicator Click buttons (left and right mouse buttons. Internal microphone for sound recording. Touch-sensitive pointing device which functions like the left and right) Touchpad Speaker Microphone 2-in AC mode. Communication indicator Power button / indicator Keyboard Power indicator Indicates the computer's wireless connectivity device status. 5 English # Icon 2 3 4 5 6 7 8 9 10 Item Display screen HDD...

Quick Start Guide
Page 8
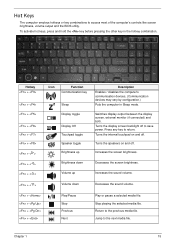
... off to save power. Return to access most of the computer's controls like screen brightness and volume output. Hotkey Icon + + Function Description Communication Enables/disables the computer's communication devices. Increases the sound volume. + < > Volume down Volume up Increases the screen brightness. + < > + < > Brightness down Decreases the sound volume. + + + + Play/Pause Stop Previous Next Play or pause a selected media file. English 6 Hotkeys The computer employs hotkeys or key combinations to the previous media file. Sleep Puts the computer...
... off to save power. Return to access most of the computer's controls like screen brightness and volume output. Hotkey Icon + + Function Description Communication Enables/disables the computer's communication devices. Increases the sound volume. + < > Volume down Volume up Increases the screen brightness. + < > + < > Brightness down Decreases the sound volume. + + + + Play/Pause Stop Previous Next Play or pause a selected media file. English 6 Hotkeys The computer employs hotkeys or key combinations to the previous media file. Sleep Puts the computer...
Service Guide
Page 7
... 11 Indicators 11 Touchpad Basics 12 Using the Keyboard 13 Lock Keys and embedded numeric keypad 13 Windows Keys 14 Hot Keys 15 Hardware Specifications and Configurations 16 System Utilities 29 BIOS Setup Utility 29 Navigating the BIOS Utility 29 Aspire AS5552/AS5552G BIOS 30 Information 30 Main 31 Security 32 Boot 35 Exit 36 BIOS Flash Utilities 37 DOS Flash Utility 38 WinFlash Utility 40 Remove HDD/BIOS Password Utilities 41 Machine Disassembly and Replacement 45 Disassembly Requirements 45 Pre-disassembly Instructions 46 Disassembly Process 47 External Module...
... 11 Indicators 11 Touchpad Basics 12 Using the Keyboard 13 Lock Keys and embedded numeric keypad 13 Windows Keys 14 Hot Keys 15 Hardware Specifications and Configurations 16 System Utilities 29 BIOS Setup Utility 29 Navigating the BIOS Utility 29 Aspire AS5552/AS5552G BIOS 30 Information 30 Main 31 Security 32 Boot 35 Exit 36 BIOS Flash Utilities 37 DOS Flash Utility 38 WinFlash Utility 40 Remove HDD/BIOS Password Utilities 41 Machine Disassembly and Replacement 45 Disassembly Requirements 45 Pre-disassembly Instructions 46 Disassembly Process 47 External Module...
Service Guide
Page 8
... Contents Removing the Touchpad FFC 70 Removing the Card Reader Board (Discrete Only 71 Removing the USB Board 73 Removing the Bluetooth Module 75 Removing the ODD Connector Board (UMA Only 77 Removing the Mainboard 78 Removing the Thermal Module 82 Removing the CPU 84 Removing the LCD Assembly 85 Removing the DC-IN Assembly 88 LCD Module Disassembly Process 89 LCD Module Disassembly Flowchart 89 Removing the LCD Bezel 90 Removing the Camera Module 91 Removing the Inverter Board (LCD Only 92 Removing the LCD/LED Panel 94 Removing the LCD...
... Contents Removing the Touchpad FFC 70 Removing the Card Reader Board (Discrete Only 71 Removing the USB Board 73 Removing the Bluetooth Module 75 Removing the ODD Connector Board (UMA Only 77 Removing the Mainboard 78 Removing the Thermal Module 82 Removing the CPU 84 Removing the LCD Assembly 85 Removing the DC-IN Assembly 88 LCD Module Disassembly Process 89 LCD Module Disassembly Flowchart 89 Removing the LCD Bezel 90 Removing the Camera Module 91 Removing the Inverter Board (LCD Only 92 Removing the LCD/LED Panel 94 Removing the LCD...

Service Guide
Page 9
... View (UMA 170 Power Board(Discrete 171 Power Board(UMA 172 USB Board 173 Card Reader Board (Discrete only 173 Clearing Password Check and BIOS Recovery 174 Clearing Password Check 174 Clear CMOS Jumper 174 BIOS Recovery by Crisis Disk 175 FRU (Field Replaceable Unit) List 177 Aspire AS5552/AS5552G Exploded Diagrams 178 Main Assembly 178 Upper Assembly 179 LCD Assembly 180 LED Assembly 181 Aspire AS5552/AS5552G FRU List 182 Screw List 199 Model Definition and Configuration 200 Test Compatible...
... View (UMA 170 Power Board(Discrete 171 Power Board(UMA 172 USB Board 173 Card Reader Board (Discrete only 173 Clearing Password Check and BIOS Recovery 174 Clearing Password Check 174 Clear CMOS Jumper 174 BIOS Recovery by Crisis Disk 175 FRU (Field Replaceable Unit) List 177 Aspire AS5552/AS5552G Exploded Diagrams 178 Main Assembly 178 Upper Assembly 179 LCD Assembly 180 LED Assembly 181 Aspire AS5552/AS5552G FRU List 182 Screw List 199 Model Definition and Configuration 200 Test Compatible...
Service Guide
Page 19
... audio output. Connects to a display device (e.g. Charging: The light shows amber when the battery is charging. 2. Comfortable support area for recording sound. 2-in-1 card reader Accepts Secure Digital (SD), MultiMediaCard (MMC). Internal microphone for your hands when you use the computer. NOTE: The 2-in1 card reader will be on the front left and right mouse buttons. Fully charged: The light shows blue when in jack 2 34 56 Description Connects to an AC adapter External display (VGA) port...
... audio output. Connects to a display device (e.g. Charging: The light shows amber when the battery is charging. 2. Comfortable support area for recording sound. 2-in-1 card reader Accepts Secure Digital (SD), MultiMediaCard (MMC). Internal microphone for your hands when you use the computer. NOTE: The 2-in1 card reader will be on the front left and right mouse buttons. Fully charged: The light shows blue when in jack 2 34 56 Description Connects to an AC adapter External display (VGA) port...
Service Guide
Page 25
...'s controls like screen brightness, volume output and the BIOS utility. Hot Keys The computer employs hotkeys or key combinations to the next media file. Hotkey + + + + + + + < > + < > + < > Icon Function Communication key Sleep Display toggle Display Off Touchpad toggle Speaker toggle Brightness up Increases the sound volume. + < > Volume down Decreases the screen brightness. Turns the internal touchpad on and off to save power. Stop playing the selected media file. Increases the screen brightness. Switches display output between the display screen, external...
...'s controls like screen brightness, volume output and the BIOS utility. Hot Keys The computer employs hotkeys or key combinations to the next media file. Hotkey + + + + + + + < > + < > + < > Icon Function Communication key Sleep Display toggle Display Off Touchpad toggle Speaker toggle Brightness up Increases the sound volume. + < > Volume down Decreases the screen brightness. Turns the internal touchpad on and off to save power. Stop playing the selected media file. Increases the screen brightness. Switches display output between the display screen, external...
Service Guide
Page 27
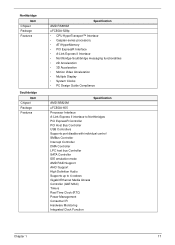
... Guide Compliance Specification AMD SB820M uFCBGA-605 Processor Interface A-Link Express II interface to Northbridges PCI ExpressR Controller PCI Host Bus Controller USB Controllers Supports port disable with individual control SMBus Controller Interrupt Controller DMA Controller LPC host bus Controller SATA Controller IDE emulation mode AMD RAID Support AHCI Support High Definition Audio Supports up to 4 codecs Gigabit Ethernet Media Access Controller (GbE MAC) Timers Real Time Clock (RTC) Power Management Consumer IR Hardware Monitoring Integrated Clock Function...
... Guide Compliance Specification AMD SB820M uFCBGA-605 Processor Interface A-Link Express II interface to Northbridges PCI ExpressR Controller PCI Host Bus Controller USB Controllers Supports port disable with individual control SMBus Controller Interrupt Controller DMA Controller LPC host bus Controller SATA Controller IDE emulation mode AMD RAID Support AHCI Support High Definition Audio Supports up to 4 codecs Gigabit Ethernet Media Access Controller (GbE MAC) Timers Real Time Clock (RTC) Power Management Consumer IR Hardware Monitoring Integrated Clock Function...
Service Guide
Page 37
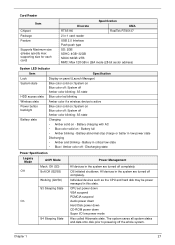
... in the system are turned off completely. Battery charging with AC • Blue color solid on - All devices in low power state Discharging • Amber and blinking - Off (G3) Off Soft Off (G2/S5) Working (G0/S0) S3 Sleeping State On S4 Sleeping State Power Management All devices in LBA mode (28-bit sector address) System LED Indicator Item Specification Lock Display on panel (Launch Manager) System state Blue color...
... in the system are turned off completely. Battery charging with AC • Blue color solid on - All devices in low power state Discharging • Amber and blinking - Off (G3) Off Soft Off (G2/S5) Working (G0/S0) S3 Sleeping State On S4 Sleeping State Power Management All devices in LBA mode (28-bit sector address) System LED Indicator Item Specification Lock Display on panel (Launch Manager) System state Blue color...
Service Guide
Page 40
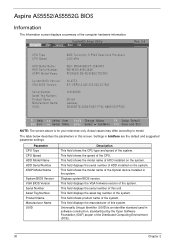
... CPU. Aspire AS5552/AS5552G BIOS Information The Information screen displays a summary of HDD installed on the system. Actual values may differ according to model. The table below describes the parameters in software construction, standardized by the Open Software Foundation (OSF) as part of this screen. Universally Unique Identifier (UUID) is for your reference only. InsydeH20 Setup Utility Information Main Security Boot Exit Rev. 3.5 CPU Type CPU Speed HDD Model Name: HDD Serial Number: ATAPI Model...
... CPU. Aspire AS5552/AS5552G BIOS Information The Information screen displays a summary of HDD installed on the system. Actual values may differ according to model. The table below describes the parameters in software construction, standardized by the Open Software Foundation (OSF) as part of this screen. Universally Unique Identifier (UUID) is for your reference only. InsydeH20 Setup Utility Information Main Security Boot Exit Rev. 3.5 CPU Type CPU Speed HDD Model Name: HDD Serial Number: ATAPI Model...

Service Guide
Page 43
... the Set Supervisor Password parameter and press the Enter key. The password length can opt to enable the Password on the screen. 3. Press Enter. Press Enter twice without typing anything in the "Enter New Password" field. If desired, you have changed the settings, press F10 to save the changes and exit the BIOS Setup Utility. Removing a Password Follow these steps as you are done, press F10 to save the changes and exit the BIOS Setup Utility. Use...
... the Set Supervisor Password parameter and press the Enter key. The password length can opt to enable the Password on the screen. 3. Press Enter. Press Enter twice without typing anything in the "Enter New Password" field. If desired, you have changed the settings, press F10 to save the changes and exit the BIOS Setup Utility. Removing a Password Follow these steps as you are done, press F10 to save the changes and exit the BIOS Setup Utility. Use...

Service Guide
Page 44
... the changes and exit the BIOS Setup Utility. When you can enable the Password on Boot parameter. 6. Setup Warning Invalid Password. [Continue] If the new password and confirm new password strings do not match. Retype the password in the Enter Current Password field and press Enter. 3. Set Supervisor Password Enter Current Password [ ] Enter New Password [ ] Confirm New Password [ ] 2. Setup Notice Changes have been saved. [Continue] The password setting is OK, the screen will display the following . Type the current password in the Confirm New Password field...
... the changes and exit the BIOS Setup Utility. When you can enable the Password on Boot parameter. 6. Setup Warning Invalid Password. [Continue] If the new password and confirm new password strings do not match. Retype the password in the Enter Current Password field and press Enter. 3. Set Supervisor Password Enter Current Password [ ] Enter New Password [ ] Confirm New Password [ ] 2. Setup Notice Changes have been saved. [Continue] The password setting is OK, the screen will display the following . Type the current password in the Confirm New Password field...
Service Guide
Page 46
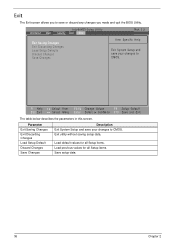
... Exit System Setup and save or discard any changes you made and quit the BIOS Utility. F1 Help ESC Exit Select Item F5/F6 Change Values F9 Setup Default Select Menu Enter Select SubMenu F10 Save and Exit The table below describes the parameters in this screen. Exit utility without saving setup data. Exit The Exit screen allows you to save your changes to CMOS.
... Exit System Setup and save or discard any changes you made and quit the BIOS Utility. F1 Help ESC Exit Select Item F5/F6 Change Values F9 Setup Default Select Menu Enter Select SubMenu F10 Save and Exit The table below describes the parameters in this screen. Exit utility without saving setup data. Exit The Exit screen allows you to save your changes to CMOS.
Service Guide
Page 159
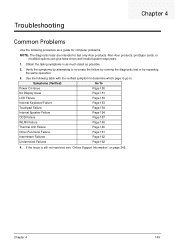
... page 245. Troubleshooting Chapter 4 Common Problems Use the following table with the verified symptom to determine which page to go to. Obtain the failing symptoms in as much detail as a guide for computer problems. NOTE: The diagnostic tests are intended to test only Acer products. Non-Acer products, prototype cards, or modified options can give false errors and invalid system...
... page 245. Troubleshooting Chapter 4 Common Problems Use the following table with the verified symptom to determine which page to go to. Obtain the failing symptoms in as much detail as a guide for computer problems. NOTE: The diagnostic tests are intended to test only Acer products. Non-Acer products, prototype cards, or modified options can give false errors and invalid system...
Service Guide
Page 161
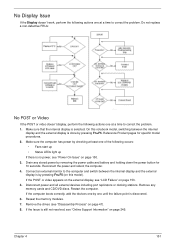
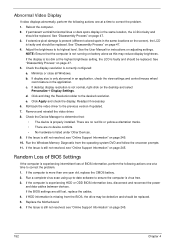
... this model). Connect an external monitor to correct the problem. Disconnect power and all external devices including port replicators or docking stations. If the computer boots correctly, add the devices one by one at a time to the computer and switch between the internal display and the external display is no power, see "Online Support Information" on page 150. 3. Reseat the memory modules. 7. Do not replace a non-defective FRUs: No POST or Video...
... this model). Connect an external monitor to correct the problem. Disconnect power and all external devices including port replicators or docking stations. If the computer boots correctly, add the devices one by one at a time to the computer and switch between the internal display and the external display is no power, see "Online Support Information" on page 150. 3. Reseat the memory modules. 7. Do not replace a non-defective FRUs: No POST or Video...
Service Guide
Page 162
... Support Information" on the screen), the LCD is not normal, right-click on page 47. 3. See "Disassembly Process" on the desktop and select Personalize´ Display Settings. If desktop display resolution is faulty and should be replaced. Run the Windows Memory Diagnostic from the BIOS, the drive may reduce display brightness. If HDD information is properly installed. See "Disassembly Process" on adjusting settings. NOTE: Ensure that : • The device is...
... Support Information" on the screen), the LCD is not normal, right-click on page 47. 3. See "Disassembly Process" on the desktop and select Personalize´ Display Settings. If desktop display resolution is faulty and should be replaced. Run the Windows Memory Diagnostic from the BIOS, the drive may reduce display brightness. If HDD information is properly installed. See "Disassembly Process" on adjusting settings. NOTE: Ensure that : • The device is...
Service Guide
Page 166
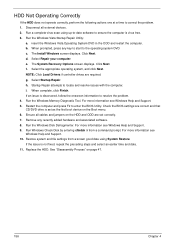
... Recovery Options screen displays. h. i. For more information see Windows Help and Support. 10. Remove any key to start to resolve the problem. 4. If the issue is discovered, follow the onscreen information to the operating system DVD. e. Select the appropriate operating system, and click Next. g. Startup Repair attempts to enter the BIOS Utility. Restart the computer and press F2 to locate and resolve issues with the computer. Check the BIOS settings are set...
... Recovery Options screen displays. h. i. For more information see Windows Help and Support. 10. Remove any key to start to resolve the problem. 4. If the issue is discovered, follow the onscreen information to the operating system DVD. e. Select the appropriate operating system, and click Next. g. Startup Repair attempts to enter the BIOS Utility. Restart the computer and press F2 to locate and resolve issues with the computer. Check the BIOS settings are set...

Service Guide
Page 171
... are no device conflicts. • No hardware is properly installed. Remove any recently added software and reboot. 8. Run the Event Viewer to verify mouse operation. Do not replace a non-defective FRUs: 1. Swap M/B to Try. Chapter 4 161 Restore system and file settings from a known good date using System Restore. Other Failures If the CRT Switch, Dock, LAN Port, external MIC or Speakers, PCI Express Card, 5-in-1 Card Reader or Volume Wheel fail...
... are no device conflicts. • No hardware is properly installed. Remove any recently added software and reboot. 8. Run the Event Viewer to verify mouse operation. Do not replace a non-defective FRUs: 1. Swap M/B to Try. Chapter 4 161 Restore system and file settings from a known good date using System Restore. Other Failures If the CRT Switch, Dock, LAN Port, external MIC or Speakers, PCI Express Card, 5-in-1 Card Reader or Volume Wheel fail...
Service Guide
Page 257
...on indicator 11 CPU Removing 84 Replacing 116 D DIMM Modules Replacing 140 Display 6 display hotkeys 15 Index E EasyTouch Failure 160 External Module Disassembly Flowchart 48 F Features 1 Flash Utility 37 FRU (Field Replaceable Unit) List 177 H Hard Disk Drive Removing 60 Replacing 137 HDTV Switch Failure 161 Hibernation mode hotkey 15 Hot Keys 13 I Indicators 11 Intermittent Problems 162 Internal Microphone Failure 155 Internal Speaker Failure 154 J Jumper and Connector Locations 167 K Keyboard Removing 51 Replacing 145 Keyboard Failure 153 L LCD Bezel Replacing 111 LCD Bracket Replacing 106...
...on indicator 11 CPU Removing 84 Replacing 116 D DIMM Modules Replacing 140 Display 6 display hotkeys 15 Index E EasyTouch Failure 160 External Module Disassembly Flowchart 48 F Features 1 Flash Utility 37 FRU (Field Replaceable Unit) List 177 H Hard Disk Drive Removing 60 Replacing 137 HDTV Switch Failure 161 Hibernation mode hotkey 15 Hot Keys 13 I Indicators 11 Intermittent Problems 162 Internal Microphone Failure 155 Internal Speaker Failure 154 J Jumper and Connector Locations 167 K Keyboard Removing 51 Replacing 145 Keyboard Failure 153 L LCD Bezel Replacing 111 LCD Bracket Replacing 106...


