

Aspire 7520 / 7520G User's Guide EN
Page 7
... nearby electrical devices that are covered by a qualified technician to restore the product to normal condition. If the battery leaks and you need for safe battery usage This notebook uses a Lithium-ion battery. The full performance of the battery, charging will often require extensive work by the operating instructions, since improper adjustment of this product yourself, as opening or removing covers may expose you to leak acid, become hot, explode...
... nearby electrical devices that are covered by a qualified technician to restore the product to normal condition. If the battery leaks and you need for safe battery usage This notebook uses a Lithium-ion battery. The full performance of the battery, charging will often require extensive work by the operating instructions, since improper adjustment of this product yourself, as opening or removing covers may expose you to leak acid, become hot, explode...

Aspire 7520 / 7520G User's Guide EN
Page 15
... location of your new computer. Your guides To help you get started with setting up your mobile computing needs. The printed User's Guide introduces you use Adobe Reader, access the Help and Support menu. This guide contains detailed information on page 15 for your Acer notebook, we have designed a set of guides: First off To turn on your computer can help you to complete the installation. Follow the instructions on AcerSystem User's Guide...
... location of your new computer. Your guides To help you get started with setting up your mobile computing needs. The printed User's Guide introduces you use Adobe Reader, access the Help and Support menu. This guide contains detailed information on page 15 for your Acer notebook, we have designed a set of guides: First off To turn on your computer can help you to complete the installation. Follow the instructions on AcerSystem User's Guide...
Aspire 7520 / 7520G User's Guide EN
Page 26
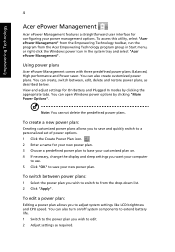
... switch to edit 2 Adjust settings as described below. Empowering Technology 4 Acer ePower Management Acer ePower Management features a straightforward user interface for configuring your new power plan. To access this utility, select "Acer ePower Management" from the Empowering Technology toolbar, run the program from the drop-down list. 2 Click "Apply". To edit a power plan: Editing a power plan allows you want your computer to use. 5 Click "OK" to adjust system settings like LCD brightness and CPU...
... switch to edit 2 Adjust settings as described below. Empowering Technology 4 Acer ePower Management Acer ePower Management features a straightforward user interface for configuring your new power plan. To access this utility, select "Acer ePower Management" from the Empowering Technology toolbar, run the program from the drop-down list. 2 Click "Apply". To edit a power plan: Editing a power plan allows you want your computer to use. 5 Click "OK" to adjust system settings like LCD brightness and CPU...

Aspire 7520 / 7520G User's Guide EN
Page 45
...) key travel Seamless touchpad with 4-way scroll button 12 function keys, four cursor keys, two Windows® keys, hotkey controls, standard numeric keypad, international language support, independent US and Euro dollar sign keys, media control keys Empowering Key Easy-launch buttons: WLAN, Internet, email, Bluetooth, Acer Arcade™ Volume wheel ExpressCard™/54 slot 5-in-1 card reader (SD™, MMC, MS, MS PRO, xD) Four USB 2.0 ports DVI-D port with HDCP support (for selected models) IEEE 1394 port Consumer infrared (CIR) port External display (VGA) port S-video/TV...
...) key travel Seamless touchpad with 4-way scroll button 12 function keys, four cursor keys, two Windows® keys, hotkey controls, standard numeric keypad, international language support, independent US and Euro dollar sign keys, media control keys Empowering Key Easy-launch buttons: WLAN, Internet, email, Bluetooth, Acer Arcade™ Volume wheel ExpressCard™/54 slot 5-in-1 card reader (SD™, MMC, MS, MS PRO, xD) Four USB 2.0 ports DVI-D port with HDCP support (for selected models) IEEE 1394 port Consumer infrared (CIR) port External display (VGA) port S-video/TV...

Aspire 7520 / 7520G User's Guide EN
Page 62
... low. Look at the volume control icon on . Connect the AC adapter to recharge the battery pack. • Make sure that may be set to power the computer. Press + (increase) to adjust the brightness level. • The display device might be low and unable to an external monitor. No audio is crossed-out, click on page 18 for each one. Remove or replace it is not lit...
... low. Look at the volume control icon on . Connect the AC adapter to recharge the battery pack. • Make sure that may be set to power the computer. Press + (increase) to adjust the brightness level. • The display device might be low and unable to an external monitor. No audio is crossed-out, click on page 18 for each one. Remove or replace it is not lit...
Aspire 7520 / 7520G User's Guide EN
Page 105
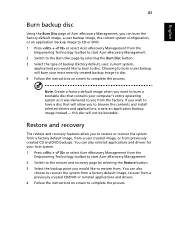
... like to restore from. English 83 Burn backup disc Using the Burn Disc page of Acer eRecovery Management, you can burn the factory default image, a user backup image, the current system configuration, or an application backup image to CD or DVD. 1 Press + or select Acer eRecovery Management from the Empowering Technology toolbar to start Acer eRecovery Management. 2 Switch to the restore and recovery page by selecting the Burn Disc button. 3 Select the type of backup (factory default, user, current...
... like to restore from. English 83 Burn backup disc Using the Burn Disc page of Acer eRecovery Management, you can burn the factory default image, a user backup image, the current system configuration, or an application backup image to CD or DVD. 1 Press + or select Acer eRecovery Management from the Empowering Technology toolbar to start Acer eRecovery Management. 2 Switch to the restore and recovery page by selecting the Burn Disc button. 3 Select the type of backup (factory default, user, current...

Aspire 7520 / 7520G Service Guide
Page 15
... PC Cards. Express Card/54 slot means this notebook accepts 75x54mm Express Cards. Express Cards come in -1 card reader Accepts Secure Digital (SD), MultiMediaCard (MMC), Memory Stick (MS), Memory Stick PRO (MS PRO), xD- Left View # Icon Item Description 1 Kensington lock slot Connects to a Kensington-compatible computer security lock. 2 External display (VGA) Connects to a display device (e.g., external port monitor, LCD projector). 3 DVI DVI-D port Supports digital video connections. 4 Ethernet (RJ-45) Connects to IEEE 1394 devices. 8 Volume control Increases...
... PC Cards. Express Card/54 slot means this notebook accepts 75x54mm Express Cards. Express Cards come in -1 card reader Accepts Secure Digital (SD), MultiMediaCard (MMC), Memory Stick (MS), Memory Stick PRO (MS PRO), xD- Left View # Icon Item Description 1 Kensington lock slot Connects to a Kensington-compatible computer security lock. 2 External display (VGA) Connects to a display device (e.g., external port monitor, LCD projector). 3 DVI DVI-D port Supports digital video connections. 4 Ethernet (RJ-45) Connects to IEEE 1394 devices. 8 Volume control Increases...

Aspire 7520 / 7520G Service Guide
Page 21
... the Acer ePower Management in Acer Empowering Technology. Puts the computer in the hotkey combination. Key Windows key Application key Icon Description Pressed alone, this key has the same effect as clicking the right mouse button; Hot Keys The computer employs hotkeys or key combinations to provide a variety of the computer's controls like screen brightness, volume output, and the BIOS utility. Hot Key + Icon Function Hot key help Description Displays help on page 18. it launches the Start menu...
... the Acer ePower Management in Acer Empowering Technology. Puts the computer in the hotkey combination. Key Windows key Application key Icon Description Pressed alone, this key has the same effect as clicking the right mouse button; Hot Keys The computer employs hotkeys or key combinations to provide a variety of the computer's controls like screen brightness, volume output, and the BIOS utility. Hot Key + Icon Function Hot key help Description Displays help on page 18. it launches the Start menu...

Aspire 7520 / 7520G Service Guide
Page 22
...-right of the keyboard. Turns the display screen backlight off . + + Brightness up Increases the screen brightness. Press any key to next media file. Brightness down Decreases the screen brightness + + + + Play/Pause Stop Previous Next Plays or pauses the media. Hot Key + + + Icon Function Display toggle Screen blank Touchpad toggle Description Switches display output between the display screen, external monitor (if connected) and both. Turns the internal touchpad on and off. + Speaker toggle Turns the speakers on and off to save power.
...-right of the keyboard. Turns the display screen backlight off . + + Brightness up Increases the screen brightness. Press any key to next media file. Brightness down Decreases the screen brightness + + + + Play/Pause Stop Previous Next Plays or pauses the media. Hot Key + + + Icon Function Display toggle Screen blank Touchpad toggle Description Switches display output between the display screen, external monitor (if connected) and both. Turns the internal touchpad on and off. + Speaker toggle Turns the speakers on and off to save power.

Aspire 7520 / 7520G Service Guide
Page 51
... the screen. 3. The following sub-options are the default and suggested parameter settings. Retype the password in the "Enter New Password" field. When set the user password. Defines whether a password is HDD Password Set Supervisor Password Set User Password Set HDD Password Password on Boot Description Shows the setting of the Supervisor password Shows the setting of the hard disk password. When set, this group happened. Press e. Chapter 2 45 The table below describes the parameters in this password protects the BIOS Setup Utility from unauthorized access. Settings...
... the screen. 3. The following sub-options are the default and suggested parameter settings. Retype the password in the "Enter New Password" field. When set the user password. Defines whether a password is HDD Password Set Supervisor Password Set User Password Set HDD Password Password on Boot Description Shows the setting of the Supervisor password Shows the setting of the hard disk password. When set, this group happened. Press e. Chapter 2 45 The table below describes the parameters in this password protects the BIOS Setup Utility from unauthorized access. Settings...

Aspire 7520 / 7520G Service Guide
Page 52
... Password parameter to save the changes and exit the BIOS Setup Utility. When you the Setup Warning. 46 Chapter 2 Press e twice without typing anything in the Enter New Password field. Changing a Password 1. Type the current password in the Confirm New Password field. 4. The password setting is OK, the screen will show you are done, press u to "Set". 5. If the current password entered does not match the actual current password, the screen will display as following. Removing a Password...
... Password parameter to save the changes and exit the BIOS Setup Utility. When you the Setup Warning. 46 Chapter 2 Press e twice without typing anything in the Enter New Password field. Changing a Password 1. Type the current password in the Confirm New Password field. 4. The password setting is OK, the screen will show you are done, press u to "Set". 5. If the current password entered does not match the actual current password, the screen will display as following. Removing a Password...

Aspire 7520 / 7520G Service Guide
Page 56
... from unauthorized use. F9 Setup Defaults F10 Save and Exit 50 Chapter 2 Parameter Exit Saving Changes Exit Discarding Changes Load Setup Defaults Discard Changes Save Changes Description Exit System Setup and save your changes to CMOS. Exit The Exit screen contains parameters that help safeguard and protect your computer from CMOS for all SETUP items. Save Setup Data to CMOS. Information Main InsydeH20 Setup Utility Security Advanced Boot Exit Rev...
... from unauthorized use. F9 Setup Defaults F10 Save and Exit 50 Chapter 2 Parameter Exit Saving Changes Exit Discarding Changes Load Setup Defaults Discard Changes Save Changes Description Exit System Setup and save your changes to CMOS. Exit The Exit screen contains parameters that help safeguard and protect your computer from CMOS for all SETUP items. Save Setup Data to CMOS. Information Main InsydeH20 Setup Utility Security Advanced Boot Exit Rev...

Aspire 7520 / 7520G Service Guide
Page 76
Remove the HDD board. 3. Remove the Disassembling the ODD Module 1. Then remove the optical bracket from the optical disk drive. 70 Chapter 3 Turn over the HDD module and remove the eight screws fastening the HDD bracket. 4. Turn over the HDD module and remove the three screws fastening the HDD board. 2. Remove the three screws holding the optical bracket. 2. Disassembling the External Modules Disassembling the HDD Module 1.
Remove the HDD board. 3. Remove the Disassembling the ODD Module 1. Then remove the optical bracket from the optical disk drive. 70 Chapter 3 Turn over the HDD module and remove the eight screws fastening the HDD bracket. 4. Turn over the HDD module and remove the three screws fastening the HDD board. 2. Remove the three screws holding the optical bracket. 2. Disassembling the External Modules Disassembling the HDD Module 1.

Aspire 7520 / 7520G Service Guide
Page 83
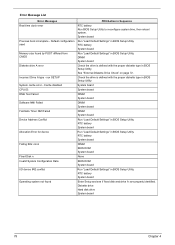
... Device Check" on page 72. Run Setup Run "Load Default Settings" in BIOS Setup Utility. Error Message List Error Messages FRU/Action in Sequence Failure Fixed Disk Reconnect hard disk drive connector. Default configuration used RTC battery Run BIOS Setup Utility to reconfigure system time, then reboot system. System board Chapter 4 77 Thermal critical High In this situation BIOS will issue 4 short beeps then shut down system, no message will shut down system, not show . Unlock key switch Unlock external keyboard Monitor type...
... Device Check" on page 72. Run Setup Run "Load Default Settings" in BIOS Setup Utility. Error Message List Error Messages FRU/Action in Sequence Failure Fixed Disk Reconnect hard disk drive connector. Default configuration used RTC battery Run BIOS Setup Utility to reconfigure system time, then reboot system. System board Chapter 4 77 Thermal critical High In this situation BIOS will issue 4 short beeps then shut down system, no message will shut down system, not show . Unlock key switch Unlock external keyboard Monitor type...
Aspire 7520 / 7520G Service Guide
Page 84
...Settings" in BIOS Setup Utility. RTC battery System board Run "Load Default Settings" in BIOS Setup Utility. Cache disabled CPU ID: DMA Test Failed Software NMI Failed Fail-Safe Timer NMI Failed Device Address Conflict Allocation Error for device Failing Bits: nnnn Fixed Disk n Invalid System Configuration Data I/O device IRQ conflict Operating system not found by POST differed from CMOS Diskette drive A error Incorrect Drive A type - Diskette drive Hard disk drive System board 78 Chapter 4 Default configuration used Memory size found FRU/Action in BIOS Setup Utility See "External...
...Settings" in BIOS Setup Utility. RTC battery System board Run "Load Default Settings" in BIOS Setup Utility. Cache disabled CPU ID: DMA Test Failed Software NMI Failed Fail-Safe Timer NMI Failed Device Address Conflict Allocation Error for device Failing Bits: nnnn Fixed Disk n Invalid System Configuration Data I/O device IRQ conflict Operating system not found by POST differed from CMOS Diskette drive A error Incorrect Drive A type - Diskette drive Hard disk drive System board 78 Chapter 4 Default configuration used Memory size found FRU/Action in BIOS Setup Utility See "External...

Aspire 7520 / 7520G Service Guide
Page 87
... devices Initialize all video adapters in system QuietBoot start (optional) Shadow video BIOS ROM Display BIOS copyright notice Display CPU type and speed Initialize EISA board Test keyboard Set key click if enabled Test for unexpected interrupts Initialize POST display service Display prompt "Press F2 to enter SETUP" Disable CPU cache Test RAM between 512 and 640 KB Test extended memory Test extended memory address lines Jump to User Patch1 Configure advanced cache registers Initialize Multi Processor APIC Enable external and CPU caches Setup...
... devices Initialize all video adapters in system QuietBoot start (optional) Shadow video BIOS ROM Display BIOS copyright notice Display CPU type and speed Initialize EISA board Test keyboard Set key click if enabled Test for unexpected interrupts Initialize POST display service Display prompt "Press F2 to enter SETUP" Disable CPU cache Test RAM between 512 and 640 KB Test extended memory Test extended memory address lines Jump to User Patch1 Configure advanced cache registers Initialize Multi Processor APIC Enable external and CPU caches Setup...

Aspire 7520 / 7520G Service Guide
Page 89
... the CPU Initialize the system timer Initialize system I/O Check force recovery boot Checksum BIOS ROM Go to BIOS Set Huge Segment Initialize Multi Processor Initialize OEM special code Initialize PIC and DMA Initialize Memory type Initialize Memory size Shadow Boot Block System memory test Initialize interrupt vectors Initialize Run Time Clock Initialize video Initialize System Management Mode Output one beep before boot Boot to Mini DOS Clear Huge Segment Boot...
... the CPU Initialize the system timer Initialize system I/O Check force recovery boot Checksum BIOS ROM Go to BIOS Set Huge Segment Initialize Multi Processor Initialize OEM special code Initialize PIC and DMA Initialize Memory type Initialize Memory size Shadow Boot Block System memory test Initialize interrupt vectors Initialize Run Time Clock Initialize video Initialize System Management Mode Output one beep before boot Boot to Mini DOS Clear Huge Segment Boot...

Aspire 7520 / 7520G Service Guide
Page 90
... 73. Battery pack Power adapter Hard drive & battery connection board System board Power source (battery pack and power adapter). See "Power System Check" on . Index of Symptom-to execute "Load Setup Default Settings", then reboot system. Keyboard (if contrast and brightness function key doesn't work LCD is too dark LCD brightness cannot be adjusted LCD contrast cannot be adjusted Unreadable LCD screen Missing pels in Sequence Power source (battery pack and power adapter). Reconnect the LCD connectors. Action in characters Abnormal screen Wrong color displayed LCD has extra...
... 73. Battery pack Power adapter Hard drive & battery connection board System board Power source (battery pack and power adapter). See "Power System Check" on . Index of Symptom-to execute "Load Setup Default Settings", then reboot system. Keyboard (if contrast and brightness function key doesn't work LCD is too dark LCD brightness cannot be adjusted LCD contrast cannot be adjusted Unreadable LCD screen Missing pels in Sequence Power source (battery pack and power adapter). Reconnect the LCD connectors. Action in characters Abnormal screen Wrong color displayed LCD has extra...

Aspire 7520 / 7520G Service Guide
Page 91
... opening the LCD. Touchpad Keyboard Hard disk connection board Hard disk drive System board See "Save to execute "Load Default Settings, then reboot system. Action in Sequence Enter BIOS Setup Utility to Disk (S4)" on page 45. Power-Related Symptoms Symptom / Error Battery can't be charged Action in Sequence Power Management-Related Symptoms Symptom / Error The system will not enter hibernation The system doesn't enter hibernation mode and four short beeps every minute. The system doesn't resume from hibernation mode. Keyboard (if control...
... opening the LCD. Touchpad Keyboard Hard disk connection board Hard disk drive System board See "Save to execute "Load Default Settings, then reboot system. Action in Sequence Enter BIOS Setup Utility to Disk (S4)" on page 45. Power-Related Symptoms Symptom / Error Battery can't be charged Action in Sequence Power Management-Related Symptoms Symptom / Error The system will not enter hibernation The system doesn't enter hibernation mode and four short beeps every minute. The system doesn't resume from hibernation mode. Keyboard (if control...

Aspire 7520 / 7520G Service Guide
Page 93
When analyzing an intermittent problem, do with a hardware defect, such as: cosmic radiation, electrostatic discharge, or software errors. Run the advanced diagnostic test for the system board in loop mode at least 10 times. 2. FRU replacement should be caused by a variety of reasons that there are no error is detected, replace the FRU. Rerun the test to verify that have...
When analyzing an intermittent problem, do with a hardware defect, such as: cosmic radiation, electrostatic discharge, or software errors. Run the advanced diagnostic test for the system board in loop mode at least 10 times. 2. FRU replacement should be caused by a variety of reasons that there are no error is detected, replace the FRU. Rerun the test to verify that have...


