
Aspire 7720 / 7720G Service Guide
Page 4
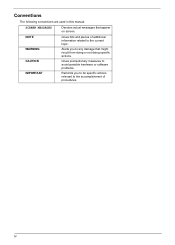
NOTE WARNING CAUTION IMPORTANT Gives bits and pieces of procedures. Gives precautionary measures to avoid possible hardware or software problems. Reminds you to the current topic. IV Conventions The following conventions are used in this manual: SCREEN MESSAGES Denotes actual messages that might result from doing or not doing specific actions. Alerts you to do specific actions relevant to the accomplishment of additional information related to any damage that appear on screen.
NOTE WARNING CAUTION IMPORTANT Gives bits and pieces of procedures. Gives precautionary measures to avoid possible hardware or software problems. Reminds you to the current topic. IV Conventions The following conventions are used in this manual: SCREEN MESSAGES Denotes actual messages that might result from doing or not doing specific actions. Alerts you to do specific actions relevant to the accomplishment of additional information related to any damage that appear on screen.

Aspire 7720 / 7720G Service Guide
Page 13
... of wireless LAN communication. Keyboard Touchpad Scroll button For entering data into your computer. Press up, down, left and right to scroll around your new Aspire computer. Your Acer Notebook Tour After knowing your computer features, let us show you around the screen. 7 Wireless communication Enables/disables the wireless function.
... of wireless LAN communication. Keyboard Touchpad Scroll button For entering data into your computer. Press up, down, left and right to scroll around your new Aspire computer. Your Acer Notebook Tour After knowing your computer features, let us show you around the screen. 7 Wireless communication Enables/disables the wireless function.
Aspire 7720 / 7720G Service Guide
Page 14
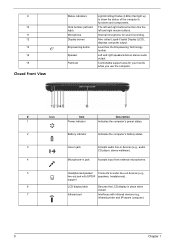
... (LCD), displays computer output. Left and right speakers deliver stereo audio output. The left and right buttons function like the left and right) Microphone Display screen Empowering button Speaker Palmrest Light-Emitting Diodes (LEDs) that light up to audio line-out devices (e.g., line-out jack with infrared devices (e.g. Launches the Empowering...
... (LCD), displays computer output. Left and right speakers deliver stereo audio output. The left and right buttons function like the left and right) Microphone Display screen Empowering button Speaker Palmrest Light-Emitting Diodes (LEDs) that light up to audio line-out devices (e.g., line-out jack with infrared devices (e.g. Launches the Empowering...
Aspire 7720 / 7720G Service Guide
Page 20
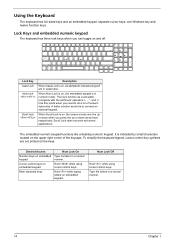
Use this mode when you press the up or down arrow keys respectively. When Scroll Lock is on, the screen moves one Windows key and twelve function keys. Scroll Lock does not work with the arithmetic operators +, -, *, and /). It is on, all alphabetic characters typed ...
Use this mode when you press the up or down arrow keys respectively. When Scroll Lock is on, the screen moves one Windows key and twelve function keys. Scroll Lock does not work with the arithmetic operators +, -, *, and /). It is on, all alphabetic characters typed ...

Aspire 7720 / 7720G Service Guide
Page 21
... as clicking on the Windows Start button; See "Acer Empowering Technology" on hot keys. + Acer eSettings Launches the Acer eSettings in Acer eManager. + + Acer ePower Management Sleep Launches the Acer ePower Management in the hotkey combination. Hot Keys The... computer employs hotkeys or key combinations to provide a variety of the computer's controls like screen brightness, ...
... as clicking on the Windows Start button; See "Acer Empowering Technology" on hot keys. + Acer eSettings Launches the Acer eSettings in Acer eManager. + + Acer ePower Management Sleep Launches the Acer ePower Management in the hotkey combination. Hot Keys The... computer employs hotkeys or key combinations to provide a variety of the computer's controls like screen brightness, ...

Aspire 7720 / 7720G Service Guide
Page 22
... Touchpad toggle Description Switches display output between the display screen, external monitor (if connected) and both. Press any key to previous media file. Stops the media playing. Returns to return. Special Key You can locate ... of the keyboard, or hold and then press the symbol at the upper-center and/or bottom-right of the keyboard. Brightness down Decreases the screen brightness + + + + Play/Pause Stop Previous Next Plays or pauses the media. Jumps to www.microsoft.com/ typography/faq/faq12.htm for more information. 16 Chapter...
... Touchpad toggle Description Switches display output between the display screen, external monitor (if connected) and both. Press any key to previous media file. Stops the media playing. Returns to return. Special Key You can locate ... of the keyboard, or hold and then press the symbol at the upper-center and/or bottom-right of the keyboard. Brightness down Decreases the screen brightness + + + + Play/Pause Stop Previous Next Plays or pauses the media. Jumps to www.microsoft.com/ typography/faq/faq12.htm for more information. 16 Chapter...
Aspire 7720 / 7720G Service Guide
Page 33
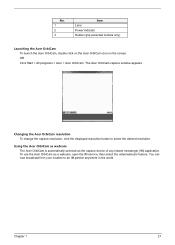
... as the capture device of any instant messenger (IM) application. Chapter 1 27 OR Click Start > All programs > Acer > Acer OrbiCam. Changing the Acer OrbiCam resolution To change the capture resolution, click the displayed resolution button to an IM partner anywhere in the world. You can now broadcast from ...your location to select the desired resolution. No. 1 2 3 Item Lens Power indicator Rubber grip (selected models only) Launching the Acer OrbiCam To launch the Acer OrbiCam, double click on the Acer OrbiCam icon on the screen.
... as the capture device of any instant messenger (IM) application. Chapter 1 27 OR Click Start > All programs > Acer > Acer OrbiCam. Changing the Acer OrbiCam resolution To change the capture resolution, click the displayed resolution button to an IM partner anywhere in the world. You can now broadcast from ...your location to select the desired resolution. No. 1 2 3 Item Lens Power indicator Rubber grip (selected models only) Launching the Acer OrbiCam To launch the Acer OrbiCam, double click on the Acer OrbiCam icon on the screen.

Aspire 7720 / 7720G Service Guide
Page 34
...is connected, then select Start, Control Panel, Display and click on Acer GridVista. AcerGridVista is dual-display compatible, allowing two displays to set up: 1. Run Acer GridVista and select your preferred screen configuration for each window into the appropriate grid. 3. Drag and ...multiple windows on certain models. You may choose any one of a well-organized desktop. 28 Chapter 1 Acer Gridvista is only available on the same screen. Acer GridVista (dual-display compatible) NOTE: This feature is dual-display compatible, allowing two displays to complete the ...
...is connected, then select Start, Control Panel, Display and click on Acer GridVista. AcerGridVista is dual-display compatible, allowing two displays to set up: 1. Run Acer GridVista and select your preferred screen configuration for each window into the appropriate grid. 3. Drag and ...multiple windows on certain models. You may choose any one of a well-organized desktop. 28 Chapter 1 Acer Gridvista is only available on the same screen. Acer GridVista (dual-display compatible) NOTE: This feature is dual-display compatible, allowing two displays to complete the ...

Aspire 7720 / 7720G Service Guide
Page 36
... Program Interface), PC99a and Mobile PC2001 Compliant, Intel Enhanced SpeedStep Technology Set by setup manual NOTE: If you will see PXE version displaying on the screen. Second Level Cache Item Cache controller Cache size 1st level cache control 2st level cache control Cache scheme control Built-in CPU 2MB Always enabled...
... Program Interface), PC99a and Mobile PC2001 Compliant, Intel Enhanced SpeedStep Technology Set by setup manual NOTE: If you will see PXE version displaying on the screen. Second Level Cache Item Cache controller Cache size 1st level cache control 2st level cache control Cache scheme control Built-in CPU 2MB Always enabled...

Aspire 7720 / 7720G Service Guide
Page 45
...xxxxxxxxxxxxxxxxxxxxxx System BIOS Version: V0.18.T04 VGA BIOS Version: ATI Serial Number: Asset Tag Number: Product Name: Manufacturer Name: Acer UUID: xxxxxxxxxxxxxxxxxxxxxxxxxxxxxxxx F1 Help Esc Exit Chapter 2 Select Item Select Menu F5/F6 Change Values Enter Select Sub-Menu F9 Setup ... without entering BIOS Setup Utility, please set to "disabled". Press m to Chapter 4 Troubleshooting when problem arises. The default parameter of screen). To activate the BIOS Utility, press m during POST to enter multi-boot menu. Chapter 2 System Utilities BIOS Setup Utility The BIOS...
...xxxxxxxxxxxxxxxxxxxxxx System BIOS Version: V0.18.T04 VGA BIOS Version: ATI Serial Number: Asset Tag Number: Product Name: Manufacturer Name: Acer UUID: xxxxxxxxxxxxxxxxxxxxxxxxxxxxxxxx F1 Help Esc Exit Chapter 2 Select Item Select Menu F5/F6 Change Values Enter Select Sub-Menu F9 Setup ... without entering BIOS Setup Utility, please set to "disabled". Press m to Chapter 4 Troubleshooting when problem arises. The default parameter of screen). To activate the BIOS Utility, press m during POST to enter multi-boot menu. Chapter 2 System Utilities BIOS Setup Utility The BIOS...
Aspire 7720 / 7720G Service Guide
Page 46
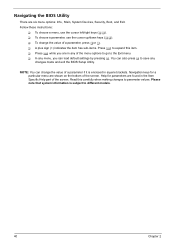
...). T Press ^ while you can load default settings by pressing t. Help for a particular menu are found in the Item Specific Help part of the screen. Please note that system information is subject to save any of a parameter if it is enclosed in square brackets. T To change the value of the... menu options to go to parameter values. Navigation keys for parameters are shown on the bottom of the screen. Read this item. T In any menu, you are six menu options: Info., Main, System Devices, Security, Boot, and Exit. NOTE: You can also press...
...). T Press ^ while you can load default settings by pressing t. Help for a particular menu are found in the Item Specific Help part of the screen. Please note that system information is subject to save any of a parameter if it is enclosed in square brackets. T To change the value of the... menu options to go to parameter values. Navigation keys for parameters are shown on the bottom of the screen. Read this item. T In any menu, you are six menu options: Info., Main, System Devices, Security, Boot, and Exit. NOTE: You can also press...
Aspire 7720 / 7720G Service Guide
Page 48
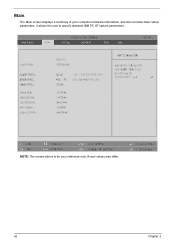
It allows the user to 23. F1 Help Esc Exit Select Item Select Menu F5/F6 Change Values Enter Se lect Sub-Menu NOTE: The screen above is for the hour field. Valid range is the help for your computer hardware information, and also includes basic setup parameters. F9 Se tup ... extended memory size [Enabled] [Enabled] [Disabled] [Enabled] [Disabled] Item Specific Help This is from 0 to specify standard IBM PC AT system parameters. Main The Main screen displays a summary of your reference only.
It allows the user to 23. F1 Help Esc Exit Select Item Select Menu F5/F6 Change Values Enter Se lect Sub-Menu NOTE: The screen above is for the hour field. Valid range is the help for your computer hardware information, and also includes basic setup parameters. F9 Se tup ... extended memory size [Enabled] [Enabled] [Disabled] [Enabled] [Disabled] Item Specific Help This is from 0 to specify standard IBM PC AT system parameters. Main The Main screen displays a summary of your reference only.

Aspire 7720 / 7720G Service Guide
Page 49
... format. Format: HH:MM:SS (hour:minute:second) System Time Sets the system date. Disabled: Customer Logo is not displayed, and Summary Screen is disabled or enabled. Option: Enabled or Disabled Enables, disables the system boot from LAN (remote server). The hours are the default and ...-items under each device will be shown if the device control is disabled. Chapter 2 43 Enabled: Customer Logo is displayed, and Summary Screen is set to factory defaults. Parameter System Time System Date System Memory Total Memory Video Memory Quiet Boot Network Boot F12 Boot Menu D2D...
... format. Format: HH:MM:SS (hour:minute:second) System Time Sets the system date. Disabled: Customer Logo is not displayed, and Summary Screen is disabled or enabled. Option: Enabled or Disabled Enables, disables the system boot from LAN (remote server). The hours are the default and ...-items under each device will be shown if the device control is disabled. Chapter 2 43 Enabled: Customer Logo is displayed, and Summary Screen is set to factory defaults. Parameter System Time System Date System Memory Total Memory Video Memory Quiet Boot Network Boot F12 Boot Menu D2D...
Aspire 7720 / 7720G Service Guide
Page 50
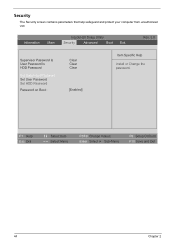
F1 Help Esc Exit Select Item Select Menu F5/F6 Change Values Enter Select Sub-Menu F9 Setup Defaults F10 Save and Exit 44 Chapter 2 Information Main InsydeH20 Setup Utility Security Advanced Boot Exit Rev. 3.0 Supervisor Password Is User Password Is HDD Password Set Supervisor Password Set User Password Set HDD Password Password on Boot : Clear Clear Clear [Enabled] Item Specific Help Install or Change the password. Security The Security screen contains parameters that help safeguard and protect your computer from unauthorized use.
F1 Help Esc Exit Select Item Select Menu F5/F6 Change Values Enter Select Sub-Menu F9 Setup Defaults F10 Save and Exit 44 Chapter 2 Information Main InsydeH20 Setup Utility Security Advanced Boot Exit Rev. 3.0 Supervisor Password Is User Password Is HDD Password Set Supervisor Password Set User Password Set HDD Password Password on Boot : Clear Clear Clear [Enabled] Item Specific Help Install or Change the password. Security The Security screen contains parameters that help safeguard and protect your computer from unauthorized use.

Aspire 7720 / 7720G Service Guide
Page 51
...the setting of the Supervisor password Shows the setting of the user password. The Set Supervisor Password box appears: 2. When you set , this screen. The user can not exceed 8 alphanumeric characters (A-Z, a-z, 0-9, not case sensitive). Option Clear or Set Clear or Set Clear or Set Disabled ... value of parameters. Parameter Supervisor Password is User Password is HDD Password Set Supervisor Password Set User Password Set HDD Password Password on the screen. 3. Retype the password in the "Enter New Password" field. If desired, you can opt to "Set". 4. Settings in boldface ...
...the setting of the Supervisor password Shows the setting of the user password. The Set Supervisor Password box appears: 2. When you set , this screen. The user can not exceed 8 alphanumeric characters (A-Z, a-z, 0-9, not case sensitive). Option Clear or Set Clear or Set Clear or Set Disabled ... value of parameters. Parameter Supervisor Password is User Password is HDD Password Set Supervisor Password Set User Password Set HDD Password Password on the screen. 3. Retype the password in the "Enter New Password" field. If desired, you can opt to "Set". 4. Settings in boldface ...
Aspire 7720 / 7720G Service Guide
Page 52
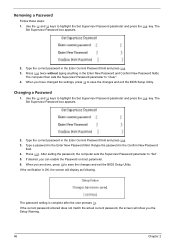
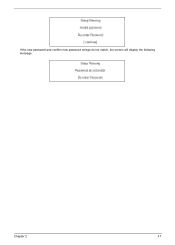
... press the e key. The Set Supervisor Password box appears: 2. Press e. If the verification is complete after the user presses u. The password setting is OK, the screen will show you can enable the Password on boot parameter. 6. Type the current password in the Enter New Password and Confirm New Password fields. Changing... BIOS Setup Utility. Retype the password in the Confirm New Password field. 4. If the current password entered does not match the actual current password, the screen will display as following. When you have changed the settings, press u to "Set". 5.
... press the e key. The Set Supervisor Password box appears: 2. Press e. If the verification is complete after the user presses u. The password setting is OK, the screen will show you can enable the Password on boot parameter. 6. Type the current password in the Enter New Password and Confirm New Password fields. Changing... BIOS Setup Utility. Retype the password in the Confirm New Password field. 4. If the current password entered does not match the actual current password, the screen will display as following. When you have changed the settings, press u to "Set". 5.
Aspire 7720 / 7720G Service Guide
Page 53
If the new password and confirm new password strings do not match, the screen will display the following message. Chapter 2 47
If the new password and confirm new password strings do not match, the screen will display the following message. Chapter 2 47
Aspire 7720 / 7720G Service Guide
Page 54
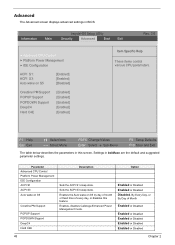
... parameter settings. Settings in BIOS. Option Enabled or Disabled Enabled or Disabled Disabled, By Every Day, or By Day of every day, or disables this screen. Parameter Advanced CPU Control Platform Power Management IDE Configuration ACPI S1 ACPI S3 Auto wake on S5 [Enabled] [Enabled] [Disabled] Crestline PM Support POPUP Support...
... parameter settings. Settings in BIOS. Option Enabled or Disabled Enabled or Disabled Disabled, By Every Day, or By Day of every day, or disables this screen. Parameter Advanced CPU Control Platform Power Management IDE Configuration ACPI S1 ACPI S3 Auto wake on S5 [Enabled] [Enabled] [Disabled] Crestline PM Support POPUP Support...

Aspire 7720 / 7720G Service Guide
Page 56
F1 Help Esc Exit Select Item Select Menu F5/F6 Change Values Enter Select Sub-Menu The table below describes the parameters in this screen. Load default values for all SETUP item. F9 Setup Defaults F10 Save and Exit 50 Chapter 2 Information Main InsydeH20 Setup Utility Security Advanced ... Discard Changes Save Changes Description Exit System Setup and save your changes to CMOS. Load previous values from unauthorized use. Exit The Exit screen contains parameters that help safeguard and protect your computer from CMOS for all SETUP items. Save Setup Data to CMOS.
F1 Help Esc Exit Select Item Select Menu F5/F6 Change Values Enter Select Sub-Menu The table below describes the parameters in this screen. Load default values for all SETUP item. F9 Setup Defaults F10 Save and Exit 50 Chapter 2 Information Main InsydeH20 Setup Utility Security Advanced ... Discard Changes Save Changes Description Exit System Setup and save your changes to CMOS. Load previous values from unauthorized use. Exit The Exit screen contains parameters that help safeguard and protect your computer from CMOS for all SETUP items. Save Setup Data to CMOS.

Aspire 7720 / 7720G Service Guide
Page 77
... test or by repeating the same operation. 3. No beep or error codes are intended to test only Acer products. Symptoms cannot be re-created (intermittent problems). Non-Acer products, prototype cards, or modified options can give false errors and invalid system responses. 1. Go To ... 4 71 POST does not complete. Other symptoms (i.e. Use the following procedure as possible. 2. POST detects an error and displayed messages on screen. Verify the symptoms by attempting to "Power-On Self-Test (POST) Error Message" on page 76 "Intermittent Problems" on page 87 "Undetermined...
... test or by repeating the same operation. 3. No beep or error codes are intended to test only Acer products. Symptoms cannot be re-created (intermittent problems). Non-Acer products, prototype cards, or modified options can give false errors and invalid system responses. 1. Go To ... 4 71 POST does not complete. Other symptoms (i.e. Use the following procedure as possible. 2. POST detects an error and displayed messages on screen. Verify the symptoms by attempting to "Power-On Self-Test (POST) Error Message" on page 76 "Intermittent Problems" on page 87 "Undetermined...

