

User Manual
Page 2
... not be liable for technical or editorial errors or omissions contained in this manual. 2 - © 2015 All Rights Reserved Acer Iconia One 8 User's Manual Covers: B1-820 Regulatory Model Number (RMN): A5001 This revision: April 2015 Sign up for an Acer ID and enjoy great benefits Open the Acer Portal app from the Start screen to sign up for an Acer ID or sign in if you...
... not be liable for technical or editorial errors or omissions contained in this manual. 2 - © 2015 All Rights Reserved Acer Iconia One 8 User's Manual Covers: B1-820 Regulatory Model Number (RMN): A5001 This revision: April 2015 Sign up for an Acer ID and enjoy great benefits Open the Acer Portal app from the Start screen to sign up for an Acer ID or sign in if you...

User Manual
Page 3
... time 6 Charging your tablet 8 Assembling the power adapter 8 Using your tablet 10 Using the touchscreen 10 The Home screen 10 The onscreen keyboard 18 Editing text 19 Shutting down your tablet 21 Connecting devices to your tablet 22 Connecting to AC power 22 Inserting a microSD card 22 Transferring files between your tablet and a PC 22 Connecting a Bluetooth device 23 Accessories 24 Going online 25 Managing Wi-Fi connections 25 Browsing the Internet 25 Setting up the Email application 26 Google services...
... time 6 Charging your tablet 8 Assembling the power adapter 8 Using your tablet 10 Using the touchscreen 10 The Home screen 10 The onscreen keyboard 18 Editing text 19 Shutting down your tablet 21 Connecting devices to your tablet 22 Connecting to AC power 22 Inserting a microSD card 22 Transferring files between your tablet and a PC 22 Connecting a Bluetooth device 23 Accessories 24 Going online 25 Managing Wi-Fi connections 25 Browsing the Internet 25 Setting up the Email application 26 Google services...

User Manual
Page 4
... • USB cable • AC adapter • Warranty card Note Before using your tablet Your new tablet comes packed in touch with your People and social networking APPs. After that you need to charge it for at least four hours. Unpacking your tablet for the first time, you can : • Connect to -access multimedia and entertainment features. You can recharge the battery as needed. Getting started with...
... • USB cable • AC adapter • Warranty card Note Before using your tablet Your new tablet comes packed in touch with your People and social networking APPs. After that you need to charge it for at least four hours. Unpacking your tablet for the first time, you can : • Connect to -access multimedia and entertainment features. You can recharge the battery as needed. Getting started with...
User Manual
Page 5
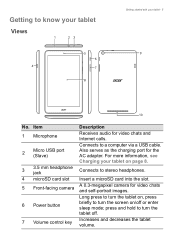
... card slot 5 Front-facing camera 6 Power button 7 Volume control key Description Receives audio for video chats and self-portrait images. A 0.3-megapixel camera for video chats and Internet calls. press and hold to turn the screen on/off . Getting to know your tablet Views 1 23 5 6 4 7 8 Getting started with your tablet on page 8. Connects to stereo headphones. Increases and decreases the tablet volume. Connects to a computer via a USB cable. Also serves as the charging port for the AC adapter...
... card slot 5 Front-facing camera 6 Power button 7 Volume control key Description Receives audio for video chats and self-portrait images. A 0.3-megapixel camera for video chats and Internet calls. press and hold to turn the screen on/off . Getting to know your tablet Views 1 23 5 6 4 7 8 Getting started with your tablet on page 8. Connects to stereo headphones. Increases and decreases the tablet volume. Connects to a computer via a USB cable. Also serves as the charging port for the AC adapter...
User Manual
Page 6
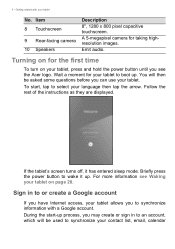
... entered sleep mode. Follow the rest of the instructions as they are displayed. Sign in to an account, which will then be used to synchronize your language then tap the arrow. Emit audio. Turning on for taking highresolution images. If the tablet's screen turns off, it up. Item 8 Touchscreen 9 Rear-facing camera 10 Speakers Description 8", 1280 x 800 pixel capacitive touchscreen. A 5-megapixel camera for the first time To turn...
... entered sleep mode. Follow the rest of the instructions as they are displayed. Sign in to an account, which will then be used to synchronize your language then tap the arrow. Emit audio. Turning on for taking highresolution images. If the tablet's screen turns off, it up. Item 8 Touchscreen 9 Rear-facing camera 10 Speakers Description 8", 1280 x 800 pixel capacitive touchscreen. A 5-megapixel camera for the first time To turn...

User Manual
Page 7
to download APPs from another device with your tablet. If you want to restore existing settings from Google Play; See Multiple Google accounts on your tablet - 7 and other information. to Google servers; If you wait until after setup is complete, your settings to back up your settings will not be restored. If you can access and synchonize them from the Accounts settings section. Getting started with Android 2.0 (or later) installed, you must sign...
to download APPs from another device with your tablet. If you want to restore existing settings from Google Play; See Multiple Google accounts on your tablet - 7 and other information. to Google servers; If you wait until after setup is complete, your settings to back up your settings will not be restored. If you can access and synchonize them from the Accounts settings section. Getting started with Android 2.0 (or later) installed, you must sign...
User Manual
Page 8
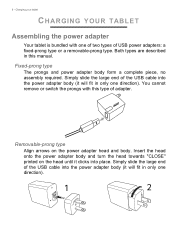
.... Simply slide the large end of the USB cable into the power adapter body (it clicks into the power adapter body (it will fit in this type of USB power adapters: a fixed-prong type or a removable-prong type. You cannot remove or switch the prongs with one direction). Charging your tablet CHARGING YOUR TABLET Assembling the power adapter Your tablet is bundled with this manual. Removable-prong type Align arrows on the head until it will...
.... Simply slide the large end of the USB cable into the power adapter body (it clicks into the power adapter body (it will fit in this type of USB power adapters: a fixed-prong type or a removable-prong type. You cannot remove or switch the prongs with one direction). Charging your tablet CHARGING YOUR TABLET Assembling the power adapter Your tablet is bundled with this manual. Removable-prong type Align arrows on the head until it will...
User Manual
Page 10
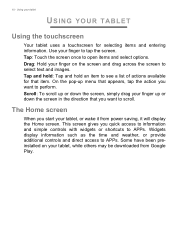
... tablet, while others may be downloaded from power saving, it from Google Play. Using your finger to perform. The Home screen When you start your finger up menu that appears, tap the action you want to open items and select options. This screen gives you want to tap the screen. Some have been preinstalled on the screen and drag across the screen to APPs. Tap: Touch the screen...
... tablet, while others may be downloaded from power saving, it from Google Play. Using your finger to perform. The Home screen When you start your finger up menu that appears, tap the action you want to open items and select options. This screen gives you want to tap the screen. Some have been preinstalled on the screen and drag across the screen to APPs. Tap: Touch the screen...
User Manual
Page 13
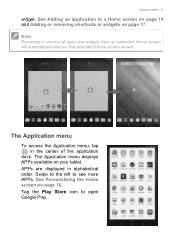
... to open Google Play. See Adding an application to a Home screen on page 14 and Adding or removing shortcuts or widgets on page 16. Note Removing or moving all apps and widgets from an extended Home screen will automatically remove that extended Home screen as well. APPs are displayed in the center of the application dock. The Application menu To access the Application menu, tap in alphabetical order. Using your tablet.
... to open Google Play. See Adding an application to a Home screen on page 14 and Adding or removing shortcuts or widgets on page 16. Note Removing or moving all apps and widgets from an extended Home screen will automatically remove that extended Home screen as well. APPs are displayed in the center of the application dock. The Application menu To access the Application menu, tap in alphabetical order. Using your tablet.
User Manual
Page 14
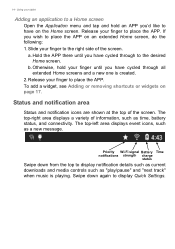
... as time, battery status, and connectivity. Release your finger to the desired Home screen. The top-right area displays a variety of the screen. To add a widget, see Adding or removing shortcuts or widgets on an extended Home screen, do the following: 1. Swipe down from the top to place the APP on page 17. Release your tablet Adding an application to a Home screen Open the Application menu and...
... as time, battery status, and connectivity. Release your finger to the desired Home screen. The top-right area displays a variety of the screen. To add a widget, see Adding or removing shortcuts or widgets on an extended Home screen, do the following: 1. Swipe down from the top to place the APP on page 17. Release your tablet Adding an application to a Home screen Open the Application menu and...

User Manual
Page 16
... to toggle Reading mode on and off (waves indicate signal strength). Tap and hold to adjust the screen's brightness (button always remains green). To adjust the level of time easier on and off . Tap to display location service settings. Reading mode filters blue light from the screen making reading or viewing for long periods of filtering, open the Application menu and tap Settings > Display > Reading mode. Using your device's location services on and...
... to toggle Reading mode on and off (waves indicate signal strength). Tap and hold to adjust the screen's brightness (button always remains green). To adjust the level of time easier on and off . Tap to display location service settings. Reading mode filters blue light from the screen making reading or viewing for long periods of filtering, open the Application menu and tap Settings > Display > Reading mode. Using your device's location services on and...
User Manual
Page 17
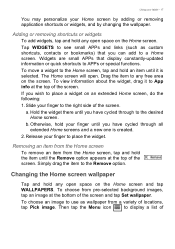
... an image to use as custom shortcuts, contacts or bookmarks) that display constantly-updated information or quick shortcuts to App info at the bottom of locations, tap Pick image. Adding or removing shortcuts or widgets To add widgets, tap and hold your Home screen by adding or removing application shortcuts or widgets, and by changing the wallpaper. To view information about the...
... an image to use as custom shortcuts, contacts or bookmarks) that display constantly-updated information or quick shortcuts to App info at the bottom of locations, tap Pick image. Adding or removing shortcuts or widgets To add widgets, tap and hold your Home screen by adding or removing application shortcuts or widgets, and by changing the wallpaper. To view information about the...

User Manual
Page 19
Changing Google keyboard settings To use a different keyboard language or change settings, open the Application menu and tap Settings. Tap Language & input and under Keyboard & input methods, tap the option you want to modify. In addition, tap Auto correction and select one of the options to see more options. Tap and hold a key to insert it in certain areas. Tap Language & input and under Keyboard & input methods, tap Google Keyboard > Text correction. Tap Show correction...
Changing Google keyboard settings To use a different keyboard language or change settings, open the Application menu and tap Settings. Tap Language & input and under Keyboard & input methods, tap the option you want to modify. In addition, tap Auto correction and select one of the options to see more options. Tap and hold a key to insert it in certain areas. Tap Language & input and under Keyboard & input methods, tap Google Keyboard > Text correction. Tap Show correction...
User Manual
Page 20
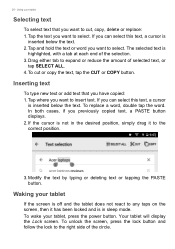
... the text, tap the CUT or COPY button. Using your tablet, press the power button. Tap and hold the text or word you want to select. To replace a word, double tap the word. Modify the text by typing or deleting text or tapping the PASTE button. To unlock the screen, press the lock button and follow the lock to insert text. If the cursor...
... the text, tap the CUT or COPY button. Using your tablet, press the power button. Tap and hold the text or word you want to select. To replace a word, double tap the word. Modify the text by typing or deleting text or tapping the PASTE button. To unlock the screen, press the lock button and follow the lock to insert text. If the cursor...

User Manual
Page 23
... device. 2. After the initial pairing, you can connect your device to a PC using the supplied USB cable. 1. Connecting devices to your tablet - 23 internal memory), you only need to ensure your tablet's Bluetooth is on and the device is on to connect as a Media device (MTP) (the default option) or Camera (PTP). Plug the USB sync cable into an available USB port on your computer's file explorer. Open the Application menu and tap Settings, then under Wireless & networks tap Bluetooth...
... device. 2. After the initial pairing, you can connect your device to a PC using the supplied USB cable. 1. Connecting devices to your tablet - 23 internal memory), you only need to ensure your tablet's Bluetooth is on and the device is on to connect as a Media device (MTP) (the default option) or Camera (PTP). Plug the USB sync cable into an available USB port on your computer's file explorer. Open the Application menu and tap Settings, then under Wireless & networks tap Bluetooth...

User Manual
Page 26
... screen to view emails from most popular email providers. Enter your email address and tap Manual setup to enter the parameters manually or simply tap Next to the internet. 2. Google services Note APPs may add new categories or change how to access email from multiple accounts in two steps. The contents and design of Service. New tab Setting up your tablet is open, tap the small New tab button. Open the Application menu and then tap Email to start setting up the Email...
... screen to view emails from most popular email providers. Enter your email address and tap Manual setup to enter the parameters manually or simply tap Next to the internet. 2. Google services Note APPs may add new categories or change how to access email from multiple accounts in two steps. The contents and design of Service. New tab Setting up your tablet is open, tap the small New tab button. Open the Application menu and then tap Email to start setting up the Email...
User Manual
Page 36
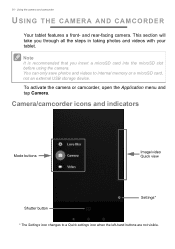
... save photos and videos to a Quick settings icon when the left-hand buttons are not visible. To activate the camera or camcorder, open the Application menu and tap Camera. Using the camera and camcorder USING THE CAMERA AND CAMCORDER Your tablet features a front- and rear-facing camera. Camera/camcorder icons and indicators Mode buttons Image/video Quick view Shutter button Settings* * The Settings icon changes to internal memory or a microSD card, not an external USB storage device. 36 - Note It...
... save photos and videos to a Quick settings icon when the left-hand buttons are not visible. To activate the camera or camcorder, open the Application menu and tap Camera. Using the camera and camcorder USING THE CAMERA AND CAMCORDER Your tablet features a front- and rear-facing camera. Camera/camcorder icons and indicators Mode buttons Image/video Quick view Shutter button Settings* * The Settings icon changes to internal memory or a microSD card, not an external USB storage device. 36 - Note It...
User Manual
Page 45
... minutes, depending on your network speed. Note Downloading new firmware can download and install system updates, adding support for updates, tap APPs > Settings > About tablet > System updates > Check now. Do not press the power or reset button or access your tablet to prevent firmware installation failure. To check for new devices or expanding software options. Resetting your tablet A clean boot restores your tablet in the Application menu and tap . To add or edit alarm settings, tap Clock in any...
... minutes, depending on your network speed. Note Downloading new firmware can download and install system updates, adding support for updates, tap APPs > Settings > About tablet > System updates > Check now. Do not press the power or reset button or access your tablet to prevent firmware installation failure. To check for new devices or expanding software options. Resetting your tablet A clean boot restores your tablet in the Application menu and tap . To add or edit alarm settings, tap Clock in any...

User Manual
Page 48
... the OS version of my device? Device Information. After five wrong entries, you can I forgot my unlock pattern. and enter your unlock pattern. 48 - The battery power may need to delete installed APPs or move media files to memory status? Recharge the device. Settings > Storage. Tap Forgotten pattern? You may be depleted. Where can reset your Google account username Unlock pattern I find check the OS version (Kernel/ build number) and other hardware and software information. How...
... the OS version of my device? Device Information. After five wrong entries, you can I forgot my unlock pattern. and enter your unlock pattern. 48 - The battery power may need to delete installed APPs or move media files to memory status? Recharge the device. Settings > Storage. Tap Forgotten pattern? You may be depleted. Where can reset your Google account username Unlock pattern I find check the OS version (Kernel/ build number) and other hardware and software information. How...

User Manual
Page 54
... the Acer Live Update service, which allows for updates for any authorized copies you are using on your device and may provide upgrades to be protected by applicable law. To use best efforts to prevent any Software for such software to such software that Acer (or its licensors) may automatically check the version of the applicable content owner and may be automatically downloaded on your device...
... the Acer Live Update service, which allows for updates for any authorized copies you are using on your device and may provide upgrades to be protected by applicable law. To use best efforts to prevent any Software for such software to such software that Acer (or its licensors) may automatically check the version of the applicable content owner and may be automatically downloaded on your device...

