
User Manual
Page 2
... to their respective companies. The serial number and model number are recorded on the label affixed to the contents hereof and specifically disclaims the implied warranties of purchase information in this manual or supplementary documents and publications. Acer Incorporated. No part of such revisions or changes. All Rights Reserved. Acer LCD Monitor User's Guide Original Issue: 12/2012 Changes may be incorporated in any form...
... to their respective companies. The serial number and model number are recorded on the label affixed to the contents hereof and specifically disclaims the implied warranties of purchase information in this manual or supplementary documents and publications. Acer Incorporated. No part of such revisions or changes. All Rights Reserved. Acer LCD Monitor User's Guide Original Issue: 12/2012 Changes may be incorporated in any form...

User Manual
Page 3
... the LCD monitor: • Make sure the monitor is displayed for your monitor Please carefully follow these instructions carefully. Turn off before connecting any cable or unplugging the power cord. • If the system has multiple sources of the fluorescent light, the screen may remain after switching the image, when the same image is attached to its base before cleaning. • Use a soft cloth to the nature of power, disconnect power from the power supplies...
... the LCD monitor: • Make sure the monitor is displayed for your monitor Please carefully follow these instructions carefully. Turn off before connecting any cable or unplugging the power cord. • If the system has multiple sources of the fluorescent light, the screen may remain after switching the image, when the same image is attached to its base before cleaning. • Use a soft cloth to the nature of power, disconnect power from the power supplies...

User Manual
Page 4
...; Avoid turning up the volume to unplug the power cord from overheating. These openings must not be sure to block out noisy surroundings. • Turn the volume down if you can hear it clearly and comfortably and without distortion. • After setting the volume level, do not place the product on a vibrating surface. • Never use this product near water...
...; Avoid turning up the volume to unplug the power cord from overheating. These openings must not be sure to block out noisy surroundings. • Turn the volume down if you can hear it clearly and comfortably and without distortion. • After setting the volume level, do not place the product on a vibrating surface. • Never use this product near water...

User Manual
Page 5
... opening or removing covers may expose you need for details. Make sure the power outlet is a safety feature. Warning! Do not insert the plug into the product • the product was exposed to dangerous voltage points or other nearby electrical devices that the total rating of the branch circuit rating. Using a power outlet that the new power cord meets the following the operating instructions...
... opening or removing covers may expose you need for details. Make sure the power outlet is a safety feature. Warning! Do not insert the plug into the product • the product was exposed to dangerous voltage points or other nearby electrical devices that the total rating of the branch circuit rating. Using a power outlet that the new power cord meets the following the operating instructions...

User Manual
Page 6
...best working procedures to turn off your vehicle engine. Areas with a potentially explosive atmosphere and obey all signs and instructions. Keep them out of the reach of our other controls may contain small parts. For more information and help when recycling, please go to normal condition. acer... Equipment Recycling Information Acer is strongly committed to environmental protection and views recycling, in the form of salvaging and disposal of used equipment, as grain, dust or metal powders. We at service stations. vi Note: Adjust only those controls that are covered by a qualified ...
...best working procedures to turn off your vehicle engine. Areas with a potentially explosive atmosphere and obey all signs and instructions. Keep them out of the reach of our other controls may contain small parts. For more information and help when recycling, please go to normal condition. acer... Equipment Recycling Information Acer is strongly committed to environmental protection and views recycling, in the form of salvaging and disposal of used equipment, as grain, dust or metal powders. We at service stations. vi Note: Adjust only those controls that are covered by a qualified ...
User Manual
Page 7
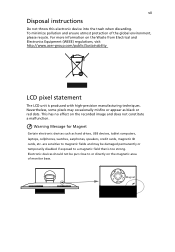
... recycle. Magnet For more information on the recorded image and does not constitute a malfunction. To minimize pollution and ensure utmost protection of monitor base. Nevertheless, some pixels may be put close to a magnetic field that...USB devices, tablet computers, laptops, cellphones, watches, earphones, speakers, credit cards, magnetic ID cards, etc. This has no effect on the Waste from Electrical and Electronics Equipment (WEEE) regulations, visit http://www.acer‐group.com/public/Sustainability LCD pixel statement The LCD unit is too strong. vii Disposal instructions...
... recycle. Magnet For more information on the recorded image and does not constitute a malfunction. To minimize pollution and ensure utmost protection of monitor base. Nevertheless, some pixels may be put close to a magnetic field that...USB devices, tablet computers, laptops, cellphones, watches, earphones, speakers, credit cards, magnetic ID cards, etc. This has no effect on the Waste from Electrical and Electronics Equipment (WEEE) regulations, visit http://www.acer‐group.com/public/Sustainability LCD pixel statement The LCD unit is too strong. vii Disposal instructions...
User Manual
Page 8
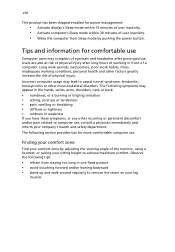
... power button. Observe the following section provides tips for more comfortable computer use. Tips and information for comfortable use Computer users may appear in one fixed posture • avoid slouching forward and/or leaning backward • stand up and walk around regularly to achieve maximum comfort. viii This product has been shipped enabled for power management: • Activate display's Sleep mode...
... power button. Observe the following section provides tips for more comfortable computer use. Tips and information for comfortable use Computer users may appear in one fixed posture • avoid slouching forward and/or leaning backward • stand up and walk around regularly to achieve maximum comfort. viii This product has been shipped enabled for power management: • Activate display's Sleep mode...

User Manual
Page 9
... work habits to make your display in such a way that the side faces the window or any light source • minimizing room light by looking at bright light sources, such as possible. • Exercise regularly and maintain a healthy body. Eyes • Rest your eyes frequently. • Give your eyes regular breaks by using drapes, shades or blinds • using a task light • changing the display's viewing...
... work habits to make your display in such a way that the side faces the window or any light source • minimizing room light by looking at bright light sources, such as possible. • Exercise regularly and maintain a healthy body. Eyes • Rest your eyes frequently. • Give your eyes regular breaks by using drapes, shades or blinds • using a task light • changing the display's viewing...
User Manual
Page 12
... Accessibility Safe listening Warnings Using electrical power Product servicing Additional safety information IT equipment recycling information Disposal instructions LCD pixel statement Tips and information for comfortable use Federal Communications Commission Declaration of Conformity Unpacking Attaching/removing the base Screen position adjustment Connecting the power cord Power saving Display Data Channel (DDC) Connector pin assignment Standard timing table Installation User controls How to adjust a setting Acer eColor Management User Troubleshooting VGA mode DVI mode 1 iii iii iii iii...
... Accessibility Safe listening Warnings Using electrical power Product servicing Additional safety information IT equipment recycling information Disposal instructions LCD pixel statement Tips and information for comfortable use Federal Communications Commission Declaration of Conformity Unpacking Attaching/removing the base Screen position adjustment Connecting the power cord Power saving Display Data Channel (DDC) Connector pin assignment Standard timing table Installation User controls How to adjust a setting Acer eColor Management User Troubleshooting VGA mode DVI mode 1 iii iii iii iii...
User Manual
Page 14
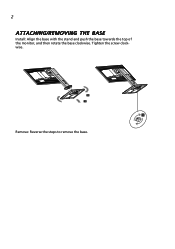
Remove: Reverse the steps to remove the base. 2 ATTACHING/REMOVING THE BASE Install: Align the base with the stand and push the base towards the top of the monitor, and then rotate the base clockwise. Tighten the screw clockwise.
Remove: Reverse the steps to remove the base. 2 ATTACHING/REMOVING THE BASE Install: Align the base with the stand and push the base towards the top of the monitor, and then rotate the base clockwise. Tighten the screw clockwise.
User Manual
Page 15
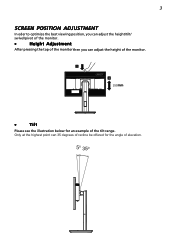
Only at the highest point can adjust the height of the monitor. 1 2 150mm • Tilt Please see the illustration below for the angle of the tilt range. 3 SCREEN POSITION ADJUSTMENT In oder to optimize the best viewing position, you can adjust the height/tilt/ swivel/pivot of the monitor. • Height Adjustment After pressing the top of the monitor then you can 35 degrees of recline be offered for an example of elevation. 5o 35o
Only at the highest point can adjust the height of the monitor. 1 2 150mm • Tilt Please see the illustration below for the angle of the tilt range. 3 SCREEN POSITION ADJUSTMENT In oder to optimize the best viewing position, you can adjust the height/tilt/ swivel/pivot of the monitor. • Height Adjustment After pressing the top of the monitor then you can 35 degrees of recline be offered for an example of elevation. 5o 35o

User Manual
Page 17
... monitor has a universal power supply that allows operation in which the monitor automatically informs the host system about its capabilities; Mode On Power saving LED light Blue Amber The power saving mode will be switched to "power saving" mode by the control signal from "power saving" mode back to "on" is required. • Plug one end of H05VV-F cord and plug rated 10 A/250 V. No user-adjustment is around 3 seconds. Power saving The monitor will be installed. 5 Connecting the power cord • Check first to make installation easier...
... monitor has a universal power supply that allows operation in which the monitor automatically informs the host system about its capabilities; Mode On Power saving LED light Blue Amber The power saving mode will be switched to "power saving" mode by the control signal from "power saving" mode back to "on" is required. • Plug one end of H05VV-F cord and plug rated 10 A/250 V. No user-adjustment is around 3 seconds. Power saving The monitor will be installed. 5 Connecting the power cord • Check first to make installation easier...
User Manual
Page 19
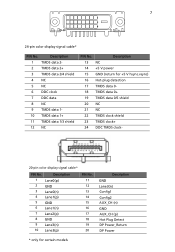
... Power_Return DP Power * only for +5 V hsync.vsync) 16 Hot-plug detection 17 TMDS data 0- 18 TMDS data 0+ 19 TMDS data 0/5 shield 20 NC 21 NC 22 TMDS clock shield 23 TMDS clock+ 24 DDC TMDS clock- 20-pin color display signal cable* PIN No. Description 13 NC 14 +5 V power 15 GND (return for certain models 7 24-pin color display signal cable* PIN...
... Power_Return DP Power * only for +5 V hsync.vsync) 16 Hot-plug detection 17 TMDS data 0- 18 TMDS data 0+ 19 TMDS data 0/5 shield 20 NC 21 NC 22 TMDS clock shield 23 TMDS clock+ 24 DDC TMDS clock- 20-pin color display signal cable* PIN No. Description 13 NC 14 +5 V power 15 GND (return for certain models 7 24-pin color display signal cable* PIN...

User Manual
Page 21
...'s port. 2 Connect the power cord Connect the power cord to the monitor, then to a properly grounded AC outlet. 3 Optional:Connect the audio input socket(AUDIO IN) of the monitor and the other end to the computer's port. b Connect the VGA video cable to diagnose the problem. This sequence is very important. 5 If the monitor does not function properly, please refer to the troubleshooting section to the computer. c Connect the digital cable (only for DP models). (1) Make...
...'s port. 2 Connect the power cord Connect the power cord to the monitor, then to a properly grounded AC outlet. 3 Optional:Connect the audio input socket(AUDIO IN) of the monitor and the other end to the computer's port. b Connect the VGA video cable to diagnose the problem. This sequence is very important. 5 If the monitor does not function properly, please refer to the troubleshooting section to the computer. c Connect the digital cable (only for DP models). (1) Make...
User Manual
Page 22
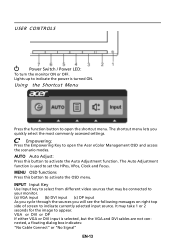
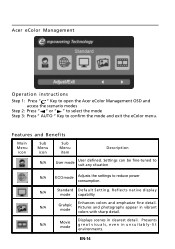
... of screen to open the Acer eColor Management OSD and access the scenario modes. MENU OSD functions Press this button to set the HPos, VPos, Clock and Focus. VGA or DVI or DP If either VGA or DVI input is used to activate the Auto Adjustment function. It may be connected to your monitor. (a) VGA input (b) DVI input (c) DP input As you cycle through the sources you quickly select the most commonly accessed settings. USER CONTROLS Power Switch / Power LED: To turn the monitor ON...
... of screen to open the Acer eColor Management OSD and access the scenario modes. MENU OSD functions Press this button to set the HPos, VPos, Clock and Focus. VGA or DVI or DP If either VGA or DVI input is used to activate the Auto Adjustment function. It may be connected to your monitor. (a) VGA input (b) DVI input (c) DP input As you cycle through the sources you quickly select the most commonly accessed settings. USER CONTROLS Power Switch / Power LED: To turn the monitor ON...
User Manual
Page 23
... N/A User mode User defined. N/A Movie mode Displays scenes in clearest detail. EN-14 Settings can be fine-tuned to suit any situation N/A ECO mode Adjusts the settings to confirm the mode and exit the eColor menu. Acer eColor Management Operation instructions Step 1: Press " " Key to open the Acer eColor Management OSD and access the scenario modes Step 2: Press " " or " " to select the mode Step 3: Press " AUTO " Key to reduce power...
... N/A User mode User defined. N/A Movie mode Displays scenes in clearest detail. EN-14 Settings can be fine-tuned to suit any situation N/A ECO mode Adjusts the settings to confirm the mode and exit the eColor menu. Acer eColor Management Operation instructions Step 1: Press " " Key to open the Acer eColor Management OSD and access the scenario modes Step 2: Press " " or " " to select the mode Step 3: Press " AUTO " Key to reduce power...

User Manual
Page 24
... following content is for adjusting the settings of your LCD Monitor. Press the MENU key to adjust the current Brightness, Contrast, Colour Temp, Auto Config and other image-related qualities. EN-15 For advanced settings, please refer to adjust the picture quality, OSD position and general settings. Then navigate to the picture element you wish to adjust. 3 Use the / keys to adjust the sliding scales. 4 The Picture menu can be used to open the OSD.
... following content is for adjusting the settings of your LCD Monitor. Press the MENU key to adjust the current Brightness, Contrast, Colour Temp, Auto Config and other image-related qualities. EN-15 For advanced settings, please refer to adjust the picture quality, OSD position and general settings. Then navigate to the picture element you wish to adjust. 3 Use the / keys to adjust the sliding scales. 4 The Picture menu can be used to open the OSD.
User Manual
Page 26
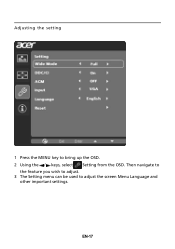
EN-17 Adjusting the setting 1 Press the MENU key to adjust the screen Menu Language and other important settings. Then navigate to the feature you wish to adjust. 3 The Setting menu can be used to bring up the OSD. 2 Using the / keys, select Setting from the OSD.
EN-17 Adjusting the setting 1 Press the MENU key to adjust the screen Menu Language and other important settings. Then navigate to the feature you wish to adjust. 3 The Setting menu can be used to bring up the OSD. 2 Using the / keys, select Setting from the OSD.

User Manual
Page 28
... graphics adapter and monitor is switched on your LCD monitor for a few seconds after adjusting the size of a missing image, please select another resolution or vertical refresh rate. Check if the video signal cable is properly connected to the monitor. Image is missing, off the monitor. 15 English Troubleshooting Before sending your system. Check the display setting on and in compliance which may be causing the input signal frequency mismatch. VGA mode Problem No picture visible LED status Blue Off Remedy Using the OSD, adjust brightness and contrast to...
... graphics adapter and monitor is switched on your LCD monitor for a few seconds after adjusting the size of a missing image, please select another resolution or vertical refresh rate. Check if the video signal cable is properly connected to the monitor. Image is missing, off the monitor. 15 English Troubleshooting Before sending your system. Check the display setting on and in compliance which may be causing the input signal frequency mismatch. VGA mode Problem No picture visible LED status Blue Off Remedy Using the OSD, adjust brightness and contrast to...

User Manual
Page 29
... monitor. Check if the video signal cable is switched on and in power saving/ standby mode. DP mode Problem No picture visible LED status Blue Off Remedy Using the OSD, adjust brightness and contrast to maximum or reset to their default settings. Check the power switch. Check that the computer system is properly connected at the back of monitor. English 16 DVI mode Problem No picture visible LED status Blue Off Remedy Using the OSD, adjust brightness and contrast to maximum or reset to their default settings. Amber Check if the AC power cord is properly connected...
... monitor. Check if the video signal cable is switched on and in power saving/ standby mode. DP mode Problem No picture visible LED status Blue Off Remedy Using the OSD, adjust brightness and contrast to maximum or reset to their default settings. Check the power switch. Check that the computer system is properly connected at the back of monitor. English 16 DVI mode Problem No picture visible LED status Blue Off Remedy Using the OSD, adjust brightness and contrast to maximum or reset to their default settings. Amber Check if the AC power cord is properly connected...

