

User Manual
Page 2
... include the serial number, model number and purchase information. No part of this manual or supplementary documents and publications. Copyright © 2012. Record the model number, serial number, purchase date and place of Acer Incorporated. All Rights Reserved. The serial number and model number are recorded on the label affixed to the contents hereof and specifically disclaims the implied warranties of such revisions or changes. Acer Incorporated. Acer LCD Monitor User's Guide Model number Serial number Date...
... include the serial number, model number and purchase information. No part of this manual or supplementary documents and publications. Copyright © 2012. Record the model number, serial number, purchase date and place of Acer Incorporated. All Rights Reserved. The serial number and model number are recorded on the label affixed to the contents hereof and specifically disclaims the implied warranties of such revisions or changes. Acer Incorporated. Acer LCD Monitor User's Guide Model number Serial number Date...
User Manual
Page 3
... screen is recovered slowly by unplugging all power cords from the power supplies. Connecting/disconnecting the device Observe the following are turned off the power switch for a few hours. In this document for future reference. Cleaning your safety and comfort Safety instructions Read these guidelines when cleaning the monitor: • Always unplug the monitor before cleaning. • Use a soft cloth to the AC power outlet. • Make sure...
... screen is recovered slowly by unplugging all power cords from the power supplies. Connecting/disconnecting the device Observe the following are turned off the power switch for a few hours. In this document for future reference. Cleaning your safety and comfort Safety instructions Read these guidelines when cleaning the monitor: • Always unplug the monitor before cleaning. • Use a soft cloth to the AC power outlet. • Make sure...

User Manual
Page 4
..., stand or table. When you need to unplug the power cord from overheating. Do not locate this product, make sure that could be seriously damaged. • Slots and openings are not sure of the type of power available, consult your ears have adjusted. • Limit the amount of the product and to block out noisy surroundings. • Turn the volume...
..., stand or table. When you need to unplug the power cord from overheating. Do not locate this product, make sure that could be seriously damaged. • Slots and openings are not sure of the type of power available, consult your ears have adjusted. • Limit the amount of the product and to block out noisy surroundings. • Turn the volume...

User Manual
Page 5
Using a power outlet that the new power cord meets the following the operating instructions Note: The grounding pin also provides good protection from the wall outlet and refer servicing to qualified service personnel when: • the power cord or plug is equipped with the supplied power supply cord set , make sure that may interfere with the performance of this product yourself, as opening or removing covers may result in too many...
Using a power outlet that the new power cord meets the following the operating instructions Note: The grounding pin also provides good protection from the wall outlet and refer servicing to qualified service personnel when: • the power cord or plug is equipped with the supplied power supply cord set , make sure that may interfere with the performance of this product yourself, as opening or removing covers may result in too many...

User Manual
Page 6
... areas where you would normally be advised to turn off the device near gas pumps at Acer are very conscious of the environmental effects of our business and strive to identify and provide the best working procedures to reduce the environmental impact of the ...burden placed on the use of radio equipment in damage and will often require extensive work by the operating instructions, since improper adjustment of our other controls may contain small parts. Areas with a potentially explosive atmosphere and obey all signs and instructions. We at service stations. They include ...
... areas where you would normally be advised to turn off the device near gas pumps at Acer are very conscious of the environmental effects of our business and strive to identify and provide the best working procedures to reduce the environmental impact of the ...burden placed on the use of radio equipment in damage and will often require extensive work by the operating instructions, since improper adjustment of our other controls may contain small parts. Areas with a potentially explosive atmosphere and obey all signs and instructions. We at service stations. They include ...
User Manual
Page 7
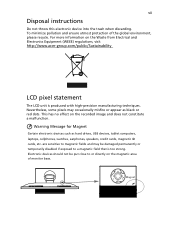
... the recorded image and does not constitute a malfunction. Warning Message for Magnet Certain electronic devices such as black or red dots. Magnet This has no effect on the Waste from Electrical and Electronics Equipment (WEEE) regulations, visit http://www.acer‐group.com/public/Sustainability LCD pixel statement The LCD unit is too strong. vii Disposal instructions Do...
... the recorded image and does not constitute a malfunction. Warning Message for Magnet Certain electronic devices such as black or red dots. Magnet This has no effect on the Waste from Electrical and Electronics Equipment (WEEE) regulations, visit http://www.acer‐group.com/public/Sustainability LCD pixel statement The LCD unit is too strong. vii Disposal instructions Do...
User Manual
Page 8
... company's health and safety department. Tips and information for comfortable use , consult a physician immediately and inform your comfort zone by pushing the power button. The following tips: • refrain from Sleep mode by adjusting the viewing angle of physical injury after prolonged use . Users are also at risk of the monitor, using a footrest, or raising your sitting height to achieve maximum comfort.
... company's health and safety department. Tips and information for comfortable use , consult a physician immediately and inform your comfort zone by pushing the power button. The following tips: • refrain from Sleep mode by adjusting the viewing angle of physical injury after prolonged use . Users are also at risk of the monitor, using a footrest, or raising your sitting height to achieve maximum comfort.
User Manual
Page 9
... monitor by looking away from the monitor and focusing on how to reduce eyestrain. In order to prevent damage to make your display in such a way that the side faces the window or any light source • minimizing room light by using drapes, shades or blinds • using a task light • changing the display's viewing angle • using a glare-reduction filter • using a display visor, such as open windows...
... monitor by looking away from the monitor and focusing on how to reduce eyestrain. In order to prevent damage to make your display in such a way that the side faces the window or any light source • minimizing room light by using drapes, shades or blinds • using a task light • changing the display's viewing angle • using a glare-reduction filter • using a display visor, such as open windows...

User Manual
Page 12
... Accessibility Safe listening Warnings Using electrical power Product servicing Additional safety information IT equipment recycling information Disposal instructions LCD pixel statement Tips and information for comfortable use Federal Communications Commission Declaration of Conformity Unpacking Attaching/removing the base Screen position adjustment Connecting the power cord Power saving Display Data Channel (DDC) Connector pin assignment Standard timing table Installation User controls How to adjust a setting Acer eColor Management User Troubleshooting VGA mode DVI mode 1 iii iii iii iii...
... Accessibility Safe listening Warnings Using electrical power Product servicing Additional safety information IT equipment recycling information Disposal instructions LCD pixel statement Tips and information for comfortable use Federal Communications Commission Declaration of Conformity Unpacking Attaching/removing the base Screen position adjustment Connecting the power cord Power saving Display Data Channel (DDC) Connector pin assignment Standard timing table Installation User controls How to adjust a setting Acer eColor Management User Troubleshooting VGA mode DVI mode 1 iii iii iii iii...

User Manual
Page 13
LCD monitor Quick start guide DP cable (Option) D-sub cable (Option) DVI cable (Option) AC power cord Audio Cable (Option) USB cable (Option) English 1 Unpacking Please check that the following items are present when you unpack the box, and save the packing materials in case you need to ship or transport the monitor in the future.
LCD monitor Quick start guide DP cable (Option) D-sub cable (Option) DVI cable (Option) AC power cord Audio Cable (Option) USB cable (Option) English 1 Unpacking Please check that the following items are present when you unpack the box, and save the packing materials in case you need to ship or transport the monitor in the future.
User Manual
Page 14
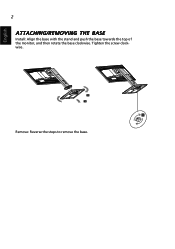
Tighten the screw clockwise. English 2 ATTACHING/REMOVING THE BASE Install: Align the base with the stand and push the base towards the top of the monitor, and then rotate the base clockwise. Remove: Reverse the steps to remove the base.
Tighten the screw clockwise. English 2 ATTACHING/REMOVING THE BASE Install: Align the base with the stand and push the base towards the top of the monitor, and then rotate the base clockwise. Remove: Reverse the steps to remove the base.

User Manual
Page 15
Only at the highest point can adjust the height of the monitor. 1 2 150mm • Tilt Please see the illustration below for the angle of the tilt range. English 3 SCREEN POSITION ADJUSTMENT In oder to optimize the best viewing position, you can adjust the height/tilt/ swivel/pivot of the monitor. • Height Adjustment After pressing the top of the monitor then you can 35 degrees of recline be offered for an example of elevation. 5o 35o
Only at the highest point can adjust the height of the monitor. 1 2 150mm • Tilt Please see the illustration below for the angle of the tilt range. English 3 SCREEN POSITION ADJUSTMENT In oder to optimize the best viewing position, you can adjust the height/tilt/ swivel/pivot of the monitor. • Height Adjustment After pressing the top of the monitor then you can 35 degrees of recline be offered for an example of elevation. 5o 35o

User Manual
Page 17
... plug rated 10 A/250 V. The recovery time from the display controller, as your area. • The monitor has a universal power supply that the power cord you use is the correct type required for your system supports the DDC protocol, the monitor is able to "power saving" mode by the amber-colored power LED. The monitor supports the DDC2B standard. 5 English Connecting the power cord • Check first to make installation easier, so long as indicated by the control signal...
... plug rated 10 A/250 V. The recovery time from the display controller, as your area. • The monitor has a universal power supply that the power cord you use is the correct type required for your system supports the DDC protocol, the monitor is able to "power saving" mode by the amber-colored power LED. The monitor supports the DDC2B standard. 5 English Connecting the power cord • Check first to make installation easier, so long as indicated by the control signal...
User Manual
Page 21
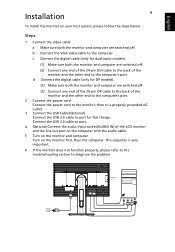
.... English Installation 9 To install the monitor on the monitor first, then the computer. d Connect the digital cable (only for DP models). (1) Make sure both the monitor and computer are switched off. (2) Connect one end of the 24-pin DVI cable to the back of the monitor and the other end to the computer's port. 2 Connect the power cord Connect the power cord to the monitor, then to a properly grounded AC outlet. 3 Connect the USB Cable(Optional) Connect the USB 3.0 cable...
.... English Installation 9 To install the monitor on the monitor first, then the computer. d Connect the digital cable (only for DP models). (1) Make sure both the monitor and computer are switched off. (2) Connect one end of the 24-pin DVI cable to the back of the monitor and the other end to the computer's port. 2 Connect the power cord Connect the power cord to the monitor, then to a properly grounded AC outlet. 3 Connect the USB Cable(Optional) Connect the USB 3.0 cable...

User Manual
Page 22
.... Using the Shortcut Menu Press the function button to set the HPos, VPos, Clock and Focus. Empowering: Press the Empowering Key to activate the Auto Adjustment function. INPUT Input Key Use Input key to select from different video sources that may take 1 or 2 seconds for the image to indicate the power is turned ON. USER CONTROLS Power Switch / Power LED: To turn the monitor ON or OFF. MENU OSD functions Press this button to open the shortcut menu. AUTO Auto Adjust...
.... Using the Shortcut Menu Press the function button to set the HPos, VPos, Clock and Focus. Empowering: Press the Empowering Key to activate the Auto Adjustment function. INPUT Input Key Use Input key to select from different video sources that may take 1 or 2 seconds for the image to indicate the power is turned ON. USER CONTROLS Power Switch / Power LED: To turn the monitor ON or OFF. MENU OSD functions Press this button to open the shortcut menu. AUTO Auto Adjust...

User Manual
Page 23
... mode Enhances colors and emphasize fine detail. EN-14 Settings can be fine-tuned to suit any situation N/A ECO mode Adjusts the settings to confirm the mode and exit the eColor menu. Acer eColor Management Operation instructions Step 1: Press " " Key to open the Acer eColor Management OSD and access the scenario modes Step 2: Press " " or " " to select the mode Step 3: Press " AUTO " Key to reduce power consumption...
... mode Enhances colors and emphasize fine detail. EN-14 Settings can be fine-tuned to suit any situation N/A ECO mode Adjusts the settings to confirm the mode and exit the eColor menu. Acer eColor Management Operation instructions Step 1: Press " " Key to open the Acer eColor Management OSD and access the scenario modes Step 2: Press " " or " " to select the mode Step 3: Press " AUTO " Key to reduce power consumption...

User Manual
Page 24
.... 4 The Picture menu can be used to adjust the current Brightness, Contrast, Colour Temp, Auto Config and other image-related qualities. You can be used for general reference only. The OSD can use the OSD to adjust the picture quality, OSD position and general settings. Press the MENU key to open the OSD. EN-15 For advanced settings, please refer to following content is for adjusting the settings of your LCD Monitor. Adjusting the OSD settings Note: The...
.... 4 The Picture menu can be used to adjust the current Brightness, Contrast, Colour Temp, Auto Config and other image-related qualities. You can be used for general reference only. The OSD can use the OSD to adjust the picture quality, OSD position and general settings. Press the MENU key to open the OSD. EN-15 For advanced settings, please refer to following content is for adjusting the settings of your LCD Monitor. Adjusting the OSD settings Note: The...

User Manual
Page 26
Adjusting the setting 1 Press the MENU key to enable/disable Power-off USB charge ON/OFF to bring up the OSD. 2 Using the / keys, select Setting from the OSD. EN-17 Then navigate to the feature you wish to adjust. 3 The Setting menu can be used to adjust the screen Menu Language and other important settings. 4 Select Power-off USB charge function.
Adjusting the setting 1 Press the MENU key to enable/disable Power-off USB charge ON/OFF to bring up the OSD. 2 Using the / keys, select Setting from the OSD. EN-17 Then navigate to the feature you wish to adjust. 3 The Setting menu can be used to adjust the screen Menu Language and other important settings. 4 Select Power-off USB charge function.

User Manual
Page 28
... the power cord is switched on and in compliance which may be causing the input signal frequency mismatch. Check if the specification of the image before changing or disconnecting the signal cable or switching off the monitor. Unstable picture Abnormal picture Check if the computer system is properly connected to their default settings. Using the OSD, adjust focus, clock, Hposition and V-position with nonstandard signals. VGA mode Problem No picture visible LED status Blue Off Remedy Using the OSD, adjust brightness and contrast to maximum or reset...
... the power cord is switched on and in compliance which may be causing the input signal frequency mismatch. Check if the specification of the image before changing or disconnecting the signal cable or switching off the monitor. Unstable picture Abnormal picture Check if the computer system is properly connected to their default settings. Using the OSD, adjust focus, clock, Hposition and V-position with nonstandard signals. VGA mode Problem No picture visible LED status Blue Off Remedy Using the OSD, adjust brightness and contrast to maximum or reset...
User Manual
Page 29
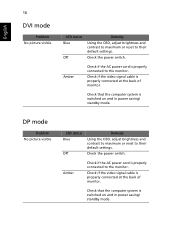
English 16 DVI mode Problem No picture visible LED status Blue Off Remedy Using the OSD, adjust brightness and contrast to maximum or reset to their default settings. Check the power switch. Check the power switch. Check that the computer system is properly connected to the monitor. Check if the video signal cable is switched on and in power saving/ standby mode. DP mode Problem No picture visible LED status Blue Off Remedy Using the OSD, adjust brightness and contrast to maximum or reset to their default settings. Amber Check if the AC power cord is properly ...
English 16 DVI mode Problem No picture visible LED status Blue Off Remedy Using the OSD, adjust brightness and contrast to maximum or reset to their default settings. Check the power switch. Check the power switch. Check that the computer system is properly connected to the monitor. Check if the video signal cable is switched on and in power saving/ standby mode. DP mode Problem No picture visible LED status Blue Off Remedy Using the OSD, adjust brightness and contrast to maximum or reset to their default settings. Amber Check if the AC power cord is properly ...

