Acer BR277 Support and Manuals
Get Help and Manuals for this Acer Computers item
Popular Acer BR277 Manual Pages
User Manual - Page 2

... fitness for identification purposes only and belong to your unit should include the serial number, model number and purchase information. Acer Incorporated. No part of this publication may be reproduced, stored in a retrieval system, or transmitted, in this manual or supplementary documents and publications. This company makes no representations or warranties, either expressed...
User Manual - Page 4
...and comfortably
and without distortion.
• After setting the volume level, do not increase it under...and to protect it could result in installation unless proper ventilation is easily accessible and... power available, consult your hearing, follow these instructions.
• Gradually increase the volume until you... dangerous voltage points or short-out parts that the total If you are ...
User Manual - Page 5
.... If you to replace the power cord set . Make sure the power outlet is a safety feature. The overall system load must not exceed 80% of all servicing to rain or water... set , make sure that the new power cord meets the following the operating
instructions
Note: The grounding pin also provides good protection from the wall outlet and refer servicing to qualified service personnel...
User Manual - Page 19

... GPUs: AMD Radeon™ R7 260 series and R9 290 series graphics cards. For other GPUs, please contact the graphics card manufactures whether they can support or not.
EN-9 Standard Timing Table
Mode
Resolution
1
VGA
640 x 480
2
VGA
640 x 480
3
VGA
640 x 480
4
MAC
640 x 480
5
VESA
720 x 400
6
SVGA
800...
User Manual - Page 20

... and computer are powered-OFF. b. Connect the DP cable to other settings than the center position may increase the ear-/ headphones output voltage and ...-10 Connect the HDMI cable to the computer. 1-2 Connect HDMI Cable (Only HDMI-input model) a. Connect the Audio Cable (Optional) 3. INSTALLATION
To install the monitor to your monitor into the power port at the back of the monitor. 4....
User Manual - Page 21
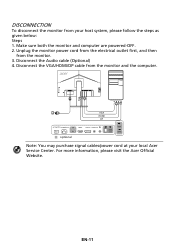
... sure both the monitor and computer are powered-OFF. 2. Unplug the monitor power cord from the electrical outlet first, and then
from your local Acer Service Center.
Disconnect the Audio cable (Optional) 4. EN-11
DISCONNECTION
To disconnect the monitor from the monitor. 3. For more information, please visit the Acer Official Website...
User Manual - Page 23
... necessary to open the OSD. Modes 2. Menu
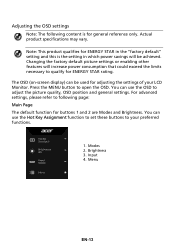
EN-13 Actual product specifications may vary. For advanced settings, please refer to your LCD Monitor. You can use the OSD to adjust the picture quality, OSD position and general settings. Brightness 3. Adjusting the OSD settings
Note: The following page: Main Page The default function for buttons...
User Manual - Page 24
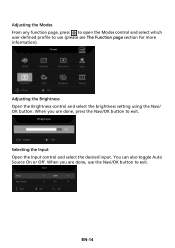
EN-14 You can also toggle Auto Source On or Off. Adjusting the Brightness Open the Brightness control and select the brightness setting using the Navi/ OK button. Adjusting the Modes From any function page, press to open the Modes control and select which user-defined profile to ...
User Manual - Page 25
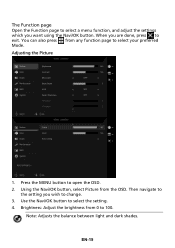
...: Adjusts the balance between light and dark shades. Using the Navi/OK button, select Picture from 0 to select your preferred Mode. Then navigate to
the setting you want using the Navi/OK button. EN-15 Brightness: Adjust the brightness from the OSD. Use the Navi/OK button to exit.
The Function...
User Manual - Page 26
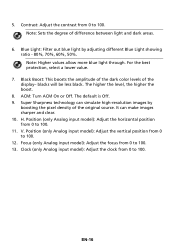
The default is Off. 9. V.
Clock (only Analog input model): Adjust the clock from 0 to 100. 13. Note: Sets the degree of the display- blacks will be less black. Super Sharpness technology can make images sharper and clear. 10. Focus (only Analog input model): Adjust the focus from 0 to 100. 11. EN-16 Note: Higher...
User Manual - Page 27

Using the Navi/OK button, select Color from the OSD. Gamma mode allows you wish to select the setting. 4. sRGB mode is for Windows). 5. EN-17 Press the MENU button to adjust the luminance tone. The default value
is warm..... 8. You can choose Cool, Warm,
Normal, Bluelight or User. 6.
Use the Navi/OK button to change. 3. Then navigate to
the setting you to open the OSD. 2.
User Manual - Page 29
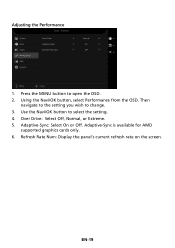
...: Display the panel's current refresh rate on the screen. Then
navigate to the setting you wish to select the setting. 4. Adaptive-Sync: Select On or Off. Over Drive: Select Off, Normal, or Extreme. 5. Adaptive-Sync is available for AMD
supported graphics cards only. 6. Press the MENU button to open the OSD. 2. Using the...
User Manual - Page 33
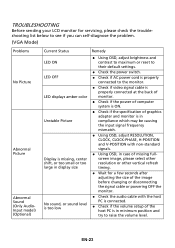
... your LCD monitor for servicing, please check the troubleshooting list below to see if you can self-diagnose the problem.
(VGA Mode)
Problems No Picture
Abnormal Picture Abnormal Sound (Only AudioInput model) (Optional)
Current Status LED ON LED OFF LED displays amber color Unstable Picture
Display is missing, center shift, or too small or too...
User Manual - Page 34
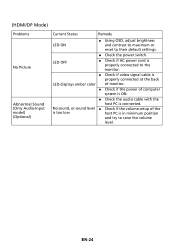
EN-24
No sound, or sound level Check if the volume setup of the
is too low
host PC is in minimum position
and try to the...the volume
level. LED OFF
Check if AC power cord is connected. (HDMI/DP Mode)
Problems No Picture Abnormal Sound (Only Audio-Input model) (Optional)
Current Status
Remedy
LED ON
Using OSD, adjust brightness and contrast to maximum ...
User Manual - Page 37

...qualified use less energy and prevent greenhouse gas emissions by meeting strict energy efficiency guidelines set by reducing energy costs and helps protect the environment without sacrificing features or performance. ... gases and the risks of our environment. Acer is committed to offer products and services worldwide that are registered U.S. What is in Active Off mode, move the mouse ...
Acer BR277 Reviews
We have not received any reviews for Acer yet.