User Manual
Page 2
... prior written permission of such revisions or changes. Acer LCD Monitor User's Guide Model number Serial number Date of purchase Place of purchase Acer and the Acer logo are recorded on the label affixed to the contents hereof and specifically disclaims the implied warranties of Acer Incorporated. All correspondence concerning your computer. All Rights Reserved. This company makes no representations or warranties, either expressed or...
... prior written permission of such revisions or changes. Acer LCD Monitor User's Guide Model number Serial number Date of purchase Place of purchase Acer and the Acer logo are recorded on the label affixed to the contents hereof and specifically disclaims the implied warranties of Acer Incorporated. All correspondence concerning your computer. All Rights Reserved. This company makes no representations or warranties, either expressed or...
User Manual
Page 3
... a problem. • Due to make sure the flicker disappears. • You may flicker during initial use . • The LCD screen has 99.99% or more effective pixels. Cleaning your safety and comfort Safety instructions Read these guidelines when cleaning the monitor: • Always unplug the monitor before connecting any cable or unplugging the power cord. • If the system has multiple sources of the previous screen may remain after switching...
... a problem. • Due to make sure the flicker disappears. • You may flicker during initial use . • The LCD screen has 99.99% or more effective pixels. Cleaning your safety and comfort Safety instructions Read these guidelines when cleaning the monitor: • Always unplug the monitor before connecting any cable or unplugging the power cord. • If the system has multiple sources of the previous screen may remain after switching...
User Manual
Page 4
... outlet. Warnings • Do not use it after your hearing, follow these instructions. • Gradually increase the volume until you can 't hear people speaking near you plug the power cord into is provided. • Never push objects of any kind onto or into this monitor, do not be blocked or covered. The openings should never be seriously damaged. •...
... outlet. Warnings • Do not use it after your hearing, follow these instructions. • Gradually increase the volume until you can 't hear people speaking near you plug the power cord into is provided. • Never push objects of any kind onto or into this monitor, do not be blocked or covered. The openings should never be seriously damaged. •...
User Manual
Page 5
... service personnel. If you need to replace the power cord set . Warning! If you are used with this product where people will walk on the power cord. v Using electrical power • This product should be operated from the wall outlet and refer servicing to qualified service personnel when: • the power cord or plug is used , the load should not exceed 80% of the power strip's input rating. • This product's power cord...
... service personnel. If you need to replace the power cord set . Warning! If you are used with this product where people will walk on the power cord. v Using electrical power • This product should be operated from the wall outlet and refer servicing to qualified service personnel when: • the power cord or plug is used , the load should not exceed 80% of the power strip's input rating. • This product's power cord...
User Manual
Page 6
... instructions, since improper adjustment of used equipment, as grain, dust or metal powders. We at service stations. Potentially explosive atmospheres include areas where you would normally be advised to turn off your vehicle engine. Areas with a potentially explosive atmosphere and obey all signs and instructions. IT Equipment Recycling Information Acer is strongly committed to environmental protection and views...
... instructions, since improper adjustment of used equipment, as grain, dust or metal powders. We at service stations. Potentially explosive atmospheres include areas where you would normally be advised to turn off your vehicle engine. Areas with a potentially explosive atmosphere and obey all signs and instructions. IT Equipment Recycling Information Acer is strongly committed to environmental protection and views...
User Manual
Page 7
... of user inactivity. • Wake the monitor when it is produced with high-precision manufacturing techniques. This has no effect on the recorded image and does not constitute a malfunction. This product has been shipped enabled for comfortable use . Tips and information for power management: • Activate the Display Sleep mode within 5 minutes of our other products. Disposal instructions Do...
... of user inactivity. • Wake the monitor when it is produced with high-precision manufacturing techniques. This has no effect on the recorded image and does not constitute a malfunction. This product has been shipped enabled for comfortable use . Tips and information for power management: • Activate the Display Sleep mode within 5 minutes of our other products. Disposal instructions Do...
User Manual
Page 8
... blinds • using a task light • changing the display's viewing angle • using a glare-reduction filter • using a footrest, or raising your display to an awkward viewing angle. Observe the following section provides tips for enhanced text readability and graphics clarity. • Eliminate glare and reflections by looking at the middle of the display. • Adjust the display brightness and/or contrast to a comfortable...
... blinds • using a task light • changing the display's viewing angle • using a glare-reduction filter • using a footrest, or raising your display to an awkward viewing angle. Observe the following section provides tips for enhanced text readability and graphics clarity. • Eliminate glare and reflections by looking at the middle of the display. • Adjust the display brightness and/or contrast to a comfortable...
User Manual
Page 12
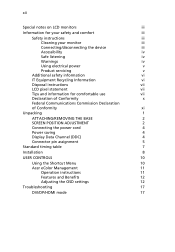
... LCD pixel statement vii Tips and information for comfortable use vii Declaration of Conformity x Federal Communications Commission Declaration of Conformity xi Unpacking 1 ATTACHING/REMOVING THE BASE 2 SCREEN POSITION ADJUSTMENT 2 Connecting the power cord 4 Power saving 4 Display Data Channel (DDC) 4 Connector pin assignment 5 Standard timing table 7 Installation 8 USER CONTROLS 10 Using the Shortcut Menu 10 Acer eColor Management 11 Operation instructions 11 Features and Benefits 12 Adjusting the OSD settings 12 Troubleshooting 17 DVI/DP/HDMI mode...
... LCD pixel statement vii Tips and information for comfortable use vii Declaration of Conformity x Federal Communications Commission Declaration of Conformity xi Unpacking 1 ATTACHING/REMOVING THE BASE 2 SCREEN POSITION ADJUSTMENT 2 Connecting the power cord 4 Power saving 4 Display Data Channel (DDC) 4 Connector pin assignment 5 Standard timing table 7 Installation 8 USER CONTROLS 10 Using the Shortcut Menu 10 Acer eColor Management 11 Operation instructions 11 Features and Benefits 12 Adjusting the OSD settings 12 Troubleshooting 17 DVI/DP/HDMI mode...
User Manual
Page 13
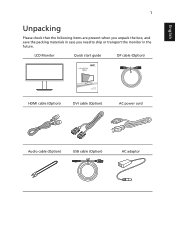
English 1 Unpacking Please check that the following items are present when you unpack the box, and save the packing materials in case you need to ship or transport the monitor in the future. LCD Monitor Quick start guide DP cable (Option) HDMI cable (Option) DVI cable (Option) AC power cord Audio cable (Option) USB cable (Option) AC adaptor
English 1 Unpacking Please check that the following items are present when you unpack the box, and save the packing materials in case you need to ship or transport the monitor in the future. LCD Monitor Quick start guide DP cable (Option) HDMI cable (Option) DVI cable (Option) AC power cord Audio cable (Option) USB cable (Option) AC adaptor
User Manual
Page 14
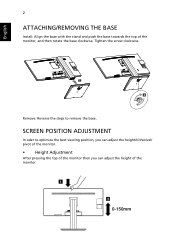
Remove: Reverse the steps to optimize the best viewing position, you can adjust the height/tilt/swivel/ pivot of the monitor. • Height Adjustment After pressing the top of the monitor then you can adjust the height of the monitor, and then rotate the base clockwise. SCREEN POSITION ADJUSTMENT In oder to remove the base. Tighten the screw clockwise. English 2 ATTACHING/REMOVING THE BASE Install: Align the base with the stand and push the base towards the top of the monitor. 1 2 0-150mm
Remove: Reverse the steps to optimize the best viewing position, you can adjust the height/tilt/swivel/ pivot of the monitor. • Height Adjustment After pressing the top of the monitor then you can adjust the height of the monitor, and then rotate the base clockwise. SCREEN POSITION ADJUSTMENT In oder to remove the base. Tighten the screw clockwise. English 2 ATTACHING/REMOVING THE BASE Install: Align the base with the stand and push the base towards the top of the monitor. 1 2 0-150mm
User Manual
Page 16
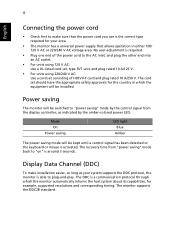
... activated. The monitor supports the DDC2B standard. The cord set consisting of H05VV-F cord and plug rated 10 A/250 V. Display Data Channel (DDC) To make sure that the power cord you use is the correct type required for example, supported resolutions and corresponding timing. No user-adjustment is able to plug-and-play. 4 English Connecting the power cord • Check first to make installation easier, so long as indicated by the control signal from "power saving" mode back to...
... activated. The monitor supports the DDC2B standard. The cord set consisting of H05VV-F cord and plug rated 10 A/250 V. Display Data Channel (DDC) To make sure that the power cord you use is the correct type required for example, supported resolutions and corresponding timing. No user-adjustment is able to plug-and-play. 4 English Connecting the power cord • Check first to make installation easier, so long as indicated by the control signal from "power saving" mode back to...

User Manual
Page 17
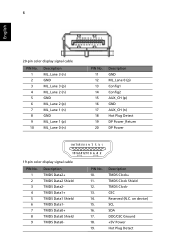
5 Connector pin assignment English 24-pin color display signal cable PIN No. 1 2 3 Description TMDS data2TMDS data2+ TMDS data 2/4 shield 4 NC 5 NC 6 DDC clock 7 DDC data 8 NC 9 TMDS data1- 10 TMDS data1+ 11 TMDS data 1/3 shield 12 NC PIN No. 13 14 15 16 17 18 19 20 21 22 23 24 Description NC +5 V power GND (return for +5 V hsync.vsync) Hot-plug detect TMDS data0TMDS data0+ TMDS data 0/5 shield NC NC TMDS clock shield TMDS clock+ DDC tMDS clock-
5 Connector pin assignment English 24-pin color display signal cable PIN No. 1 2 3 Description TMDS data2TMDS data2+ TMDS data 2/4 shield 4 NC 5 NC 6 DDC clock 7 DDC data 8 NC 9 TMDS data1- 10 TMDS data1+ 11 TMDS data 1/3 shield 12 NC PIN No. 13 14 15 16 17 18 19 20 21 22 23 24 Description NC +5 V power GND (return for +5 V hsync.vsync) Hot-plug detect TMDS data0TMDS data0+ TMDS data 0/5 shield NC NC TMDS clock shield TMDS clock+ DDC tMDS clock-
User Manual
Page 18
6 English 20-pin color display signal cable PIN No. 1 2 3 4 5 6 7 8 9 10 Description ML_Lane 3 (n) GND ML_Lane 3 (p) ML_Lane 2 (n) GND ML_Lane 2 (p) ML_Lane 1 (n) GND ML_Lane 1 (p) ML_Lane 0 (n) PIN No. 11 12 13 14 15 16 17 18 19 20 Description GND ML_Lane 0 (p) Config1 Config2 AUX_CH (p) GND AUX_CH (n) Hot Plug Detect DP Power_Return DP Power 19-pin color display signal cable PIN No. 1 2 3 4 5 6 7 8 9 Description TMDS Data2+ TMDS Data2 Shield...
6 English 20-pin color display signal cable PIN No. 1 2 3 4 5 6 7 8 9 10 Description ML_Lane 3 (n) GND ML_Lane 3 (p) ML_Lane 2 (n) GND ML_Lane 2 (p) ML_Lane 1 (n) GND ML_Lane 1 (p) ML_Lane 0 (n) PIN No. 11 12 13 14 15 16 17 18 19 20 Description GND ML_Lane 0 (p) Config1 Config2 AUX_CH (p) GND AUX_CH (n) Hot Plug Detect DP Power_Return DP Power 19-pin color display signal cable PIN No. 1 2 3 4 5 6 7 8 9 Description TMDS Data2+ TMDS Data2 Shield...
User Manual
Page 20
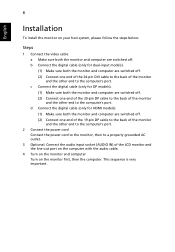
... LCD monitor and the line-out port on the computer with the audio cable. 4 Turn on the monitor and computer Turn on your host system, please follow the steps below: Steps 1 Connect the video cable a Make sure both the monitor and computer are switched off . (2) Connect one end of the 24-pin DVI cable to the back of the monitor and the other end to the computer's port. 2 Connect the power cord Connect...
... LCD monitor and the line-out port on the computer with the audio cable. 4 Turn on the monitor and computer Turn on your host system, please follow the steps below: Steps 1 Connect the video cable a Make sure both the monitor and computer are switched off . (2) Connect one end of the 24-pin DVI cable to the back of the monitor and the other end to the computer's port. 2 Connect the power cord Connect...
User Manual
Page 22
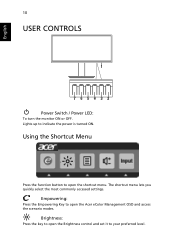
Lights up to open the shortcut menu. Brightness: Press the key to your preferred level. English 10 USER CONTROLS 1 765432 Power Switch / Power LED: To turn the monitor ON or OFF. Empowering: Press the Empowering Key to open the Brightness control and set it to open the Acer eColor Management OSD and access the scenario modes. The shortcut menu lets you quickly select the most commonly accessed settings. Using the Shortcut Menu Press the function button to indicate the power is turned ON.
Lights up to open the shortcut menu. Brightness: Press the key to your preferred level. English 10 USER CONTROLS 1 765432 Power Switch / Power LED: To turn the monitor ON or OFF. Empowering: Press the Empowering Key to open the Brightness control and set it to open the Acer eColor Management OSD and access the scenario modes. The shortcut menu lets you quickly select the most commonly accessed settings. Using the Shortcut Menu Press the function button to indicate the power is turned ON.
User Manual
Page 23
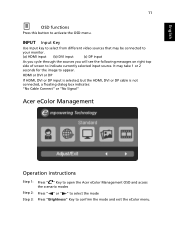
... the HDMI, DVI or DP cable is not connected, a floating dialog box indicates: "No Cable Connect" or "No Signal" Acer eColor Management Operation instructions Step 1: Step 2: Step 3: Press " " Key to open the Acer eColor Management OSD and access the scenario modes Press " " or " " to select the mode Press "Brightness" Key to activate the OSD menu. It may be connected to your monitor. (a) HDMI input (b) DVI input (c) DP input As you cycle through the sources you...
... the HDMI, DVI or DP cable is not connected, a floating dialog box indicates: "No Cable Connect" or "No Signal" Acer eColor Management Operation instructions Step 1: Step 2: Step 3: Press " " Key to open the Acer eColor Management OSD and access the scenario modes Press " " or " " to select the mode Press "Brightness" Key to activate the OSD menu. It may be connected to your monitor. (a) HDMI input (b) DVI input (c) DP input As you cycle through the sources you...
User Manual
Page 24
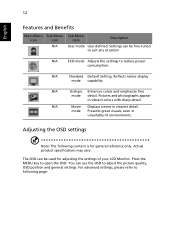
.... Settings can be used for general reference only. mode Presents great visuals, even in vibrant colors with sharp detail. Press the MENU key to adjust the picture quality, OSD position and general settings. Adjusting the OSD settings Note: The following page: N/A Movie Displays scenes in clearest detail. English 12 Features and Benefits Main Menu icon Sub Menu icon N/A Sub Menu item Description User mode User defined. The OSD can use the OSD to open the OSD.
.... Settings can be used for general reference only. mode Presents great visuals, even in vibrant colors with sharp detail. Press the MENU key to adjust the picture quality, OSD position and general settings. Adjusting the OSD settings Note: The following page: N/A Movie Displays scenes in clearest detail. English 12 Features and Benefits Main Menu icon Sub Menu icon N/A Sub Menu item Description User mode User defined. The OSD can use the OSD to open the OSD.
User Manual
Page 25
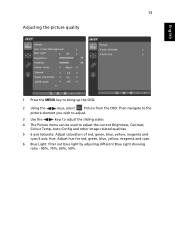
.... 4 The Picture menu can be used to bring up the OSD. 2 Using the / keys, select Picture from the OSD. Hue: Adjust hue for red, green, blue, yellow, magenta and cyan. 6 Blue Light: filter out blue light by adjusting different Blue Light showing ratio - 80%, 70%, 60%, 50%. 13 Adjusting the picture quality English 1 Press the MENU key to adjust the current Brightness, Contrast, Colour Temp, Auto Config and other image-related qualities. 5 6 axis Saturate: Adjust saturation of red, green, blue, yellow...
.... 4 The Picture menu can be used to bring up the OSD. 2 Using the / keys, select Picture from the OSD. Hue: Adjust hue for red, green, blue, yellow, magenta and cyan. 6 Blue Light: filter out blue light by adjusting different Blue Light showing ratio - 80%, 70%, 60%, 50%. 13 Adjusting the picture quality English 1 Press the MENU key to adjust the current Brightness, Contrast, Colour Temp, Auto Config and other image-related qualities. 5 6 axis Saturate: Adjust saturation of red, green, blue, yellow...
User Manual
Page 27
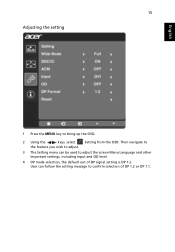
User can be used to adjust the screen Menu Language and other important settings, including Input and OD level. 4 DP mode selection, the default out of DP 1.2 or DP 1.1. 15 Adjusting the setting English 1 Press the MENU key to confirm selection of DP signal setting is DP 1.2. Then navigate to the feature you wish to adjust. 3 The Setting menu can follow the setting message to bring up the OSD. 2 Using the / keys, select Setting from the OSD.
User can be used to adjust the screen Menu Language and other important settings, including Input and OD level. 4 DP mode selection, the default out of DP 1.2 or DP 1.1. 15 Adjusting the setting English 1 Press the MENU key to confirm selection of DP signal setting is DP 1.2. Then navigate to the feature you wish to adjust. 3 The Setting menu can follow the setting message to bring up the OSD. 2 Using the / keys, select Setting from the OSD.
User Manual
Page 29
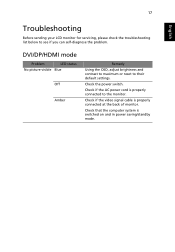
... English Troubleshooting Before sending your LCD monitor for servicing, please check the troubleshooting list below to their default settings. DVI/DP/HDMI mode Problem LED status No picture visible Blue Off Amber Remedy Using the OSD, adjust brightness and contrast to maximum or reset to see if you can self-diagnose the problem. Check if the video signal cable is switched on and in power saving/standby mode. Check that the computer system is properly connected at the back of monitor. Check if the AC power cord...
... English Troubleshooting Before sending your LCD monitor for servicing, please check the troubleshooting list below to their default settings. DVI/DP/HDMI mode Problem LED status No picture visible Blue Off Amber Remedy Using the OSD, adjust brightness and contrast to maximum or reset to see if you can self-diagnose the problem. Check if the video signal cable is switched on and in power saving/standby mode. Check that the computer system is properly connected at the back of monitor. Check if the AC power cord...


