
User Manual
Page 1
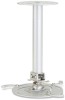
...: It is recommended that you keep a reasonable space between the bracket and the projector to the projector bracket (illustration 1), and then screw up four screws (illustration 2). Illustration 1 5 . Type 2 and Type 3: Alternatively, for proper heat distribution. 4 . Connect the main body connector to allow for the larger size, use three bracket screws to mount the projector to the ceiling. 2 . Adjust the angle and positioning as...
...: It is recommended that you keep a reasonable space between the bracket and the projector to the projector bracket (illustration 1), and then screw up four screws (illustration 2). Illustration 1 5 . Type 2 and Type 3: Alternatively, for proper heat distribution. 4 . Connect the main body connector to allow for the larger size, use three bracket screws to mount the projector to the ceiling. 2 . Adjust the angle and positioning as...
User Manual
Page 2
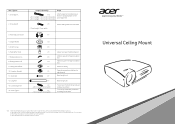
.... Ceiling Mount Base 10. Projector Bracket 11. The thread type of CM-02S is 11cm, while the length of all the included screws are not comfortable with the installation process. 2. Heat Buffer Piece 7. Sliding Extension B 9. Connecting Screw 14. The length of CM-01S from ceiling mount base to projector bracket is adjustable from 11cm to 20 kg weight. 4. This ceiling mounting can sustain a projector up...
.... Ceiling Mount Base 10. Projector Bracket 11. The thread type of CM-02S is 11cm, while the length of all the included screws are not comfortable with the installation process. 2. Heat Buffer Piece 7. Sliding Extension B 9. Connecting Screw 14. The length of CM-01S from ceiling mount base to projector bracket is adjustable from 11cm to 20 kg weight. 4. This ceiling mounting can sustain a projector up...


