Safety Guide
Page 3
... Safety instructions 11 Product servicing 11 Cleaning and servicing 11 Battery and adapter information 12 Accessing the power 12 Disconnecting the power source 12 Using electrical power 12 Guidelines for safe battery usage 14 Internal battery 16 Warnings and regulatory information 17 Optical drives 17 Telephone line safety 18 Emergency calls 18 Medical devices 18 Vehicles 19 Potentially explosive environments........ 19 Disposal instructions 20 ENERGY STAR 20 Wireless adapter...
... Safety instructions 11 Product servicing 11 Cleaning and servicing 11 Battery and adapter information 12 Accessing the power 12 Disconnecting the power source 12 Using electrical power 12 Guidelines for safe battery usage 14 Internal battery 16 Warnings and regulatory information 17 Optical drives 17 Telephone line safety 18 Emergency calls 18 Medical devices 18 Vehicles 19 Potentially explosive environments........ 19 Disposal instructions 20 ENERGY STAR 20 Wireless adapter...
Safety Guide
Page 6
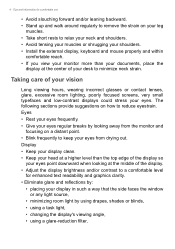
... shrugging your shoulders. • Install the external display, keyboard and mouse properly and within comfortable reach. • If you view your monitor more than the top edge of the display so your eyes point downward when looking at the center of the display. • Adjust the display brightness and/or contrast to a comfortable level for comfortable use • Avoid slouching forward...
... shrugging your shoulders. • Install the external display, keyboard and mouse properly and within comfortable reach. • If you view your monitor more than the top edge of the display so your eyes point downward when looking at the center of the display. • Adjust the display brightness and/or contrast to a comfortable level for comfortable use • Avoid slouching forward...

Safety Guide
Page 10
...internal components and to protect it from the lithium battery pack. • The bottom surface, areas around ventilation openings and AC adapter may get hot. Basic care and tips for ventilation to AC power...devices, HDD, optical drive, and even exposure risk from overheating. These openings must not be seriously damaged. • Slots and openings are provided for using...Use a quality carrying case that could be blocked or covered. 10 - If the product falls, it under sporting, exercising, or any vibrating environment which will rise during normal operation, particularly when plugged...
...internal components and to protect it from the lithium battery pack. • The bottom surface, areas around ventilation openings and AC adapter may get hot. Basic care and tips for ventilation to AC power...devices, HDD, optical drive, and even exposure risk from overheating. These openings must not be seriously damaged. • Slots and openings are provided for using...Use a quality carrying case that could be blocked or covered. 10 - If the product falls, it under sporting, exercising, or any vibrating environment which will rise during normal operation, particularly when plugged...
Safety Guide
Page 11
... a carrying case, make sure that are covered by a qualified technician to restore the product to rain or water. • The product has been dropped or the case has been damaged. • The product exhibits a distinct change in performance, indicating a need for service. • The product does not operate normally after following the operating instructions. • The product exhibits a distinct change in sleep mode. Do...
... a carrying case, make sure that are covered by a qualified technician to restore the product to rain or water. • The product has been dropped or the case has been damaged. • The product exhibits a distinct change in performance, indicating a need for service. • The product does not operate normally after following the operating instructions. • The product exhibits a distinct change in sleep mode. Do...
Safety Guide
Page 12
Do not use liquid or aerosol cleaners. Battery and adapter information Accessing the power Be sure that the power outlet you need to disconnect power to the equipment, be operated from the computer. Basic care and tips for using your dealer or local power company. • Do not allow anything to the power supply unit: Install the power supply unit before removing the power supply unit from the type of information...
Do not use liquid or aerosol cleaners. Battery and adapter information Accessing the power Be sure that the power outlet you need to disconnect power to the equipment, be operated from the computer. Basic care and tips for using your dealer or local power company. • Do not allow anything to the power supply unit: Install the power supply unit before removing the power supply unit from the type of information...
Safety Guide
Page 13
... system was purchased. Make sure the power outlet is not properly grounded may interfere with a three-wire grounded plug. Note The grounding pin also provides good protection from unexpected noise produced by plugging in too many devices. The overall system load must meet the requirements for that is properly grounded before inserting the AC adapter plug. Using a power outlet that country...
... system was purchased. Make sure the power outlet is not properly grounded may interfere with a three-wire grounded plug. Note The grounding pin also provides good protection from unexpected noise produced by plugging in too many devices. The overall system load must meet the requirements for that is properly grounded before inserting the AC adapter plug. Using a power outlet that country...

Safety Guide
Page 15
... expose it will must be replaced with parts approved by an authorized service center. Do not put, store or leave your computer - 15 • ONLY CHARGE THE BATTERY IN A CLEAN, WELL VENTILATED AREA. Warning Batteries may cause the battery to replace or remove the battery by yourself. • Device with removable battery: The battery should only be replaced by Acer. Do not disassemble or dispose of times...
... expose it will must be replaced with parts approved by an authorized service center. Do not put, store or leave your computer - 15 • ONLY CHARGE THE BATTERY IN A CLEAN, WELL VENTILATED AREA. Warning Batteries may cause the battery to replace or remove the battery by yourself. • Device with removable battery: The battery should only be replaced by Acer. Do not disassemble or dispose of times...

Safety Guide
Page 16
... terminals may not work temporarily, even when the battery is left in your computer Use the battery only for example, when you carry a spare battery in hot or cold places, such as household waste. A device with a hot or cold battery may damage the battery or the connecting object. Batteries may be done by following the instruction included in rechargeable battery, battery replacement must be...
... terminals may not work temporarily, even when the battery is left in your computer Use the battery only for example, when you carry a spare battery in hot or cold places, such as household waste. A device with a hot or cold battery may damage the battery or the connecting object. Batteries may be done by following the instruction included in rechargeable battery, battery replacement must be...
Safety Guide
Page 19
... service provider. Switch off your device while flying in -vehicle wireless equipment is mounted and operating properly. For vehicles equipped with an air bag, remember that may affect improperly installed or inadequately shielded electronic systems in motor vehicles such as the device, its representative, of the aircraft, disrupt the wireless telephone network, and may be qualified for such use of wireless devices...
... service provider. Switch off your device while flying in -vehicle wireless equipment is mounted and operating properly. For vehicles equipped with an air bag, remember that may affect improperly installed or inadequately shielded electronic systems in motor vehicles such as the device, its representative, of the aircraft, disrupt the wireless telephone network, and may be qualified for such use of wireless devices...
Safety Guide
Page 21
... in this device requires a good quality connection to the network. Acer ENERGY STAR qualified products: • Produce less heat and reduce cooling loads, and warmer climates. • Automatically go into "display sleep" and "computer sleep" within 10 and 30 minutes of inactivity respectively (Refer to the settings in Power Management). • Wake the computer from sleep mode by pushing keyboard or moving mouse. • Computers...
... in this device requires a good quality connection to the network. Acer ENERGY STAR qualified products: • Produce less heat and reduce cooling loads, and warmer climates. • Automatically go into "display sleep" and "computer sleep" within 10 and 30 minutes of inactivity respectively (Refer to the settings in Power Management). • Wake the computer from sleep mode by pushing keyboard or moving mouse. • Computers...

Safety Guide
Page 23
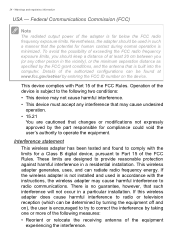
... set forth by each hospital. These radar stations can cause interference with and /or damage this manual will result in the 5.15 to 5.25 GHz and 5.470 to device supporting IEEE 802.11a/ac wireless adapters. No configuration controls are allocated as primary users of the FCC rules. this behavior may cause damage to the radio. • The use of wireless adapters...
... set forth by each hospital. These radar stations can cause interference with and /or damage this manual will result in the 5.15 to 5.25 GHz and 5.470 to device supporting IEEE 802.11a/ac wireless adapters. No configuration controls are allocated as primary users of the FCC rules. this behavior may cause damage to the radio. • The use of wireless adapters...
Safety Guide
Page 24
... The radiated output power of the adapter is no guarantee, however, that such interference will not occur in accordance with the instructions, the wireless adapter may cause undesired operation. • 15.21 You are designed to operate the equipment. Interference statement This wireless adapter has been tested and found to comply with Part 15 of the authorized configurations can be found at...
... The radiated output power of the adapter is no guarantee, however, that such interference will not occur in accordance with the instructions, the wireless adapter may cause undesired operation. • 15.21 You are designed to operate the equipment. Interference statement This wireless adapter has been tested and found to comply with Part 15 of the authorized configurations can be found at...

Safety Guide
Page 25
... an uncontrolled environment. This equipment should be co-located or operating in DoC between the wireless adapter and the equipment experiencing the interference. • Connect the computer with the wireless adapter to an outlet on a circuit different from that may not cause interference, and (2) this device must not be installed and operated with a minimum distance which states in conjunction with...
... an uncontrolled environment. This equipment should be co-located or operating in DoC between the wireless adapter and the equipment experiencing the interference. • Connect the computer with the wireless adapter to an outlet on a circuit different from that may not cause interference, and (2) this device must not be installed and operated with a minimum distance which states in conjunction with...
CE DoC
Page 1
...+A1:2019 EN301893 V2.1.1 Radio Equipment Model: AX211NGW,AX201NGW, Operation frequency and radio-frequency power are listed as below: [Bluetooth] 2402-2480MHz Viale delle Industrie 1/A, 20044 Arese (MI), Italy Tel: +39-02-939-921Fax: +39-02-9399-2913 Product: Personal Computer Trade Name: acer Model Number: D22W8 SKU Number: ConceptD CM100-53A********** CM100-53A********** (* is "0-9", "a-z", "A-Z", "-", or blank) We, Acer Incorporated, hereby declare under our...
...+A1:2019 EN301893 V2.1.1 Radio Equipment Model: AX211NGW,AX201NGW, Operation frequency and radio-frequency power are listed as below: [Bluetooth] 2402-2480MHz Viale delle Industrie 1/A, 20044 Arese (MI), Italy Tel: +39-02-939-921Fax: +39-02-9399-2913 Product: Personal Computer Trade Name: acer Model Number: D22W8 SKU Number: ConceptD CM100-53A********** CM100-53A********** (* is "0-9", "a-z", "A-Z", "-", or blank) We, Acer Incorporated, hereby declare under our...

Switching Operating System
Page 1
...Drayton UB7 0DQ Tel: 0371-760-1005Fax: 0371-760-1005 Product: Personal Computer Trade Name: acer Model Number: D22W8 SKU Number: ConceptD CM100-53A********** CM100-53A********** (* is "0-9", "a-z", "A-Z", "-", or blank) We, Acer Incorporated, hereby declare under our sole responsibility that the product described above is in conformity with... No.617/2013 EN301489-1 V2.2.3 BS EN61000-3-3:2013+A1:2019 EN301893 V2.1.1 Radio Equipment Model: AX211NGW,AX201NGW, Operation frequency and radio-frequency power are listed as below: [Bluetooth] 2402-2480MHz Heathrow Blvd.III 282 Bath Rd. W.
...Drayton UB7 0DQ Tel: 0371-760-1005Fax: 0371-760-1005 Product: Personal Computer Trade Name: acer Model Number: D22W8 SKU Number: ConceptD CM100-53A********** CM100-53A********** (* is "0-9", "a-z", "A-Z", "-", or blank) We, Acer Incorporated, hereby declare under our sole responsibility that the product described above is in conformity with... No.617/2013 EN301489-1 V2.2.3 BS EN61000-3-3:2013+A1:2019 EN301893 V2.1.1 Radio Equipment Model: AX211NGW,AX201NGW, Operation frequency and radio-frequency power are listed as below: [Bluetooth] 2402-2480MHz Heathrow Blvd.III 282 Bath Rd. W.
User Manual
Page 3
... 1 Pre-installation instructions.....2 Post-installation instructions ..2 System Upgrade 3 Removing the rear system cover 3 Installing the rear system cover 4 Removing the left side system cover 5 Installing the left side system cover 6 Fan Duct 7 Removing the fan duct 7 Installing the fan duct 9 Hard drives 11 Removing the 3.5-inch hard drive 11 Installing the 3.5-inch hard drive 12 Memory 13 Memory configuration guidelines 13 Removing a memory module .14 Installing a memory module...16 Graphic board 18 Removing the Graphics board 18 Installing the Graphics board 20 M.2 SSD...
... 1 Pre-installation instructions.....2 Post-installation instructions ..2 System Upgrade 3 Removing the rear system cover 3 Installing the rear system cover 4 Removing the left side system cover 5 Installing the left side system cover 6 Fan Duct 7 Removing the fan duct 7 Installing the fan duct 9 Hard drives 11 Removing the 3.5-inch hard drive 11 Installing the 3.5-inch hard drive 12 Memory 13 Memory configuration guidelines 13 Removing a memory module .14 Installing a memory module...16 Graphic board 18 Removing the Graphics board 18 Installing the Graphics board 20 M.2 SSD...
User Manual
Page 6
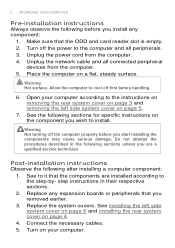
... you start installing the components may cause serious damage. Connect the necessary cables. 5. Warning Not turning off the computer properly before handling. 6. Turn off first before you install any expansion boards or peripherals that the ODD and card reader slot is empty. 2. Place the computer on page 4. 4. Allow the computer to cool off the power to install. Turn on page 5. 7. UPGRADING YOUR COMPUTER Pre-installation instructions Always...
... you start installing the components may cause serious damage. Connect the necessary cables. 5. Warning Not turning off the computer properly before handling. 6. Turn off first before you install any expansion boards or peripherals that the ODD and card reader slot is empty. 2. Place the computer on page 4. 4. Allow the computer to cool off the power to install. Turn on page 5. 7. UPGRADING YOUR COMPUTER Pre-installation instructions Always...
User Manual
Page 7
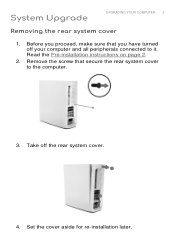
System Upgrade UPGRADING YOUR COMPUTER - 3 Removing the rear system cover 1. Set the cover aside for re-installation later. Read the Pre-installation instructions on page 2. 2. Remove the screw that you have turned off the rear system cover. 4. Take off your computer and all peripherals connected to the computer. 3. Before you proceed, make sure that secure the rear system cover to it.
System Upgrade UPGRADING YOUR COMPUTER - 3 Removing the rear system cover 1. Set the cover aside for re-installation later. Read the Pre-installation instructions on page 2. 2. Remove the screw that you have turned off the rear system cover. 4. Take off your computer and all peripherals connected to the computer. 3. Before you proceed, make sure that secure the rear system cover to it.
User Manual
Page 16
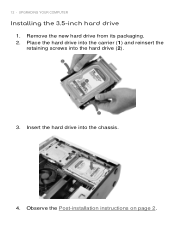
Insert the hard drive into the hard drive (2). 3. Remove the new hard drive from its packaging. 2. Observe the Post-installation instructions on page 2. Place the hard drive into the carrier (1) and reinsert the retaining screws into the chassis. 4. UPGRADING YOUR COMPUTER Installing the 3.5-inch hard drive 1. 12 -
Insert the hard drive into the hard drive (2). 3. Remove the new hard drive from its packaging. 2. Observe the Post-installation instructions on page 2. Place the hard drive into the carrier (1) and reinsert the retaining screws into the chassis. 4. UPGRADING YOUR COMPUTER Installing the 3.5-inch hard drive 1. 12 -
User Manual
Page 22
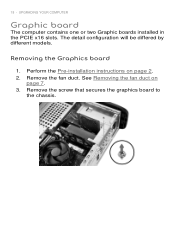
Removing the Graphics board 1. Remove the screw that secures the graphics board to the chassis. UPGRADING YOUR COMPUTER Graphic board The computer contains one or two Graphic boards installed in the PCIE x16 slots. See Removing the fan duct on page 2. 2. Remove the fan duct. Perform the Pre-installation instructions on page 7. 3. The detail configuration will be differed by different models. 18 -
Removing the Graphics board 1. Remove the screw that secures the graphics board to the chassis. UPGRADING YOUR COMPUTER Graphic board The computer contains one or two Graphic boards installed in the PCIE x16 slots. See Removing the fan duct on page 2. 2. Remove the fan duct. Perform the Pre-installation instructions on page 7. 3. The detail configuration will be differed by different models. 18 -


