
User Manual
Page 3
... the LCD screen, an afterimage of the fluorescent light, the screen may remain after switching the image, when the same image is displayed for your monitor Please carefully follow these instructions carefully. Special notes on LCD monitors The following guidelines when connecting and disconnecting power from the LCD monitor: • Make sure the monitor is attached to its base before connecting the power cord to the AC power outlet. • Make sure both the LCD monitor...
... the LCD screen, an afterimage of the fluorescent light, the screen may remain after switching the image, when the same image is displayed for your monitor Please carefully follow these instructions carefully. Special notes on LCD monitors The following guidelines when connecting and disconnecting power from the LCD monitor: • Make sure the monitor is attached to its base before connecting the power cord to the AC power outlet. • Make sure both the LCD monitor...

User Manual
Page 4
... power indicated on the power cord. Warning! Using a power outlet that the total ampere rating of the equipment plugged into the wall outlet does not exceed the fuse rating. • Do not overload a power outlet, strip or receptacle by placing the product on an unstable cart, stand or table. Safe listening To protect your hearing, follow these instructions. • Gradually increase the volume...
... power indicated on the power cord. Warning! Using a power outlet that the total ampere rating of the equipment plugged into the wall outlet does not exceed the fuse rating. • Do not overload a power outlet, strip or receptacle by placing the product on an unstable cart, stand or table. Safe listening To protect your hearing, follow these instructions. • Gradually increase the volume...
User Manual
Page 5
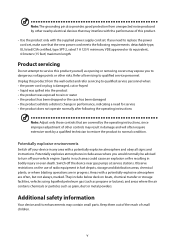
.... • Use the product only with the supplied power supply cord set , make sure that are in damage and will often require extensive work by the operating instructions, since improper adjustment of small children. Switch off your device in any area with a potentially explosive atmosphere are often, but not always, marked. Areas with a potentially explosive atmosphere and obey all servicing to dangerous...
.... • Use the product only with the supplied power supply cord set , make sure that are in damage and will often require extensive work by the operating instructions, since improper adjustment of small children. Switch off your device in any area with a potentially explosive atmosphere are often, but not always, marked. Areas with a potentially explosive atmosphere and obey all servicing to dangerous...

User Manual
Page 6
.../ Visit www.acer-group.com for power management: • Activate display's Sleep mode within 15 minutes of user inactivity. • Activate computer's Sleep mode within 30 minutes of user inactivity. • Wake the computer from Electrical and Electronics Equipment (WEEE) regulations, visit http://www.acergroup.com/public/Sustainability/ LCD pixel statement The LCD unit is strongly committed to environmental protection and views recycling...
.../ Visit www.acer-group.com for power management: • Activate display's Sleep mode within 15 minutes of user inactivity. • Activate computer's Sleep mode within 30 minutes of user inactivity. • Wake the computer from Electrical and Electronics Equipment (WEEE) regulations, visit http://www.acergroup.com/public/Sustainability/ LCD pixel statement The LCD unit is strongly committed to environmental protection and views recycling...

User Manual
Page 7
...working in one fixed posture • avoid slouching forward and/or leaning backward • stand up and walk around regularly to remove the strain on how to a comfortable level for enhanced text readability and graphics clarity. • Eliminate glare and reflections by adjusting the viewing angle of the monitor, using drapes, shades or blinds vii Display • Keep your display clean. • Keep... side faces the window or any other factors greatly increase the risk of the display. • Adjust the display brightness and/or contrast to reduce eyestrain. Users are also at ...
...working in one fixed posture • avoid slouching forward and/or leaning backward • stand up and walk around regularly to remove the strain on how to a comfortable level for enhanced text readability and graphics clarity. • Eliminate glare and reflections by adjusting the viewing angle of the monitor, using drapes, shades or blinds vii Display • Keep your display clean. • Keep... side faces the window or any other factors greatly increase the risk of the display. • Adjust the display brightness and/or contrast to reduce eyestrain. Users are also at ...
User Manual
Page 11
... 1 Attaching/removing the base 2 Connecting the power cord 3 Power saving 3 Display Data Channel (DDC) 3 Connector pin assignment 4 Standard timing table 7 Installation 8 User controls 9 How to adjust a setting 10 Mode Management Menu 9 Adjusting the OSD settings 11 Adjusting the picture quality 11 Adjusting the Color setting 12 Adjusting the Audio setting 13 Adjusting the Performance setting 13 Adjusting the OSD setting 14 Product the System setting 15 Product the Information setting 15 Troubleshooting 16 VGA mode 16 DVI model 17 HDMI 1.4 model 18
... 1 Attaching/removing the base 2 Connecting the power cord 3 Power saving 3 Display Data Channel (DDC) 3 Connector pin assignment 4 Standard timing table 7 Installation 8 User controls 9 How to adjust a setting 10 Mode Management Menu 9 Adjusting the OSD settings 11 Adjusting the picture quality 11 Adjusting the Color setting 12 Adjusting the Audio setting 13 Adjusting the Performance setting 13 Adjusting the OSD setting 14 Product the System setting 15 Product the Information setting 15 Troubleshooting 16 VGA mode 16 DVI model 17 HDMI 1.4 model 18

User Manual
Page 12
LCD monitor Quick start guide AC power cord LCD monitor EB5 series-EB225Q USER GUIDE VGA cable (Option) HDMI 1.4 cable (Option) DVI cable (Option) 1 Unpacking Please check that the following items are present when you unpack the box, and save the packing materials in case you need to ship or transport the monitor in the future.
LCD monitor Quick start guide AC power cord LCD monitor EB5 series-EB225Q USER GUIDE VGA cable (Option) HDMI 1.4 cable (Option) DVI cable (Option) 1 Unpacking Please check that the following items are present when you unpack the box, and save the packing materials in case you need to ship or transport the monitor in the future.

User Manual
Page 13
Attaching/removing the base Installation: By aligning the front-end of the bracket with the corresponding slot on the back of the display, and fix the stand onto the display by screwing the four screws clockwise. 1 2 Remove: Reverse the steps to remove the base. 2
Attaching/removing the base Installation: By aligning the front-end of the bracket with the corresponding slot on the back of the display, and fix the stand onto the display by screwing the four screws clockwise. 1 2 Remove: Reverse the steps to remove the base. 2
User Manual
Page 14
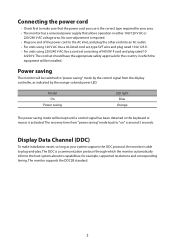
Connecting the power cord • Check first to make installation easier, so long as indicated by the orange-colored power LED. The DDC is the correct type required for your system supports the DDC protocol, the monitor is activated. Model On Power saving LED light Blue Orange The power saving mode will be switched to "power saving" mode by the control signal from "power saving" mode back to "on" is required. • Plug one end of the power cord to plug-and-play. Display Data...
Connecting the power cord • Check first to make installation easier, so long as indicated by the orange-colored power LED. The DDC is the correct type required for your system supports the DDC protocol, the monitor is activated. Model On Power saving LED light Blue Orange The power saving mode will be switched to "power saving" mode by the control signal from "power saving" mode back to "on" is required. • Plug one end of the power cord to plug-and-play. Display Data...

User Manual
Page 15
Connector pin assignment 19-pin color display signal cable PIN No. Description 1 TMDS data 2+ 2 TMDS data 2 shield 3 TMDS data 2- 4 TMDS data 1+ 5 TMDS data 1 shield 6 TMDS data 1- 7 TMDS data 0+ 8 TMDS data 0 shield 9 TMDS data 0- 10 TMDS clock+ * only for certain models PIN No. 11 12 13 14 15 16 17 18 19 Description TMDS clock shield TMDS clockCEC DDC-serial data SCL SDA DDC/CEC Ground +5V Power Hot Plug Detect 4
Connector pin assignment 19-pin color display signal cable PIN No. Description 1 TMDS data 2+ 2 TMDS data 2 shield 3 TMDS data 2- 4 TMDS data 1+ 5 TMDS data 1 shield 6 TMDS data 1- 7 TMDS data 0+ 8 TMDS data 0 shield 9 TMDS data 0- 10 TMDS clock+ * only for certain models PIN No. 11 12 13 14 15 16 17 18 19 Description TMDS clock shield TMDS clockCEC DDC-serial data SCL SDA DDC/CEC Ground +5V Power Hot Plug Detect 4
User Manual
Page 19
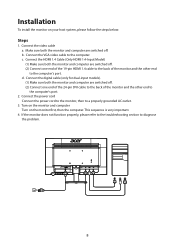
... DVI cable to the back of the monitor and the other end to the computer. d. Connect the digital cable (only for dual-input models). (1) Make sure both the monitor and computer are switched off . (2) Connect one end of the 19-pin HDMI 1.4 cable to the back of the monitor and the other end to the computer's port. Installation To install the monitor on the monitor first, then the computer. Connect the VGA video cable...
... DVI cable to the back of the monitor and the other end to the computer. d. Connect the digital cable (only for dual-input models). (1) Make sure both the monitor and computer are switched off . (2) Connect one end of the 19-pin HDMI 1.4 cable to the back of the monitor and the other end to the computer's port. Installation To install the monitor on the monitor first, then the computer. Connect the VGA video cable...

User Manual
Page 20
... button to adjust volume. (Only HDMI Mode) Press to adjust Brightness. (Only DVI Mode) 9 Using the Shortcut Menu Power A B C D Press the function button to select scenario mode. OSD functions / Down / Right a. Empowering Key/Exit Press this button to select the desired item when in OSD menu. b. Press this button to open the shortcut menu. When the OSD menu is turned ON. Input source switching/ Up / Left a. Press this button will act as the exit key ( exit OSD menu). USER CONTROLS Power Switch / Power LED: To turn the monitor...
... button to adjust volume. (Only HDMI Mode) Press to adjust Brightness. (Only DVI Mode) 9 Using the Shortcut Menu Power A B C D Press the function button to select scenario mode. OSD functions / Down / Right a. Empowering Key/Exit Press this button to select the desired item when in OSD menu. b. Press this button to open the shortcut menu. When the OSD menu is turned ON. Input source switching/ Up / Left a. Press this button will act as the exit key ( exit OSD menu). USER CONTROLS Power Switch / Power LED: To turn the monitor...
User Manual
Page 21
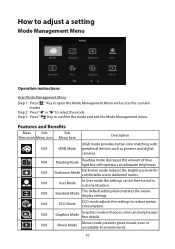
... Menu icon Menu item Description sRGB mode provides better color matching with N/A sRGB Mode peripheral devices such as printers and digital cameras. N/A Standard Mode The default setting demonstrates the native display settings. N/A Movie Mode Movie mode presents great visuals, even in darkened rooms. N/A User Mode In User mode the settings can be fine-tuned to suit any situation. How to adjust a setting Mode Management Menu Operation instructions Acer Mode Management Menu Step 1: Press " " Key to open the Mode Management Menu...
... Menu icon Menu item Description sRGB mode provides better color matching with N/A sRGB Mode peripheral devices such as printers and digital cameras. N/A Standard Mode The default setting demonstrates the native display settings. N/A Movie Mode Movie mode presents great visuals, even in darkened rooms. N/A User Mode In User mode the settings can be fine-tuned to suit any situation. How to adjust a setting Mode Management Menu Operation instructions Acer Mode Management Menu Step 1: Press " " Key to open the Mode Management Menu...
User Manual
Page 22
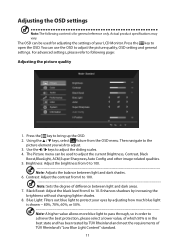
... to adjust the picture quality, OSD setting and general settings. The Picture menu can be used to adjust the sliding scales. 4. Brightness: Adjust the brightness from 0 to 100 Note: Sets the degree of your eyes by increasing the brightness without changing lighter shades. 8. You can be used for general reference only. Actual product specifications may vary. Contrast: Adjust the contrast from 0 to protect your LCD Monitor. Blue Light: Filters out blue light to 100. Note: Adjusts the...
... to adjust the picture quality, OSD setting and general settings. The Picture menu can be used to adjust the sliding scales. 4. Brightness: Adjust the brightness from 0 to 100 Note: Sets the degree of your eyes by increasing the brightness without changing lighter shades. 8. You can be used for general reference only. Actual product specifications may vary. Contrast: Adjust the contrast from 0 to protect your LCD Monitor. Blue Light: Filters out blue light to 100. Note: Adjusts the...
User Manual
Page 23
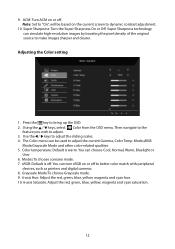
... and digital cameras. 8. Press the key to adjust. 3. Modes:To choose scenario mode. 7. sRGB: Default is warm. Then navigate to the feature you wish to bring up the OSD. 2. Using the / keys, select Color from the OSD menu. Use the / keys to make images sharper and clearer. The Color menu can choose Cool, Normal, Warm, Bluelight or User. 6. Grayscale Mode:To choose Grayscale mode. 9. 6-axis Hue: Adjust the red, green, blue, yellow...
... and digital cameras. 8. Press the key to adjust. 3. Modes:To choose scenario mode. 7. sRGB: Default is warm. Then navigate to the feature you wish to bring up the OSD. 2. Using the / keys, select Color from the OSD menu. Use the / keys to make images sharper and clearer. The Color menu can choose Cool, Normal, Warm, Bluelight or User. 6. Grayscale Mode:To choose Grayscale mode. 9. 6-axis Hue: Adjust the red, green, blue, yellow...
User Manual
Page 24
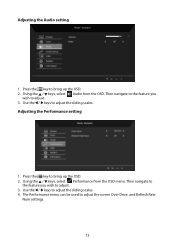
Then navigate to the feature you wish to adjust. 3. Using the / keys, select Performance from the OSD. Then navigate to the feature you wish to bring up the OSD. 2. The Performance menu can be used to adjust the sliding scales. Adjusting the Performance setting 1. Press the key to adjust. 3. Use the / keys to adjust the screen Over Drive and Refresh Rate Num settings. 13 Use the / keys to bring up the OSD. 2. Adjusting the Audio setting 1. Press the key to adjust the sliding scales. 4. Using the / keys, select Audio from the OSD menu.
Then navigate to the feature you wish to adjust. 3. Using the / keys, select Performance from the OSD. Then navigate to the feature you wish to bring up the OSD. 2. The Performance menu can be used to adjust the sliding scales. Adjusting the Performance setting 1. Press the key to adjust. 3. Use the / keys to adjust the screen Over Drive and Refresh Rate Num settings. 13 Use the / keys to bring up the OSD. 2. Adjusting the Audio setting 1. Press the key to adjust the sliding scales. 4. Using the / keys, select Audio from the OSD menu.
User Manual
Page 25
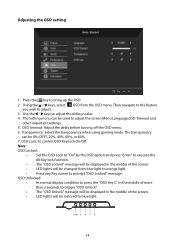
.... Power A B C D 14 OSD timeout: Adjust the delay before turning off the OSD menu. 6. OSD Unlocked: • In normal display condition to press the "OSD Key C" in the middle of the screen. • LED lights will be 0% (OFF), 20%, 40%, 60%, or 80%. 7. Adjusting the OSD setting 1. Using the / keys, select OSD from blue light to orange light. • Press any Key screen to bring up the OSD. 2. Transparency: Select the transparency when using gaming mode...
.... Power A B C D 14 OSD timeout: Adjust the delay before turning off the OSD menu. 6. OSD Unlocked: • In normal display condition to press the "OSD Key C" in the middle of the screen. • LED lights will be 0% (OFF), 20%, 40%, 60%, or 80%. 7. Adjusting the OSD setting 1. Using the / keys, select OSD from blue light to orange light. • Press any Key screen to bring up the OSD. 2. Transparency: Select the transparency when using gaming mode...
User Manual
Page 27
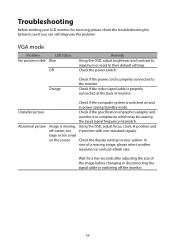
... select another resolution or vertical refresh rate. In case of the image before changing or disconnecting the signal cable or switching off -center, too V-position with non-standard signals. Check the display setting on the screen. Wait for servicing, please check the troubleshooting list below to see if you can self-diagnose the problem VGA mode Problem LED status No picture visible Blue Off Remedy Using the OSD, adjust brightness and contrast to maximum or reset to the monitor. Check the power switch. Check if the...
... select another resolution or vertical refresh rate. In case of the image before changing or disconnecting the signal cable or switching off -center, too V-position with non-standard signals. Check the display setting on the screen. Wait for servicing, please check the troubleshooting list below to see if you can self-diagnose the problem VGA mode Problem LED status No picture visible Blue Off Remedy Using the OSD, adjust brightness and contrast to maximum or reset to the monitor. Check the power switch. Check if the...
User Manual
Page 28
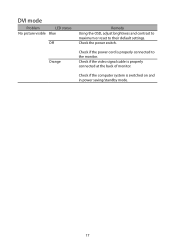
DVI mode Problem LED status No picture visible Blue Off Orange Remedy Using the OSD, adjust brightness and contrast to maximum or reset to the monitor. Check if the power cord is properly connected to their default settings. Check if the video signal cable is switched on and in power saving/standby mode. 17 Check if the computer system is properly connected at the back of monitor. Check the power switch.
DVI mode Problem LED status No picture visible Blue Off Orange Remedy Using the OSD, adjust brightness and contrast to maximum or reset to the monitor. Check if the power cord is properly connected to their default settings. Check if the video signal cable is switched on and in power saving/standby mode. 17 Check if the computer system is properly connected at the back of monitor. Check the power switch.
User Manual
Page 29
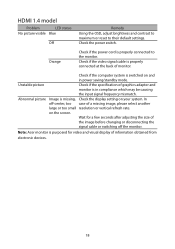
... resolution or vertical refresh rate. Orange Check if the power cord is missing, Check the display setting on your system. In off the monitor. Unstable picture Check if the specification of information obtained from electronic devices. 18 Wait for video and visual display of graphics adapter and monitor is switched on the screen. Abnormal picture Image is properly connected to their default settings. HDMI 1.4 model Problem LED status No picture visible Blue Off Remedy Using the OSD, adjust brightness and contrast to maximum or reset to the monitor...
... resolution or vertical refresh rate. Orange Check if the power cord is missing, Check the display setting on your system. In off the monitor. Unstable picture Check if the specification of information obtained from electronic devices. 18 Wait for video and visual display of graphics adapter and monitor is switched on the screen. Abnormal picture Image is properly connected to their default settings. HDMI 1.4 model Problem LED status No picture visible Blue Off Remedy Using the OSD, adjust brightness and contrast to maximum or reset to the monitor...

