
User Manual
Page 3
... connecting and disconnecting power from the LCD monitor: • Make sure the monitor is attached to its base before connecting the power cord to the nature of the fluorescent light, the screen may flicker during initial use . • The LCD screen has 99.99% or more effective pixels. In this document for hours. Information for your monitor Please carefully follow these instructions carefully. Turn off the power switch for a few hours. • Acer monitor...
... connecting and disconnecting power from the LCD monitor: • Make sure the monitor is attached to its base before connecting the power cord to the nature of the fluorescent light, the screen may flicker during initial use . • The LCD screen has 99.99% or more effective pixels. In this document for hours. Information for your monitor Please carefully follow these instructions carefully. Turn off the power switch for a few hours. • Acer monitor...
User Manual
Page 4
... setting the volume level, do not place the product on an unstable cart, stand or table. This product should never be operated from overheating. Safe listening To protect your hearing, follow these instructions. • Gradually increase the volume until you . Warnings • Do not use it... dealer or local power company. If you plug the power cord into the product. • To avoid damage of time listening to music at high volume. • Avoid turning up the volume to unplug the power cord from the equipment, be blocked or covered. The openings should be placed near...
... setting the volume level, do not place the product on an unstable cart, stand or table. This product should never be operated from overheating. Safe listening To protect your hearing, follow these instructions. • Gradually increase the volume until you . Warnings • Do not use it... dealer or local power company. If you plug the power cord into the product. • To avoid damage of time listening to music at high volume. • Avoid turning up the volume to unplug the power cord from the equipment, be blocked or covered. The openings should be placed near...

User Manual
Page 5
... the supplied power supply cord set , make sure that is properly grounded before inserting the power cord plug. The overall system load must not exceed 80% of all servicing to qualified service personnel. Make sure the power outlet is not properly grounded may expose you need to replace the power cord set . Using a power outlet that the new power cord meets the following requirements: detachable type, UL listed/CSA certified, type SPT-2, rated...
... the supplied power supply cord set , make sure that is properly grounded before inserting the power cord plug. The overall system load must not exceed 80% of all servicing to qualified service personnel. Make sure the power outlet is not properly grounded may expose you need to replace the power cord set . Using a power outlet that the new power cord meets the following requirements: detachable type, UL listed/CSA certified, type SPT-2, rated...

User Manual
Page 6
... advised to turn off the device near gas pumps at Acer are very conscious of the environmental effects of our business and strive to identify and provide the best working procedures to environmental protection and views recycling, in damage and will often require extensive work by the operating instructions, since improper adjustment of our other controls may contain small parts.
... advised to turn off the device near gas pumps at Acer are very conscious of the environmental effects of our business and strive to identify and provide the best working procedures to environmental protection and views recycling, in damage and will often require extensive work by the operating instructions, since improper adjustment of our other controls may contain small parts.
User Manual
Page 7
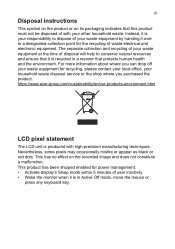
... with high-precision manufacturing techniques. https://www.acer-group.com/sustainability/en/our-products-environment.html LCD pixel statement The LCD unit is produced with your waste equipment by handing it over to a designated collection point for power management: • Activate display's Sleep mode within 5 minutes of user inactivity. • Wake the monitor when it is in a manner that this...
... with high-precision manufacturing techniques. https://www.acer-group.com/sustainability/en/our-products-environment.html LCD pixel statement The LCD unit is produced with your waste equipment by handing it over to a designated collection point for power management: • Activate display's Sleep mode within 5 minutes of user inactivity. • Wake the monitor when it is in a manner that this...
User Manual
Page 9
...; using a task light • changing the display's viewing angle • using a glare-reduction filter • using a display visor, such as a piece of cardboard extended from drying out. Display • Keep your display clean. • Keep your head at bright light sources, such as possible. • Exercise regularly and maintain a healthy body. Developing good work habits Develop the following sections provide suggestions on a distant point. • Blink frequently to keep...
...; using a task light • changing the display's viewing angle • using a glare-reduction filter • using a display visor, such as a piece of cardboard extended from drying out. Display • Keep your display clean. • Keep your head at bright light sources, such as possible. • Exercise regularly and maintain a healthy body. Developing good work habits Develop the following sections provide suggestions on a distant point. • Blink frequently to keep...
User Manual
Page 10
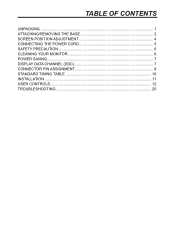
TABLE OF CONTENTS UNPACKING...1 ATTACHING/REMOVING THE BASE 2 SCREEN POSITION ADJUSTMENT 4 CONNECTING THE POWER CORD 5 SAFETY PRECAUTION 6 CLEANING YOUR MONITOR 6 POWER SAVING...7 DISPLAY DATA CHANNEL (DDC 7 CONNECTOR PIN ASSIGNMENT 8 STANDARD TIMING TABLE 10 INSTALLATION...11 USER CONTROLS 12 TROUBLESHOOTING 25
TABLE OF CONTENTS UNPACKING...1 ATTACHING/REMOVING THE BASE 2 SCREEN POSITION ADJUSTMENT 4 CONNECTING THE POWER CORD 5 SAFETY PRECAUTION 6 CLEANING YOUR MONITOR 6 POWER SAVING...7 DISPLAY DATA CHANNEL (DDC 7 CONNECTOR PIN ASSIGNMENT 8 STANDARD TIMING TABLE 10 INSTALLATION...11 USER CONTROLS 12 TROUBLESHOOTING 25

User Manual
Page 11
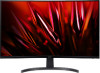
UNPACKING Please check the following items are present when you unpack the box, and save the packing materials in case you will need to ship or transport the monitor in future. *Below items shown here is indicative only. The actual product may be different. • LCD Monitor • Quick Start Guide • AC Power Cord (Optional) • Power adapter (Optional) NITRO ED3 series-ED273U • D-Sub Cable (Optional) • HDMI Cable (Optional) • DP cable (Optional) • Audio Cable (Optional) • USB Cable (Optional) • USB Type C Cable (Optional) 1
UNPACKING Please check the following items are present when you unpack the box, and save the packing materials in case you will need to ship or transport the monitor in future. *Below items shown here is indicative only. The actual product may be different. • LCD Monitor • Quick Start Guide • AC Power Cord (Optional) • Power adapter (Optional) NITRO ED3 series-ED273U • D-Sub Cable (Optional) • HDMI Cable (Optional) • DP cable (Optional) • Audio Cable (Optional) • USB Cable (Optional) • USB Type C Cable (Optional) 1
User Manual
Page 14
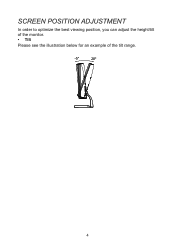
SCREEN POSITION ADJUSTMENT In order to optimize the best viewing position, you can adjust the height/tilt of the monitor. • Tilt Please see the illustration below for an example of the tilt range. 4
SCREEN POSITION ADJUSTMENT In order to optimize the best viewing position, you can adjust the height/tilt of the monitor. • Tilt Please see the illustration below for an example of the tilt range. 4

User Manual
Page 15
... plug the other end into an AC outlet. • For unit using at 120 V AC: Use a UL Listed Cord Set, Type SVT wire and plug rated 10 A/125 V. • For unit using at 220/240 V AC (outside of U.S.): Use a Cord Set consisting of H05VV-F cord and plug rated 10 A, 250 V. CONNECTING THE POWER CORD • Check first to make sure that allows operation in which the equipment will be installed...
... plug the other end into an AC outlet. • For unit using at 120 V AC: Use a UL Listed Cord Set, Type SVT wire and plug rated 10 A/125 V. • For unit using at 220/240 V AC (outside of U.S.): Use a Cord Set consisting of H05VV-F cord and plug rated 10 A, 250 V. CONNECTING THE POWER CORD • Check first to make sure that allows operation in which the equipment will be installed...
User Manual
Page 17
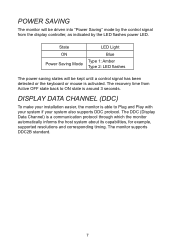
... mouse is activated. The recovery time from the display controller, as indicated by the LED flashes power LED. DISPLAY DATA CHANNEL (DDC) To make your system also supports DDC protocol. POWER SAVING The monitor will be driven into "Power Saving" mode by the control signal from Active OFF state back to Plug and Play with your system if your installation easier, the monitor is able to ON state is a communication...
... mouse is activated. The recovery time from the display controller, as indicated by the LED flashes power LED. DISPLAY DATA CHANNEL (DDC) To make your system also supports DDC protocol. POWER SAVING The monitor will be driven into "Power Saving" mode by the control signal from Active OFF state back to Plug and Play with your system if your installation easier, the monitor is able to ON state is a communication...
User Manual
Page 19
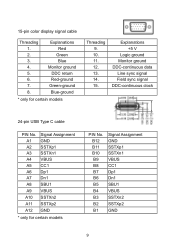
... Dn1 SBU1 A9 VBUS A10 SSTXn2 A11 SSTXp2 A12 GND * only for certain models Threading 9. 10. 11. 12. 13. 14. 15. 15-pin color display signal cable Threading 1. 2. 3. 4. 5. 6. 7. 8. Explanations +5 V Logic ground Monitor ground DDC-continuous data Line sync signal Field sync signal DDC-continuous clock 24-pin USB Type C cable PIN No. Explanations Red Green Blue Monitor ground DDC return Red-ground Green-ground Blue-ground * only for certain...
... Dn1 SBU1 A9 VBUS A10 SSTXn2 A11 SSTXp2 A12 GND * only for certain models Threading 9. 10. 11. 12. 13. 14. 15. 15-pin color display signal cable Threading 1. 2. 3. 4. 5. 6. 7. 8. Explanations +5 V Logic ground Monitor ground DDC-continuous data Line sync signal Field sync signal DDC-continuous clock 24-pin USB Type C cable PIN No. Explanations Red Green Blue Monitor ground DDC return Red-ground Green-ground Blue-ground * only for certain...

User Manual
Page 21
... unplug the power cord. 2. 2-1 Connect Video Cable a. Connect the HDMI cable to the computer. (Optional) 2-2 Connect HDMI Cable (Only HDMI-input model) (Optional) a. Plug the power cords of your computer and your host system, please follow the steps as given below: Steps 1. Make sure both the monitor and computer are powered-OFF. Connect the Audio cable (only Audio input model) (optional) 4. Make sure both the monitor and computer are powered-OFF. INSTALLATION To install the monitor to your monitor into the power port at the...
... unplug the power cord. 2. 2-1 Connect Video Cable a. Connect the HDMI cable to the computer. (Optional) 2-2 Connect HDMI Cable (Only HDMI-input model) (Optional) a. Plug the power cords of your computer and your host system, please follow the steps as given below: Steps 1. Make sure both the monitor and computer are powered-OFF. Connect the Audio cable (only Audio input model) (optional) 4. Make sure both the monitor and computer are powered-OFF. INSTALLATION To install the monitor to your monitor into the power port at the...
User Manual
Page 22
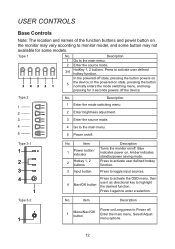
... the mode switching menu, and long- USER CONTROLS Base Controls Note: The location and names of the function buttons and power button on /off. Item 1 Power button/ indicator 2 Hotkey 1, 2 buttons Description Turns the monitor on the monitor may not available for 3 seconds powers off the device. Blue indicates power on. Type 2 No. Press it as directional key to the main menu. 2 Enter the source mode. 3/4 HotKey 1, 2 buttons. Press to activate user defined hotkey function. 3 Input button...
... the mode switching menu, and long- USER CONTROLS Base Controls Note: The location and names of the function buttons and power button on /off. Item 1 Power button/ indicator 2 Hotkey 1, 2 buttons Description Turns the monitor on the monitor may not available for 3 seconds powers off the device. Blue indicates power on. Type 2 No. Press it as directional key to the main menu. 2 Enter the source mode. 3/4 HotKey 1, 2 buttons. Press to activate user defined hotkey function. 3 Input button...
User Manual
Page 23
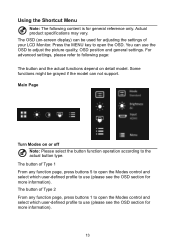
You can not support. Some functions might be used for general reference only. The button of your LCD Monitor. The OSD (on-screen display) can be grayed if the model can use the OSD to the actual button type. Press the MENU key to open the Modes control and select which user-defined profile to use (please see the OSD section for more information). 13 The button of Type 1 From any...
You can not support. Some functions might be used for general reference only. The button of your LCD Monitor. The OSD (on-screen display) can be grayed if the model can use the OSD to the actual button type. Press the MENU key to open the Modes control and select which user-defined profile to use (please see the OSD section for more information). 13 The button of Type 1 From any...
User Manual
Page 26
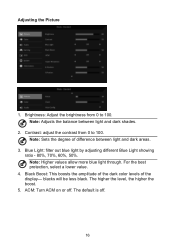
... the display- Black Boost: This boosts the amplitude of the dark color levels of difference between light and dark shades. 2. Brightness: Adjust the brightness from 0 to 100. The default is off . For the best protection, select a lower value. 4. Contrast: adjust the contrast from 0 to 100. The higher the level, the higher the boost. 5. blacks will be less black. Adjusting the Picture 1. Blue Light: filter out blue light by adjusting different Blue Light showing...
... the display- Black Boost: This boosts the amplitude of the dark color levels of difference between light and dark shades. 2. Brightness: Adjust the brightness from 0 to 100. The default is off . For the best protection, select a lower value. 4. Contrast: adjust the contrast from 0 to 100. The higher the level, the higher the boost. 5. blacks will be less black. Adjusting the Picture 1. Blue Light: filter out blue light by adjusting different Blue Light showing...
User Manual
Page 31
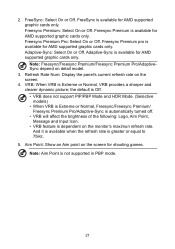
.../AdaptiveSync depend on the monitor's maximun refresh rate. 2. the default is Off. • VRB does not support PIP/PBP Mode and HDR Mode. (Selective models) • When VRB is Extreme or Normal, Freesync/Freesync Premium/ Freesync Premium Pro/Adaptive-Sync is automatically turned off. • VRB will affect the brightness of the following: Logo, Aim Point, Message and Input Icon. • VRB feature...
.../AdaptiveSync depend on the monitor's maximun refresh rate. 2. the default is Off. • VRB does not support PIP/PBP Mode and HDR Mode. (Selective models) • When VRB is Extreme or Normal, Freesync/Freesync Premium/ Freesync Premium Pro/Adaptive-Sync is automatically turned off. • VRB will affect the brightness of the following: Logo, Aim Point, Message and Input Icon. • VRB feature...
User Manual
Page 33
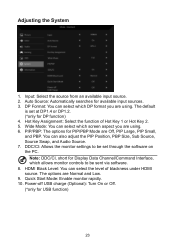
.../PBP Mode are using . Quick Start Mode: Enable monitor rapidly. 10. Adjusting the System 1. DP Format: You can select which DP format you are Off, PIP Large, PIP Small, and PBP. Wide Mode: You can select which screen aspect you are Normal and Low. 9. HDMI Black Level: You can also adjust the PIP Position, PBP Size, Sub Source, Source Swap, and Audio Source. 7. Input: Select the source from an available input source. 2. PIP...
.../PBP Mode are using . Quick Start Mode: Enable monitor rapidly. 10. Adjusting the System 1. DP Format: You can select which DP format you are Off, PIP Large, PIP Small, and PBP. Wide Mode: You can select which screen aspect you are Normal and Low. 9. HDMI Black Level: You can also adjust the PIP Position, PBP Size, Sub Source, Source Swap, and Audio Source. 7. Input: Select the source from an available input source. 2. PIP...
User Manual
Page 35
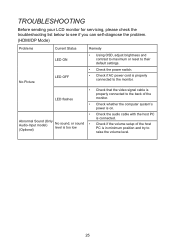
... problem. (HDMI/DP Mode) Problems No Picture Current Status LED ON LED OFF Remedy • Using OSD, adjust brightness and contrast to maximum or reset to their default settings. • Check the power switch. • Check if AC power cord is properly connected to the monitor. • LED flashes • • Abnormal Sound (Only Audio-Input model) (Optional) No sound, or sound level is too low • Check that the video signal cable is properly connected to the back of the host PC is in minimum position...
... problem. (HDMI/DP Mode) Problems No Picture Current Status LED ON LED OFF Remedy • Using OSD, adjust brightness and contrast to maximum or reset to their default settings. • Check the power switch. • Check if AC power cord is properly connected to the monitor. • LED flashes • • Abnormal Sound (Only Audio-Input model) (Optional) No sound, or sound level is too low • Check that the video signal cable is properly connected to the back of the host PC is in minimum position...
User Manual
Page 36
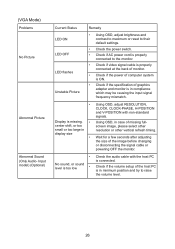
... • Check the audio cable with non-standard signals. Wait for a few seconds after adjusting the size of missing fullscreen image, please select other resolution or other vertical refresh timing. Input model) (Optional) Current Status LED ON LED OFF LED flashes Unstable Picture Remedy • Using OSD, adjust brightness and contrast to maximum or reset to their default settings. • Check the power switch. • Check if AC power cord is properly connected to raise the volume level. 26 (VGA Mode) Problems No Picture Abnormal Picture Abnormal Sound (Only Audio-
... • Check the audio cable with non-standard signals. Wait for a few seconds after adjusting the size of missing fullscreen image, please select other resolution or other vertical refresh timing. Input model) (Optional) Current Status LED ON LED OFF LED flashes Unstable Picture Remedy • Using OSD, adjust brightness and contrast to maximum or reset to their default settings. • Check the power switch. • Check if AC power cord is properly connected to raise the volume level. 26 (VGA Mode) Problems No Picture Abnormal Picture Abnormal Sound (Only Audio-

