
User Manual
Page 3
... screen and cabinet front and sides. Accessibility Be sure that the power outlet you plug the power cord into is displayed for hours. Safe listening To protect your hearing, follow these guidelines when cleaning the monitor: • Always unplug the monitor before cleaning. • Use a soft cloth to a higher refresh rate than advertised by changing the image or turning off the power switch and then turn it after switching the image...
... screen and cabinet front and sides. Accessibility Be sure that the power outlet you plug the power cord into is displayed for hours. Safe listening To protect your hearing, follow these guidelines when cleaning the monitor: • Always unplug the monitor before cleaning. • Use a soft cloth to a higher refresh rate than advertised by changing the image or turning off the power switch and then turn it after switching the image...
User Manual
Page 4
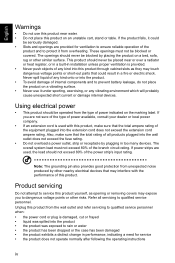
... a need for ventilation to ensure reliable operation of the equipment plugged into the wall outlet does not exceed the fuse rating. • Do not overload a power outlet, strip or receptacle by other similar surface. Using electrical power • This product should never be operated from the wall outlet and refer servicing to qualified service personnel when: • the power cord or plug is...
... a need for ventilation to ensure reliable operation of the equipment plugged into the wall outlet does not exceed the fuse rating. • Do not overload a power outlet, strip or receptacle by other similar surface. Using electrical power • This product should never be operated from the wall outlet and refer servicing to qualified service personnel when: • the power cord or plug is...

User Manual
Page 5
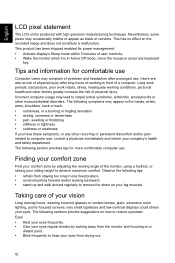
... one of our other controls may contain small parts. Disposal instructions Do not throw this website: http://www.acer-group.com/public/Sustainability/sustainability01.htm Visit www.acer-group.com for video and visual display of information obtained from Electrical and Electronics Equipment (WEEE) regulations, visit http://www.acer-group.com/public/Sustainability/sustainability01.htm Acer monitor is strongly committed...
... one of our other controls may contain small parts. Disposal instructions Do not throw this website: http://www.acer-group.com/public/Sustainability/sustainability01.htm Visit www.acer-group.com for video and visual display of information obtained from Electrical and Electronics Equipment (WEEE) regulations, visit http://www.acer-group.com/public/Sustainability/sustainability01.htm Acer monitor is strongly committed...
User Manual
Page 6
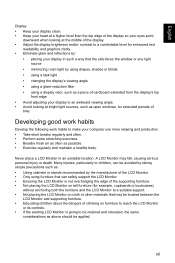
... the monitor, using a footrest, or raising your sitting height to remove the strain on your eyes regular breaks by adjusting the viewing angle of eyestrain and headaches after long hours of working conditions, personal health and other recurring or persistent discomfort and/or pain related to reduce eyestrain. The following section provides tips for power management: • Activate display's Sleep mode...
... the monitor, using a footrest, or raising your sitting height to remove the strain on your eyes regular breaks by adjusting the viewing angle of eyestrain and headaches after long hours of working conditions, personal health and other recurring or persistent discomfort and/or pain related to reduce eyestrain. The following section provides tips for power management: • Activate display's Sleep mode...
User Manual
Page 7
... reach the LCD Monitor or its controls. • If the existing LCD Monitor is going to be retained and relocated, the same considerations as above should be applied. vii English Display • Keep your display clean. • Keep your head at a higher level than the top edge of the display so your eyes point downward when looking at bright light sources, such as open windows, for example...
... reach the LCD Monitor or its controls. • If the existing LCD Monitor is going to be retained and relocated, the same considerations as above should be applied. vii English Display • Keep your display clean. • Keep your head at a higher level than the top edge of the display so your eyes point downward when looking at bright light sources, such as open windows, for example...
User Manual
Page 10
... v Disposal instructions v LCD pixel statement vi Tips and information for comfortable use vi Finding your comfort zone vi Taking care of your vision vi Developing good work habits vii PACKAGE CONTENTS 1 Attaching the monitor to the base 2 Attaching the monitor on the wall 3 SCREEN POSITION ADJUSTMENT 4 CONNECTING THE POWER CORD 5 Connecting the adapter and AC Power cord 5 POWER SAVING 5 Display Data Channel (DDC) 6 20-Pin Color Display Signal Cable 6 19-Pin Color Display Signal Cable 7 STANDARD TIMING TABLE 8 Connecting Your Monitor to...
... v Disposal instructions v LCD pixel statement vi Tips and information for comfortable use vi Finding your comfort zone vi Taking care of your vision vi Developing good work habits vii PACKAGE CONTENTS 1 Attaching the monitor to the base 2 Attaching the monitor on the wall 3 SCREEN POSITION ADJUSTMENT 4 CONNECTING THE POWER CORD 5 Connecting the adapter and AC Power cord 5 POWER SAVING 5 Display Data Channel (DDC) 6 20-Pin Color Display Signal Cable 6 19-Pin Color Display Signal Cable 7 STANDARD TIMING TABLE 8 Connecting Your Monitor to...
User Manual
Page 13
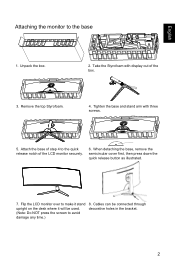
... the LCD monitor over to make it stand upright on the desk where it will be connected through decorative holes in the bracket. 2 Attach the base of the LCD monitor securely. 6. When detaching the base, remove the semicircular cover first, then press down the quick release button as illustrated. 7. Unpack the box. 2. Cables can be used. (Note: Do NOT press the screen to the quick release notch...
... the LCD monitor over to make it stand upright on the desk where it will be connected through decorative holes in the bracket. 2 Attach the base of the LCD monitor securely. 6. When detaching the base, remove the semicircular cover first, then press down the quick release button as illustrated. 7. Unpack the box. 2. Cables can be used. (Note: Do NOT press the screen to the quick release notch...
User Manual
Page 15
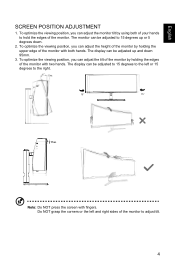
... monitor with two hands. To optimize the viewing position, you can adjust the tilt of the monitor by using both of the monitor with both hands. To optimize the viewing position, you can adjust the height of the monitor by holding the edges of your hands to 15 degrees up and down . 2. To optimize the viewing position, you can be adjusted up or 5 degrees down 95mm. 3. The display can adjust the monitor tilt...
... monitor with two hands. To optimize the viewing position, you can adjust the tilt of the monitor by using both of the monitor with both hands. To optimize the viewing position, you can adjust the height of the monitor by holding the edges of your hands to 15 degrees up and down . 2. To optimize the viewing position, you can be adjusted up or 5 degrees down 95mm. 3. The display can adjust the monitor tilt...
User Manual
Page 16
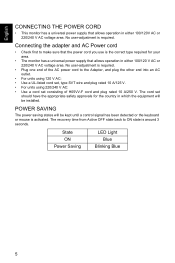
...; For units using 120 V AC: • Use a UL-listed cord set, type SVT wire and plug rated 10 A/125 V. • For units using 220/240 V AC: • Use a cord set should have the appropriate safety approvals for your area. • The monitor has a universal power supply that allows operation in which the equipment will be installed. No user-adjustment is activated. State ON Power Saving LED Light Blue Blinking Blue 5 No user-adjustment is around...
...; For units using 120 V AC: • Use a UL-listed cord set, type SVT wire and plug rated 10 A/125 V. • For units using 220/240 V AC: • Use a cord set should have the appropriate safety approvals for your area. • The monitor has a universal power supply that allows operation in which the equipment will be installed. No user-adjustment is activated. State ON Power Saving LED Light Blue Blinking Blue 5 No user-adjustment is around...

User Manual
Page 17
... ML_Lane 3+ ML_Lane 3CONFIG2 GND Hot Plug DP_PWR 6 The DDC (Display Data Channel) is able to Plug and Play with your system if your system also supports DDC protocol. English Display Data Channel (DDC) To make your installation easier, the monitor is a communication protocol through which the monitor automatically informs the host system about its capabilities, for example, supported resolutions and corresponding timing.
... ML_Lane 3+ ML_Lane 3CONFIG2 GND Hot Plug DP_PWR 6 The DDC (Display Data Channel) is able to Plug and Play with your system if your system also supports DDC protocol. English Display Data Channel (DDC) To make your installation easier, the monitor is a communication protocol through which the monitor automatically informs the host system about its capabilities, for example, supported resolutions and corresponding timing.
User Manual
Page 19
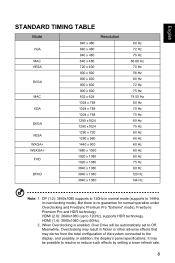
English STANDARD TIMING TABLE Mode VGA MAC VESA SVGA MAC XGA SXGA VESA WXGA+ WSXGA+ ... 1080 1920 x 1080 3840 x 1080 3840 x 1080 3840 x 1080 Resolution 60 Hz 72 Hz 75 Hz 66.66 Hz 70 Hz 56 Hz 60...flicker or other adverse effects that may be automatically set to resolve or reduce such effects by setting a lower refresh rate. 8 But there is enabled, Over Drive will be possible to Off. It may derive from the total configuration of the system connected to 144Hz in addition, the display's panel specifications. DP (1.2): 3840x1080 supports to 120Hz in normal mode (supports to the display...
English STANDARD TIMING TABLE Mode VGA MAC VESA SVGA MAC XGA SXGA VESA WXGA+ WSXGA+ ... 1080 1920 x 1080 3840 x 1080 3840 x 1080 3840 x 1080 Resolution 60 Hz 72 Hz 75 Hz 66.66 Hz 70 Hz 56 Hz 60...flicker or other adverse effects that may be automatically set to resolve or reduce such effects by setting a lower refresh rate. 8 But there is enabled, Over Drive will be possible to Off. It may derive from the total configuration of the system connected to 144Hz in addition, the display's panel specifications. DP (1.2): 3840x1080 supports to 120Hz in normal mode (supports to the display...
User Manual
Page 20
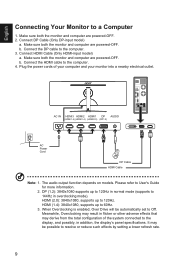
....2) AC Power Cord HDMI HDMI DP Cable HDMI Cable Note: 1. The audio output function depends on models. Please refer to 60Hz. 3. HDMI (1.4): 3840x1080, supports up to User's Guide for more information. 2. Make sure both the monitor and computer are powered-OFF. 2. Connect the HDMI cable to the display, and possibly, in addition, the display's panel specifications. Meanwhile, Overclocking may result in flicker or other adverse effects that may be automatically set to 120Hz. b. HDMI (2.0): 3840x1080, supports up...
....2) AC Power Cord HDMI HDMI DP Cable HDMI Cable Note: 1. The audio output function depends on models. Please refer to 60Hz. 3. HDMI (1.4): 3840x1080, supports up to User's Guide for more information. 2. Make sure both the monitor and computer are powered-OFF. 2. Connect the HDMI cable to the display, and possibly, in addition, the display's panel specifications. Meanwhile, Overclocking may result in flicker or other adverse effects that may be automatically set to 120Hz. b. HDMI (2.0): 3840x1080, supports up...

User Manual
Page 21
... Premium Pro supported graphics source to the next menu. 5 POWER Power button Turns the monitor on/off. a. When the OSD menu is enabled, press to select or return to open the Brightness 2 / Brightness / Enter control. When the OSD menu is enabled, press to view the OSD. 4 / OSD functions/- Press to next level. Press to exit the current menu and go to dynamically adjust display refresh rate based on . Blinking Blue indicates standby mode. When the OSD menu is enabled, press...
... Premium Pro supported graphics source to the next menu. 5 POWER Power button Turns the monitor on/off. a. When the OSD menu is enabled, press to select or return to open the Brightness 2 / Brightness / Enter control. When the OSD menu is enabled, press to view the OSD. 4 / OSD functions/- Press to next level. Press to exit the current menu and go to dynamically adjust display refresh rate based on . Blinking Blue indicates standby mode. When the OSD menu is enabled, press...

User Manual
Page 23
The OSD (On Screen Display) can use or scenario mode (User, Standard, ECO, Graphics, HDR) Hot key1 (default: Brightness) Open the Brightness control and select the brightness setting. Mode B. You can be used to open the OSD. Main Menu Mode To choose scenario mode (G1, G2, G3) which user-defined profile to use the OSD to adjust the picture quality, OSD position and general settings. Hot Key2: Brightness, Volume, Gamma, Contrast, Blue Light, Over Drive, PIP/PBP D. English Using the Shortcut Menu The following page: Main page...
The OSD (On Screen Display) can use or scenario mode (User, Standard, ECO, Graphics, HDR) Hot key1 (default: Brightness) Open the Brightness control and select the brightness setting. Mode B. You can be used to open the OSD. Main Menu Mode To choose scenario mode (G1, G2, G3) which user-defined profile to use the OSD to adjust the picture quality, OSD position and general settings. Hot Key2: Brightness, Volume, Gamma, Contrast, Blue Light, Over Drive, PIP/PBP D. English Using the Shortcut Menu The following page: Main page...
User Manual
Page 26
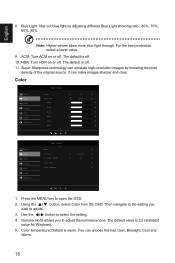
...; button, select Color from the OSD. W arm 50 50 50 50 50 50 Picture Color Audio Gaming OSD System Information Mode - Note: Higher values allow more blue light through. Use the / button to open the OSD. 2. Standard Gamma Color T emp RGain GGain B Gain R Bias G Bias B Bias 2 2. Blue Light: filter out blue light by boosting the pixel density of the original source. Color temperature: Default is 2.2 (standard value for Windows). 5. English Ř Ř 8. Color Picture Color Audio Gaming OSD System Information Mode...
...; button, select Color from the OSD. W arm 50 50 50 50 50 50 Picture Color Audio Gaming OSD System Information Mode - Note: Higher values allow more blue light through. Use the / button to open the OSD. 2. Standard Gamma Color T emp RGain GGain B Gain R Bias G Bias B Bias 2 2. Blue Light: filter out blue light by boosting the pixel density of the original source. Color temperature: Default is 2.2 (standard value for Windows). 5. English Ř Ř 8. Color Picture Color Audio Gaming OSD System Information Mode...

User Manual
Page 28
... is enabled under Overclocking (144Hz-Mode), it may result in some scene modes. 6. Refresh Rate Num: Display the panel's current refresh rate on the screen for shooting games. 17 English Ř Ř Gaming Picture Color Audio Gaming OSD System Information Mode - Use the / button to Off. 5. FreeSync Premium Pro: Default is "OFF", then the user can choose Extreme and Off. You can set to select the setting. 4. DP support "FreeSync Premium Pro". 4.
... is enabled under Overclocking (144Hz-Mode), it may result in some scene modes. 6. Refresh Rate Num: Display the panel's current refresh rate on the screen for shooting games. 17 English Ř Ř Gaming Picture Color Audio Gaming OSD System Information Mode - Use the / button to Off. 5. FreeSync Premium Pro: Default is "OFF", then the user can choose Extreme and Off. You can set to select the setting. 4. DP support "FreeSync Premium Pro". 4.
User Manual
Page 29
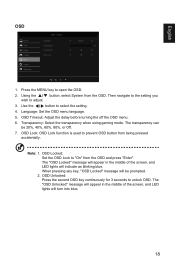
... screen, and LED lights will be 20%, 40%, 60%, 80%, or Off. 7. Using the !Ř 0 Ř button, select System from the OSD and press "Enter". Then navigate to the setting you wish to open the OSD. 2. English OSD Picture Color Audio Gaming OSD System Information Mode - Note: 1. OSD Locked: Set the OSD Lock to select the setting. 4. When pressing any key, "OSD Locked" message will indicate as blinking blue. Press the MENU key to adjust. 3. OSD Unlocked: Press the second OSD...
... screen, and LED lights will be 20%, 40%, 60%, 80%, or Off. 7. Using the !Ř 0 Ř button, select System from the OSD and press "Enter". Then navigate to the setting you wish to open the OSD. 2. English OSD Picture Color Audio Gaming OSD System Information Mode - Note: 1. OSD Locked: Set the OSD Lock to select the setting. 4. When pressing any key, "OSD Locked" message will indicate as blinking blue. Press the MENU key to adjust. 3. OSD Unlocked: Press the second OSD...

User Manual
Page 30
... OSD. The default is "On". 11. English Ř Ř System Picture Color Audio Gaming OSD System InformaƟon 1. Using the !Ř 0 Ř button, select OSD from DP or HDMI input source. The color can select which screen aspect you are Aspect, 1:1, 21:9 and Full. 9. PIP/PBP: Open and use the same display to select the setting. 5. Note: PIP/PBP is not supported while FreeSync is set at DP1.2. 8. Standard Picture Quick Start Mode Of f Color...
... OSD. The default is "On". 11. English Ř Ř System Picture Color Audio Gaming OSD System InformaƟon 1. Using the !Ř 0 Ř button, select OSD from DP or HDMI input source. The color can select which screen aspect you are Aspect, 1:1, 21:9 and Full. 9. PIP/PBP: Open and use the same display to select the setting. 5. Note: PIP/PBP is not supported while FreeSync is set at DP1.2. 8. Standard Picture Quick Start Mode Of f Color...
User Manual
Page 31
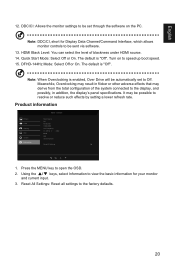
..., which allows monitor controls to be automatically set through the software on to the display, and possibly, in addition, the display's panel specifications. Reset All Settings: Reset all settings to open the OSD. 2. Standard Main Source DP Resoiution 3840x1080 H/V Frequency H: 67KHz V : 60Hz Mode SDR Series Number Reset All Settings 1. The default is "Off". The default is "Off". HDMI Black Level: You can select the level of the system connected to speed up boot speed. 15. Quick Start Mode: Select...
..., which allows monitor controls to be automatically set through the software on to the display, and possibly, in addition, the display's panel specifications. Reset All Settings: Reset all settings to open the OSD. 2. Standard Main Source DP Resoiution 3840x1080 H/V Frequency H: 67KHz V : 60Hz Mode SDR Series Number Reset All Settings 1. The default is "Off". The default is "Off". HDMI Black Level: You can select the level of the system connected to speed up boot speed. 15. Quick Start Mode: Select...
User Manual
Page 33
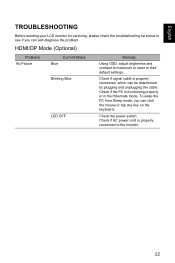
... is properly connected to the monitor. 22 To wake the PC from Sleep mode, you can self-diagnose the problem. HDMI/DP Mode (Optional) Problems No Picture Current Status Blue Blinking Blue LED OFF Remedy Using OSD, adjust brightness and contrast to maximum or reset to see if you can be determined by plugging and unplugging the cable. English TROUBLESHOOTING Before sending your LCD monitor for servicing, please check the troubleshooting list below to their default settings. Check if AC power cord is...
... is properly connected to the monitor. 22 To wake the PC from Sleep mode, you can self-diagnose the problem. HDMI/DP Mode (Optional) Problems No Picture Current Status Blue Blinking Blue LED OFF Remedy Using OSD, adjust brightness and contrast to maximum or reset to see if you can be determined by plugging and unplugging the cable. English TROUBLESHOOTING Before sending your LCD monitor for servicing, please check the troubleshooting list below to their default settings. Check if AC power cord is...

