User Manual
Page 2
English Copyright © 2017. Such changes will be incorporated in new editions of Acer Incorporated. The serial number and model number are recorded on the label affixed to your unit should include the serial number, model number and purchase information. Acer LCD Monitor User Guide Model number Serial number Date of purchase Place of purchase Acer and the Acer logo are used herein for a particular purpose. Other companies' product names or trademarks are registered...
English Copyright © 2017. Such changes will be incorporated in new editions of Acer Incorporated. The serial number and model number are recorded on the label affixed to your unit should include the serial number, model number and purchase information. Acer LCD Monitor User Guide Model number Serial number Date of purchase Place of purchase Acer and the Acer logo are used herein for a particular purpose. Other companies' product names or trademarks are registered...

User Manual
Page 3
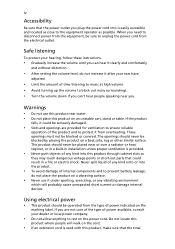
...; uIfntphluegsgyinstgemall hpaoswmerualtdiappletesrosufrrocems tohfeppoowweerr,sduipscpolinesn.ect power from the system by changing the image or turning off before cleaning. • Use a soft cloth to wipe the screen and cabinet front and sides. computer are turned off the power switch for a few hours. • Acer monitor is displayed for video and visual display of the fluorescent light, the screen may find slightly uneven brightness on the screen depending on the product...
...; uIfntphluegsgyinstgemall hpaoswmerualtdiappletesrosufrrocems tohfeppoowweerr,sduipscpolinesn.ect power from the system by changing the image or turning off before cleaning. • Use a soft cloth to wipe the screen and cabinet front and sides. computer are turned off the power switch for a few hours. • Acer monitor is displayed for video and visual display of the fluorescent light, the screen may find slightly uneven brightness on the screen depending on the product...
User Manual
Page 4
... any vibrating environment which will walk on an unstable cart, stand or table. iv Accessibility Be sure that the power outlet you plug the power cord into is easily accessible and located as close to the equipment operator as they may touch dangerous voltage points or short-out parts that the total The openings should be blocked or covered.
... any vibrating environment which will walk on an unstable cart, stand or table. iv Accessibility Be sure that the power outlet you plug the power cord into is easily accessible and located as close to the equipment operator as they may touch dangerous voltage points or short-out parts that the total The openings should be blocked or covered.
User Manual
Page 5
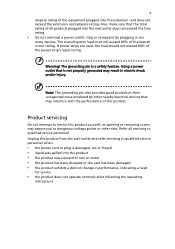
... • the product exhibits a distinct change in performance, indicating a need Prottdoheurefcpotllalumoscnwaeeeyixtrnhipvngeticrecpetroieqfnedwurgienerroewmcisoieterhndptrssohe:detd,upemcteearadcfkohberaymbsuolaertnehtceyterphoeanf,teUatthhrLbieslyinpsetereloweddc/tpuCrocSictAwa. The plug only fits in too ammanpeyrdeervaitciensg. the wall outlet does not exceed the fusev This product's power cord is properly grounded before inserting the power cord plug. tMeaxkceesdur8e0t%heopfotwheerborauntlceht cisirpcruoitprWeartlayirnnggir.noIguf!npTdohewedegbrresotfruoinpreds...
... • the product exhibits a distinct change in performance, indicating a need Prottdoheurefcpotllalumoscnwaeeeyixtrnhipvngeticrecpetroieqfnedwurgienerroewmcisoieterhndptrssohe:detd,upemcteearadcfkohberaymbsuolaertnehtceyterphoeanf,teUatthhrLbieslyinpsetereloweddc/tpuCrocSictAwa. The plug only fits in too ammanpeyrdeervaitciensg. the wall outlet does not exceed the fusev This product's power cord is properly grounded before inserting the power cord plug. tMeaxkceesdur8e0t%heopfotwheerborauntlceht cisirpcruoitprWeartlayirnnggir.noIguf!npTdohewedegbrresotfruoinpreds...

User Manual
Page 6
... to identify and provide the best working procedures to normal condition. They include below deck on the features and benefits of our other controls may contain small parts. For more information and help when recycling, please go to environmental protection and views recycling, in the form of salvaging and disposal of used equipment, as grain, dust or...
... to identify and provide the best working procedures to normal condition. They include below deck on the features and benefits of our other controls may contain small parts. For more information and help when recycling, please go to environmental protection and views recycling, in the form of salvaging and disposal of used equipment, as grain, dust or...
User Manual
Page 8
... remove the strain on your leg muscles This product has been shipped enabled for power management: Tip•s aAnctdivaitne dfisoplramy's Saleteipomnodfeowirthcino15mmfinoutrets aofbusleer use inactivity. • Activate computer's Sleep mode within 30 minutes of working in one fixed posture leaning backward Ff•tohinoedtfrosmyetolsalutuon,srwcdolcieruonsrpmgaiaftsoinipnrdstg:wzyooanlukerabsriytotauindngjduhsrteeiniggguhlttahrtleoyvatiocehwrieeimnvgeomvaenagtxhliemeousftmrtahcineommonfoonyroitt.uoOrr,bleusgesirnvge a • refrain from Sleep mode by pushing the power button...
... remove the strain on your leg muscles This product has been shipped enabled for power management: Tip•s aAnctdivaitne dfisoplramy's Saleteipomnodfeowirthcino15mmfinoutrets aofbusleer use inactivity. • Activate computer's Sleep mode within 30 minutes of working in one fixed posture leaning backward Ff•tohinoedtfrosmyetolsalutuon,srwcdolcieruonsrpmgaiaftsoinipnrdstg:wzyooanlukerabsriytotauindngjduhsrteeiniggguhlttahrtleoyvatiocehwrieeimnvgeomvaenagtxhliemeousftmrtahcineommonfoonyroitt.uoOrr,bleusgesirnvge a • refrain from Sleep mode by pushing the power button...

User Manual
Page 9
... middle of the display. • Adjust the display brightness and/or contrast to a comfortable level for enhanced text readability and graphics clarity. • Eliminate glare and reflections by using drapes, shades or blinds • using a task light • changing the display's viewing angle • using a glare-reduction filter • using a display visor, such as open windows, for extended periods of time. The following work habits Develop the...
... middle of the display. • Adjust the display brightness and/or contrast to a comfortable level for enhanced text readability and graphics clarity. • Eliminate glare and reflections by using drapes, shades or blinds • using a task light • changing the display's viewing angle • using a glare-reduction filter • using a display visor, such as open windows, for extended periods of time. The following work habits Develop the...

User Manual
Page 10
Contents Unpacking 1 Installing/removing base 2 Adjusting screen position 4 Connecting the power cord 5 Safety precautions 5 Cleaning the display 6 Connector pin assignment 7 Standard timing table 8 Installation 9 User control 10 Troubleshooting 19
Contents Unpacking 1 Installing/removing base 2 Adjusting screen position 4 Connecting the power cord 5 Safety precautions 5 Cleaning the display 6 Connector pin assignment 7 Standard timing table 8 Installation 9 User control 10 Troubleshooting 19

User Manual
Page 12
Installing/removing base Note: Unpack the monitor and base first. use a cloth pad to the arm of the monitor stand base. Secure the base to prevent scratching the screen. 1. Carefully place the monitor face down on a stable surface - Attach the monitor stand arm to the wall. 2 Note: If using a wall-mounting kit, we recommend using a VESA mounting kit (75 mm × 75 mm) and M4 × 10 (L) mm screws to secure the monitor to the base. 2.
Installing/removing base Note: Unpack the monitor and base first. use a cloth pad to the arm of the monitor stand base. Secure the base to prevent scratching the screen. 1. Carefully place the monitor face down on a stable surface - Attach the monitor stand arm to the wall. 2 Note: If using a wall-mounting kit, we recommend using a VESA mounting kit (75 mm × 75 mm) and M4 × 10 (L) mm screws to secure the monitor to the base. 2.
User Manual
Page 15
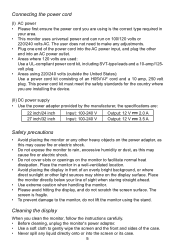
... an overly bright background, or where direct sunlight or other end into the screen or its case. 5 Cleaning the display When you are installing the device. (II) DC power supply • Use the power adapter provided by the manufacturer, the specifications are: 22 inch/24 inch 27 inch/32 inch Input: 100-240 V Input: 100-240 V Output: 12 V Output: 12 V 2.0 A 3.5 A Safety precautions • Avoid placing the monitor or...
... an overly bright background, or where direct sunlight or other end into the screen or its case. 5 Cleaning the display When you are installing the device. (II) DC power supply • Use the power adapter provided by the manufacturer, the specifications are: 22 inch/24 inch 27 inch/32 inch Input: 100-240 V Input: 100-240 V Output: 12 V Output: 12 V 2.0 A 3.5 A Safety precautions • Avoid placing the monitor or...
User Manual
Page 17
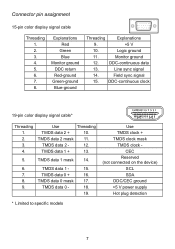
... 11. TMDS data 1 + 13. 5. TMDS data 0 + 16. 8. TMDS data 0 - 18. 19. Monitor ground 12. Connector pin assignment 15-pin color display signal cable Threading 1. 2. 3. 4. 5. 6. 7. 8. Use TMDS clock + TMDS clock mask TMDS clock - Explanations Red Green Blue Monitor ground DDC return Red-ground Green-ground Blue-ground Threading Explanations 9. +5 V 10. CEC Reserved (not connected on the device) SCL SDA DDC/CEC ground +5 V power supply Hot plug detection * Limited to specific models 7
... 11. TMDS data 1 + 13. 5. TMDS data 0 + 16. 8. TMDS data 0 - 18. 19. Monitor ground 12. Connector pin assignment 15-pin color display signal cable Threading 1. 2. 3. 4. 5. 6. 7. 8. Use TMDS clock + TMDS clock mask TMDS clock - Explanations Red Green Blue Monitor ground DDC return Red-ground Green-ground Blue-ground Threading Explanations 9. +5 V 10. CEC Reserved (not connected on the device) SCL SDA DDC/CEC ground +5 V power supply Hot plug detection * Limited to specific models 7
User Manual
Page 19
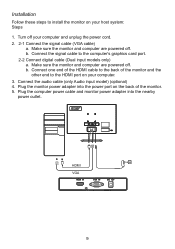
.... Turn off . Connect the signal cable to the computer's graphics card port. 2-2 Connect digital cable (Dual input models only) a. Connect one end of the HDMI cable to the back of the monitor. 5. Plug the computer power cable and monitor power adapter into the power port on the back of the monitor and the other end to the HDMI port on your host system: Steps 1. Make sure the monitor and computer are powered off your computer and unplug the power cord. 2. 2-1 Connect the signal cable (VGA cable) a. Installation...
.... Turn off . Connect the signal cable to the computer's graphics card port. 2-2 Connect digital cable (Dual input models only) a. Connect one end of the HDMI cable to the back of the monitor. 5. Plug the computer power cable and monitor power adapter into the power port on the back of the monitor and the other end to the HDMI port on your host system: Steps 1. Make sure the monitor and computer are powered off your computer and unplug the power cord. 2. 2-1 Connect the signal cable (VGA cable) a. Installation...
User Manual
Page 20
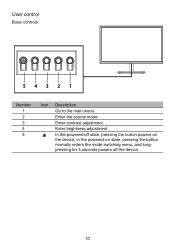
Enter brightness adjustment. In the powered-off state, pressing the button powers on state, pressing the button normally enters the mode switching menu, and longpressing for 3 seconds powers off the device. 10 Enter the source mode. in the powered-on the device; Enter contrast adjustment. User control Basic controls 54321 Number 1 2 3 4 5 Icon Description Go to the main menu.
Enter brightness adjustment. In the powered-off state, pressing the button powers on state, pressing the button normally enters the mode switching menu, and longpressing for 3 seconds powers off the device. 10 Enter the source mode. in the powered-on the device; Enter contrast adjustment. User control Basic controls 54321 Number 1 2 3 4 5 Icon Description Go to the main menu.

User Manual
Page 21
Adjust OSD settings Note: The following pages: Home page All keys bring up the home page. For information on or off Double-press Button 5 to enter mode control and select a user-defined profile to adjust the settings of the LCD display. Use the OSD to open the OSD. Actual product specifications may vary. Press the MENU button to adjust image quality, OSD position, and general settings. OSD (On Screen Display) can be used to use (see the following is for more information.) 11 Turn mode on advanced settings, see the OSD section for general reference only.
Adjust OSD settings Note: The following pages: Home page All keys bring up the home page. For information on or off Double-press Button 5 to enter mode control and select a user-defined profile to adjust the settings of the LCD display. Use the OSD to open the OSD. Actual product specifications may vary. Press the MENU button to adjust image quality, OSD position, and general settings. OSD (On Screen Display) can be used to use (see the following is for more information.) 11 Turn mode on advanced settings, see the OSD section for general reference only.

User Manual
Page 22
Contrast: Contrast can be adjusted from the OSD. Use Buttons 1/2 to bring up the OSD. 2. Brightness: Brightness can be adjusted from 0-100. Then double-press Button 3 to navigate to the setting you need. Picture adjustment 1. Feature page Double-press Button 1 to select the menu function, and then use Button 4 to return to adjust the slider. 4. Double-press Button 1 to select the Picture from 0 to 100. Use Buttons 1/2 to the previous level or exit the menu. Note...
Contrast: Contrast can be adjusted from the OSD. Use Buttons 1/2 to bring up the OSD. 2. Brightness: Brightness can be adjusted from 0-100. Then double-press Button 3 to navigate to the setting you need. Picture adjustment 1. Feature page Double-press Button 1 to select the menu function, and then use Button 4 to return to adjust the slider. 4. Double-press Button 1 to select the Picture from 0 to 100. Use Buttons 1/2 to the previous level or exit the menu. Note...
User Manual
Page 23
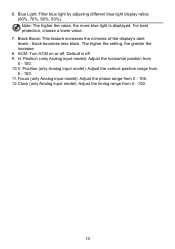
... off . 9. Default is displayed. Focus (only Analog input model): Adjust the phase range from 0 - 100. 12.Clock (only Analog input model): Adjust the timing range from 0 - 100. 11. For best protection, choose a lower value. 7. Position (only Analog input model): Adjust the vertical position range from 0 - 100. 13 Blue Light: Filter blue light by adjusting different blue light display ratios (80%, 70%, 60%, 50%). Note: The higher the value, the more blue light is off . 6. Position (only Analog input model): Adjust the horizontal position from 0 - 100. 10.V. Black Boost: This...
... off . 9. Default is displayed. Focus (only Analog input model): Adjust the phase range from 0 - 100. 12.Clock (only Analog input model): Adjust the timing range from 0 - 100. 11. For best protection, choose a lower value. 7. Position (only Analog input model): Adjust the vertical position range from 0 - 100. 13 Blue Light: Filter blue light by adjusting different blue light display ratios (80%, 70%, 60%, 50%). Note: The higher the value, the more blue light is off . 6. Position (only Analog input model): Adjust the horizontal position from 0 - 100. 10.V. Black Boost: This...

User Manual
Page 24
The default value is warm. Use Buttons 1/2 to improve the color matching display with peripherals such as DSC or printers. 8. Color Temperature: The default is 2.2 (the standard value for Windows). 5. Modes: Select the preferred mode. 7. You can choose Cool, Warm, Normal, Blue Light or custom User Settings. 6. Grayscale Mode: Turn gray mode on or off. 9. 6-axis Hue: Adjust the red, green, blue, yellow, magenta and cyan hues. 10.6-axis Saturate: Adjust the red, green, blue, yellow...
The default value is warm. Use Buttons 1/2 to improve the color matching display with peripherals such as DSC or printers. 8. Color Temperature: The default is 2.2 (the standard value for Windows). 5. Modes: Select the preferred mode. 7. You can choose Cool, Warm, Normal, Blue Light or custom User Settings. 6. Grayscale Mode: Turn gray mode on or off. 9. 6-axis Hue: Adjust the red, green, blue, yellow, magenta and cyan hues. 10.6-axis Saturate: Adjust the red, green, blue, yellow...
User Manual
Page 27
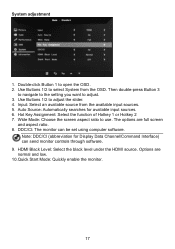
Use Buttons 1/2 to adjust. 3. Auto Source: Automatically searches for Display Data Channel/Command Interface) can be set using computer software. DDC/CI: The monitor can send monitor controls through software. 9. Use Buttons 1/2 to select System from the available input sources. 5. The options are normal and low. 10.Quick Start Mode: Quickly enable the monitor. 17 Note: DDC/CI (abbreviation for available input sources. 6. Then double-press Button 3 to navigate to the setting you want to adjust the slider...
Use Buttons 1/2 to adjust. 3. Auto Source: Automatically searches for Display Data Channel/Command Interface) can be set using computer software. DDC/CI: The monitor can send monitor controls through software. 9. Use Buttons 1/2 to select System from the available input sources. 5. The options are normal and low. 10.Quick Start Mode: Quickly enable the monitor. 17 Note: DDC/CI (abbreviation for available input sources. 6. Then double-press Button 3 to navigate to the setting you want to adjust the slider...

User Manual
Page 29
... the problem. (VGA mode) Problem No picture Status LED lights up LED off the monitor, resize the image and wait for non-standard signals. • When the full screen image disappears, use the OSD to select another resolution or vertical frequency. • Before changing or disconnecting the signal cable or turning off LED flashes Picture is unstable Picture abnormal The display disappears, cannot be centered, or is too large or small Audio abnormal (only Audio input model) (optional) No audio, or the volume...
... the problem. (VGA mode) Problem No picture Status LED lights up LED off the monitor, resize the image and wait for non-standard signals. • When the full screen image disappears, use the OSD to select another resolution or vertical frequency. • Before changing or disconnecting the signal cable or turning off LED flashes Picture is unstable Picture abnormal The display disappears, cannot be centered, or is too large or small Audio abnormal (only Audio input model) (optional) No audio, or the volume...
User Manual
Page 30
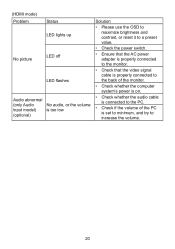
(HDMI mode) Problem Status LED lights up No picture LED off LED flashes Audio abnormal (only Audio input model) (optional) No audio, or the volume is too low Solution • Please use the OSD to maximize brightness and contrast, or reset it to a preset value. • Check the power switch. • Ensure that the AC power adapter is properly connected to the monitor. • Check that the video signal cable is properly connected to the back of the monitor. • Check whether the computer system...
(HDMI mode) Problem Status LED lights up No picture LED off LED flashes Audio abnormal (only Audio input model) (optional) No audio, or the volume is too low Solution • Please use the OSD to maximize brightness and contrast, or reset it to a preset value. • Check the power switch. • Ensure that the AC power adapter is properly connected to the monitor. • Check that the video signal cable is properly connected to the back of the monitor. • Check whether the computer system...

