

User Manual
Page 4
... on a vibrating surface. • Never use it under sporting, exercising, or any vibrating environment which will probably cause unexpected short current or damage rotor devices, lamp. The overall system load must not exceed 80% of internal components and to rest on the marking label. Do not insert the plug into the...
... on a vibrating surface. • Never use it under sporting, exercising, or any vibrating environment which will probably cause unexpected short current or damage rotor devices, lamp. The overall system load must not exceed 80% of internal components and to rest on the marking label. Do not insert the plug into the...

User Manual
Page 5
... qualified service personnel when: • the power cord or plug is damaged, cut or frayed • liquid was spilled into the projector's lens when the lamp is something wrong with an ambient temperature above 40 ºC/104 ºF. • Locations where the altitudes are covered by a qualified technician to restore the...
... qualified service personnel when: • the power cord or plug is damaged, cut or frayed • liquid was spilled into the projector's lens when the lamp is something wrong with an ambient temperature above 40 ºC/104 ºF. • Locations where the altitudes are covered by a qualified technician to restore the...

User Manual
Page 6
... Do not face the projector lens to change the lamp when is capable of the lamp itself. The best way is operating. Please be sure to the sun. Refer servicing only to wait for ceiling mount installation. Only use acer ceiling mount kit for mounting the projector and ensure ... grille when projector is to suitable qualified professional service personnel. • Do not stand the projector on the remote control. • The lamp becomes extremely hot during operation. In this case contact your dealer. • Do not keep using this could cause the object to break...
... Do not face the projector lens to change the lamp when is capable of the lamp itself. The best way is operating. Please be sure to the sun. Refer servicing only to wait for ceiling mount installation. Only use acer ceiling mount kit for mounting the projector and ensure ... grille when projector is to suitable qualified professional service personnel. • Do not stand the projector on the remote control. • The lamp becomes extremely hot during operation. In this case contact your dealer. • Do not keep using this could cause the object to break...

User Manual
Page 7
... high volumes for Listening To protect your ears have adjusted. • Do not listen to music at www.eiae.org. Lamp(s) inside this electronic device into the trash when discarding. For more information on the Waste from Electrical and Electronics Equipment (WEEE...) regulations, visit http://www.acer-group.com/public/Sustainability/index.htm Mercury advisory For projectors or electronic products containing an LCD/CRT monitor or display: "Lamp(s) contain Mercury, Dispose Properly." For lamp-specific disposal information, check www.lamprecycle.org vii ...
... high volumes for Listening To protect your ears have adjusted. • Do not listen to music at www.eiae.org. Lamp(s) inside this electronic device into the trash when discarding. For more information on the Waste from Electrical and Electronics Equipment (WEEE...) regulations, visit http://www.acer-group.com/public/Sustainability/index.htm Mercury advisory For projectors or electronic products containing an LCD/CRT monitor or display: "Lamp(s) contain Mercury, Dispose Properly." For lamp-specific disposal information, check www.lamprecycle.org vii ...
User Manual
Page 8
...; Turn off , please ensure the projector completes its life, it shows warning messages. • Reset the "Lamp Hour Reset" function from the Onscreen display "Management" menu after replacing the lamp module. • When switching the projector off the product before disconnecting power. • Turn on the projector ... The bright light may make a loud popping sound. Warning: • Do not look into the projector's lens when the lamp is in operation. • When the lamp reaches the end of fire or electric shock, do not expose this product to maximize the life of your eyes. •...
...; Turn off , please ensure the projector completes its life, it shows warning messages. • Reset the "Lamp Hour Reset" function from the Onscreen display "Management" menu after replacing the lamp module. • When switching the projector off the product before disconnecting power. • Turn on the projector ... The bright light may make a loud popping sound. Warning: • Do not look into the projector's lens when the lamp is in operation. • When the lamp reaches the end of fire or electric shock, do not expose this product to maximize the life of your eyes. •...

User Manual
Page 10
Appendices 37 Troubleshooting 37 LED & Alarm Definition Listing 41 Cleaning and replacing the dust filters 42 Replacing the Lamp 43 Ceiling Mount Installation 44 Specifications 47 Compatibility modes 50 Regulations and safety notices 54
Appendices 37 Troubleshooting 37 LED & Alarm Definition Listing 41 Cleaning and replacing the dust filters 42 Replacing the Lamp 43 Ceiling Mount Installation 44 Specifications 47 Compatibility modes 50 Regulations and safety notices 54

User Manual
Page 11
...1280x800 WXGA resolution P7505/F155/PF-807/H9505BD/E255D/HE-822J series: True 1920x1080 1080p resolution P7605/F165/PF-WU07 series: True 1920x1200 WUXGA resolution Full/4:3/16:9/L.Box aspect ratio supported • Acer ColorBoost technology delivers nature's true colors ... compatible and HDTV (720p, 1080i, 1080p) supported • Side-sliding lamp design allows easy lamp replacement • Lower power consumption and economy (ECO) mode extends lamp life • Acer EcoProjeciton Technology delivers Intelligent power management approach and physical efficiency improvement • Equipped...
...1280x800 WXGA resolution P7505/F155/PF-807/H9505BD/E255D/HE-822J series: True 1920x1080 1080p resolution P7605/F165/PF-WU07 series: True 1920x1200 WUXGA resolution Full/4:3/16:9/L.Box aspect ratio supported • Acer ColorBoost technology delivers nature's true colors ... compatible and HDTV (720p, 1080i, 1080p) supported • Side-sliding lamp design allows easy lamp replacement • Lower power consumption and economy (ECO) mode extends lamp life • Acer EcoProjeciton Technology delivers Intelligent power management approach and physical efficiency improvement • Equipped...

User Manual
Page 13
ENTER TEMP MENU SOURCE BACK LAMP ZOOM Projector with all the items shown below. Check to make sure your dealer immediately if any thing is complete. Contact your unit is missing. ...
ENTER TEMP MENU SOURCE BACK LAMP ZOOM Projector with all the items shown below. Check to make sure your dealer immediately if any thing is complete. Contact your unit is missing. ...

User Manual
Page 14
English 4 Projector Overview Projector Outlook Front / upper side 8 9 5 ENTER TEMP MENU SOURCE BACK LAMP 3 4 5 10 ZOOM 2 1 # Description 1 Lens cap 2 Zoom lever 3 Zoom Lens 4 Focus ring 5 Remote control receivers 7 6 # Description 6 Elevator feet 7 Tilt adjusting wheels 8 Control panel 9 Power button 10 Lens shift control rings
English 4 Projector Overview Projector Outlook Front / upper side 8 9 5 ENTER TEMP MENU SOURCE BACK LAMP 3 4 5 10 ZOOM 2 1 # Description 1 Lens cap 2 Zoom lever 3 Zoom Lens 4 Focus ring 5 Remote control receivers 7 6 # Description 6 Elevator feet 7 Tilt adjusting wheels 8 Control panel 9 Power button 10 Lens shift control rings
User Manual
Page 16
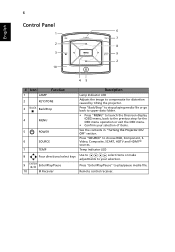
English 6 Control Panel 6 1 SOURCE 7 2 8 3 BACK ENTER 9 2 10 45 # Icon Function 1 LAMP 2 KEYSTONE 3 Back/Stop 4 MENU 5 POWER 6 SOURCE 7 TEMP Description Lamp Indicator LED Adjusts the image to the previous step for distortion caused by tilting the projector. Press "Back/Stop" to stop playing media file or ...
English 6 Control Panel 6 1 SOURCE 7 2 8 3 BACK ENTER 9 2 10 45 # Icon Function 1 LAMP 2 KEYSTONE 3 Back/Stop 4 MENU 5 POWER 6 SOURCE 7 TEMP Description Lamp Indicator LED Adjusts the image to the previous step for distortion caused by tilting the projector. Press "Back/Stop" to stop playing media file or ...

User Manual
Page 21
... or the remote control or direct source key on the remote control to switch between inputs. 2 Power button 1 Lens cap ENTER TEMP MENU SOURCE BACK LAMP ZOOM
... or the remote control or direct source key on the remote control to switch between inputs. 2 Power button 1 Lens cap ENTER TEMP MENU SOURCE BACK LAMP ZOOM
User Manual
Page 22
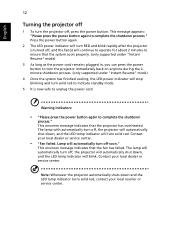
..." mode) 3 As long as the power cord remains plugged in, you can press the power button to unplug the power cord. The lamp with automatically turn off soon." Warning indicators: • "Please press the power button again to complete the shutdown process." Note: Whenever the...supported under "Instant Resume" mode) 4 Once the system has finished cooling, the LED power indicator will automatically shut down and the LED lamp indicator turns solid red, contact your local reseller or service center. Contact your local dealer or service center. This onscreen message indicates that ...
..." mode) 3 As long as the power cord remains plugged in, you can press the power button to unplug the power cord. The lamp with automatically turn off soon." Warning indicators: • "Please press the power button again to complete the shutdown process." Note: Whenever the...supported under "Instant Resume" mode) 4 Once the system has finished cooling, the LED power indicator will automatically shut down and the LED lamp indicator turns solid red, contact your local reseller or service center. Contact your local dealer or service center. This onscreen message indicates that ...
User Manual
Page 43
...timer. Note: Functions vary depending on the screen. Choose "On" to turn the lamp hour counter to 0 hours. Instant Resume: Resumes the system when the Power button is 120 minutes) Displays the lamp's elapsed operating time (in hours). Activate this function to adjust the notification volume ... ECO Mode High Altitude Turn Off Mode Timer Auto Shutdown Lamp Hour Elapse Lamp Reminding Lamp Hour Reset Choose "On" to dim the projector lamp which timer mode to display on model definition. Choose "Off" to change the lamp 30 hours before its expected end-of the projector. Alarm...
...timer. Note: Functions vary depending on the screen. Choose "On" to turn the lamp hour counter to 0 hours. Instant Resume: Resumes the system when the Power button is 120 minutes) Displays the lamp's elapsed operating time (in hours). Activate this function to adjust the notification volume ... ECO Mode High Altitude Turn Off Mode Timer Auto Shutdown Lamp Hour Elapse Lamp Reminding Lamp Hour Reset Choose "On" to dim the projector lamp which timer mode to display on model definition. Choose "Off" to change the lamp 30 hours before its expected end-of the projector. Alarm...
User Manual
Page 47
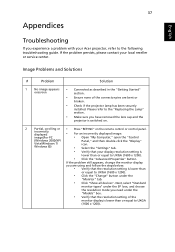
... equal to UXGA (1600 x 1200). Please refer to the following troubleshooting guide. 37 Appendices English Troubleshooting If you experience a problem with your Acer projector, refer to the "Replacing the Lamp" section. • Make sure you have removed the lens cap and the projector is switched on. 2 Partial, scrolling or • Press "RESYNC... using and follow the steps below: • Verify that the resolution setting of the connector pins are bent or broken. • Check if the projector lamp has been securely installed.
... equal to UXGA (1600 x 1200). Please refer to the following troubleshooting guide. 37 Appendices English Troubleshooting If you experience a problem with your Acer projector, refer to the "Replacing the Lamp" section. • Make sure you have removed the lens cap and the projector is switched on. 2 Partial, scrolling or • Press "RESYNC... using and follow the steps below: • Verify that the resolution setting of the connector pins are bent or broken. • Check if the projector lamp has been securely installed.
User Manual
Page 49
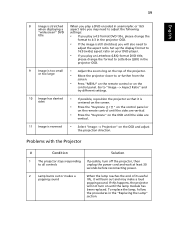
...responding If possible, turn on until the sides are vertical. 11 Image is reversed • Select "Image --> Projection" on the OSD until the lamp module has been replaced. 39 English 8 Image is stretched When you play a DVD encoded in anamorphic or 16:9 when displaying a aspect ratio ... OSD and adjust the projection direction. or too large • Move the projector closer to Letterbox (LBX) in the "Replacing the Lamp" section. To replace the lamp, follow the procedures in the projector OSD. 9 Image is still stretched, you play an Letterbox (LBX) format DVD title, please ...
...responding If possible, turn on until the sides are vertical. 11 Image is reversed • Select "Image --> Projection" on the OSD until the lamp module has been replaced. 39 English 8 Image is stretched When you play a DVD encoded in anamorphic or 16:9 when displaying a aspect ratio ... OSD and adjust the projection direction. or too large • Move the projector closer to Letterbox (LBX) in the "Replacing the Lamp" section. To replace the lamp, follow the procedures in the projector OSD. 9 Image is still stretched, you play an Letterbox (LBX) format DVD title, please ...

User Manual
Page 50
the projector has exceeded its maximum lifetime. the lamp is not working. • Projector Overheated - the system fan is about to replace it soon. Please refer to cool down before it . If the dust ...filter is clogged with dust, please clean it may be allowed to "Cleaning and replacing the dust filter" for details. • Replace the lamp - Please check the following message. Please also check the dust filters if they are installed. English 40 OSD Messages # Condition 1 Message Message Reminder • Fan...
the projector has exceeded its maximum lifetime. the lamp is not working. • Projector Overheated - the system fan is about to replace it soon. Please refer to cool down before it . If the dust ...filter is clogged with dust, please clean it may be allowed to "Cleaning and replacing the dust filter" for details. • Replace the lamp - Please check the following message. Please also check the dust filters if they are installed. English 40 OSD Messages # Condition 1 Message Message Reminder • Fan...

User Manual
Page 51
Temp LED Red -- --- Quick flashing V V Quick flashing -- -- -- V -- Turning off -- (cooling state) Turning off -- (cooling completed) Error (thermal failure) -- V -- Error (lamp breakdown) Error (color Wheel fail) V Quick flashing -- -- Error (fan lock failure) -- Power LED Red Blue V -- --- V Quick flashing --- V -- V 41 LED & Alarm Definition Listing LED Messages English Message Standby (power cord plugged in) Power button ON Lamp retry Lamp LED Red -- ---
Temp LED Red -- --- Quick flashing V V Quick flashing -- -- -- V -- Turning off -- (cooling state) Turning off -- (cooling completed) Error (thermal failure) -- V -- Error (lamp breakdown) Error (color Wheel fail) V Quick flashing -- -- Error (fan lock failure) -- Power LED Red Blue V -- --- V Quick flashing --- V -- V 41 LED & Alarm Definition Listing LED Messages English Message Standby (power cord plugged in) Power button ON Lamp retry Lamp LED Red -- ---

User Manual
Page 52
SOURCE TEMP ENTER MENU LAMP BACK 2 1 Follow these steps: 1 Turn the projector off. Wait for the Power LED to stop flashing then unplug the power cord. 2 Allow the projector at ...
SOURCE TEMP ENTER MENU LAMP BACK 2 1 Follow these steps: 1 Turn the projector off. Wait for the Power LED to stop flashing then unplug the power cord. 2 Allow the projector at ...

User Manual
Page 53
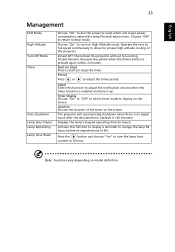
...(s) from the cover, and then pull out the lamp. LAMP BACK MENU SOURCE TEMP ENTER 1 4 3 2 To Change the Lamp 1 Turn off the projector by force. (Illustration #4) To replace the lamp module, reverse the previous step. English 43 Replacing the Lamp Use a screwdriver to open the cover. (Illustration ...the cover. (Illustration #2) 6 Remove the two screws that secure the lamp module.(Illustration #3) 7 Pull out the lamp module by pressing the power button. 2 Allow the projector at least 30 minutes before changing the lamp. Make sure the projector has been cooling down for at least 30...
...(s) from the cover, and then pull out the lamp. LAMP BACK MENU SOURCE TEMP ENTER 1 4 3 2 To Change the Lamp 1 Turn off the projector by force. (Illustration #4) To replace the lamp module, reverse the previous step. English 43 Replacing the Lamp Use a screwdriver to open the cover. (Illustration ...the cover. (Illustration #2) 6 Remove the two screws that secure the lamp module.(Illustration #3) 7 Pull out the lamp module by pressing the power button. 2 Allow the projector at least 30 minutes before changing the lamp. Make sure the projector has been cooling down for at least 30...

User Manual
Page 58
... consumption Operating temperature I/O connectors • P7505/F155/PF-807/P7605/F165/PF-WU07/P7305W/ F125/PF-W07 series: 370 W user-replaceable lamp • H9505BD/E255D/HE-822J series: 280 W user-replaceable lamp +/- 40 degrees Internal speaker with 3 W x 2 output 7.5 kg (16.5 Ibs.) 398 mm x 310 mm x 140 mm (15.7" x ...WU07/P7305W/ F125/PF-W07 series: Normal mode: 460W ± 10% @ 110VAC ECO mode: 350W ± 10% @ 110VAC Standby mode < 0.5W • H9505BD/E255D/HE-822J series: Normal mode: 337W ± 10% @ 110VAC ECO mode: 290W ± 10% @ 110VAC Standby mode < 0.5W 0ºC to 40º...
... consumption Operating temperature I/O connectors • P7505/F155/PF-807/P7605/F165/PF-WU07/P7305W/ F125/PF-W07 series: 370 W user-replaceable lamp • H9505BD/E255D/HE-822J series: 280 W user-replaceable lamp +/- 40 degrees Internal speaker with 3 W x 2 output 7.5 kg (16.5 Ibs.) 398 mm x 310 mm x 140 mm (15.7" x ...WU07/P7305W/ F125/PF-W07 series: Normal mode: 460W ± 10% @ 110VAC ECO mode: 350W ± 10% @ 110VAC Standby mode < 0.5W • H9505BD/E255D/HE-822J series: Normal mode: 337W ± 10% @ 110VAC ECO mode: 290W ± 10% @ 110VAC Standby mode < 0.5W 0ºC to 40º...


